How to Build a Deck: Expert Guidelines Inside
Building a deck transforms your outdoor living space into a functional entertainment area while adding significant value to your home. Whether you’re a seasoned DIYer or tackling your first major project, understanding the fundamentals of deck construction ensures a safe, durable, and beautiful result. This comprehensive guide walks you through every phase of deck building, from initial planning and material selection to final finishing touches.
A well-constructed deck can last 15-20 years or longer with proper maintenance, but the quality of your build determines its longevity and safety. We’ll cover essential steps, local code requirements, material choices, and professional techniques that help you avoid costly mistakes. By following these expert guidelines, you’ll create an outdoor space your family can enjoy for years to come.
Planning Your Deck Project
Before purchasing a single board, invest time in detailed planning. Measure your space carefully, considering how the deck will connect to your home and relate to your yard’s layout. Sketch your design on graph paper, noting the deck’s dimensions, height, and any special features like stairs, built-in seating, or planter boxes. A typical residential deck ranges from 12×16 feet to 20×20 feet, though custom sizes depend on your specific needs.
Calculate the budget by determining total square footage and multiplying by material costs. Basic pressure-treated decks cost $8-15 per square foot for materials, while composite or exotic wood decking runs $15-30+ per square foot. Include expenses for fasteners, concrete footings, hardware, and finishing materials. Don’t forget permits and inspections, which typically cost $200-500 depending on your location.
Consider the deck’s purpose and traffic patterns. Will it accommodate a hot tub, outdoor kitchen, or just furniture? High-traffic areas need more durable materials and reinforced framing. Sketch sight lines from your main living areas to ensure the deck view enhances your home’s aesthetics. Plan for shade by considering tree coverage or adding a pergola later.
Check seasonal weather patterns in your region. Winter snow load, summer heat, and moisture exposure all affect material selection and structural requirements. Consult with neighbors or local builders about what works best in your climate. This planning phase prevents expensive redesigns once construction begins.

Understanding Building Codes and Permits
Building codes exist to protect your safety and your home’s structural integrity. Every jurisdiction has specific requirements for deck construction, including International Building Code (IBC) standards adapted to local conditions. Never skip the permitting process—unpermitted decks can create liability issues, void homeowner’s insurance, and complicate future property sales.
Most jurisdictions require permits for decks over 200 square feet or elevated more than 30 inches from grade. Contact your local building department to obtain specific code requirements for your area. Key code elements typically include:
- Post spacing: Usually 6-8 feet maximum on center
- Footing depth: Below frost line (2-4 feet depending on climate)
- Railing height: 36-42 inches above deck surface
- Railing balusters: No gap larger than 4 inches (sphere rule)
- Stair dimensions: 7-7.75 inch rise, 10-11 inch tread depth
- Load capacity: 40 pounds per square foot live load minimum
Hire a structural engineer for decks over 12 feet high or with complex designs. They’ll calculate proper beam sizing, post spacing, and footing requirements. Submit detailed plans showing dimensions, materials, and load calculations. Inspectors will verify your work at multiple stages: footing installation, framing completion, and final inspection. Schedule these inspections before covering work with decking boards.
Review American Wood Council guidelines for wood specifications and National Wood Window and Door Association standards for outdoor construction. These resources provide technical specifications ensuring your deck meets or exceeds minimum safety standards.
Materials Selection and Preparation
Material choice significantly impacts durability, maintenance requirements, and aesthetics. Pressure-treated lumber offers affordability and rot resistance, making it popular for structural components. Kiln-dried after treatment (KDAT) lumber minimizes warping and works better for visible elements. Composite decking combines wood fibers and plastic, reducing maintenance while costing more upfront. Tropical hardwoods like ipe or cumaru provide exceptional durability but require specialized fasteners and tools.
For structural elements (beams, joists, posts), pressure-treated lumber rated for ground contact ensures longevity. Look for lumber graded by Southern Pine Inspection Bureau or equivalent regional graders. Verify the retention level—0.40 pounds per cubic foot copper chromium arsenate (CCA) equivalent protects against decay and insect damage.
Store materials properly before installation. Stack lumber flat on spacers to allow air circulation, preventing moisture absorption. Cover with tarps but ensure ventilation to prevent mildew. Acclimate materials to your climate for 2-3 weeks before installation—this reduces movement and warping after installation.
Select stainless steel or hot-dipped galvanized fasteners to prevent rust and corrosion. Aluminum and composite fasteners work well with non-pressure-treated wood. Avoid standard steel fasteners on pressure-treated lumber—chemical reactions cause fastener failure and wood staining. Calculate fastener quantities: typically 2.5 pounds per 100 square feet of decking.
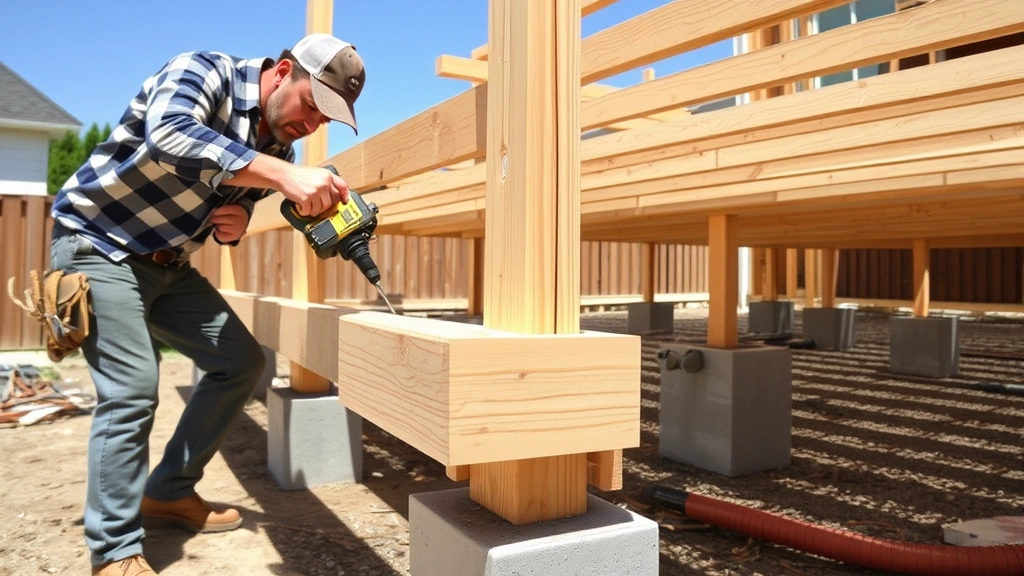
Foundation and Post Installation
Proper footings prevent frost heave, settling, and structural failure. Dig holes below your region’s frost line—this critical depth prevents ground freezing from lifting posts. Contact your local extension office or building department for frost line depth in your area. In northern climates, this may reach 4 feet; southern regions might only require 18-24 inches.
For each post location, dig a hole 12 inches in diameter (larger for bigger posts) extending 12 inches below the frost line. Add 4-6 inches of gravel for drainage. Set posts on concrete piers—never bury wood directly in soil, as contact promotes rot. Use adjustable post bases that allow leveling and height adjustment without removing concrete.
Pour concrete footings using 4,000 PSI concrete mix. Mix thoroughly and fill holes to grade level, creating a slight dome to shed water. Allow concrete to cure 7 days before loading. Set posts plumb in both directions using a level. Posts typically measure 4×4 inches for residential decks, but larger posts support heavier loads or longer spans.
Connect posts to beams using galvanized hardware—post bases, beam hangers, and lag bolts prevent separation under load. Ensure connections allow for seasonal wood movement while maintaining structural integrity. Posts should extend above the deck surface by at least 36 inches if they’ll support railings, or you’ll add separate railing posts.
Framing Your Deck Structure
The framing system carries all loads—people, furniture, snow, and wind—to the footings. Beams typically measure 2×8, 2×10, or 2×12 depending on span and post spacing. Joists usually run perpendicular to beams at 16-inch on-center spacing, though 12-inch spacing provides additional support and reduces bouncing. Joist size depends on span and species—a 2×8 pressure-treated pine joist spans roughly 12 feet at 16-inch spacing.
Install beams level using shims and adjustable post bases. Connect beams to posts with hardware rated for your load conditions. Attach joists to beams using galvanized joist hangers—these connections transfer loads efficiently and prevent wood crushing. Nail or bolt hangers per manufacturer specifications, typically using galvanized nails or bolts.
Install blocking between joists at mid-span for joists exceeding 10 feet—this prevents twisting and improves load distribution. Add diagonal bracing for tall decks (over 6 feet) to resist lateral wind forces. Install rim board around the deck perimeter, connecting joists and creating a finished edge.
For stairs, calculate rise and run carefully. Divide total rise by 7.5 inches to determine the number of steps. If the total rise is 24 inches, you’ll need approximately 3-4 steps. Each step must be identical—inconsistency causes tripping hazards. Stringers (diagonal supports) typically space at 3-4 feet apart. Ensure stairs include handrails for safety and code compliance.
Installing Decking Boards
Decking boards create the walking surface and determine the deck’s appearance. Space boards 1/8 inch apart to allow drainage and seasonal expansion—too-tight spacing causes buckling as wood swells with moisture. Use spacers between boards to maintain consistent gaps. Stagger board joints randomly; never align multiple joints in a line, as this weakens the structure.
Fasten boards with two fasteners per joist—stainless steel screws (3-inch deck screws) or galvanized nails work well. Screws resist withdrawal better than nails, especially in high-traffic areas. Space fasteners 1-1.5 inches from board edges to prevent splitting. Pre-drill holes in hardwood decking to prevent splitting.
Plan board layout before fastening anything. Start from the house, measuring to ensure the last board at the deck’s far edge won’t be extremely narrow—adjust spacing or board width to create balanced proportions. Trim boards around posts and obstacles using a circular saw or miter saw. Sand cut edges smooth to prevent splinters.
If using composite decking, follow manufacturer installation guidelines—spacing, fastener type, and expansion requirements vary by product. Composite typically expands more than wood, requiring larger gaps and special fasteners. Budget extra time for composite installation, as boards often need pre-drilling and careful fastening to prevent marking.
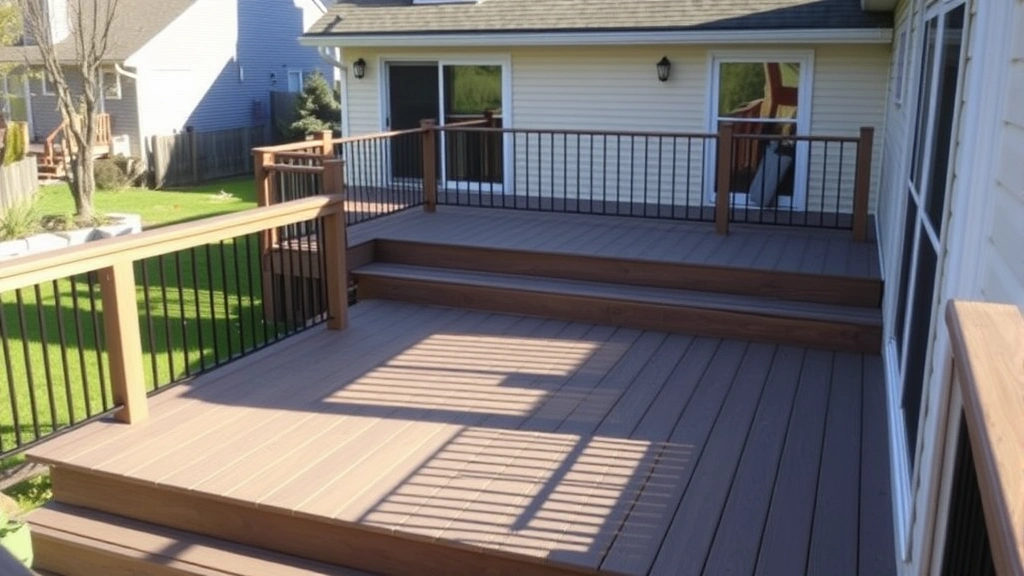
Railing and Safety Features
Railings serve dual purposes: safety and aesthetics. Building codes require railings on decks exceeding 30 inches above grade. Railing height must measure 36-42 inches from the deck surface to the top rail. The critical sphere rule requires that no opening in the railing allows passage of a 4-inch sphere—this prevents child entrapment.
Railing posts typically space at 4-6 feet apart, connected to the rim joist with bolts or lag screws. Balusters (vertical spindles) space at no more than 4 inches apart. Choose from wood balusters, metal balusters, cable systems, or composite materials. Each has aesthetic and maintenance characteristics worth considering.
Install handrails on stairs and sloped ramps. Handrails must accommodate a 1.25-inch diameter grip, with 1.5 inches of clearance from the wall or surface. Handrail height ranges from 34-38 inches above stair treads. Ensure handrails resist 200 pounds of lateral force—test by pushing firmly to verify stability.
Consider lighting for safety and ambiance. Low-voltage deck lights mounted on posts or stairs prevent tripping hazards and create welcoming pathways. Install GFCI-protected outlets if adding electrical features. Hire a licensed electrician for any hardwired electrical work to ensure code compliance and safety.
Finishing and Maintenance
Finishing protects wood from UV damage, moisture, and weathering while enhancing appearance. Pressure-treated lumber typically weathers to gray without finish, which is acceptable but less attractive. Semi-transparent stains penetrate wood while showing grain, lasting 2-3 years. Solid stains provide better UV protection, lasting 3-5 years. Clear sealers offer minimal UV protection but highlight wood grain.
Allow new pressure-treated lumber to weather 3-6 months before staining—this ensures the wood’s surface has properly stabilized. Pressure-wash the deck, then apply stain or sealer per manufacturer instructions. Two coats provide optimal protection. Reapply finish every 2-3 years to maintain appearance and protection.
Regular maintenance extends deck life significantly. Sweep debris to prevent mold growth. Pressure-wash annually to remove mildew and algae—use 500 PSI maximum to avoid damaging wood. Remove leaves and standing water promptly. Trim overhanging branches to improve air circulation and reduce shade-related moisture issues.
Inspect fasteners annually, tightening loose bolts or replacing corroded fasteners. Check for soft spots indicating rot—probe with a screwdriver to identify compromised wood. Replace rotted boards immediately before structural failure occurs. Check railings for loose connections and repair before they become safety hazards.
Consider your deck as an extension of your home requiring similar maintenance attention. A well-maintained deck provides decades of enjoyment, while neglected decks deteriorate rapidly. Budget time and money for annual maintenance—it’s far cheaper than replacing a failed deck.
For related guidance on home improvement projects, explore our comprehensive resources on DIY basement finishing and beginner woodworking projects to develop additional skills. You might also review our home security guide for protecting your outdoor investment.
FAQ
How long does it take to build a deck?
A typical 16×20 foot deck takes 3-5 weekends for experienced DIYers, assuming favorable weather and no complications. Permits and inspections add 2-4 weeks to the overall timeline. Complex designs with multiple levels, built-ins, or unusual shapes extend construction time significantly. Professional contractors typically complete similar projects in 5-10 working days.
Do I need a permit for my deck?
Most jurisdictions require permits for decks over 200 square feet or elevated more than 30 inches. Check with your local building department—permit requirements vary by location. Unpermitted decks create insurance and resale complications, making permits worth the investment and modest cost.
What’s the best decking material?
Pressure-treated lumber offers affordability and proven durability. Composite decking reduces maintenance but costs more initially. Tropical hardwoods provide exceptional durability but require specialized tools and fasteners. Choose based on budget, maintenance tolerance, climate, and aesthetic preferences. Pressure-treated remains the most popular choice for value-conscious homeowners.
How deep should deck footings be?
Footings must extend below your region’s frost line to prevent frost heave. Northern climates require 3-4 feet depth, while southern regions might only need 18-24 inches. Contact your local extension office or building department for specific frost line depth in your area.
Can I build a deck without a permit?
While possible, unpermitted decks create serious problems: insurance claim denials, failed home inspections during sales, and liability if someone is injured. Permits cost $200-500 and involve minimal inspections. The protection and peace of mind justify the expense far more than the short-term savings.
What fasteners should I use?
Use stainless steel or hot-dipped galvanized fasteners to prevent rust and corrosion. Match fastener type to your decking material—pressure-treated lumber requires different fasteners than composite or exotic hardwoods. Deck screws offer better holding power than nails, especially in high-traffic areas.
How often should I stain or seal my deck?
Reapply finish every 2-3 years to maintain protection and appearance. Semi-transparent stains typically last 2-3 years, while solid stains last 3-5 years. Climate, sun exposure, and traffic affect finish longevity. Annual pressure-washing and maintenance extend finish life between applications.


