Build a Shed? Expert Tips for Success
Building a shed is one of the most rewarding DIY projects a homeowner can undertake. Whether you’re creating additional storage space, a garden retreat, or a workshop, a well-constructed shed adds both functionality and value to your property. The process requires careful planning, proper materials, and attention to detail—but with the right guidance, even first-time builders can achieve professional results.
This comprehensive guide walks you through every phase of shed construction, from initial site selection and foundation work to framing, roofing, and finishing touches. You’ll learn about building codes, material selection, and proven techniques that ensure your shed stands strong for decades. Unlike quick online tutorials, we’ve incorporated safety standards and best practices that align with International Building Code requirements and industry standards.
Planning Your Shed Project
Before you purchase a single board or nail, invest time in comprehensive planning. Start by defining your shed’s purpose—will it store gardening tools, serve as a workshop, house recreational equipment, or function as a backyard office? The intended use directly influences size requirements, interior layout, ventilation needs, and utility connections.
Check your local building codes and permit requirements early in the planning phase. Most jurisdictions require permits for structures exceeding 100-120 square feet, and some have setback requirements dictating how far your shed must be from property lines. Violations can result in costly removal orders or fines. Contact your local building department or planning office to obtain specific guidelines for your area.
Create detailed plans or obtain quality pre-made designs. Your plans should include dimensions, material lists, foundation specifications, and structural details. Many builders find that reviewing DIY building resources and guides helps clarify construction sequences and best practices. Consider hiring a local contractor for a brief consultation—the cost ($100-300) often pays for itself through improved efficiency and avoided mistakes.
Budget realistically. A basic 8×10 shed typically costs $2,000-4,000 in materials, while larger or more specialized structures run considerably more. Factor in tools you may need to purchase or rent, permits, and contingencies for unexpected issues.
Choosing the Right Location and Site Preparation
Location determines your shed’s longevity and functionality. Select a spot that receives adequate drainage—never build in low-lying areas prone to water accumulation. South or east-facing orientation provides natural light and helps prevent moisture buildup. Ensure the location is accessible for delivery of materials and future maintenance.
Clear the site of vegetation, rocks, and debris. Remove topsoil and any organic material down to bare earth or existing grade. The prepared ground should be level—use a laser level or transit to check high and low points. Minor variations (under 1 inch) can be addressed during foundation preparation, but significant slopes require more extensive leveling or alternative foundation approaches.
Mark out your building footprint using batter boards and string lines. This ensures square corners (verify by measuring diagonals—they should be equal) and provides reference points during foundation work. If building near trees, consider root systems and future growth that might damage your structure.
Utility location is critical. Call before you dig—most regions have free services marking underground utilities. Identify water lines, gas pipes, electrical conduits, and sewer systems. Position your shed to avoid conflicts and simplify future utility connections if needed.
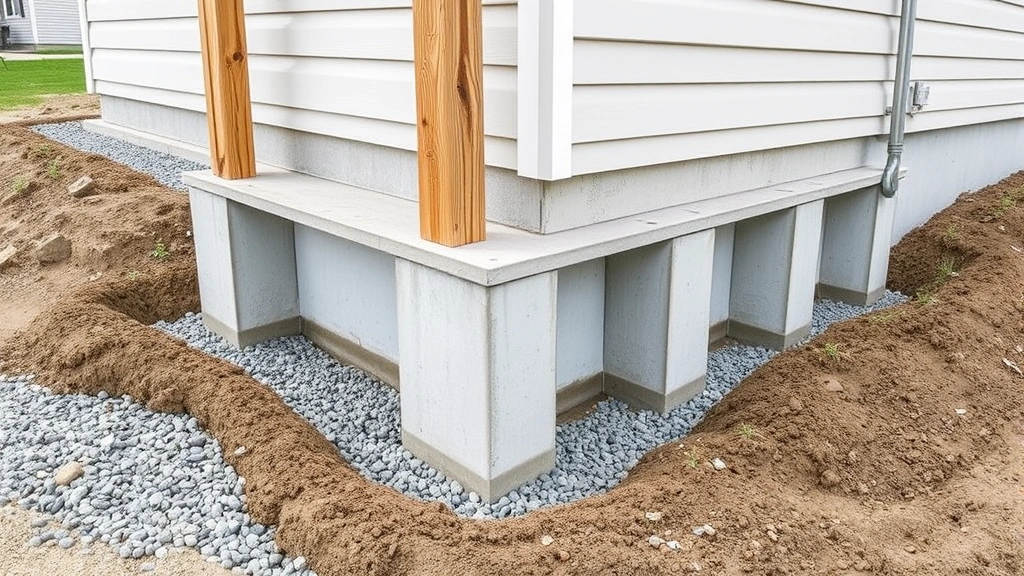
Foundation Fundamentals
Your shed’s foundation determines structural stability and longevity. Three primary options exist: concrete piers, concrete slabs, and treated wood skids.
Concrete Pier Foundation: This approach involves setting concrete footings below the frost line (typically 2-4 feet deep, depending on your climate) and supporting posts on those footings. Piers prevent frost heave and provide excellent drainage. Dig holes at each corner and every 4-6 feet along the perimeter, pour concrete, and set post bases. This method is ideal for most climates and allows air circulation beneath the structure.
Concrete Slab: A monolithic or thickened-edge slab provides a solid, level surface but requires proper drainage preparation and may complicate future repairs. Install 4-6 inches of gravel base for drainage, use reinforcing mesh or rebar, and ensure the slab slopes slightly away from the structure (1/8 inch per foot minimum). Slab foundations work well in dry climates but require careful planning in wet regions.
Treated Wood Skids: Pressure-treated 4×4 or 4×6 beams set on concrete piers or blocks offer simplicity and adjustability. This approach is popular for small sheds and allows easy repositioning if needed. Ensure skids are rated for ground contact and properly supported at regular intervals.
Regardless of method, foundation preparation is non-negotiable. A poorly prepared foundation leads to settling, water infiltration, and structural failure. Take time to get this right—it’s the single most important investment in your shed’s lifespan.
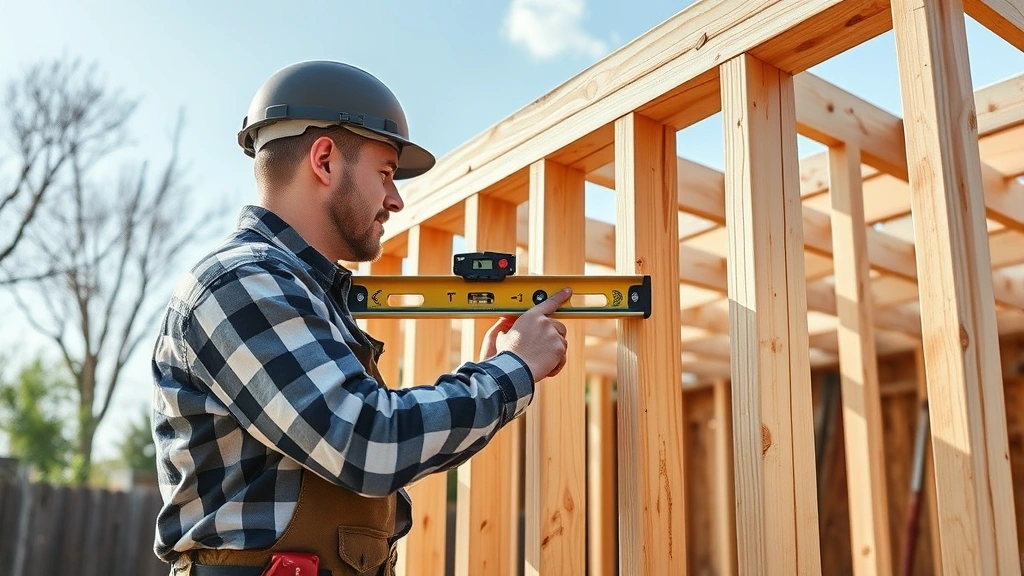
Framing and Structural Integrity
Framing creates your shed’s skeleton and must be robust enough to support roof loads, wind forces, and snow accumulation (if applicable to your region). Standard framing uses 2×4 lumber for walls and 2×6 or 2×8 for roof rafters, depending on span and loading.
Wall Framing: Construct wall sections on the ground, then raise and brace them. Space studs 16 inches on center (standard for residential construction) for adequate strength and insulation support. Include corner bracing using diagonal let-in braces or plywood sheathing. Header boards above doors and windows should be appropriately sized for the opening width—use engineered headers if spans exceed 4 feet.
Roof Framing: Rafters must be properly sized based on span, spacing, roof pitch, and local snow/wind loads. Consult American Wood Council span tables or building code requirements to determine correct rafter dimensions. Ensure adequate ventilation by installing soffit and ridge vents—this prevents moisture accumulation in the attic space and extends roof life significantly.
Use quality fasteners—galvanized or stainless steel nails and screws resist rust and corrosion. Avoid economy fasteners that fail prematurely. Connection details matter: use hurricane ties or rafter ties to secure rafters to top plates, preventing wind uplift.
Building a shed with proper framing techniques mirrors approaches used in DIY basement finishing projects, where structural integrity and long-term durability depend on meticulous construction sequencing.
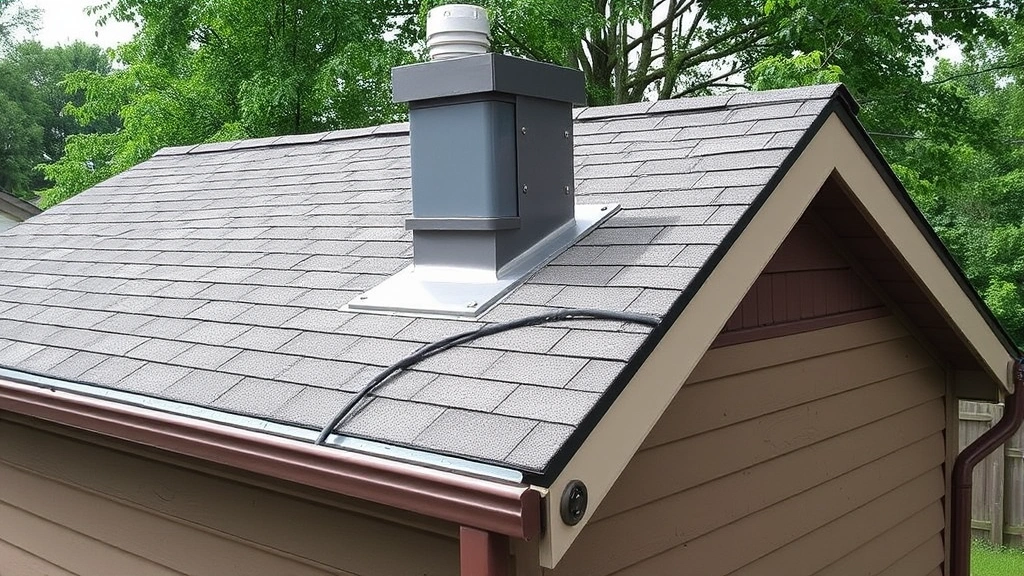
Roofing Systems and Weather Protection
The roof is your shed’s primary defense against the elements. Proper installation determines whether your structure remains dry and functional for decades or deteriorates within years.
Roof Deck: Install 1/2-inch plywood or OSB sheathing over rafters, securing with 8-penny nails or 1-3/8-inch screws spaced 6-8 inches apart. Stagger seams and leave 1/8-inch gaps between sheets for expansion. Ensure all edges are supported by rafters or blocking.
Underlayment: Install synthetic or felt underlayment over the sheathing before shingles. This provides secondary water protection if shingles fail or during installation. Synthetic underlayment is superior to felt—it resists tearing, doesn’t absorb moisture, and lasts longer. Secure with roofing nails or staples per manufacturer specifications.
Shingles and Roofing Materials: Asphalt composition shingles are economical and durable (20-30 year lifespan with proper installation). Metal roofing offers superior longevity (40-70 years) and handles snow shedding better in heavy snow climates. Wood shingles provide aesthetic appeal but require regular maintenance. Select materials appropriate for your climate and budget.
Install shingles following manufacturer instructions precisely. Proper nailing (typically 4 nails per shingle, positioned 5/8 inch from the top and within the nail strip) prevents wind damage and premature failure. Seal shingle tabs in hot climates as specified. Install flashing around roof penetrations (vents, chimneys) to prevent leaks—flashing is one of the most critical waterproofing elements.
Gutters and Drainage: Install gutters and downspouts to direct water away from the foundation. Gutters should slope 1/16 inch per foot toward downspouts. Downspouts should discharge at least 4-6 feet from the foundation to prevent water infiltration and foundation damage.
Siding, Doors, and Finishing
Siding protects framing from weather and defines your shed’s appearance. Options include vinyl, metal, wood, and fiber cement—each with distinct advantages.
Wood Siding: Traditional and attractive, wood requires regular maintenance (painting or staining every 3-5 years). Use exterior-grade lumber rated for ground contact or install house wrap beneath siding to prevent moisture infiltration. Cedar and redwood naturally resist rot but are costly. Pressure-treated lumber is economical but may require staining to achieve desired appearance.
Vinyl and Metal Siding: These low-maintenance options resist weathering and require only occasional cleaning. Install over house wrap or rigid foam insulation. Ensure proper ventilation behind siding to prevent moisture accumulation. Metal siding can dent but resists rot; vinyl is durable but can become brittle in extreme cold.
Doors and Windows: Install quality exterior doors with proper flashing and sealing. Metal or fiberglass doors outperform wood for durability. Windows should be double-pane, low-E rated for better insulation. Caulk and seal all openings with exterior-grade caulk to prevent water infiltration.
Paint or stain all exposed wood surfaces—this is essential maintenance that extends wood life dramatically. Use quality exterior paint rated for your climate. Prime all new wood before painting for better adhesion and longevity.
Electrical and Ventilation Considerations
Many shed owners want electrical service for lighting, power tools, or climate control. If running electrical lines, hire a licensed electrician—improper installation creates fire and shock hazards. Install a dedicated circuit with appropriate breaker protection, use weatherproof outlets and switches, and run wiring through conduit or in walls.
Ventilation prevents moisture and heat buildup. Install soffit vents under the eaves and a ridge vent at the roof peak to create continuous airflow. In humid climates, consider a small exhaust fan. Proper ventilation extends the life of stored items and prevents mold and mildew.
Insulation may be desirable if using your shed as a workshop or storage space for temperature-sensitive items. Fiberglass batts, rigid foam, or spray foam provide R-values appropriate for your climate. Insulation requires a vapor barrier on the warm side to prevent condensation within wall cavities.
Temperature and humidity control can be enhanced through proper design choices. Like planning DIY home security systems, thoughtful shed design considers multiple interconnected systems working together for optimal results.
FAQ
Do I need a permit to build a shed?
Most jurisdictions require permits for structures exceeding 100-120 square feet or those closer than specified setbacks to property lines. Even small sheds may require permits in some areas. Check with your local building department before construction. Permits ensure structures meet safety codes and don’t violate zoning regulations.
What’s the best foundation for a shed?
Concrete piers are generally superior—they prevent frost heave, provide excellent drainage, and accommodate sloped terrain. Concrete slabs work well in dry climates but complicate repairs. Treated wood skids are economical for small structures but require regular inspection. Your choice depends on climate, soil conditions, and intended use.
How much does it cost to build a shed?
A basic 8×10 shed costs $2,000-4,000 in materials. Larger structures, premium materials, or additional features (electrical, insulation, custom finishes) increase costs significantly. Labor costs vary regionally but typically add $3,000-8,000 if hiring contractors.
Can I build a shed on a slope?
Yes, but sloped terrain requires additional planning. Use stepped foundations or a combination of piers at varying heights to accommodate slope. Ensure water drains away from the structure. Consult structural guidelines or a contractor if slope exceeds 10 percent.
What tools do I need to build a shed?
Essential tools include a circular saw, drill, level, tape measure, square, nail gun or hammer, and safety equipment (glasses, gloves, dust mask). You may rent specialized equipment like scaffolding, ladders, or a compressor. Quality tools make construction faster and safer.
How long does shed construction typically take?
A basic 8×10 shed takes 2-4 weeks for an experienced builder working part-time, or 1-2 weeks for a professional crew. Timeline depends on complexity, weather, and whether you’re learning as you build. Plan for unexpected delays and setbacks.
Should I hire a contractor or build it myself?
If you have construction experience and proper tools, DIY is rewarding and economical. However, if you lack skills or confidence, hiring professionals ensures quality results and proper code compliance. Consider a hybrid approach: handle demolition and prep work yourself, hire contractors for complex framing or roofing.
What maintenance does a shed require?
Annual inspections catch problems early. Maintain gutters, check roof condition, inspect siding for damage, and ensure proper drainage around the foundation. Paint or stain wood surfaces every 3-5 years. Treat wood siding with preservatives if applicable. Proper maintenance extends shed life dramatically.
Can I add utilities to my shed later?
Yes, but planning ahead simplifies installation. Run conduit through walls during construction if you anticipate future electrical service. Install water lines during foundation work rather than retrofitting. Rough-in utilities before closing walls whenever possible.
What’s the best roof pitch for a shed?
A 4:12 to 6:12 pitch (4-6 inches of rise per 12 inches of run) works well for most climates. Steeper pitches (8:12 or higher) shed snow better in heavy snow regions but are more difficult to construct and maintain. Flatter pitches (2:12 to 4:12) are simpler but require better underlayment and drainage design in wet climates.


