Build a Deck Yourself? Expert Tips Inside
Building your own deck is one of the most rewarding DIY projects you can undertake. Whether you’re adding a small platform to your backyard or constructing a multi-level entertainment space, a well-built deck transforms your outdoor living area and increases your home’s value. This comprehensive guide walks you through every step of the process, from initial planning and material selection to final finishing touches, ensuring your deck is safe, durable, and beautiful for years to come.
Before you pick up a single tool, understanding the fundamentals of deck construction is essential. A properly built deck requires careful attention to local building codes, structural integrity, and weather resistance. This guide draws on industry best practices and expert recommendations to help you avoid costly mistakes and create a deck that meets all safety standards while reflecting your personal style and needs.
Planning Your Deck Project
Successful deck construction begins with thorough planning. Start by determining the purpose of your deck. Will it be a small breakfast nook, an entertainment space for large gatherings, or a peaceful retreat? Your intended use directly impacts the size, layout, and features you’ll need. A typical residential deck ranges from 200 to 400 square feet, though custom designs vary widely based on available space and budget.
Next, assess your site carefully. Walk your property and identify the best location considering sun exposure, views, proximity to doors, and existing landscaping. Sketch your deck’s footprint to scale, noting the relationship to your house and property lines. Consider how the deck will integrate with your home’s architecture and existing outdoor features. You’ll also want to check what’s beneath the surface—locate underground utilities, irrigation lines, and septic systems before breaking ground.
Budget planning is critical. Deck costs typically range from $15 to $35 per square foot for basic construction, though premium materials and complex designs can exceed $50 per square foot. Factor in tools you may need to purchase or rent, permits and inspections, and contingency funds for unexpected issues. When reviewing the DIY Nests Hub Blog, you’ll find practical insights on managing DIY project costs and timelines effectively.
Understanding Building Codes and Permits
Before construction begins, you must understand and comply with local building codes. These regulations exist to ensure structural safety, fire protection, and proper drainage. Building codes specify requirements for post spacing, joist sizing, railing heights, stair dimensions, and load capacity. Requirements vary by location, so contact your local building department to obtain specific code requirements for your area.
Most jurisdictions require a building permit for deck construction, particularly for decks exceeding certain heights or sizes. The International Code Council (ICC) publishes the International Building Code (IBC), which many municipalities adopt or adapt. Permits typically cost $50 to $500 depending on your location and project scope. While obtaining permits requires time and paperwork, they protect you legally and ensure your deck meets safety standards.
Inspections usually occur at several stages: after foundation and post installation, after framing completion, and after final construction. Building inspectors verify that your work complies with local codes and standards. This process, while sometimes frustrating, catches potential problems early and ensures your investment is safe and sound. Never skip the permit process—unpermitted work can create liability issues, complicate insurance claims, and cause problems when selling your home.
Materials Selection and Preparation
Choosing the right materials is fundamental to deck longevity and appearance. The primary options are pressure-treated lumber, cedar or redwood, composite decking, and tropical hardwoods. Pressure-treated lumber is affordable and durable, resistant to rot and insects. However, it requires regular sealing and can splinter. Cedar and redwood offer natural beauty and moderate rot resistance but need consistent maintenance.
Composite decking combines wood fibers and plastic polymers, offering low maintenance and excellent durability. While more expensive initially, composites reduce long-term maintenance costs and provide superior weather resistance. Tropical hardwoods like cumaru and ipe are extremely durable but expensive and raise sustainability concerns. Many builders recommend composites or pressure-treated lumber for optimal value and performance.
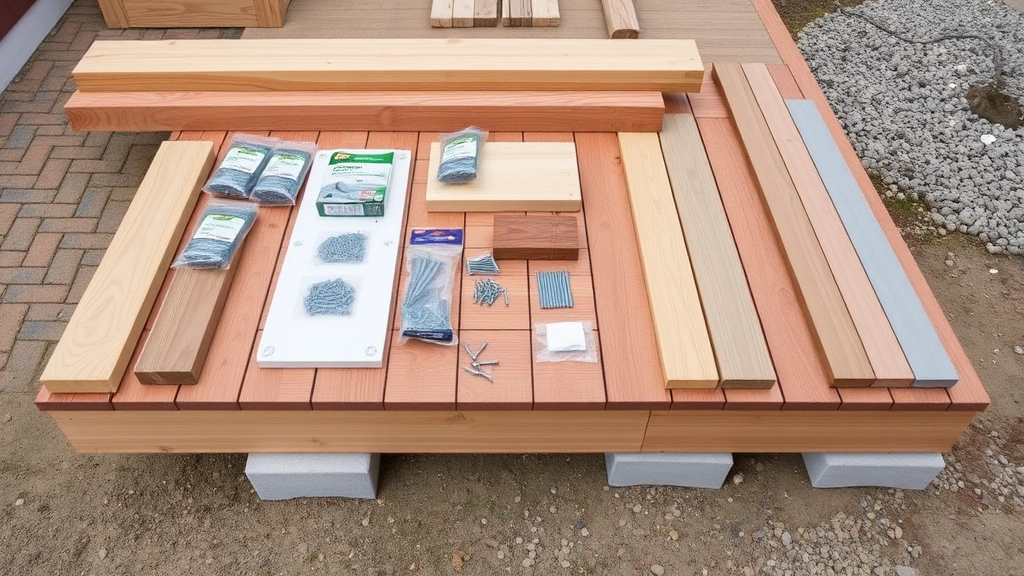
For fasteners, use corrosion-resistant stainless steel or hot-dipped galvanized hardware designed for outdoor use. Standard steel fasteners will rust and stain your deck. Select fastener sizes and types according to your lumber dimensions and local code requirements. You’ll also need concrete for posts, galvanized post bases, joist hangers, and flashing materials to prevent water intrusion.
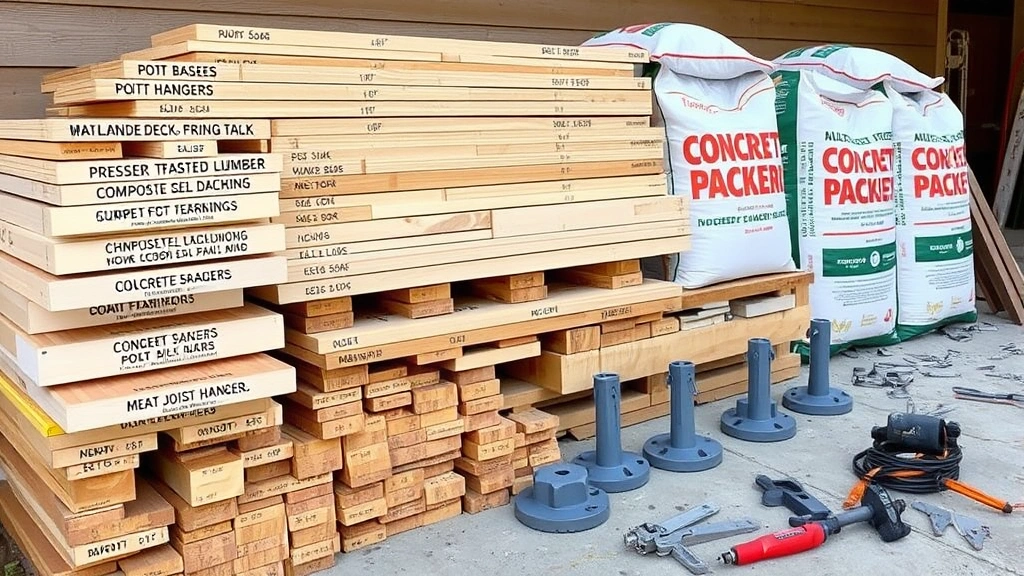
Before construction, inspect all materials upon delivery. Look for warping, splits, and damage. Store lumber in a dry location, elevated off the ground, with proper ventilation. Keep materials protected from weather until installation. Properly acclimated materials install more smoothly and perform better long-term.
” alt=”Deck construction materials laid out including pressure-treated lumber, composite boards, fasteners, concrete footings, and metal brackets” style=”width:100%; max-width:800px;”/>
Foundation and Posts
The foundation is your deck’s most critical component. A stable foundation prevents settling, shifting, and structural failure. Posts must rest on solid footings that extend below the frost line—the depth at which soil freezes in winter. Frost line depth varies by location but ranges from zero inches in warm climates to 48 inches or more in cold regions. Posts resting above the frost line will heave and shift as soil freezes and thaws, compromising structural integrity.
Install footings by digging holes to the appropriate depth and diameter. Most codes require 12-inch diameter holes with 6-8 inches of gravel for drainage. Set posts on concrete footings, never directly on soil or wood. Concrete should be mixed and poured according to manufacturer specifications, forming a solid base that extends slightly above grade to promote drainage. Some builders use adjustable post bases that allow height adjustment after concrete sets, simplifying the leveling process.
Posts are typically 4×4 lumber, though larger decks may require 6×6 posts. Space posts according to joist span and deck load capacity—typically 6 to 8 feet apart. Ensure posts are plumb (perfectly vertical) using a level. Off-plumb posts create structural stress and visible slanting. Use galvanized post bases to keep wood separated from concrete, preventing water absorption and rot.
The ledger board connects your deck to your house, transferring loads directly to the home’s rim joist. This is a critical connection that must be done correctly. Install flashing above the ledger to prevent water from running behind it into your home’s walls. Use lag bolts or screws spaced 16 inches apart, attaching the ledger directly to the rim joist, never to siding or brick veneer.
Framing and Joists
Joists are the horizontal beams that support your decking boards. They must be properly sized based on lumber species, grade, spacing, and span distance. Refer to span tables in the American Wood Council (AWC) publications or consult with your building department for specific sizing requirements. Standard residential decks typically use 2×8 or 2×10 joists spaced 16 inches on center.
Install joists perpendicular to rim joists using joist hangers, which provide superior support compared to toenailing. Joist hangers must match your lumber size and be installed with all fasteners as specified by the manufacturer. Space joists consistently—16 inches on center is standard, though 12 inches on center provides extra support for heavy-use areas or longer spans. Ensure all joists are level and properly supported at both ends.
Install blocking or bridging between joists to prevent twisting and distribute loads. Blocking is particularly important for spans exceeding 10 feet. Install rim joists around the deck perimeter, connecting to your posts and ledger board. All connections should be bolted or fastened with hardware specifically designed for outdoor use. Avoid nailing as your primary fastening method—bolts and galvanized screws provide superior strength and durability.
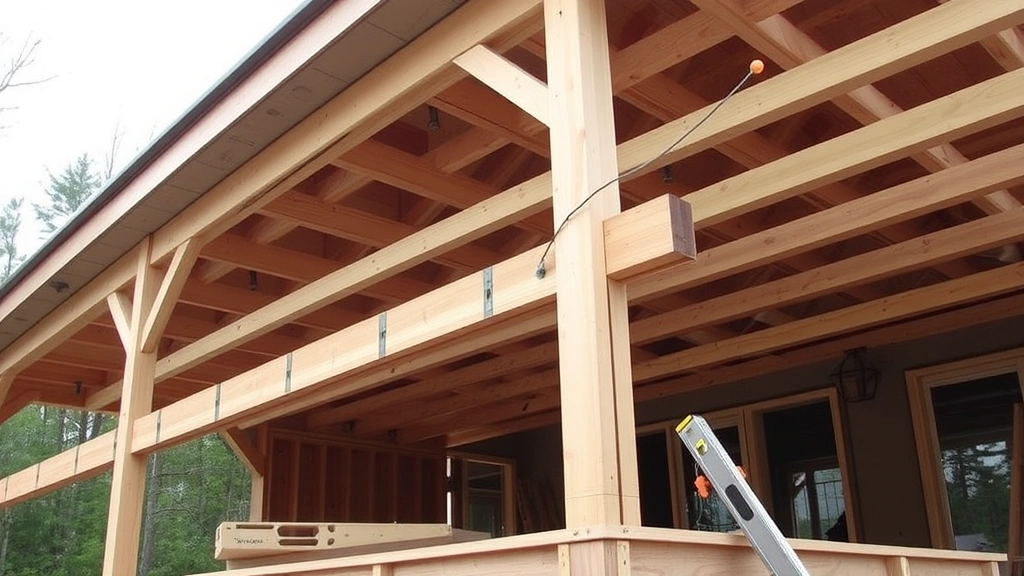
” alt=”Deck framing structure showing installed joists, joist hangers, rim joists, and support posts during mid-construction stage” style=”width:100%; max-width:800px;”/>
Decking Installation
Once your frame is complete and inspected, you’re ready to install decking boards. Begin at the house, working toward the outer edge. Maintain consistent spacing between boards—typically 1/8 to 1/4 inch depending on material and climate. This spacing allows for expansion and contraction due to temperature and moisture changes. Composite materials may require slightly larger gaps; consult manufacturer specifications.
Use corrosion-resistant fasteners appropriate for your decking material. Pressure-treated lumber typically uses galvanized screws or bolts. Composite decking often requires hidden fastening systems or screws specifically designed for composites. Install fasteners with consistent spacing, typically 2 to 3 inches from board ends and 8 to 16 inches apart along the length. Avoid splitting boards by pre-drilling fastener holes, particularly near board ends.
Stagger board joints so they don’t align across consecutive boards. This distributes loads more effectively and improves appearance. Cut boards to fit around posts and obstacles, making clean, accurate cuts. If you’re installing composite or hardwood decking, consider hiring a professional for this phase if you lack experience—material costs are high, and mistakes are expensive.
As you progress, periodically check for level and ensure boards are straight. Twisted or warped boards should be replaced or corrected. Once decking is installed, allow it to weather for 24-48 hours before applying finish products, as freshly installed boards may be slightly damp.
Railings and Safety Features
Railings are essential safety features required by building codes for decks exceeding 30 inches above ground. Railings must be at least 36 inches high, measured from the deck surface to the top rail. Balusters (vertical spindles) must be spaced so a 4-inch sphere cannot pass through, preventing children from becoming trapped. The railing must withstand 200 pounds of force applied horizontally at any point.
Railing options include traditional wood balusters, composite materials, metal spindles, or glass panels. Each has advantages regarding appearance, maintenance, and cost. Ensure all railing components are securely fastened to support posts and rim joists. Use galvanized or stainless steel hardware to prevent rust and deterioration. Regularly inspect railings for damage and loose fasteners, addressing issues immediately.
Stairs require equally careful construction. Stair treads must be 10-11 inches deep, with risers 7-8 inches tall. Handrails are required for stairs with four or more steps, mounted 34-38 inches above the stair nosing. Stair stringers (the supporting structure) must be properly sized and supported. Many builders recommend purchasing pre-made stair components rather than building from scratch—professional stairs ensure code compliance and safety.
Consider additional safety features like lighting for nighttime navigation and non-slip surfaces on stairs and high-traffic areas. These additions enhance functionality and prevent accidents.
Finishing and Maintenance
After construction is complete and inspected, finishing protects your deck and enhances its appearance. Pressure-treated lumber requires sealing to prevent graying and moisture damage. Cedar and redwood benefit from stain or sealant to maintain color and protect from weathering. Composite decking typically requires minimal finishing, though some manufacturers recommend periodic cleaning and occasional treatment.
Wait at least 3-6 months before sealing new pressure-treated lumber, allowing time for the wood to weather and stabilize. Apply finish products following manufacturer instructions regarding temperature, humidity, and drying time. Quality sealers and stains improve appearance dramatically while extending material lifespan significantly.
Regular maintenance keeps your deck safe and attractive. Sweep debris regularly to prevent moisture accumulation. Inspect fasteners, railings, and structural components annually for damage or deterioration. Power wash your deck every 1-2 years, though avoid excessive pressure that can damage wood fibers. Reapply finish products as recommended by manufacturers, typically every 2-3 years for exposed surfaces.
Address repairs promptly. Replace damaged boards, tighten loose fasteners, and repair railing damage immediately. Small issues become major problems if ignored. For comprehensive maintenance guidance, review resources from the National Wood Flooring Association (NWFA), which provides detailed care recommendations applicable to deck maintenance.
FAQ
How long does it take to build a deck?
A typical 300-400 square foot deck takes 2-4 weeks for an experienced DIYer, including planning, permitting, and construction. Complex designs, large decks, or inexperience may extend this timeline significantly. Account for permit approval time, which varies by jurisdiction but typically takes 1-2 weeks.
Do I need a permit for a small deck?
Most jurisdictions require permits for decks exceeding 30 inches in height or certain square footage thresholds, typically 200 square feet. Low-level decks and very small platforms may be exempt. Always check with your local building department—unpermitted work creates liability and legal complications.
What’s the best decking material?
The best material depends on your budget, maintenance preferences, and climate. Pressure-treated lumber offers affordability; composite provides low maintenance and longevity; hardwoods provide natural beauty and durability. Consider long-term costs including maintenance, repairs, and replacement when evaluating options.
How deep should deck footings be?
Footings must extend below your local frost line. Contact your building department for the specific depth required in your area. Frost line depths range from zero in warm climates to 48+ inches in cold regions. Posts on shallow footings will shift as soil freezes and thaws, causing structural damage.
Can I build a deck on a sloped yard?
Yes, sloped yards often make excellent deck sites. You’ll need multiple post heights and potentially a more complex framing design. Ensure all posts rest on proper footings below the frost line. A sloped site may increase complexity and cost but creates opportunities for interesting multi-level designs.
How much weight can a deck support?
Standard residential decks are designed for 40 pounds per square foot of live load, plus 10 pounds per square foot of dead load (the deck’s own weight). This allows approximately 50-60 people standing on a typical 300 square foot deck. Consult span tables and load calculations for your specific design, or work with a structural engineer for heavy-use decks.


