
Blanch Asparagus Quick! Chef’s 3-Minute Guide
Blanching asparagus is one of the most essential cooking techniques for preserving the vegetable’s vibrant green color, tender texture, and nutritional value. Whether you’re preparing asparagus for a fresh salad, freezing it for later use, or serving it as a side dish, understanding the proper blanching time makes all the difference between perfectly cooked spears and mushy disappointment. This comprehensive guide walks you through every step of the blanching process, from selecting quality asparagus to shocking it in ice water for optimal results.
The blanching process is deceptively simple yet requires precision timing and technique. Most home cooks wonder exactly how long to blanch asparagus, and the answer depends on spear thickness, desired texture, and your end use. In this guide, we’ll explore the science behind blanching, provide exact timing recommendations, and share professional tips that transform your asparagus preparation from ordinary to restaurant-quality.
What Is Blanching and Why It Matters
Blanching is a two-step cooking method that involves briefly submerging food in boiling water followed by immediate immersion in ice water. The hot water briefly cooks the exterior while the ice bath stops the cooking process instantly. This technique serves multiple purposes in professional and home kitchens, making it essential knowledge for any home cook interested in improving their culinary skills.
The primary benefits of blanching asparagus include enzyme inactivation, color preservation, and texture retention. Enzymes naturally present in vegetables cause browning, flavor loss, and nutrient degradation over time. By blanching, you deactivate these enzymes, significantly extending shelf life whether you’re storing asparagus in the refrigerator or freezer. The brief exposure to heat also sets the bright green chlorophyll color, preventing the dull olive-green appearance that occurs when vegetables are stored raw.
Beyond preservation, blanching removes dirt and surface bacteria while maintaining the crisp texture that makes fresh asparagus appealing. When you’re planning meal preparation for the week or preserving your garden harvest, understanding blanching transforms your approach to vegetable storage. DIY Nest Hub Blog covers numerous kitchen efficiency techniques that complement blanching methods.
Professional chefs use blanching as a preliminary step before incorporating asparagus into composed dishes, salads, and hot preparations. The technique is particularly valuable when you need partially cooked asparagus that will finish cooking with other ingredients, preventing overcooking and ensuring consistent doneness across all components of your dish.
Blanching Time by Asparagus Thickness
The exact blanching time for asparagus depends primarily on spear thickness, which varies considerably from pencil-thin to thick jumbo asparagus. Understanding how to measure thickness and adjust timing accordingly prevents the common problem of under or over-blanching.
Thin Asparagus (Pencil-thin, approximately 1/4 inch diameter): Blanch for 2-3 minutes. These delicate spears cook quickly and risk becoming mushy with extended cooking. Watch carefully and begin testing for doneness at the 2-minute mark by piercing the thickest part near the base with a fork.
Medium Asparagus (Standard thickness, approximately 1/2 inch diameter): Blanch for 3-4 minutes. This is the most common asparagus thickness found in grocery stores and farmers markets. The 3-4 minute window allows the heat to penetrate to the center while maintaining structural integrity and bright color.
Thick Asparagus (Jumbo or extra-thick, approximately 3/4 inch or larger diameter): Blanch for 4-5 minutes. Thicker spears require longer exposure to heat to cook through completely. These premium asparagus varieties, often more tender than their appearance suggests, benefit from the extended cooking time that allows heat to reach the dense center.
Temperature consistency matters as much as timing. Maintain a rolling boil throughout the blanching process by using adequate water volume—at least 2 quarts of water per pound of asparagus. When you add cold asparagus to boiling water, the temperature drops; if your pot doesn’t have enough water, it may take too long to return to a boil, extending your actual cooking time beyond intended parameters.
Step-by-Step Blanching Process
Following a precise blanching procedure ensures consistent results every time. This methodical approach removes guesswork and produces asparagus with optimal texture and color preservation.
- Select and prepare asparagus: Choose firm spears with tight tips and no soft spots. Rinse under cool running water, gently rubbing to remove any dirt. Snap off the woody ends by bending each spear until it breaks naturally—typically 1-2 inches from the base. Discard the tough ends or reserve them for stock.
- Bring water to a rolling boil: Fill a large pot with at least 2 quarts of water and bring to a vigorous rolling boil. Add salt at a ratio of 1 tablespoon per quart of water. The salt seasons the asparagus and raises water temperature slightly, improving heat transfer.
- Prepare ice bath: While waiting for water to boil, fill a large bowl with ice and cold water. This should be ready before you begin blanching. Some professionals add salt to ice water at the same concentration as the blanching water to prevent osmotic transfer of flavors.
- Add asparagus to boiling water: Gently place asparagus bundles into the boiling water, allowing water temperature to return to a boil before starting your timer. Stir occasionally with a slotted spoon to ensure even heat distribution, preventing some spears from cooking faster than others.
- Monitor cooking time precisely: Set a timer for your calculated blanching time based on thickness. Watch for color change to bright, vibrant green—this indicates chlorophyll has set and enzymes are inactivated.
- Test for doneness: At the minimum time, remove one asparagus spear with a slotted spoon and cool briefly under running water. Pierce with a fork near the base; it should be tender but still slightly firm. If underdone, continue blanching for 30-second intervals.
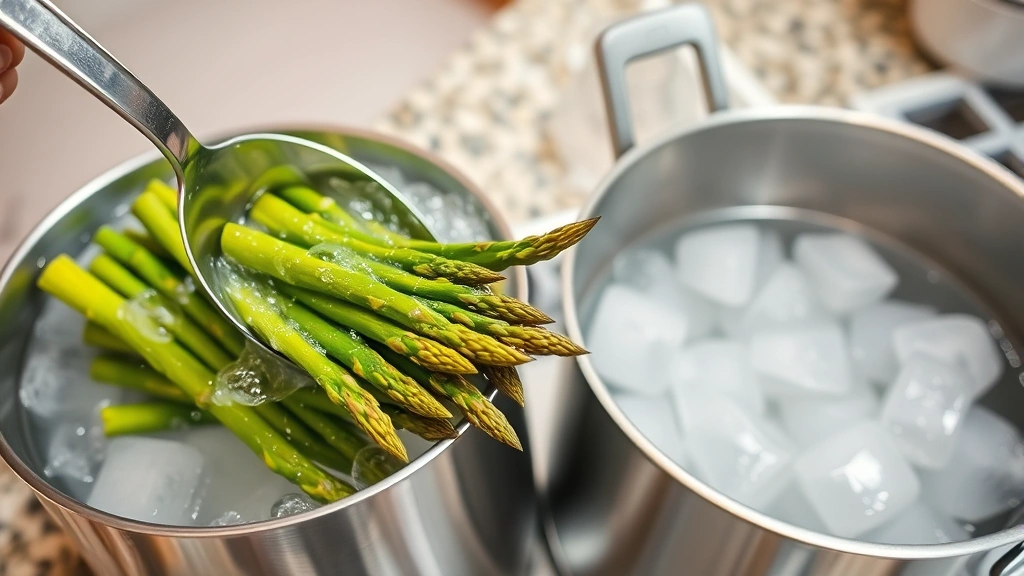
- Remove from boiling water: Using a slotted spoon or spider strainer, transfer all asparagus to the prepared ice bath immediately upon reaching desired doneness. Do not skip this step; immediate cooling stops cooking and sets color.
Timing precision during this process directly impacts final results. Unlike roasting or sautéing where slight variations in time produce minor differences, blanching’s effectiveness depends on hitting exact time targets. Professional cooks use digital timers rather than relying on memory or estimates.
Ice Bath Shocking Technique
The ice bath, also called shocking, is equally important as the blanching step itself. This critical phase stops cooking immediately and preserves the bright green color that makes blanched asparagus visually appealing.
Submerge blanched asparagus completely in ice water for a duration equal to or slightly longer than the blanching time. For thin asparagus blanched 2-3 minutes, shock for 2-3 minutes in ice water. For thick asparagus blanched 4-5 minutes, shock for 4-5 minutes. This equal timing ensures complete temperature reduction throughout the spear, preventing residual heat from continuing to cook the interior.
Stir asparagus gently in the ice bath to promote even cooling and prevent clustering that leaves some spears warmer than others. The water will gradually warm as ice melts; if you’re processing large quantities, replace the ice water once it becomes tepid, maintaining shock effectiveness throughout.
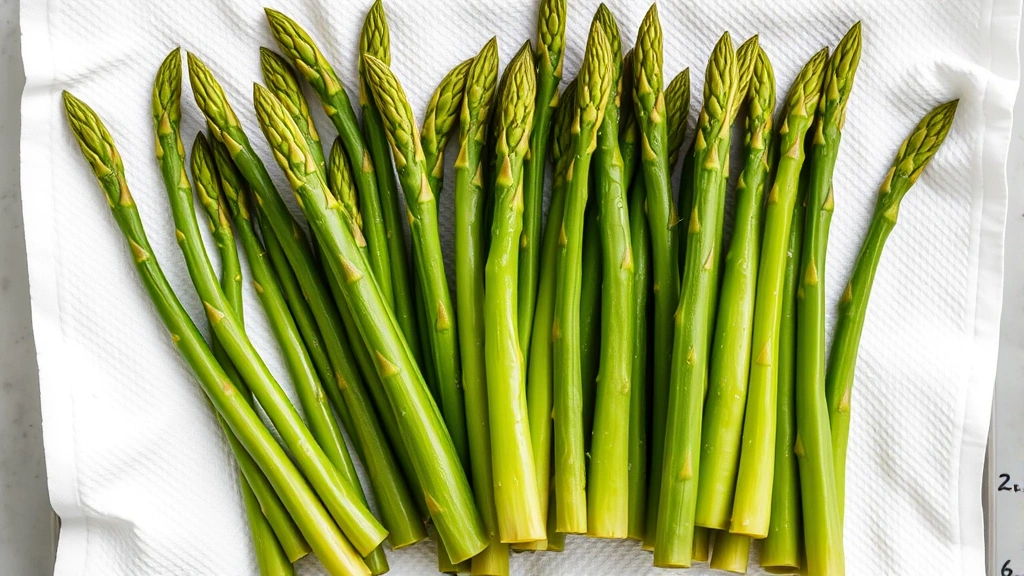
After shocking, remove asparagus from ice water and spread on clean kitchen towels or paper towels to dry. Pat gently to remove excess moisture, which prevents ice crystal formation during freezing and ensures better texture after thawing. Proper drying takes 5-10 minutes; resist the urge to rush this step.
Storage and Freezing After Blanching
Properly blanched asparagus keeps for extended periods when stored correctly. Understanding storage methods helps you preserve your blanched asparagus at peak quality.
Refrigerator Storage: Place dried blanched asparagus in an airtight container or wrapped tightly in plastic wrap. Refrigerate for up to 4-5 days. The blanching process extends shelf life beyond raw asparagus, which typically keeps only 2-3 days. Use blanched refrigerated asparagus in salads, as components in composed dishes, or quickly reheated as side vegetables.
Freezer Storage: For longer preservation, freeze blanched asparagus using one of two methods. The dry pack method involves placing dried asparagus directly into freezer bags, removing as much air as possible, and freezing for up to 8-12 months. The wet pack method uses a light syrup or water covering, though this is less common for asparagus than for fruits.
Flash freezing prevents asparagus spears from clumping together, making portion control easier later. Arrange dried blanched asparagus in a single layer on a sheet pan and freeze for 2-3 hours until solid, then transfer to freezer bags for storage. This extra step requires minimal effort but significantly improves usability when you need only a portion of your frozen asparagus.
Label all frozen containers with contents and date, rotating stock to use oldest first. When cooking frozen asparagus, there’s no need to thaw; add directly to dishes or briefly warm in simmering water or steam.
Common Blanching Mistakes to Avoid
Understanding frequent errors helps you troubleshoot problems and refine your blanching technique. Even experienced cooks occasionally encounter these pitfalls.
Insufficient water volume: Using too little water causes temperature to drop excessively when cold asparagus is added, extending cooking time unpredictably. Always use at least 2 quarts of water per pound of asparagus.
Skipping the ice bath: Omitting the shock step ruins all your careful timing work. Residual heat continues cooking asparagus, resulting in mushy texture and dull color. Never skip this critical phase.
Overcrowding the pot: Adding too much asparagus at once prevents even cooking and causes temperature to drop dramatically. Work in batches if necessary; properly blanched asparagus is worth the extra time.
Inaccurate timing: Guessing at blanching duration or relying on appearance alone produces inconsistent results. Use a digital timer and test doneness by texture, not just color.
Reusing blanching water: While some cooks reuse water to save resources, changing water between batches ensures consistent temperature and prevents accumulation of plant particles that affect cooking. If you must reuse water, maintain a rolling boil and skim surface debris between batches.
Inadequate drying before freezing: Excess moisture creates ice crystals that damage cell structure, resulting in mushy texture upon thawing. Take time to thoroughly dry asparagus before freezing.
Professional Tips from Culinary Experts
Professional chefs employ advanced techniques that elevate blanching results beyond standard home preparation. Incorporating these professional approaches improves your asparagus blanching significantly.
Add baking soda to blanching water: Some professional kitchens add 1/4 teaspoon baking soda per quart of blanching water. This raises pH slightly, accelerating chlorophyll setting and producing even brighter green color. Monitor carefully as baking soda can cause asparagus to become mushy if concentrations are too high.
Use a spider strainer or slotted spoon: Rather than pouring asparagus through a colander, which allows residual heat to continue cooking, use a spider strainer or slotted spoon to lift asparagus directly into ice water. This preserves color and texture better than traditional draining methods.
Blanch in stages by thickness: When working with asparagus of mixed thicknesses, blanch thin and medium spears together, then remove them before adding thicker spears. This ensures each thickness reaches optimal doneness without requiring separate pot setups.
Maintain meticulous temperature control: Professional kitchens use thermometers to verify water temperature remains at 212°F (100°C) throughout blanching. If your stove doesn’t maintain consistent boil, adjust heat settings to achieve optimal temperature stability.
Incorporate into meal prep systems: Like other DIY projects requiring systematic planning, blanching works best as part of organized meal preparation. Batch-blanch asparagus when fresh supply is abundant, then portion into freezer containers for convenient week-long use.
Season after cooking: Rather than relying on salt in blanching water for final seasoning, professional chefs taste blanched asparagus and season according to intended use. This provides better control over sodium content and allows flavor adjustment for specific dishes.
For additional guidance on food safety practices, consult the USDA Food Safety and Inspection Service guidelines, which provide evidence-based recommendations for blanching and freezing vegetables. The National Center for Home Food Preservation offers detailed technical information about vegetable preservation methods, including blanching protocols developed through scientific research.
FAQ
How long should I blanch asparagus before freezing?
Blanch thin asparagus 2-3 minutes, medium asparagus 3-4 minutes, and thick asparagus 4-5 minutes. Immediately shock in ice water for the same duration, then dry thoroughly before freezing. Proper blanching extends frozen asparagus quality to 8-12 months.
Can I blanch asparagus without an ice bath?
The ice bath is essential, not optional. Without shocking, residual heat continues cooking asparagus, resulting in mushy texture and color loss. If you lack ice, use the coldest tap water available, frequently refreshing it to maintain cold temperature.
Why did my blanched asparagus turn dark green or gray?
Discoloration indicates overcooking or insufficient shocking. Overcooked asparagus loses bright color as chlorophyll degrades. If your ice bath was too warm or the asparagus wasn’t fully submerged, residual heat caused continued cooking. Use colder ice water and verify complete submersion.
Is it necessary to blanch asparagus before freezing?
Yes, blanching before freezing is highly recommended. While you can freeze raw asparagus, blanching inactivates enzymes that cause quality degradation, extends frozen storage life significantly, and improves texture and color after thawing.
What’s the difference between blanching and boiling asparagus?
Blanching involves brief cooking followed by immediate ice bath shocking, stopping the cooking process completely. Boiling typically refers to extended cooking until vegetables are soft, without the shocking step. Blanching preserves texture and color better than boiling.
Can I blanch asparagus in the microwave?
Microwave blanching is not recommended for asparagus because it produces uneven heating, with some portions overcooked while others remain undercooked. Traditional boiling water blanching provides the temperature consistency necessary for reliable results.
How do I know when asparagus is done blanching?
Blanched asparagus should be bright green and tender when pierced with a fork near the base, yet still maintain slight firmness. Test at minimum time by removing one spear, cooling it briefly, and checking texture. Appearance alone isn’t reliable; texture testing is essential.


