
Smoke Chicken Wings at 250°F: Expert Tips Inside
Smoking chicken wings at 250°F is one of the most rewarding techniques for backyard pitmasters and barbecue enthusiasts. This moderate temperature creates the perfect balance between developing that coveted smoke ring and achieving tender, juicy meat without drying out these delicate morsels. Whether you’re preparing wings for a family gathering or perfecting your craft, understanding the science and timing behind smoking at this specific temperature will elevate your results significantly.
The 250°F sweet spot offers distinct advantages over higher temperatures. At this heat level, the Maillard reaction—the chemical process that creates flavorful browning—occurs gradually and evenly, allowing smoke to penetrate deeply into the meat. This temperature also gives you more control over the cooking process and reduces the risk of burning or charring the exterior before the interior reaches proper doneness. Many experienced smokers consider 250°F the ideal baseline for consistent, professional-quality results.
How Long to Smoke Chicken Wings at 250°F
The primary question every smoker asks is timing, and for chicken wings at 250°F, the answer is straightforward: plan for 1.5 to 2 hours of total smoking time. This timeframe accounts for wings of standard size (approximately 2-3 ounces each) and assumes consistent temperature maintenance throughout the cook. However, several variables can influence exact timing, including wing size, individual smoker characteristics, humidity levels, and whether you’re using the 3-2-1 method or other established smoking techniques.
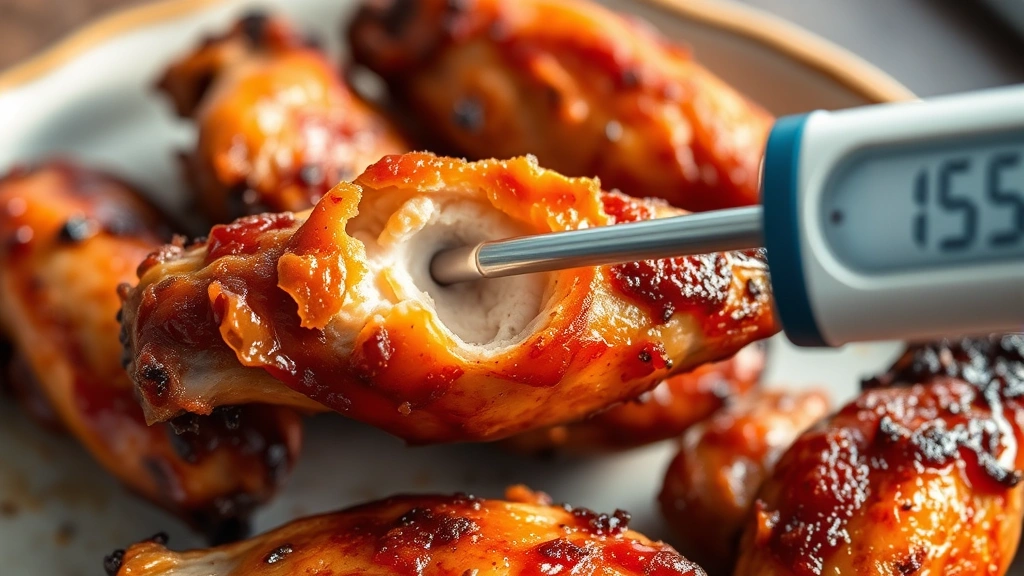
Most pitmasters find that wings reach optimal doneness—when the internal temperature hits 165°F at the thickest part near the bone—between the 1 hour 45 minute and 2 hour marks. Smaller wings may finish closer to 1.5 hours, while larger, meatier wings might require the full 2 hours or slightly longer. The key is not to rely solely on time; always verify doneness with a reliable meat thermometer inserted into the thickest portion without touching bone.
Understanding how smoking chicken thighs at 225 differs from wings helps contextualize the 250°F approach. Wings cook faster due to their smaller mass and higher surface-area-to-volume ratio, making them ideal for beginners learning temperature management. The slightly higher temperature of 250°F versus 225°F reduces cooking time while maintaining excellent smoke absorption and moisture retention.
Preparing Your Wings for Smoking
Proper preparation is foundational to smoking success. Begin by selecting fresh, high-quality chicken wings from a reputable source. Pat them completely dry with paper towels—moisture on the surface prevents proper browning and smoke adhesion. Wet wings will steam rather than develop the desirable bark texture that defines professional-quality smoked poultry.
Next, trim any excess skin or feather remnants. While some fat is desirable for moisture and flavor, large pockets of skin can create uneven cooking. Consider separating wings into flats and drumettes if you prefer, though many pitmasters leave them whole for presentation purposes. Whole wings actually cook more evenly because the flat and drumette portions benefit from the protective effect of being connected.
Seasoning application should occur at least 4-6 hours before smoking, though overnight seasoning yields superior results. This resting period allows the salt and spices to penetrate the meat through osmosis, enhancing flavor at the cellular level. A basic dry rub featuring brown sugar, paprika, garlic powder, onion powder, black pepper, and salt creates an excellent foundation. For those interested in comparative smoking techniques, exploring how long to smoke a brisket at 225 reveals how larger cuts benefit from longer seasoning periods and lower temperatures.
Consider injecting a marinade directly into wings for additional moisture and flavor penetration. A simple injection using butter, apple juice, and your favorite spices distributed throughout the meat ensures juiciness even if exterior cooking extends slightly. This technique proves particularly valuable at 250°F, where the higher temperature can occasionally dry thinner portions if not properly protected.
Temperature Control and Smoker Setup
Achieving and maintaining 250°F requires understanding your specific smoker’s characteristics. Different smoker types—offset barrel, vertical drum, kamado-style, or electric—each have unique temperature management quirks. Spend time getting familiar with your equipment before committing to a full cook. Most experienced pitmasters recommend running practice burns to map out where the hot and cool zones exist within their smoking chamber.
Thermometer placement is critical for accurate temperature monitoring. Position your primary thermometer in the cooking chamber at the level where wings will sit, away from direct heat sources. Many pitmasters use two thermometers—one for ambient chamber temperature and another for actual grate temperature—since these can vary significantly. Digital wireless thermometers with remote monitoring capabilities provide real-time data and reduce the need to open the smoker door, which causes temperature fluctuations.
For offset firebox smokers, place wings on the cool side of the chamber, away from direct flame and heat. This indirect cooking method ensures even heat distribution and prevents hot spots from charring wings prematurely. If using a vertical smoker or drum smoker, position wings on the middle grates, leaving the upper and lower areas for heat circulation. Proper air flow management through dampers and vents maintains the 250°F target—typically requiring dampers to be partially closed to restrict oxygen and heat output.
Create a water pan or drip tray below the wings to catch fat and juices. This serves multiple purposes: it adds humidity to the cooking chamber (preventing meat from drying), provides drippings for sauce creation, and prevents flare-ups that could scorch the meat. Fill the water pan with hot water before starting the cook, and replenish it as needed throughout smoking.

Wood Selection and Smoke Management
The type of wood burned dramatically influences the final flavor profile of smoked chicken wings. Mild woods like apple, cherry, and pecan are ideal for poultry, as they provide subtle smoke flavor without overwhelming delicate chicken meat. Avoid harsh woods like mesquite or hickory for wings, as their intense smoke can result in bitter, acrid flavors in just 1.5-2 hours of exposure.
Use seasoned hardwood exclusively—never green or treated wood, which produces toxic smoke and inferior flavor. Properly seasoned wood contains 15-20% moisture content and burns cleanly, producing the thin blue smoke that indicates optimal smoking conditions. Thick, white billowing smoke suggests incomplete combustion and will impart unpleasant, creosote-heavy flavors to your wings.
For 250°F smoking, use wood chunks rather than chips, as they burn more slowly and provide consistent smoke output. Two to three fist-sized chunks placed directly on coals every 30-45 minutes maintains steady smoke production without overwhelming the relatively short cook time. Monitor smoke color continuously—if it transitions to thick white smoke, temporarily reduce wood additions and increase airflow through damper adjustments.
Consider the comprehensive wood smoking guide from BBQ Guys for detailed information on wood characteristics and flavor profiles. Different regions have traditional preferences—Texas pitmasters favor oak, while Carolina practitioners often use hickory—but for wings, milder options universally produce superior results.
The Smoking Process Step by Step
Hour 1 (0-60 minutes): Place seasoned wings directly on grates, maintaining 250°F chamber temperature. Wings should not touch each other; arrange them in a single layer with slight spacing for air circulation. Begin adding smoke wood to establish the smoke profile early. This first hour is critical for smoke ring development, as the meat’s surface chemistry is most receptive to smoke penetration during initial cooking stages.
Hour 1.5 (60-90 minutes): Check wings for color development. They should exhibit a reddish-brown exterior with deepening color but no charring. Use your instant-read thermometer to check the thickest portions—wings should be approaching 155-160°F at this stage. If wings appear pale, increase wood additions slightly. If they’re darkening too quickly, reduce smoke output or lower chamber temperature by 10-15°F temporarily.
Final 30 minutes: Continue smoking until wings reach 165°F internal temperature. At this point, reduce or eliminate wood additions to prevent over-smoking. The meat is fully cooked, and additional smoke exposure won’t improve flavor—it may create bitter notes instead. Monitor temperature closely during this final phase, as wings can cook quickly once approaching doneness.
Many pitmasters employ the 3-2-1 method adaptation for wings: 45 minutes unwrapped with heavy smoke, 45 minutes wrapped in foil with butter and spices, and 15-20 minutes unwrapped to firm up the bark. This technique accelerates cooking while locking in moisture, though it requires careful temperature monitoring to prevent overshooting 165°F.
Testing for Doneness and Safety
The USDA mandates 165°F internal temperature for all poultry to eliminate pathogenic bacteria like Salmonella and Campylobacter. This temperature must be maintained for instant food safety, not as a target to exceed. Never rely on color alone to determine doneness—properly smoked wings can appear pink even when fully cooked due to the smoke ring formation, which creates a pink layer beneath the surface.
Use a quality instant-read thermometer calibrated for accuracy. Probe the thickest part of several wings—test at least three wings from different areas of your smoker to account for temperature variations. Insert the thermometer perpendicular to the bone, ensuring the probe tip reaches the thickest meat without contacting bone, which conducts heat and provides false readings.
Beyond temperature, properly smoked wings should demonstrate these characteristics: meat pulling away slightly from the bone, juice running clear rather than pink when pierced, and an internal color ranging from white to light pink (pink is acceptable and indicates smoke ring formation, not undercooking). If wings reach 165°F but appear undercooked visually, rest them for 5-10 minutes—carryover cooking will increase internal temperature another 2-3°F while allowing proteins to reabsorb moisture.
USDA food safety guidelines provide comprehensive information on safe internal temperatures for all poultry products. Following these standards protects your guests and ensures consistent, safe results across all smoking sessions.
Post-Smoking Finishing Techniques
Once wings reach 165°F, you have several finishing options that transform good smoked wings into exceptional ones. The glaze finish involves brushing wings with sauce during the final 10-15 minutes of smoking. Sauces containing sugar burn easily, so apply them only when wings are nearly done. Popular options include honey-based glazes, barbecue sauce reductions, or spicy Asian-inspired coatings.
For crispy skin texture without overcooking the meat, briefly increase chamber temperature to 325-350°F during the final 5-10 minutes. This quick high-heat finish crisps the exterior while the interior remains juicy. Some pitmasters finish wings under a hot broiler for 2-3 minutes, though this requires careful monitoring to prevent charring.
The rest period is often overlooked but crucial for texture and juiciness. Remove wings from the smoker when they reach 165°F and place them on a clean surface loosely tented with foil for 5-10 minutes. This resting period allows proteins to relax and reabsorb moisture, resulting in noticeably juicier wings compared to serving immediately.
Consider tossing finished wings in melted butter mixed with fresh herbs, garlic, and lemon juice—a simple preparation that enhances the smoke flavor without masking it. Alternatively, serve wings with complementary sauces on the side, allowing guests to customize their experience. This approach celebrates the smoking work rather than burying it under heavy sauce.
Troubleshooting Common Issues
Wings cooking too quickly: If wings reach 165°F before 1.5 hours, your smoker may be running hotter than the thermostat indicates. Reduce fuel additions, open dampers to increase airflow, or move wings to a cooler zone. Alternatively, wings may simply be smaller than anticipated—this is not a problem, just adjust timing expectations for future cooks.
Wings not browning adequately: Pale wings indicate insufficient heat or excessive moisture preventing browning. Ensure chamber temperature maintains 250°F consistently. If using a water pan, reduce water volume slightly to lower humidity. Increase wood additions to create more visible smoke. Check that your thermometer is calibrated correctly, as under-reading by 25-30°F would explain pale results.
Bitter or acrid smoke flavor: This results from burning treated wood, using green wood, or excessive smoking duration. Switch to properly seasoned hardwood chunks from reputable suppliers. Reduce wood additions frequency. Remember that smoke penetration plateaus after a certain point—additional smoke doesn’t improve flavor, it creates bitterness instead.
Uneven cooking: Temperature variations within the smoker are normal. Rotate wing trays halfway through cooking, moving cool-zone wings to hot zones and vice versa. Some pitmasters use multiple smaller racks rather than one large rack to improve heat circulation. Ensure dampers are fully open to promote even airflow throughout the chamber.
Dry meat texture: This typically indicates overcooking or insufficient moisture management. Reduce smoking time by starting at a higher initial temperature, use the 3-2-1 wrapping method to lock in moisture, or inject wings before smoking. If wings reached 165°F and appear dry, you may be testing temperature in consistently cooked portions—test multiple wings to find the actual minimum temperature achieved.
For additional smoking techniques and comparisons, explore our DIY Nests Hub Blog for comprehensive guides on various smoking methods and protein options.
FAQ
What’s the exact internal temperature target for smoked chicken wings?
The USDA-mandated safe internal temperature for all poultry, including chicken wings, is 165°F. This temperature must be reached in the thickest portion of the meat to eliminate pathogenic bacteria. Use an instant-read thermometer for accurate readings, testing multiple wings to account for temperature variations within your smoker.
Can I smoke chicken wings at a lower temperature like 225°F?
Yes, you can smoke wings at 225°F, though cooking time extends to approximately 2.5-3 hours. The lower temperature produces even more subtle smoke flavor and slightly more tender results, but it requires extended time commitment. Many pitmasters prefer 250°F as the optimal balance between cooking time and smoke penetration for wings specifically.
Should I wrap wings in foil during smoking?
Wrapping wings in foil during the middle cooking phase (the 3-2-1 method) accelerates cooking and locks in moisture, reducing total time to approximately 2 hours. However, unwrapped wings develop superior bark texture and deeper smoke flavor. Choose wrapping based on your priorities—speed and tenderness versus bark development and smoke ring depth.
What wood should I absolutely avoid for smoking wings?
Avoid mesquite, which is too intense for delicate poultry; treated or painted wood, which produces toxic smoke; and green wood with excessive moisture content, which creates thick white smoke and acrid flavors. Stick with mild hardwoods like apple, cherry, pecan, or oak for consistently excellent results with chicken wings.
How do I prevent wings from drying out at 250°F?
Maintain a water pan below wings to add humidity to the smoking chamber. Consider injecting wings with butter and broth mixture before smoking. Use the 3-2-1 wrapping method, which protects wings from direct heat during the middle cooking phase. Finally, monitor internal temperature carefully—remove wings at 165°F rather than letting them cook beyond this threshold.
Can I smoke wings and other proteins simultaneously at 250°F?
Yes, you can smoke wings alongside larger cuts like brisket or pork shoulder at 250°F, though timing requires careful planning. Wings finish in 1.5-2 hours while larger proteins require 10-16+ hours. Start larger proteins first, then add wings during the final 2 hours of the larger protein’s cook. Alternatively, smoke wings on a separate day for more consistent results.
What’s the difference between smoking and grilling chicken wings?
Smoking at 250°F uses indirect heat and smoke over extended periods (1.5-2 hours) to slowly cook wings and develop complex smoke flavor. Grilling uses direct, high heat (400-500°F) for 8-12 minutes total, creating quick charring without smoke penetration. The smoking process produces fundamentally different flavor and texture profiles compared to grilling.
How should I store leftover smoked chicken wings?
Cool wings to room temperature, then refrigerate in airtight containers for up to 4 days. Freeze wings for up to 3 months. Reheat gently in a 275°F oven for 20-30 minutes until heated through, or briefly in a microwave. Avoid overheating, which dries out the meat further. Wings are excellent for next-day use in salads, sandwiches, or as cold appetizers.


