How to Build a Shed: Expert Tips Inside
Building a shed is one of the most rewarding DIY projects you can undertake. Whether you need extra storage space for gardening tools, lawn equipment, or seasonal items, a well-constructed shed adds both functionality and value to your property. Unlike larger construction projects like how long to build a house, shed construction is manageable for homeowners with basic carpentry skills and the right guidance.
This comprehensive guide walks you through every step of the shed-building process, from initial planning and material selection through finishing touches. We’ll cover essential techniques, safety considerations, and expert tips that ensure your shed stands strong for decades. Whether you’re building a small 8×10 structure or a larger 12×16 model, the fundamental principles remain consistent.
Planning Your Shed Project
Before you purchase a single board, invest time in thorough planning. Start by determining your shed’s purpose and size requirements. A tool storage shed differs significantly from a workshop or garden shed in terms of layout and ventilation needs. Most residential sheds range from 8×8 feet (64 square feet) to 12×16 feet (192 square feet), though local building codes may restrict maximum dimensions without permits.
Check your local International Building Code (ICC) requirements and municipal zoning regulations. Many jurisdictions require permits for structures over 100-200 square feet or if the shed sits within specific setback distances from property lines. Some areas also mandate foundation types or material specifications. Contact your local building department early—this prevents costly mistakes and ensures your project meets all legal requirements.
Create detailed plans including dimensions, material lists, and elevation drawings. You can find free shed plans online or purchase professional blueprints from reputable sources. Calculate your budget comprehensively: materials typically cost $1,500-$5,000 depending on size and quality, while tools rental adds another $200-$500 if you don’t own essential equipment.
Consider the shed’s orientation based on prevailing winds and sun exposure. Position doors away from dominant wind directions and consider shade requirements if you’ll spend time inside. Plan electrical needs early if you want outlets or lighting—running conduit during construction proves easier than retrofitting afterward.
Site Preparation and Foundation
Proper site preparation determines your shed’s longevity and structural integrity. Begin by selecting a level location with good drainage. Avoid low spots where water collects during rain, as moisture causes wood rot and foundation failure. Clear the area of vegetation, rocks, and debris. Remove at least 3-4 inches of topsoil to prevent grass growth under your shed.
Foundation options include concrete pads, gravel bases, concrete blocks, or full concrete slabs. For most residential sheds, a concrete pad foundation offers excellent value and durability. Dig out the area to 4-6 inches deep, add 2 inches of gravel for drainage, then pour 4 inches of concrete. Use concrete specifications from the National Ready Mixed Concrete Association to ensure proper mix design for your climate zone.
If building on a concrete slab, ensure proper slope (1/8 inch per foot minimum) for water drainage. Allow concrete to cure fully—at least 7 days—before building your frame. Mark your foundation perimeter using chalk lines or spray paint to guide framing placement.
For gravel-base construction, level the ground thoroughly and compact the soil. Add 4-6 inches of compacted gravel, then install pressure-treated skids or concrete blocks at regular intervals (typically 4 feet apart) to support floor joists. This method works well in areas with excellent drainage but requires more maintenance than concrete.
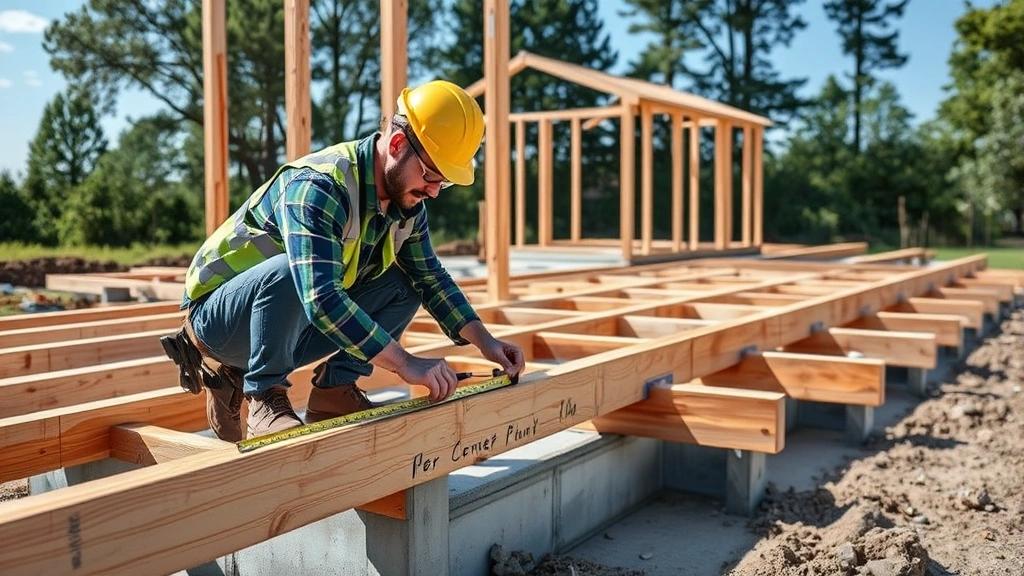
Building the Frame Structure
Frame construction is where your shed truly takes shape. Start with the floor frame using pressure-treated lumber rated for ground contact. For an 8×10 shed, use 2×8 or 2×10 joists spaced 16 inches on center. Pressure-treated wood resists rot and insect damage, essential for structures in contact with soil or moisture. Connect joists to rim boards using galvanized bolts or heavy-duty fasteners—never rely on nails alone for structural connections.
Install floor sheathing using 3/4-inch exterior-grade plywood, with staggered joints for strength. Secure with galvanized screws every 8 inches around perimeter and every 12 inches in the field. This creates a solid base for wall framing and prevents floor squeaking.
Wall framing follows standard construction practices: 2×4 studs spaced 16 inches on center form the primary structure. Build walls on the ground, then tilt them up into position—this proves easier and safer than building walls in place. Use temporary bracing to hold walls plumb (perfectly vertical) until you install permanent bracing and sheathing.
Ensure proper window and door rough openings according to your plans. Headers above openings must be sized appropriately for the span—consult National Frame Builders Association guidelines for header sizing charts. Undersized headers create structural weakness and potential sagging.
Install diagonal bracing or structural sheathing on walls for lateral stability. This prevents racking (diamond-shaped distortion) when wind or impact forces are applied. Many builders use 1/2-inch plywood sheathing on at least one wall face for this purpose, which also provides nailing surface for siding.
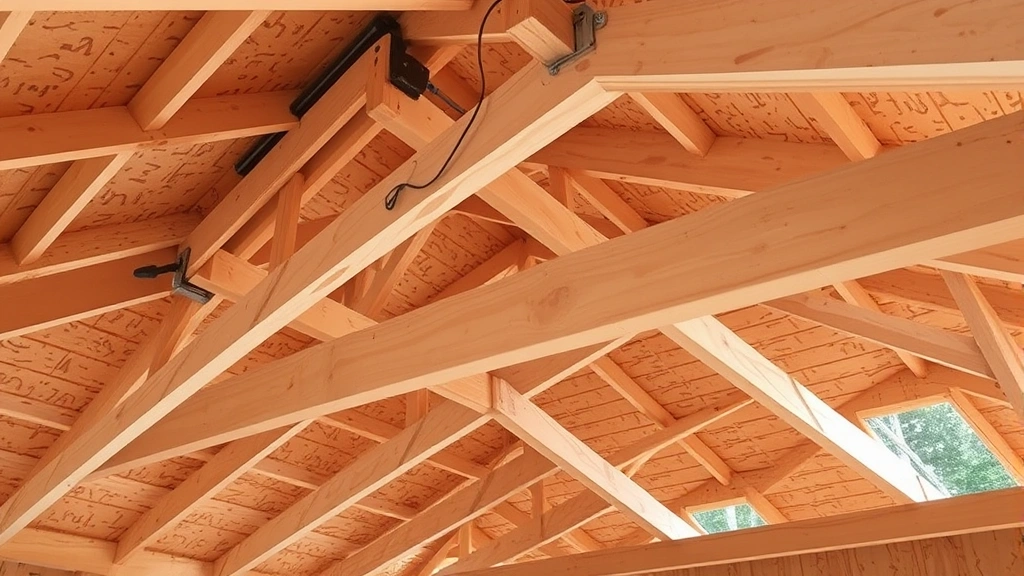
Roofing Installation
Roof design significantly impacts your shed’s functionality and longevity. Most residential sheds use simple gable or shed-style roofs. A gable roof (two sloping sides meeting at a peak) sheds water effectively and provides attic space for storage. A shed roof (single slope) costs less to build and works well for smaller structures.
Install roof trusses or rafters according to your plans, ensuring proper spacing and sizing for your snow load requirements. Snow load varies dramatically by geographic location—a shed in Vermont requires much heavier framing than one in Arizona. Check FEMA building science resources for snow load maps in your region.
Install roof sheathing using 1/2-inch plywood or OSB (oriented strand board), secured with galvanized nails or screws. Stagger joints and ensure proper nailing pattern as specified in building codes. Improper sheathing installation causes premature shingle failure and water infiltration.
Underlayment is critical for water protection. Install 30-pound roofing felt or modern synthetic underlayment according to manufacturer specifications. This secondary barrier protects against water damage during rainstorms and prevents ice dam leaks in cold climates.
Asphalt shingles remain the most economical roofing choice for sheds. Install drip edge along eaves and gables first, then begin shingling from the bottom, working upward. Use galvanized roofing nails as specified—typically 4 nails per shingle, placed just above the adhesive strip. Improper nailing causes wind damage and premature failure.
Siding and Exterior Finishing
Siding protects your shed structure from weather while defining its appearance. Options include wood siding, vinyl, metal, or composite materials. Traditional wood siding offers classic aesthetics but requires regular maintenance. Vinyl and composite materials offer durability with minimal upkeep, though they cost more initially.
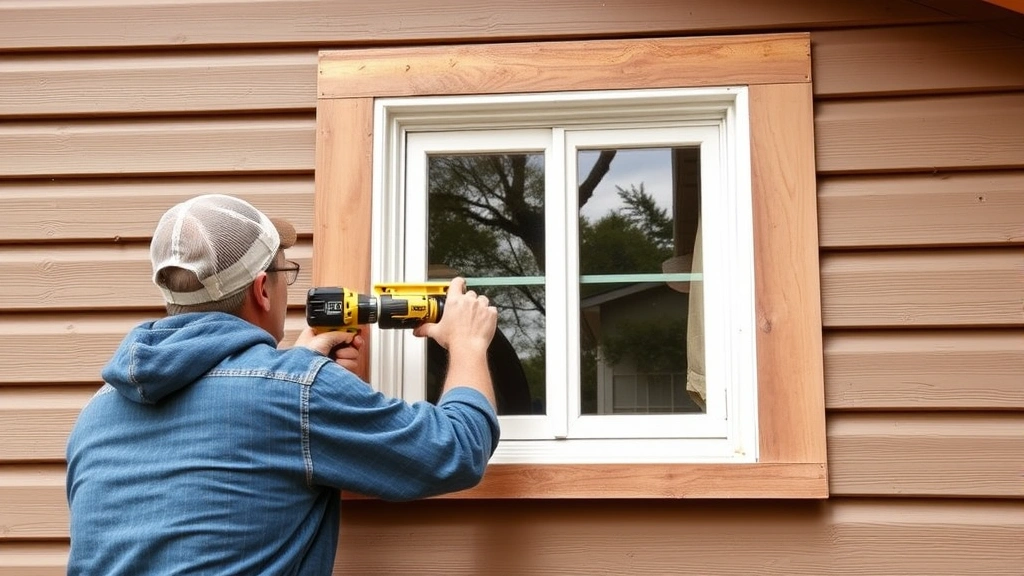
Install housewrap or building paper over wall sheathing before siding. This breathable membrane prevents water infiltration while allowing vapor to escape. Improper moisture management causes wood rot inside walls, creating expensive structural damage.
For wood siding, use pressure-treated or naturally rot-resistant species like cedar or redwood. Install boards with proper overlap (typically 1-1.5 inches) to shed water downward. Leave 1/8-inch gaps between boards for seasonal expansion—wood moves with humidity changes, and tight spacing causes buckling and splitting.
Vinyl siding installation requires careful attention to expansion and contraction. Use manufacturer-specified fasteners (typically aluminum nails) and avoid driving them too tight. Vinyl expands and contracts significantly with temperature changes—too-tight fastening prevents movement and causes buckling or nail popping.
Install flashing around all window and door openings using either metal or rubber flashing designed for your siding material. Proper flashing prevents water from entering the structure at these vulnerable points. Water intrusion around windows and doors causes rapid wood rot and interior damage.
Paint or stain your shed appropriately for your climate. Exterior paint protects wood from UV damage and moisture. Select quality exterior-grade paint designed for your siding material. In harsh climates, consider additional protection like primer before topcoats. Proper finishing extends your shed’s lifespan by 10-20 years.
Interior Organization
Once your shed is weathertight, interior organization maximizes functionality. Install shelving systems to utilize vertical space efficiently. Heavy-duty shelving supports tools and equipment safely. Wall-mounted pegboards provide accessible storage for frequently used items while keeping floor space clear.
Add interior finishing based on your shed’s purpose. A workshop might require electrical service and workbenches, while a storage shed needs only proper ventilation. Ensure adequate ventilation through soffit and gable vents to prevent moisture buildup and mold growth. Poor ventilation causes wood rot and creates unhealthy storage conditions.
If you plan to finish your shed as workspace similar to DIY basement finishing projects, consider insulation and drywall. Fiberglass or foam insulation improves temperature control, while drywall provides finished walls and fire protection. These upgrades increase costs but create more comfortable working environments.
Install a quality door with proper weatherstripping to prevent drafts and water infiltration. Ensure hinges are rated for outdoor use and apply lubricant regularly to prevent rust. A well-hung door operates smoothly for decades, while a poorly installed door causes frustration and allows weather penetration.
Consider security features if storing valuable equipment. DIY home security principles apply to sheds too—visible locks, motion lights, and strategic placement deter theft. Proper lighting also improves safety and usability during evening hours.
FAQ
How long does it take to build a shed?
Timeline depends on shed size and your experience level. A small 8×10 shed takes experienced builders 3-5 days, while novices might require 2-3 weeks working part-time. Larger structures and complex designs extend timelines accordingly. Weather delays, material delivery issues, and permit waiting periods add additional time. Plan for 4-6 weeks total for a typical residential shed project.
Do I need a permit to build a shed?
Permit requirements vary by jurisdiction. Most areas require permits for structures over 100-200 square feet or those within specific setback distances from property lines. Some jurisdictions require permits regardless of size. Contact your local building department before starting construction. Unpermitted structures can create problems when selling your property and may violate homeowners association rules.
What’s the best foundation for a shed?
Concrete pads offer excellent durability and cost-effectiveness for most applications. They prevent ground moisture from rotting wood and provide stable, level support. Concrete slabs work well for sheds where you’ll spend time inside. Gravel bases suit areas with excellent drainage but require more maintenance. Concrete block foundations work well in mild climates with good drainage.
Can I build a shed on my own?
Yes, with proper planning and realistic skill assessment. Basic carpentry experience helps significantly. Complex designs or large structures might benefit from experienced help, particularly for roof framing. Many homeowners successfully complete sheds as their first major building project by following detailed plans and taking time to learn proper techniques.
How much does shed construction cost?
Material costs typically range from $1,500 to $5,000 depending on size, materials selected, and finishing level. A basic 8×10 shed with simple construction costs around $2,000-$3,000 in materials. Larger structures, premium materials, or extensive finishing increase costs significantly. Tool rental adds $200-$500 if you don’t own essential equipment.
What tools do I need to build a shed?
Essential tools include a circular saw or miter saw, power drill, level, tape measure, square, and hammer. A reciprocating saw proves useful for cutting openings. More advanced projects benefit from a table saw, pneumatic nail gun, and scaffolding. Many tools can be rented affordably from home improvement centers. Don’t skimp on quality for critical tools like levels—accuracy prevents structural problems.
How do I protect my shed from rot?
Use pressure-treated lumber for all ground-contact wood. Install proper flashing around windows and doors. Ensure adequate ventilation through soffit and gable vents. Paint or stain exterior wood regularly—every 2-3 years for stain, 4-5 years for paint. Install gutters and downspouts to direct water away from the structure. Maintain proper slope on the foundation to shed water away from the building.
Should I insulate my shed?
Insulation depends on your shed’s purpose and climate. Storage sheds in mild climates need minimal insulation. Workshops or sheds in cold climates benefit from fiberglass or foam insulation for temperature control and comfort. Insulation also improves energy efficiency if you plan to add heating or cooling. Consider your specific needs rather than insulating by default.


