Water pressure problems plague countless homeowners, whether you’re experiencing weak showers, slow-filling bathtubs, or conversely, pipes that rattle and bang from excessive force. Understanding how to adjust water pressure is one of the most valuable skills you can develop as a DIY enthusiast, potentially saving hundreds in plumber service calls while protecting your plumbing system from damage. Most residential water pressure issues stem from simple causes that require only basic tools and fundamental knowledge to resolve.
Before diving into complex repairs, it’s worth noting that proper water pressure typically ranges between 40 and 80 pounds per square inch (PSI), with most municipalities supplying water at 50-60 PSI. When pressure falls below or exceeds these benchmarks, your fixtures suffer, your water bill climbs, and your pipes face premature wear. This comprehensive guide walks you through diagnostic procedures, adjustment techniques, and preventative maintenance strategies that professional plumbers use daily.
Like other DIY home improvement projects, water pressure adjustment requires patience, the right equipment, and methodical troubleshooting. Whether you’re dealing with a pressure regulator malfunction, mineral buildup, or supply line issues, this guide equips you with professional-grade solutions.
Understanding Your Water Pressure System
Your home’s water pressure system begins at the municipal supply line, where water enters your property at whatever pressure the city provides. Most homes receive water between 40 and 80 PSI, though some areas maintain higher pressures to accommodate tall buildings and distant service areas. Once water crosses your property line, several components control and regulate the flow throughout your home.
The pressure regulator serves as your system’s primary control valve, automatically reducing incoming pressure to a safe, consistent level. This brass or plastic device typically sits on the main supply line near where water enters your home, identifiable by its bell-shaped body with an adjustment screw on top. Without this crucial component, pressure fluctuations from the city supply would damage fixtures, burst pipes, and shorten appliance lifespans dramatically.
Secondary factors affecting pressure include pipe diameter, material composition, and age. Older homes with galvanized steel pipes often experience pressure loss due to interior corrosion and mineral accumulation. Modern copper or PEX lines maintain pressure more efficiently, though any pipe can develop issues over time. Understanding these fundamentals helps you identify whether problems originate from external supply issues or internal system failures.
When exploring DIY Nests Hub Blog resources, you’ll find that water system maintenance deserves priority status alongside electrical and structural considerations in your home maintenance schedule.
Tools and Equipment You’ll Need
Before attempting any water pressure adjustments, gather the proper tools to ensure safety and effectiveness. Most homeowners already possess several items required for basic pressure regulation work.
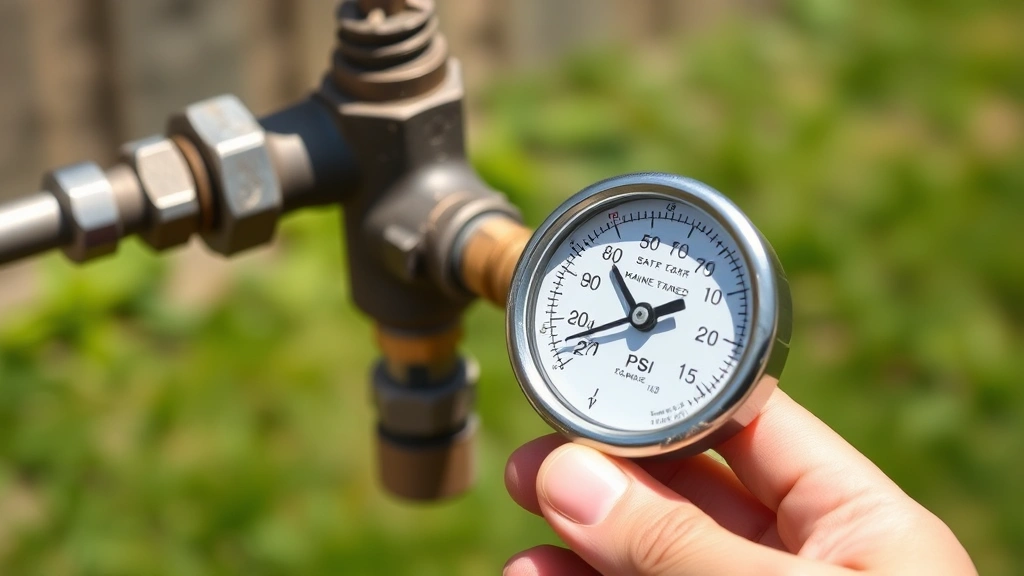
- Water pressure gauge: Essential for accurate measurements, these inexpensive devices connect to outdoor spigots or utility sinks. Choose models rated for at least 100 PSI capacity with clear, easy-to-read dials.
- Adjustable wrench: Required for loosening the adjustment screw on your pressure regulator and accessing various connection points throughout your system.
- Screwdrivers: Both Phillips and flathead varieties help with drain valves, sediment traps, and various connection points.
- Bucket: Necessary for catching water when opening drain valves or disconnecting supply lines.
- Teflon tape: Prevents leaks at threaded connections, an essential component for any plumbing work.
- Flashlight: Locating your pressure regulator often requires examining dim spaces under sinks or in utility areas.
- Pipe wrench: Helpful for larger connection points, though an adjustable wrench handles most residential situations.
Having these items assembled before starting prevents frustrating mid-project trips to hardware stores. Many homeowners find that investing in a basic plumbing toolkit pays dividends across numerous maintenance tasks and emergency repairs.
Diagnosing Low Water Pressure
Low water pressure manifests in various ways: showers that barely wet your hair, kitchen faucets that trickle rather than flow, and washing machines that fill slowly. Identifying whether the problem affects your entire home or specific fixtures determines your troubleshooting approach significantly.
Start by checking pressure at multiple locations. Connect your pressure gauge to an outdoor spigot, then test an indoor faucet furthest from your main supply line. If both readings fall below 40 PSI, your problem likely stems from the main regulator or municipal supply. Pressure readings that vary significantly between fixtures suggest localized blockages or mineral accumulation within specific supply lines.
Check your main water shut-off valve next. This valve sometimes gets accidentally partially closed during emergencies, restricting flow throughout your home. Locate it near your water meter or where the supply line enters your foundation. The handle should align with the pipe when fully open; if it’s perpendicular to the pipe, someone has partially closed it. Turn it fully open and retest pressure.
Mineral buildup represents another common culprit, particularly in hard water areas. Calcium and magnesium deposits accumulate inside pipes and aerators, gradually restricting flow. Check aerators on all faucets—these small screens at the spout’s end unscrew easily. Soak them in white vinegar overnight to dissolve mineral deposits, then rinse thoroughly and reinstall.
If pressure remains low after these checks, your pressure regulator likely needs adjustment or replacement. This is where professional home maintenance expertise becomes invaluable, though many homeowners successfully handle this adjustment independently.
Adjusting Your Pressure Regulator
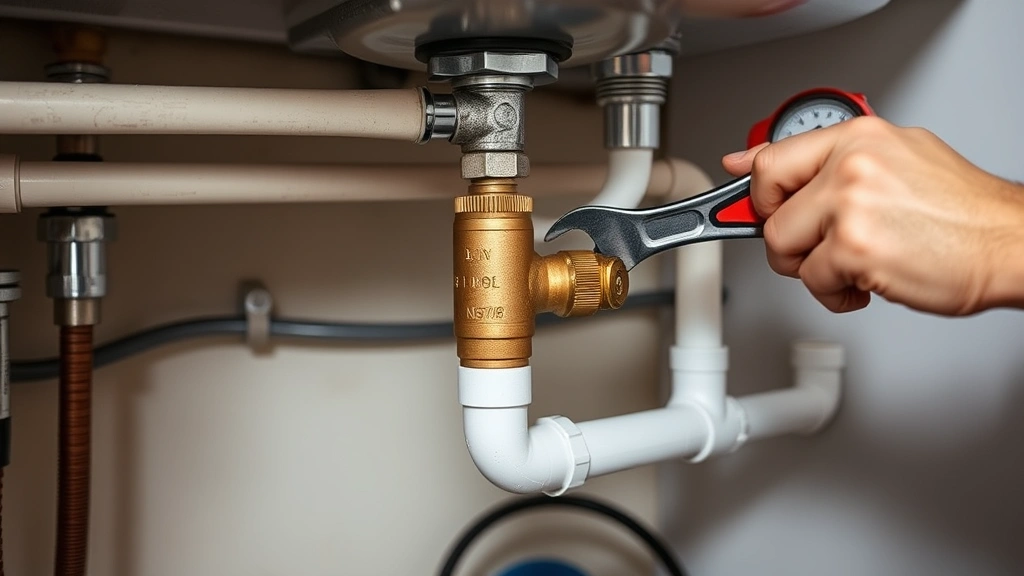
The pressure regulator adjustment is surprisingly straightforward, though it requires careful attention to detail. Locate your regulator—typically a bell-shaped brass fitting on the main supply line, often accompanied by a drain line running downward. Before touching anything, turn off the main water supply and open a faucet to release residual pressure.
Connect your pressure gauge to the nearest outdoor spigot or utility sink. Turn the main water supply back on and note the current pressure reading. Most regulators feature an adjustment screw on top, often under a plastic cap that twists or snaps off. Turning this screw clockwise increases pressure; counterclockwise decreases it. Make small quarter-turn adjustments, then retest pressure at your gauge.
The International Code Council (ICC) establishes residential plumbing standards recommending pressures between 40-80 PSI. Adjust your regulator to maintain approximately 50-60 PSI for optimal performance. Some regulators include a pressure adjustment range marked on the body, guiding your adjustments.
Work slowly and methodically. After each adjustment, allow several seconds for the system to stabilize before taking a new pressure reading. Rapid adjustments lead to overshooting your target pressure, requiring multiple corrections. Once you achieve the desired pressure, secure any caps or covers and test water flow throughout your home.
Fixing High Water Pressure Issues
Excessive water pressure causes problems as serious as insufficient pressure. You’ll notice banging pipes (water hammer), fixture leaks, and premature appliance failures. High pressure typically results from a failed or missing pressure regulator, or from municipal supply pressures exceeding safe residential levels.
First, verify that your pressure regulator exists and functions properly. If you cannot locate one, or if pressure remains excessive after adjustment attempts, the regulator likely needs replacement. Consult your home’s original plumbing documentation or contact your local water utility to understand your area’s typical supply pressure.
Many older homes lack pressure regulators entirely, relying on municipal systems to maintain safe pressures. Modern building codes, established by the International Plumbing Code (IPC), mandate pressure regulators on all residential installations. If your home predates these requirements, installing a regulator represents a wise upgrade.
Water hammer arrestors provide supplementary protection against high-pressure surges. These cylindrical devices, typically found near major appliances, absorb pressure spikes when water suddenly stops flowing. If your home experiences loud banging when shutting off faucets, a water hammer arrestor installation often resolves the issue completely.
To install a pressure regulator if one doesn’t exist, shut off your main water supply and locate the supply line entry point. Using appropriate pipe wrenches, remove a section of pipe and install the regulator according to manufacturer instructions, ensuring the arrow on the regulator body points toward your home’s interior. This typically requires basic plumbing skills, though some homeowners prefer hiring professionals for this modification.
Addressing Mineral Buildup and Sediment
Hard water areas experience accelerated mineral accumulation, which restricts water pressure and damages fixtures over time. Calcium carbonate deposits coat pipe interiors, gradually narrowing the passage water travels through. This process takes months or years to become noticeable, but prevention proves far easier than remediation.
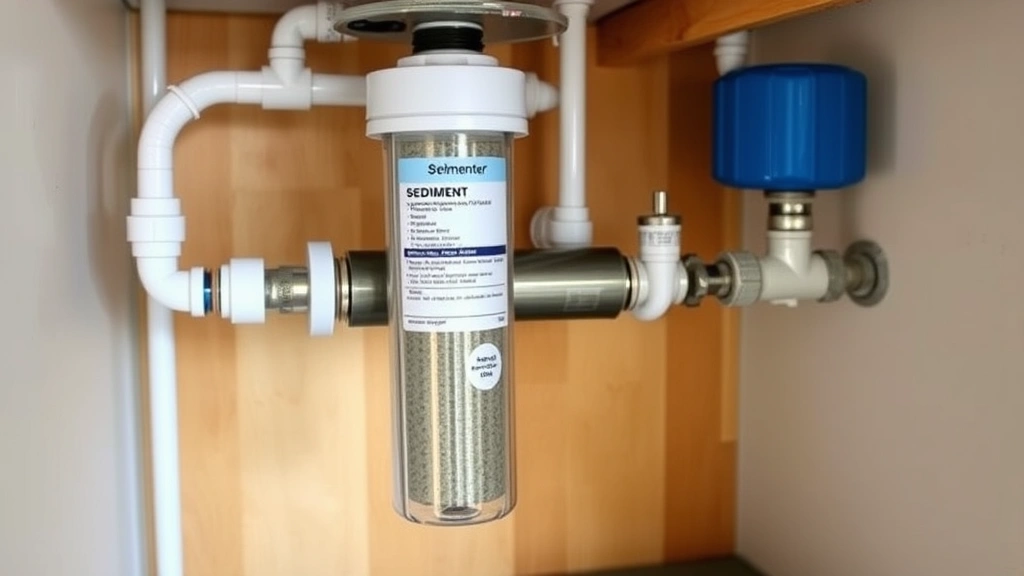
Sediment filters installed at your main supply line trap particles and minerals before they enter your home. These inexpensive cartridge-style filters require replacement every 6-12 months, depending on water quality. If your home lacks a sediment filter, installing one protects all downstream fixtures and appliances.
For existing buildup, several approaches work effectively. Chemical descaling products dissolve mineral deposits when circulated through your plumbing system. These solutions vary in strength and application method—some work through the entire system simultaneously, while others target specific fixtures. Follow manufacturer instructions carefully, as some chemicals require professional handling.
Manual flushing works for severe cases. Turn off your main water supply, then locate and open the lowest drain valve on your system. Attach a garden hose and open the valve fully, allowing pressurized water to force sediment and mineral deposits toward the drain. This process may take 15-30 minutes for heavily affected systems. Repeat monthly for preventative maintenance in high-sediment areas.
Consider installing a whole-house water softener if your area has particularly hard water. These systems use ion exchange to remove calcium and magnesium, protecting your entire plumbing system while improving water quality for drinking and bathing. While representing a larger investment than filters or chemical treatments, water softeners provide permanent solutions for hard water problems.
Professional Help and When to Call
While many water pressure adjustments fall within DIY capabilities, certain situations warrant professional plumber consultation. If pressure readings remain abnormal after regulator adjustment, if you cannot locate your pressure regulator, or if adjustment attempts fail to resolve problems, professional diagnosis becomes necessary.
Water pressure issues sometimes indicate deeper problems like leaking supply lines, burst pipes, or corroded internal plumbing. Professionals possess specialized equipment like video inspection cameras that identify hidden problems invisible to homeowners. These diagnoses prevent expensive emergency repairs later.
Installing new pressure regulators, water softeners, or sediment filtration systems requires soldering copper pipes or working with complex fittings that demand professional expertise in many situations. Improper installation causes leaks, water damage, and system failures. When jobs exceed your comfort level or require specialized tools, hiring a licensed plumber protects your home and wallet.
The Plumbers and Pipefitters Union maintains directories of certified professionals in your area. Licensed plumbers carry insurance and warranties on their work, providing protection homeowners perform independently.
For other home projects requiring similar methodical troubleshooting approaches, explore guides on DIY car repairs and woodworking projects that demonstrate how systematic diagnosis and careful execution produce professional results.
Frequently Asked Questions
What is the ideal water pressure for a home?
Residential water pressure should maintain between 40-80 PSI, with 50-60 PSI representing the optimal range for most homes. Pressures below 40 PSI cause weak water flow; pressures exceeding 80 PSI damage fixtures and pipes. Municipal water quality reports often specify your area’s typical supply pressure.
Can I adjust water pressure myself?
Yes, adjusting a pressure regulator is typically a straightforward DIY task. Locate your regulator, connect a pressure gauge, and turn the adjustment screw in small increments while monitoring pressure readings. However, if you cannot locate your regulator or if adjustments prove ineffective, professional help becomes advisable.
How often should I check my water pressure?
Annual pressure checks form part of comprehensive home maintenance. If you notice pressure changes, weak flow, or unusual noises, test pressure immediately. In areas with hard water or older homes with mineral accumulation, quarterly checks help catch problems early.
What causes water hammer and how do I fix it?
Water hammer—loud banging sounds when shutting off faucets—results from rapid pressure changes in your pipes. Water arrestors absorb these pressure spikes. Installing arrestors near major appliances or adding air chambers to your plumbing system resolves most water hammer issues. Excessive water pressure also contributes to this problem, so regulator adjustment sometimes eliminates water hammer completely.
Is installing a water softener necessary?
Water softeners become necessary in hard water areas where mineral content exceeds 60-100 mg/L of calcium carbonate equivalent. While not essential for safety, softeners protect plumbing systems, improve appliance lifespan, and enhance water quality for bathing and cleaning. Test your water hardness through your local water utility or with home testing kits before deciding.
When should I replace my pressure regulator?
Most pressure regulators last 5-10 years, though quality and water conditions affect lifespan. If adjustments no longer maintain stable pressure, if your regulator leaks, or if pressure readings fluctuate wildly, replacement becomes necessary. Have a professional assess whether your regulator needs replacement when adjustments prove ineffective.
Can low water pressure indicate a serious plumbing problem?
Sometimes. While low pressure often stems from simple issues like mineral buildup or regulator problems, it can indicate leaking supply lines, burst pipes, or corroded plumbing. If pressure loss is sudden, accompanied by wet spots in your yard or basement, or if it affects only certain areas, professional inspection becomes essential.


