How to Build a Shed: Expert Tips & Tricks for DIY Success
Building a shed transforms your outdoor space into a functional storage solution while enhancing your property’s value. Whether you’re a seasoned DIY enthusiast or tackling your first construction project, this comprehensive guide walks you through every stage—from planning and foundation work to roofing and finishing touches. A well-constructed shed provides secure storage for tools, equipment, and seasonal items while serving as a dedicated workspace or creative retreat.
The process of shed construction requires careful planning, proper materials selection, and adherence to local building codes. This guide combines expert recommendations with practical techniques to ensure your shed stands the test of time. We’ll cover everything you need to know about site preparation, structural framing, weatherproofing, and interior organization.
Planning Your Shed Project
Successful shed construction begins with thorough planning and research. Before purchasing a single board, determine your shed’s purpose, size, and location. Consider whether you need storage for lawn equipment, a workshop space, or a combination of both. Your intended use directly impacts design decisions like door size, window placement, electrical requirements, and interior layout.
Start by checking International Building Code (ICC) requirements for your area, as many municipalities have specific regulations about shed dimensions, setback distances from property lines, and permit requirements. Most jurisdictions require permits for sheds exceeding 100-120 square feet. Contact your local building department to understand zoning restrictions, height limitations, and whether your shed needs to meet specific architectural standards.
Create detailed sketches or use design software to visualize your shed before construction. Measure your available space carefully and account for drainage patterns, tree roots, and underground utilities. A typical residential shed ranges from 8×10 feet (80 square feet) to 12×16 feet (192 square feet), though larger structures are possible with proper permits and planning.
Site Selection and Foundation Preparation
Choosing the right location sets the foundation for your entire project. Select a level area with good drainage to prevent water accumulation around the structure. Avoid placing your shed directly under large trees, as falling branches pose damage risks and excessive shade promotes moisture issues. Mark your utility lines before any digging—call your local utility locating service to identify buried cables, pipes, and lines.
Foundation options include concrete pads, gravel beds, or treated wood skids, depending on your climate and local codes. The American Wood Council provides guidelines for proper wood foundation construction. For concrete pad foundations, excavate 4-6 inches deep, create a level base, and pour concrete to at least 4 inches thick. Ensure the pad slopes slightly (1/8 inch per foot) for water drainage.
Treated wood skids offer a simpler alternative for smaller sheds. Use pressure-treated lumber rated for ground contact (typically rated for 40 years or more). Space skids 4-6 feet apart and ensure they’re level using a transit level or laser level. For gravel foundations, spread landscape fabric and compact gravel to 4-6 inches deep, creating a stable base that allows drainage.
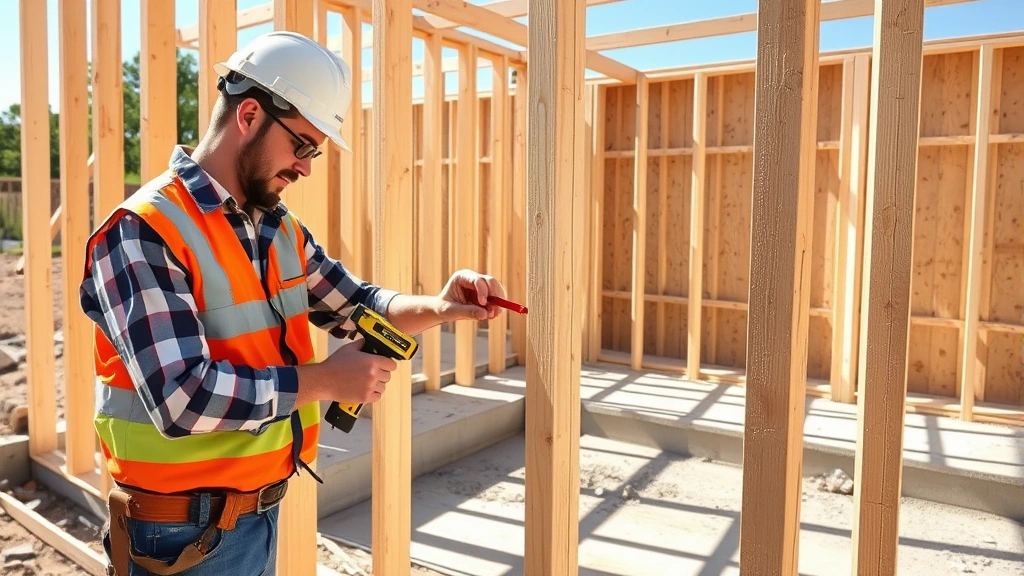
Building the Frame Structure
The frame provides your shed’s structural integrity and determines its longevity. Use pressure-treated lumber for any components contacting the ground and quality construction-grade lumber for walls and roof framing. Standard wall framing uses 2×4 studs spaced 16 inches on center, creating a strong yet economical structure.
Begin by constructing wall frames on the ground, then tilting them up and securing them together. Create rectangular frames for each wall, spacing studs 16 inches apart and adding horizontal blocking between studs for lateral bracing. Install a rim board (top and bottom plates) around the perimeter, ensuring corners are square using the 3-4-5 triangle method—measure 3 feet along one side, 4 feet along an adjacent side, and the diagonal should measure exactly 5 feet.
Door and window openings require additional framing called headers. For openings up to 4 feet wide, a double 2×4 header works well. Larger openings need more substantial headers—consult National Frame Builders Association specifications for your specific span. Brace wall frames with diagonal struts or plywood sheathing during construction to maintain squareness and prevent racking (twisting).
Connect wall frames to your foundation using bolts, anchors, or lag screws spaced 6 feet apart. This connection prevents wind from lifting the walls and resists lateral forces. Use galvanized or stainless steel fasteners to prevent corrosion and extend your shed’s lifespan. Nail or screw plywood sheathing to the exterior of walls, which adds structural rigidity and provides a base for exterior siding.
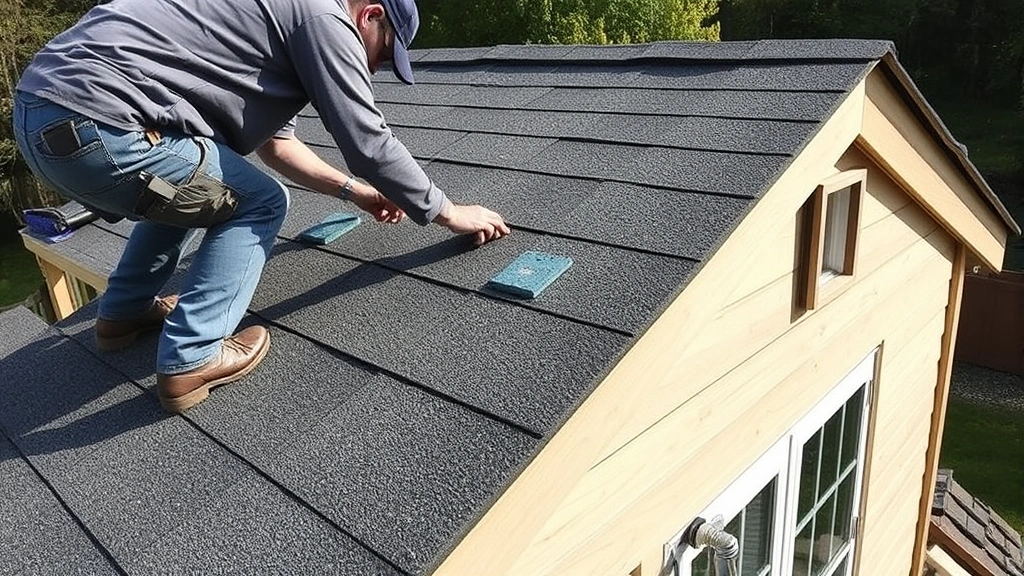
Roofing Systems and Installation
Your roof design significantly impacts water management and weather protection. Gable roofs (peaked) are popular for sheds because they shed water efficiently and provide attic space for storage. Shed roofs (single slope) are simpler to construct and work well for smaller structures. Calculate roof pitch based on your climate—steeper pitches shed snow and water faster but require more materials.
Roof framing typically uses 2×4 or 2×6 rafters spaced 16 or 24 inches on center. Rafters connect to a ridge board at the peak and rest on wall top plates. Add collar ties (horizontal bracing) between opposing rafters to resist outward thrust forces. Install proper ventilation using soffit vents and a ridge vent to prevent moisture buildup in attic spaces.
Sheathing material—typically 1/2-inch plywood—covers rafters and provides a base for roofing material. Install sheathing with proper fastening (nails or screws every 6 inches on edges and 12 inches in field areas). Add roofing underlayment (felt or synthetic) for additional weather protection, overlapping courses from bottom to top so water runs downward.
Asphalt shingles are the most common roofing choice for sheds due to cost-effectiveness and ease of installation. The Asphalt Roofing Manufacturers Association provides detailed installation guidelines. Start at the bottom edge, nailing shingles with 4 nails per shingle (or per manufacturer specifications), working upward. Metal roofing offers superior durability and longevity, though it requires specialized installation techniques.
Weatherproofing and Exterior Finishing
Proper weatherproofing protects your shed structure and contents from moisture damage. Exterior siding options include plywood, T1-11, cedar shingles, metal panels, or vinyl. Each material offers different aesthetics and maintenance requirements. Plywood siding is economical and durable, while cedar provides natural beauty but requires regular maintenance.
Install flashing around windows, doors, and roof penetrations to direct water away from vulnerable areas. Use aluminum or galvanized steel flashing installed with proper overlap—upper pieces should lap over lower pieces so water runs downward. Seal all gaps and penetrations with exterior-grade caulk or expanding foam, then paint or stain for aesthetic appeal and additional protection.
Paint or stain your shed every 3-5 years to maintain the protective finish. Choose exterior-grade paints rated for your climate zone. Light colors reflect heat and reduce interior temperatures, while darker colors hide dirt but absorb more heat. Ensure adequate gutters and downspouts direct roof water at least 4-6 feet away from the structure to prevent foundation saturation.
Install doors and windows using quality hardware rated for exterior use. Ensure doors swing freely and close securely. Add weather stripping around door frames to prevent water and pest infiltration. For enhanced home security, consider adding locks and interior organization that deters theft of valuable tools and equipment.
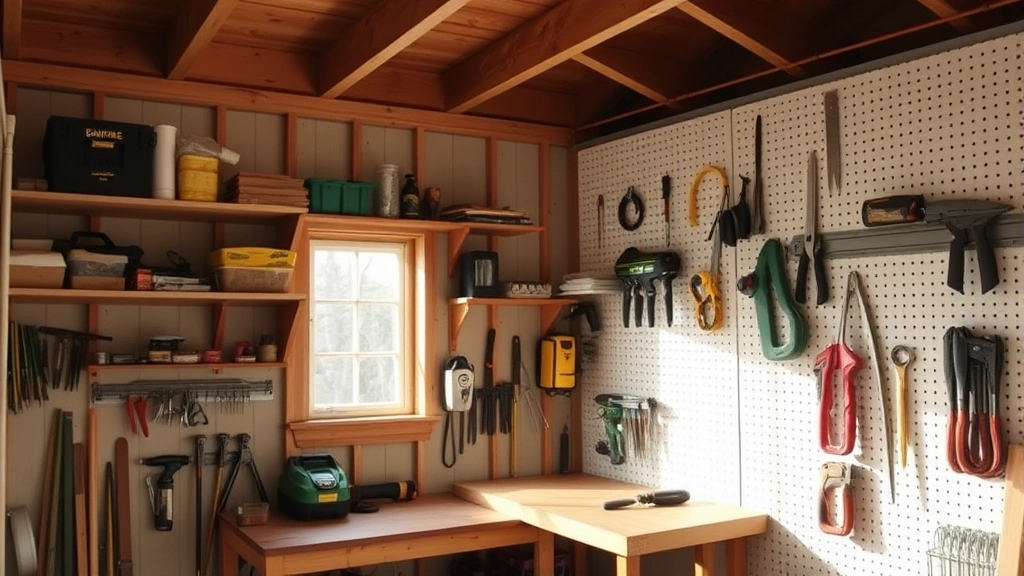
Interior Setup and Organization
Once your shed structure is complete and weatherproofed, focus on interior functionality. Install shelving systems for organized storage of tools, supplies, and seasonal items. Wall-mounted shelves maximize vertical space and keep frequently used items accessible. Pegboard walls provide flexible storage for hand tools, while heavy-duty hooks support larger equipment.
Ensure adequate lighting for safe tool use and inventory management. Install LED shop lights on the ceiling or walls, powered by weatherproof outlets. If you’re planning a dedicated workspace, create a sturdy workbench with a solid surface and storage underneath. Proper ventilation prevents moisture accumulation and odors—ceiling fans or passive vents improve air circulation.
Consider adding electrical service if you plan power tool use or need charging stations for equipment batteries. Have a licensed electrician install weatherproof outlets and circuits properly grounded and protected by GFCI (ground-fault circuit interrupter) breakers. This investment pays dividends in convenience and safety.
Implement pest prevention measures including sealed gaps, tight-fitting doors, and regular cleaning. Store items off the ground on shelves to prevent rodent damage. For climate-controlled storage of sensitive materials, insulation and ventilation systems maintain stable temperatures and humidity levels year-round.
Safety Considerations
Safety should guide every step of your shed construction project. Always wear appropriate personal protective equipment—safety glasses, work gloves, dust masks, and hearing protection when operating power tools. Follow manufacturer instructions for all equipment and never bypass safety features.
Ensure proper fall protection when working on elevated surfaces. Use sturdy ladders rated for your weight plus 50 pounds, and maintain three points of contact when climbing. When working on the roof, use fall arrest systems or work with a partner who remains on the ground.
Verify all electrical work meets National Electrical Code (NEC) standards. Improper wiring creates fire hazards and personal injury risks. When in doubt, hire licensed professionals for electrical installations. Store flammable materials away from ignition sources and maintain clear pathways for emergency egress.
Proper tool handling prevents injuries and ensures quality workmanship. Keep tools sharp and well-maintained—dull tools require excessive force and slip more easily. Secure your shed against high winds by properly anchoring it to the foundation. In areas prone to severe weather, consider additional bracing or tie-downs.
Frequently Asked Questions
Do I need a permit to build a shed?
Most jurisdictions require permits for sheds exceeding 100-120 square feet. Some areas require permits for any permanent structure. Check with your local building department before starting construction. Permits ensure your shed meets safety codes and doesn’t violate zoning regulations. The permit process typically involves submitting plans, paying fees, and scheduling inspections at key construction stages.
What’s the best foundation for a shed?
The best foundation depends on your climate, soil conditions, and shed size. Concrete pads offer superior durability and prevent frost heave in cold climates. Treated wood skids work well for smaller sheds in stable soil. Gravel foundations provide adequate support for temporary structures. Consult local building codes, as they may mandate specific foundation types for your area.
How long does it take to build a shed?
A typical 8×10 shed takes 2-4 weeks for an experienced DIYer working part-time, assuming proper planning and material availability. Larger structures or those with complex features take proportionally longer. Weather delays, material shortages, and permit waiting periods can extend timelines. Having all materials on-site before starting minimizes construction delays.
What tools do I need for shed construction?
Essential tools include a circular saw, drill-driver, level, tape measure, square, hammer, and nail gun. A miter saw improves accuracy for angle cuts. A table saw handles ripping lumber to width. Power tools significantly speed construction compared to hand tools. Rent specialized equipment like scaffolding or roof jacks for specific tasks rather than purchasing rarely-used items.
How do I prevent moisture damage in my shed?
Proper ventilation, adequate drainage, and quality weatherproofing prevent moisture issues. Install soffit and ridge vents to allow air circulation. Ensure gutters direct water away from the foundation. Seal gaps around doors, windows, and penetrations. Use pressure-treated lumber for ground-contact components. Consider installing a dehumidifier in humid climates or in sheds storing moisture-sensitive items.
Can I add electrical service to my shed?
Yes, but electrical work must meet National Electrical Code standards. For safety and code compliance, hire a licensed electrician to run power from your home’s electrical panel to the shed. They’ll ensure proper grounding, circuit protection, and weatherproof outlet installation. DIY electrical work creates serious fire and electrocution hazards.


