
DIY Shed Construction: Expert-Backed Guide
Building your own shed is one of the most rewarding DIY projects you can undertake. Whether you need extra storage, a workshop, or a garden retreat, constructing a shed from the ground up teaches valuable skills while saving thousands in labor costs. This comprehensive guide walks you through every phase of shed construction, from planning and permits to finishing touches, with expert recommendations and safety considerations throughout.
A well-built shed can last 20+ years and significantly increase your property’s functionality and value. Unlike hiring contractors, the DIY approach gives you complete control over materials, design, and timeline. However, shed construction requires careful planning, proper tools, and adherence to local building codes. This guide ensures you have everything needed to build safely and successfully.
Planning Your Shed Project
Before purchasing a single board, invest time in thorough planning. Determine your shed’s purpose—will it store lawn equipment, serve as a workshop, or function as a guest space? This decision influences size, ventilation, insulation, and electrical requirements. Most residential sheds range from 8×10 feet to 12×16 feet, though local zoning laws may restrict maximum dimensions.
Create detailed sketches or use online design tools to visualize your project. Document dimensions, door placement, window locations, and roof pitch. Sketch multiple angles to identify potential issues before construction begins. Visit your local building department to understand setback requirements—typically sheds must be positioned 5-10 feet from property lines, though this varies by jurisdiction.
Calculate material quantities using your plans. Create a comprehensive shopping list organized by category: foundation materials, framing lumber, fasteners, roofing supplies, and finishing materials. Getting accurate quantities prevents multiple trips and reduces waste. Consider purchasing 10% extra materials for mistakes and adjustments.
Budget realistically. A basic 10×12 shed costs $2,000-$4,000 in materials for DIY construction, compared to $5,000-$10,000 for professional installation. Factor in tool rentals, permit fees, and contingencies. Building during favorable weather seasons—spring through early fall—provides optimal working conditions.
Understanding Building Codes and Permits
Permit requirements vary significantly by location. Some jurisdictions require permits for all structures, while others exempt small sheds under specific square footage. Contact your local International Code Council (ICC) office or building department to determine requirements before starting.
Building codes establish minimum standards for safety, structural integrity, and occupant protection. These codes address foundation depth, snow load capacity, wind resistance, and electrical safety. Non-compliance risks fines, difficulty selling your property, and liability issues if someone is injured in an unpermitted structure.
Typical permit requirements include:
- Detailed construction plans or approved shed designs
- Site plan showing shed location relative to property lines
- Foundation specifications
- Electrical and plumbing plans (if applicable)
- Inspection appointments at key construction phases
Budget 2-4 weeks for permit approval. Inspectors typically check foundation preparation, framing completion, and final construction before approving occupancy. These inspections catch critical issues early, preventing costly corrections later.
Your shed project may also require National Association of Home Builders (NAHB) compliance reviews, particularly for structural components. If your shed includes living space or exceeds certain square footage, residential building codes apply fully rather than simplified shed standards.
Selecting Materials and Tools
Material selection determines durability, maintenance requirements, and overall cost. Pressure-treated lumber resists rot and insect damage, making it ideal for framing and foundation work. Cedar and redwood offer natural rot resistance and aesthetic appeal for exterior siding. Plywood sheathing provides structural support and weather protection when properly sealed.
For roofing, asphalt shingles offer affordability and easy installation for DIY builders. Metal roofing costs more initially but lasts 40-50 years with minimal maintenance. Corrugated polycarbonate panels work well for utility sheds where light transmission matters. Ensure all roofing materials meet local wind and snow load ratings.
Essential tools include:
- Circular saw or miter saw for cutting lumber
- Power drill for fastening
- Level (4-6 feet) for accurate alignment
- Tape measure and carpenter’s square
- Pneumatic nail gun for efficiency
- Scaffolding or ladder for roof work
- Safety equipment: hard hat, safety glasses, work gloves
Tool rental costs $100-$300 for a project lasting 2-3 weeks. Many home improvement stores offer daily rental options. Borrow tools from friends when possible to reduce expenses. Invest in quality fasteners—galvanized or stainless steel nails and screws prevent rust staining and structural failure.
Consider purchasing American Wood Council (AWC) graded lumber meeting structural specifications. Grade stamps indicate moisture content, species, and stress ratings crucial for load-bearing components.
Foundation Installation
A proper foundation prevents settling, rot, and structural failure. Concrete piers represent the most DIY-friendly approach: dig holes 3-4 feet deep below frost line (varies by region), insert sonotubes, and pour concrete. Frost line depth prevents heaving during freeze-thaw cycles—check your local requirements, typically 2-4 feet in northern climates.
Alternatively, gravel pads work for small utility sheds in mild climates. Compact 4-6 inches of gravel for drainage and level support. Concrete slabs provide excellent durability but require careful slope for water drainage. Never build directly on soil—moisture wicking causes rapid decay.
Installation steps:
- Mark foundation points using string lines and level
- Dig holes to proper depth, ensuring bottom is level
- Insert sonotubes or concrete piers
- Pour concrete, checking level frequently
- Allow 7 days curing before building frame
- Install pressure-treated rim boards on cured piers
Proper foundation work prevents the most common shed problems: rot, settling, and door misalignment. Invest time here—it’s the hidden foundation for everything above. Use a laser level for precision across multiple piers, ensuring the rim board sits perfectly level.
Framing the Structure
Framing creates your shed’s skeleton. Most residential sheds use standard 2×4 lumber spaced 16 inches on center for walls and roof trusses. This spacing balances material efficiency with structural strength for typical snow and wind loads.
Wall framing process:
- Build wall frames on the ground using 2x4s
- Space studs 16 inches on center
- Install diagonal bracing for racking resistance
- Add double top plate for strength
- Tilt walls up and secure to rim board with hurricane ties
- Brace walls temporarily until roof installation
Door and window openings require headers—doubled 2×6 or 2×8 lumber spanning the opening. Header size depends on opening width; larger openings need larger headers to support roof load. This is critical for structural integrity.
Roof framing typically uses pre-built trusses or rafters. Trusses cost more but install faster and eliminate interior support posts. Rafters offer flexibility for vaulted ceilings or loft spaces. Ensure proper overhang—typically 12-18 inches—for water protection and appearance.
Check that your State Building Code Institute standards specify rafter sizing for your region’s snow and wind loads. Most DIY builders use standard rafter tables rather than engineering calculations, which is acceptable for simple rectangular sheds under 200 square feet.
Roof Construction
Roof design significantly impacts durability and weather protection. A pitched roof (4:12 to 8:12 pitch) sheds water effectively and provides usable attic space. Steeper pitches shed snow better in snowy climates but increase wind exposure. Consult your local building department for minimum pitch requirements.
Roof installation sequence:
- Install roof sheathing (plywood or OSB)
- Apply roofing felt or synthetic underlayment
- Install drip edge along eaves and gables
- Apply roofing material (shingles, metal, or panels)
- Seal penetrations around vents and chimneys
Asphalt shingle installation requires proper nailing—four nails per shingle, driven into the nail strip beneath the adhesive line. Overdriving or underdriving nails causes premature failure. Starter shingles along the eave provide proper water shedding. Ventilation prevents moisture accumulation; include soffit vents and a ridge vent for air circulation.
Metal roofing requires specialized installation to prevent leaks at seams and fasteners. Use colored fasteners matching the roof, and seal all penetrations with compatible sealants. Metal roofing’s longevity justifies its higher initial cost for permanent structures.
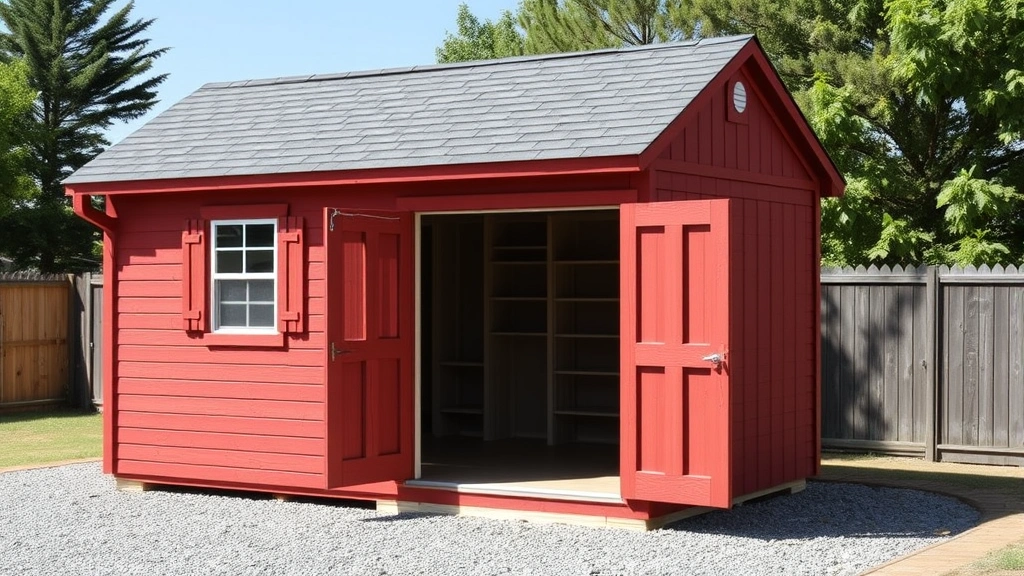
Siding and Weatherproofing
Exterior siding protects the frame from weather and defines your shed’s appearance. Options include:
- Plywood siding: Economical, quick installation, requires regular maintenance
- T1-11: Textured plywood with groove pattern, better appearance than flat plywood
- Wooden shiplap: Classic aesthetic, requires ongoing sealing and painting
- Vinyl siding: Low maintenance, limited color options, less durable than wood
- Fiber cement: Durable, paintable, moderate cost, excellent weather resistance
Installation basics:
- Install house wrap for water and air barrier
- Apply siding vertically or horizontally depending on style
- Stagger joints and seal with caulk
- Install corner trim and edge treatments
- Paint or stain exterior
Weatherproofing extends your shed’s lifespan dramatically. Proper flashing around windows, doors, and roof penetrations prevents water infiltration. Caulk all gaps and seams with exterior-grade sealant. Paint or stain protects wood from UV damage and moisture.
Consider your climate when selecting siding. In humid regions, choose materials resistant to mold and rot—fiber cement or composite options excel here. Arid climates allow more material flexibility, though sun protection remains important.
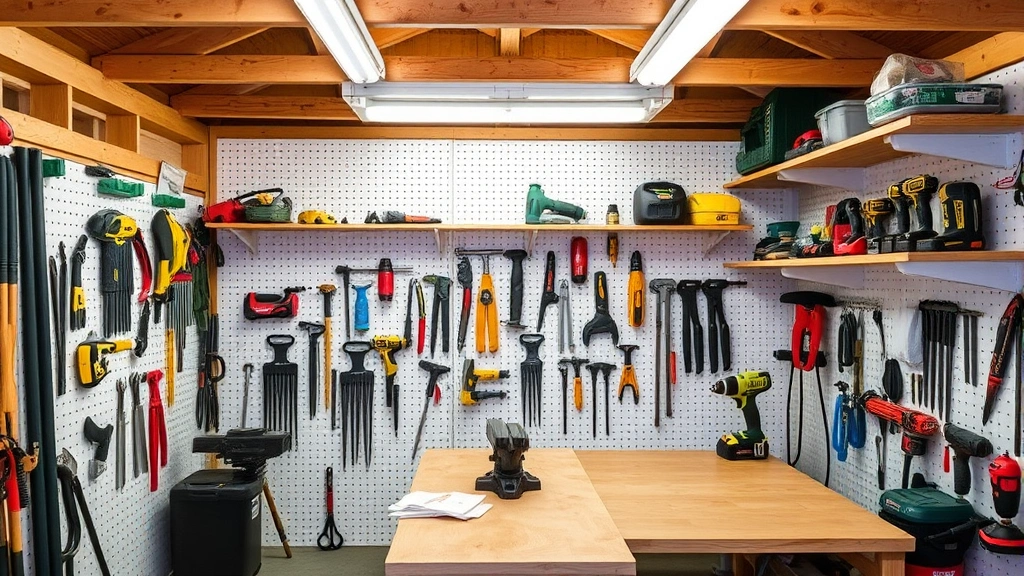
Interior Finishing
Interior finishing depends on your shed’s purpose. Storage sheds need only rough shelving and hooks. Workshop sheds benefit from workbenches, tool storage, and proper lighting. Habitable spaces require insulation, drywall, and climate control.
Insulation options:
- Fiberglass batts: Affordable, easy DIY installation, R-value 3.2-3.8 per inch
- Spray foam: Superior air sealing, higher cost, requires professional installation
- Rigid foam: Excellent performance, moderate cost, good for small spaces
Electrical installation requires following National Electrical Code (NEC) standards. Exterior outlets need GFCI protection. Use weatherproof boxes and conduit for outdoor exposure. Many jurisdictions require licensed electrician installation for permanent structures. Never skip this—electrical safety directly impacts fire and shock hazard.
Storage solutions maximize utility. Pegboard walls organize tools efficiently. Overhead storage racks utilize vertical space. Workbenches should be sturdy and well-lit. Ventilation fans prevent moisture and odor accumulation, particularly important for workshops.
Paint interior walls with moisture-resistant paint or primer-sealant combination. This prevents mildew and extends the structure’s life. Consider epoxy flooring for workshops—it’s durable, easy to clean, and professional-looking.
Your shed project may benefit from consulting our DIY basement finishing guide for interior design principles applicable to enclosed spaces. Additionally, if you’re interested in DIY skills beyond construction, explore our DIY Nest Hub blog for diverse project inspiration. For security considerations around your new shed, our DIY home security guide offers protection strategies.
FAQ
Do I need a permit for a shed?
Permit requirements vary by location. Most jurisdictions require permits for structures over 100-200 square feet or for any permanent structure with a foundation. Check with your local building department before starting. Unpermitted structures create liability and property sale complications.
How long does shed construction take?
A basic 10×12 shed takes 3-4 weeks for an experienced DIYer working weekends. This includes foundation curing, framing, roofing, and siding. Beginners may need 6-8 weeks. Weather delays and unexpected issues can extend timelines significantly.
What’s the best foundation for a shed?
Concrete piers work best for most climates—they’re durable, prevent rot, and accommodate frost heave. Concrete slabs suit mild climates but require proper slope. Gravel pads suit small utility sheds in stable soil. Never build directly on soil.
Can I build a shed without framing experience?
Yes, but start with careful planning and research. Pre-built shed kits simplify the process. Watch instructional videos from reputable sources like the National Association of Home Builders. Take your time—rushing leads to mistakes and safety issues. Consider hiring help for heavy lifting and roof work.
How do I ensure my shed is weatherproof?
Use house wrap, proper flashing, quality roofing, and exterior-grade sealant. Ensure roof overhang extends 12-18 inches beyond walls. Slope all surfaces for water drainage. Paint or stain wood annually. Proper ventilation prevents moisture accumulation inside.
What’s the cost difference between DIY and professional shed building?
DIY construction costs 40-60% less than professional installation. A $3,000 DIY project might cost $7,000-$10,000 professionally. Your labor is free, but time investment is significant. Professional builders offer warranties and expertise—valuable for complex designs or challenging sites.
Should I insulate my shed?
Insulation depends on use and climate. Storage sheds rarely need insulation. Workshop sheds benefit from modest insulation for comfort. Habitable spaces require proper insulation for climate control. In cold climates, insulation prevents condensation and equipment damage.
What tools can I rent versus buy?
Rent expensive specialty tools: pneumatic nail guns, scaffolding, circular saws, and power levels. Buy inexpensive hand tools you’ll use repeatedly: tape measures, squares, hammers, and drill bits. Renting costs $20-$40 daily but saves hundreds versus purchasing.


