Build a Backyard Fort: Complete Carpenter’s Guide
Creating a backyard fort is one of the most rewarding DIY projects you can undertake as a carpenter or homeowner. Whether you’re building a simple wooden structure for children or a sophisticated adult retreat, understanding proper construction techniques, material selection, and safety protocols is essential. A well-built fort provides not only a fun recreational space but also adds functional value to your property.
This comprehensive guide walks you through every step of fort construction, from initial planning and design considerations to final finishing touches. We’ll cover structural integrity, weather protection, safety regulations, and creative design options that suit various skill levels. Whether you’re a seasoned carpenter or a motivated beginner exploring DIY beginner woodworking projects, this guide provides the knowledge you need to build a fort that stands the test of time.
Planning and Design Considerations
Before you drive a single nail, comprehensive planning determines your fort’s success. Start by assessing your available space, considering both the footprint and overhead clearance. Most residential backyards can accommodate structures ranging from 8×10 feet to 16×20 feet, though local zoning regulations may impose restrictions. Check with your municipal building department regarding setback requirements—typically structures must be positioned several feet from property lines.
Define your fort’s primary purpose. Will it serve as a children’s play structure, a meditation retreat, an outdoor office, or a multi-functional entertaining space? This determines design complexity, internal layout, and feature requirements. Children’s forts might include climbing elements, slides, or rope systems, while adult structures may require electrical considerations or weatherproof storage. Sketch preliminary designs to scale, noting door and window placements for optimal natural light and ventilation.
Consider your local climate when designing. Regions with heavy snowfall require steeper roof pitches and reinforced framing to handle weight loads. Areas with high winds demand additional bracing and secure foundation anchoring. Humid climates necessitate enhanced ventilation and moisture-resistant materials to prevent rot and mold growth. Research typical weather patterns and seasonal variations before finalizing your design.
Budget planning cannot be overlooked. Material costs vary significantly based on wood quality, size, and finishing requirements. Factor in permits, tool rentals, safety equipment, and potential labor assistance. A basic 10×12 foot structure might range from $2,000 to $5,000, while elaborate designs can exceed $10,000. Building incrementally allows you to manage costs while maintaining quality standards.
Materials and Tools You’ll Need
Primary Structural Materials: Pressure-treated lumber remains the most economical choice for outdoor structures, offering rot resistance for 15-20 years. Use pressure-treated 4×4 posts for vertical supports, 2×8 or 2×10 joists for floor framing, and 2×6 or 2×8 boards for wall plates. Cedar or redwood provides superior aesthetics and natural decay resistance but commands premium pricing. For roofing, asphalt shingles offer affordability and reliability, while metal roofing provides superior durability and weather protection.
Fastening Hardware: Exterior-grade screws resist corrosion better than nails, providing superior holding power in outdoor applications. Use 3-inch structural screws for framing connections, 1.5-inch deck screws for decking, and 2-inch galvanized nails for shingle installation. Galvanized or stainless steel bolts, washers, and lag screws prevent rust and ensure long-term reliability. Metal framing brackets and hurricane ties strengthen critical connections.
Essential Tools: A power drill with bit sets enables efficient fastening and hole preparation. A circular saw or miter saw handles crosscutting and angled cuts required for roof framing. A speed square ensures accurate angles for rafters and bracing. A level (4-foot minimum) guarantees structural plumb and level positioning. A tape measure, carpenter’s pencil, and chalk line assist with layout precision. Safety equipment—including work gloves, safety glasses, dust masks, and hard hats—protects against common construction injuries.
Specialized Equipment: A post hole digger or auger speeds foundation preparation. A circular saw with a fine-tooth blade produces cleaner cuts in treated lumber. A pneumatic nail gun accelerates shingle installation. A caulking gun applies weatherseal around joints. A power sander smooths rough surfaces and prepares wood for finishing.
When exploring material options, consider DIY pallet projects as supplementary building components. Reclaimed pallets provide economical wall panels or decorative elements, though they require careful inspection for structural integrity and chemical treatments.
Foundation and Site Preparation
Proper foundation work prevents settling, shifting, and structural failure. Begin by clearing the site of debris, vegetation, and rocks. Mark the fort’s perimeter using chalk lines or string, then excavate to remove topsoil and create level ground. For smaller structures under 200 square feet, concrete piers or post footings provide adequate support. Dig holes 36-42 inches deep (below frost lines in cold climates), then set pressure-treated 4×4 posts into concrete-filled holes.
For larger or more permanent structures, a complete concrete slab foundation offers superior stability and moisture protection. Pour a 4-6 inch concrete pad with proper drainage slope (approximately 1/8 inch per foot) to direct water away from the structure. Embed anchor bolts in the wet concrete at 4-6 foot intervals for secure post attachment. Allow concrete to cure for 7 days before proceeding with framing work.
Grade-level site preparation prevents water accumulation and pest intrusion. Ensure the ground slopes away from the fort on all sides, directing runoff toward storm drains or low-lying areas. Remove sod and vegetation within a 2-foot perimeter around the foundation to eliminate moisture-trapping materials. Consider landscape fabric covered with gravel to prevent weed growth and improve drainage.
Verify utility line locations before digging. Contact your local utility locating service (typically “Call Before You Dig”) to mark underground electrical, gas, water, and sewer lines. This prevents dangerous and expensive accidents during foundation preparation.
Frame Construction and Structural Support
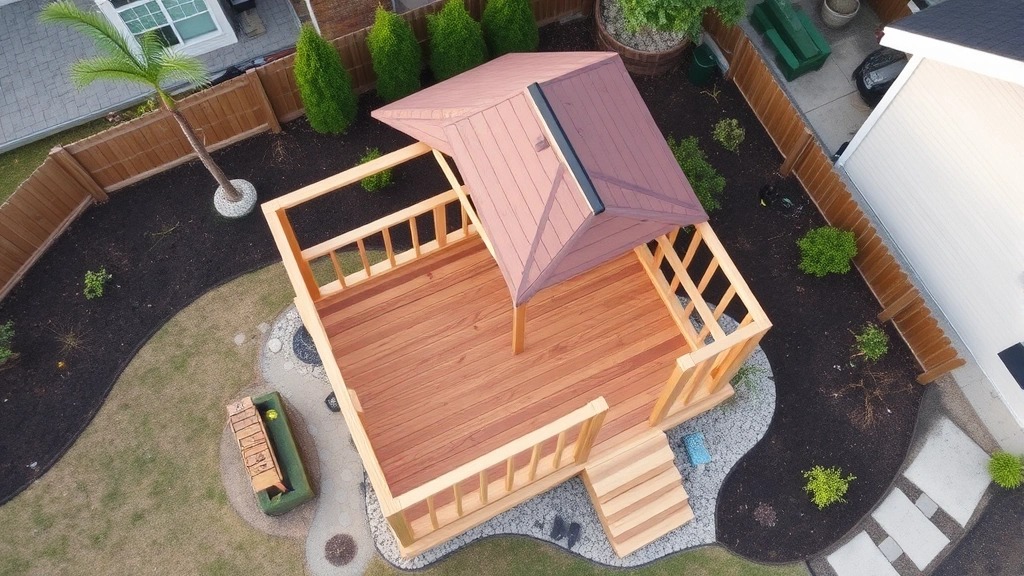
The frame forms your fort’s structural skeleton, supporting all loads and resisting environmental stresses. Begin by installing vertical posts using 4×4 pressure-treated lumber, securing them to foundation anchors with galvanized bolts and structural brackets. Ensure posts are perfectly plumb using a 4-foot level, checking both front-to-back and side-to-side orientations. Posts should extend 8-10 feet above grade for standard residential structures.
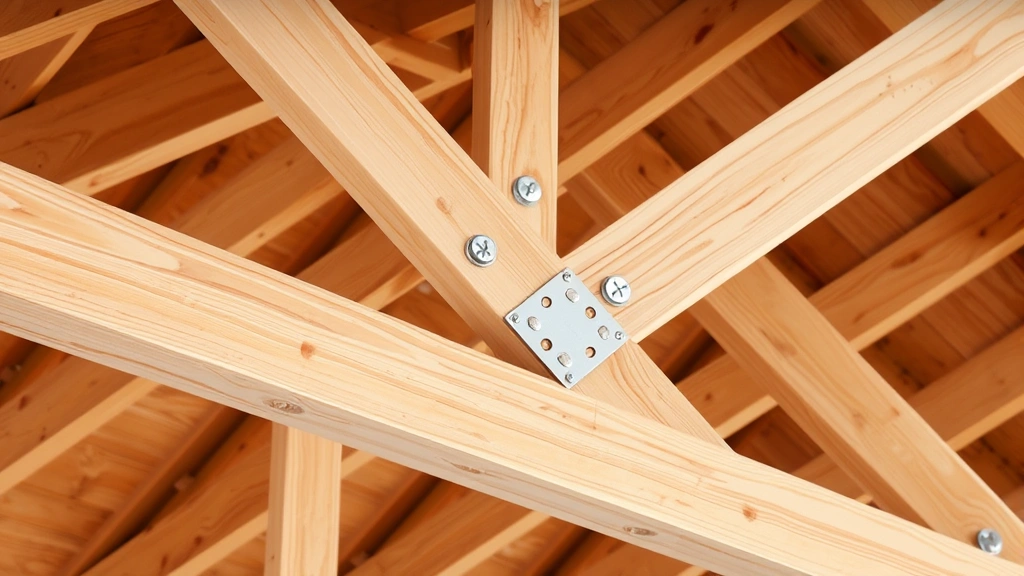
Install horizontal top plates (doubled 2×8 boards) across the post tops, fastening with 3-inch structural screws at 16-inch centers. These plates distribute roof loads and provide attachment points for wall framing and rafters. Add diagonal cross-bracing between posts to resist lateral wind and seismic forces. X-bracing patterns prove most effective, with 2×4 lumber fastened at 45-degree angles to both posts and top plates.
Floor framing typically utilizes 2×8 or 2×10 joists spaced 16 inches on center, fastened to rim boards that connect the outer posts. Install blocking (solid 2×8 sections) at mid-span between joists to prevent twisting and distribute concentrated loads. If the floor sits more than 30 inches above grade, install railings with 4-inch sphere exclusion (preventing a 4-inch sphere from passing through gaps) to meet safety standards.
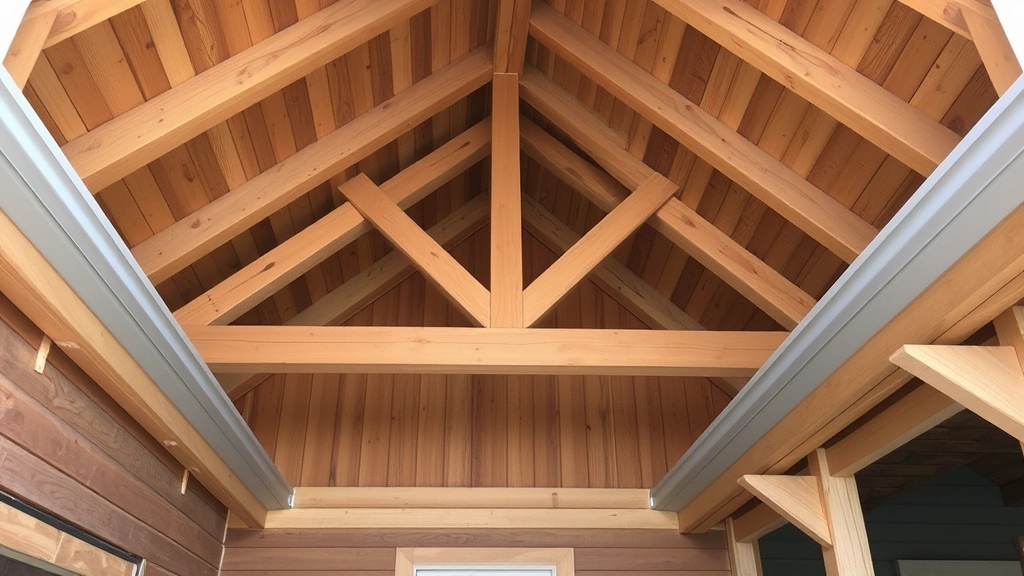
Roof framing determines weather protection and structural performance. Common rafter designs include gable (peaked) roofs, shed (single-slope) roofs, or hip roofs. Calculate rafter size and spacing based on roof pitch, expected snow loads, and local building codes. Typically, 2×6 rafters spaced 24 inches apart suffice for moderate climates, while areas with heavy snow require larger members spaced closer together. Install collar ties between opposing rafters at the ridge to resist outward thrust forces.
For advanced structural considerations, consult the International Building Code (IBC), which provides detailed specifications for post sizing, fastening requirements, and load calculations. This ensures your structure meets or exceeds minimum safety standards.
Building Walls and Roof Systems
Wall construction begins with vertical studs (typically 2×4 lumber) fastened to bottom plates and top plates, spaced 16 inches on center. Install horizontal blocking at mid-height (approximately 36-42 inches) to provide solid attachment points for interior shelving and storage. Add diagonal bracing (let-in bracing with 1×4 lumber) or plywood sheathing to resist racking and twisting from wind loads.
Consider your wall cladding material carefully. Horizontal lap siding provides classic aesthetics and excellent weather protection, with individual boards overlapped to shed water downward. Vertical board-and-batten siding offers a modern appearance and requires less maintenance. Plywood panels with battens provide rapid installation and lower costs. Always use exterior-grade fasteners and install a weather-resistant barrier beneath cladding to prevent water infiltration.
Roof installation begins with underlayment—typically asphalt-saturated felt or synthetic moisture barriers stapled directly to rafters. This secondary moisture protection prevents water penetration during rain or snow melt. For asphalt shingle roofing, start at the eave with starter shingles, then work upward with standard shingles nailed at four points per shingle. Ensure shingles overlap properly (typically 4-5 inches) to direct water downward. Install drip edge metal along eaves and gables to direct water away from fascia boards.
Metal roofing offers superior durability and weather protection, particularly in snow-prone or hurricane-prone regions. Standing seam metal roofs provide excellent water shedding and can last 40-60 years with minimal maintenance. Installation requires specialized fasteners designed to accommodate thermal expansion while preventing water penetration.
Ventilation prevents moisture accumulation and extends roof life significantly. Install soffit vents along eaves and ridge vents along the roof peak, creating continuous air circulation. This airflow prevents heat and moisture buildup that causes premature shingle deterioration and structural rot. Typically, 1 square foot of vent area per 150 square feet of roof space provides adequate ventilation.
Gutters and downspouts direct roof runoff away from the foundation, preventing water damage and erosion. Install 5-inch K-style gutters with 2-inch downspouts, positioning downspouts to discharge water at least 4-6 feet from the structure. Consider adding gutter guards to reduce leaf accumulation and maintenance requirements.
Safety and Building Code Compliance
Building codes exist to protect occupants and prevent structural failures. Before beginning construction, obtain necessary permits from your local building department. Permit requirements vary by jurisdiction but typically apply to structures exceeding 200 square feet or positioned within specific setback distances from property lines. Permits ensure your design meets code requirements and entitle you to inspections at critical construction stages.
Railing and guardrail requirements protect against falls, particularly critical for elevated structures. Railings must resist 200 pounds of horizontal force per linear foot without failing. Vertical balusters must prevent passage of a 4-inch sphere (preventing children from inserting their heads). Railings must extend at least 36-42 inches above walking surfaces. For children’s structures, ASTM F1487 standards provide specific safety guidelines for playground equipment.
Electrical safety becomes important if you plan to install lighting or power outlets. All outdoor electrical work must comply with National Electrical Code (NEC) requirements, including GFCI (ground fault circuit interrupter) protection for all outlets. Consider hiring a licensed electrician for any electrical installations to ensure code compliance and safety.
Structural load calculations determine framing member sizes and spacing. Live loads (movable loads like people and furniture) typically range from 20-40 pounds per square foot for residential structures. Snow loads vary dramatically by region, from near zero in warm climates to 100+ pounds per square foot in alpine regions. Dead loads (permanent structure weight) depend on material choices. Consult Standard Building Code resources or work with a structural engineer for precise load calculations.
Wind resistance requirements become critical in coastal regions or areas prone to severe storms. Structures must resist design wind speeds specified by local codes, typically 85-130 mph depending on location. This requires proper foundation anchoring, secure fastening of all connections, and adequate roof-to-wall attachment.
Inspection checkpoints occur at foundation completion, framing completion, roof installation, and final completion. These inspections verify compliance with approved plans and building codes. Plan your construction schedule to accommodate inspection timelines, as proceeding without required inspections may result in costly corrections or demolition.
Finishing and Weatherproofing
Exterior finishes protect wood from UV damage, moisture infiltration, and pest infestation while enhancing aesthetics. Pressure-treated lumber typically requires finish application within 6-12 months of installation. Semi-transparent stains penetrate wood, showcasing natural grain while providing water repellency. Solid stains create uniform color coverage and superior UV protection. Paints offer maximum color options but require more frequent reapplication (typically every 5-7 years).
Application technique significantly impacts finish longevity. Prepare surfaces by sanding rough spots and cleaning with a pressure washer (using low pressure to avoid wood damage). Apply finishes during dry conditions with temperatures between 50-85°F. Use quality exterior brushes or sprayers for even coverage. Apply two coats for optimal protection, allowing proper drying time between applications per manufacturer recommendations.
Caulking seals gaps between boards and around window/door frames, preventing water infiltration. Use exterior-grade caulk (typically silicone or acrylic latex) applied with a caulking gun. Smooth caulk lines with a wet finger to ensure proper adhesion and aesthetics. Quality caulking extends wood life by preventing water penetration at joints.
Interior finishing depends on intended use. For recreational spaces, sealed plywood or hardwood flooring provides durable walking surfaces. For storage-focused structures, simply seal the subfloor with polyurethane. Paint interior walls to reflect light and improve aesthetics. Insulation becomes essential if you plan year-round use—typically 3.5-6 inches of fiberglass or mineral wool batts in wall cavities and 6-12 inches in attic spaces.
Moisture barriers prevent condensation and water infiltration. Install house wrap or tar paper beneath external cladding, creating a breathable layer that allows trapped moisture to escape while preventing rain penetration. This secondary moisture defense proves invaluable in humid climates or during heavy precipitation events.
Maintenance for Long-Term Durability
Regular maintenance preserves your fort’s structural integrity and appearance. Inspect annually for signs of damage, including wood rot, insect damage, fastener corrosion, or roof deterioration. Check for soft spots by pressing a screwdriver firmly into wood—resistance indicates healthy material, while easy penetration suggests decay requiring replacement.
Clean gutters and downspouts twice yearly (spring and fall) to prevent water backup and overflow. Remove debris from roof surfaces to prevent moisture trapping. Inspect caulking annually and recaulk as needed when gaps appear. Reapply finish coatings according to manufacturer recommendations—typically every 5-7 years for stains and every 3-5 years for paints.
Address repairs promptly. Replace rotted wood sections immediately, as decay spreads rapidly and compromises structural integrity. Tighten loose fasteners and replace corroded hardware. These simple maintenance tasks cost far less than major structural repairs resulting from deferred maintenance.
Seasonal preparations protect against weather extremes. Before winter, ensure proper roof drainage and inspect for ice dam potential. Remove heavy snow accumulation to prevent excessive loading. Before summer, verify that ventilation systems function properly to prevent heat buildup.
If you’re interested in expanding your fort with additional features, explore building techniques from related projects like how to build a barn door for attractive entry systems, or how to build a bar for interior entertaining spaces. You might also reference how to build a drawer for creating storage solutions within your fort structure.
For comprehensive DIY guidance across multiple projects, the DIY Nests Hub Blog provides extensive resources and project inspiration.
FAQ
Do I need a building permit for a backyard fort?
Permit requirements vary by jurisdiction. Most areas require permits for structures exceeding 200 square feet or positioned within specific setback distances from property lines. Contact your local building department to determine requirements for your specific project. Obtaining permits ensures your design meets safety codes and provides liability protection.
What’s the best wood type for outdoor fort construction?
Pressure-treated lumber offers the best value for cost-conscious builders, providing 15-20 years of rot resistance. Cedar and redwood provide superior aesthetics and natural decay resistance but cost significantly more. For maximum longevity (40+ years), consider tropical hardwoods like ipe or cumaru, though these command premium pricing and require specialized cutting tools.
How deep should foundation posts be buried?
Posts should extend below the frost line—typically 36-42 inches in cold climates, 24-30 inches in moderate climates, and 12-18 inches in warm regions. Below the frost line, soil remains stable year-round, preventing frost heave that causes settling and structural damage. Consult your local building department for specific frost line depths in your region.
What roof pitch is best for a backyard fort?
Roof pitch depends on your climate. Areas with heavy snow require steeper pitches (8:12 or greater) to shed snow quickly and reduce loading. Moderate climates can use 6:12 or 7:12 pitches. Warm, dry climates can utilize shallow pitches (4:12 or less). Steeper pitches also improve aesthetics for many designs.
How often should I refinish my fort’s exterior?
Reapply finish coatings every 5-7 years for stains and every 3-5 years for paints, depending on local climate and UV exposure. Monitor finish condition annually—when wood appears dull or grayed, recoating is due. Proper maintenance extends wood life and prevents costly structural repairs from water damage.
Can I build a fort on a slope?
Yes, but slope construction requires additional engineering. Posts must be adjusted to different heights, or a stepped foundation must be created. Ensure proper drainage around the foundation to prevent water accumulation. For slopes exceeding 1:4 (one foot drop per four feet horizontal), consult a structural engineer to ensure stability.
What ventilation is necessary for a covered fort?
Adequate ventilation prevents moisture accumulation and extends structure life. Install soffit vents along eaves and ridge vents along roof peaks, creating continuous air circulation. Typically, 1 square foot of vent area per 150 square feet of roof space provides adequate ventilation. For enclosed structures with potential condensation issues, consider additional ventilation or dehumidification.
How do I prevent rot in my wooden fort?
Prevent rot through proper material selection (pressure-treated or naturally rot-resistant woods), adequate ventilation, proper drainage, and regular maintenance. Install moisture barriers beneath cladding, maintain gutters and downspouts, and reapply protective finishes regularly. Address any water intrusion immediately to prevent rot development.


