How to Change a Bike Tire: Cyclist-Approved Guide
Learning how to change a bike tire is one of the most essential skills every cyclist should master. Whether you’re commuting to work, enjoying a leisurely weekend ride, or tackling challenging mountain trails, a flat tire can happen to anyone at any time. Rather than being stranded on the side of the road or paying for expensive repair services, knowing how to change your tire yourself puts you in control and keeps you moving forward.
This comprehensive guide walks you through the entire process with step-by-step instructions, expert tips, and troubleshooting advice. We’ll cover everything from identifying what type of tire you have to the final inflation check, ensuring you’re equipped to handle any flat situation with confidence. Like other essential DIY car repairs and maintenance tasks, mastering bike tire changes empowers you to save money and develop valuable self-sufficiency.
Tools and Materials You’ll Need
Before you encounter a flat tire on the road, gather the essential tools and materials required for the job. Having these items readily available in your bike bag or home workshop ensures you’re never caught unprepared. The good news is that most tools are inexpensive and lightweight, making them easy to carry on your rides.
Essential Tools:
- Tire levers – Plastic or metal tools that help pry the tire bead away from the rim without damaging the wheel
- Bicycle pump – Either a floor pump for home use or a portable hand pump for roadside repairs
- New inner tube or patch kit – Depending on whether you’re replacing or repairing the tube
- Wrench or Allen key – To remove wheel axle nuts or quick-release levers
- Valve adapter – If your pump doesn’t match your valve type (Presta or Schrader)
- Sandpaper or roughening tool – Included in most patch kits for surface preparation
Store these items in a dedicated bike repair kit bag or saddle bag. Many cyclists keep duplicate tools at home and in their portable kit. This redundancy ensures you can handle emergencies whether you’re at home or miles away from assistance. Quality tire levers and a reliable pump are investments that will serve you for years, similar to how investing in proper home security systems protects your property long-term.
Understanding Your Tire and Tube Types
Before you begin the tire-changing process, identify your specific tire and tube configuration. Different bikes use different valve types and tire sizes, and using the wrong replacement can create safety hazards or prevent proper installation.
Valve Types:
- Schrader valves – Wider, similar to car tire valves; commonly found on mountain bikes and casual bicycles
- Presta valves – Narrower, with a locking nut at the top; typical on road bikes and high-performance bicycles
- Dunlop valves – Less common in modern bikes but found on some vintage or European models
Check your bike’s rim to determine which valve type your wheels accommodate. The rim hole size differs between valve types, so purchasing the wrong inner tube will make installation impossible. Your tire’s sidewall displays the tire size (such as 700x28c for road bikes or 26×2.0 for mountain bikes), and this measurement is crucial when selecting replacement tubes or tires.
Understanding tire pressure requirements is equally important. The recommended pressure range is printed on your tire’s sidewall, typically ranging from 40 to 130 PSI depending on tire width and bike type. Road bikes with narrow tires require higher pressures, while wider mountain bike tires operate at lower pressures for better traction and comfort.
Removing the Wheel and Damaged Tire
The first step in changing your tire is safely removing the wheel from your bicycle frame. This process differs slightly between front and rear wheels, and between bikes with quick-release levers versus bolt-on axles.
Quick-Release Wheel Removal:
- Flip your bike upside down so it rests on the handlebars and seat, or use a bike stand for stability
- Open the quick-release lever on the wheel axle by flipping it outward
- For the rear wheel, shift into the smallest chainring to create slack in the chain
- Lift the wheel away from the frame; the rear wheel may require lifting the chain off the smallest sprocket
- Set the wheel on a clean surface away from dirt and debris
Bolt-On Axle Removal:
- Use the appropriate wrench or Allen key to loosen the axle nuts on both sides
- Remove the nuts completely and set them in a safe location where they won’t roll away
- Pull the wheel away from the frame with steady, even pressure
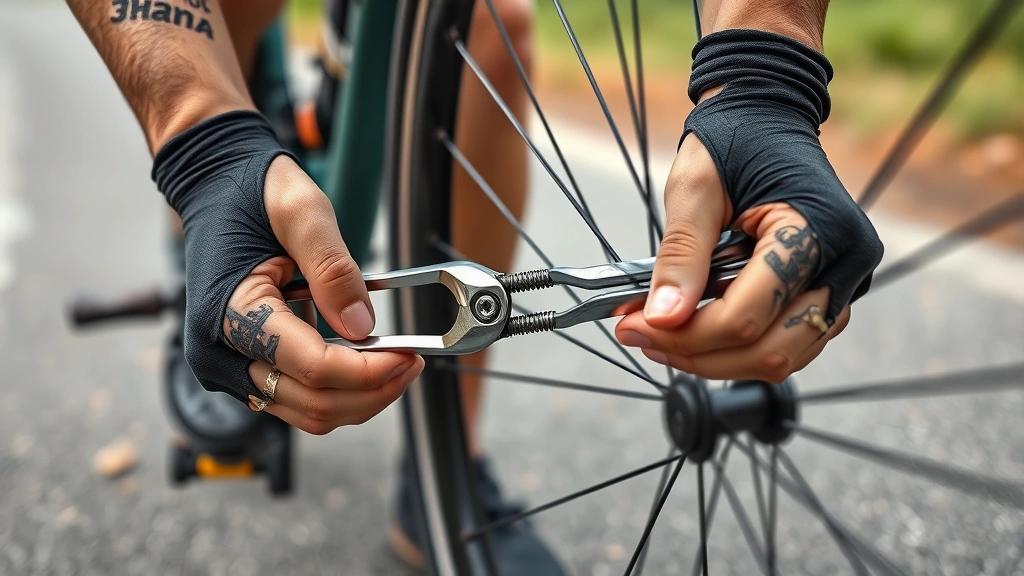
Once the wheel is removed, locate the tire valve and press it gently to release any remaining air pressure. Use your tire levers to break the bead (the edge where the tire meets the rim) by inserting the lever under the tire about six inches from the valve and prying it outward. Work your way around the tire, spacing the levers about 12 inches apart, until the entire bead separates from the rim.
Insert a tire lever under the tire bead and hook it to a spoke to hold it in place. Work a second lever around the rim to peel the tire away completely. Once one side is free, you can reach inside and pull out the damaged inner tube. Inspect the tire interior carefully for thorns, glass, or sharp objects that caused the puncture. Use your fingers or a rag to clean the rim thoroughly, removing any debris that could puncture the new tube.
Installing the New or Repaired Tire
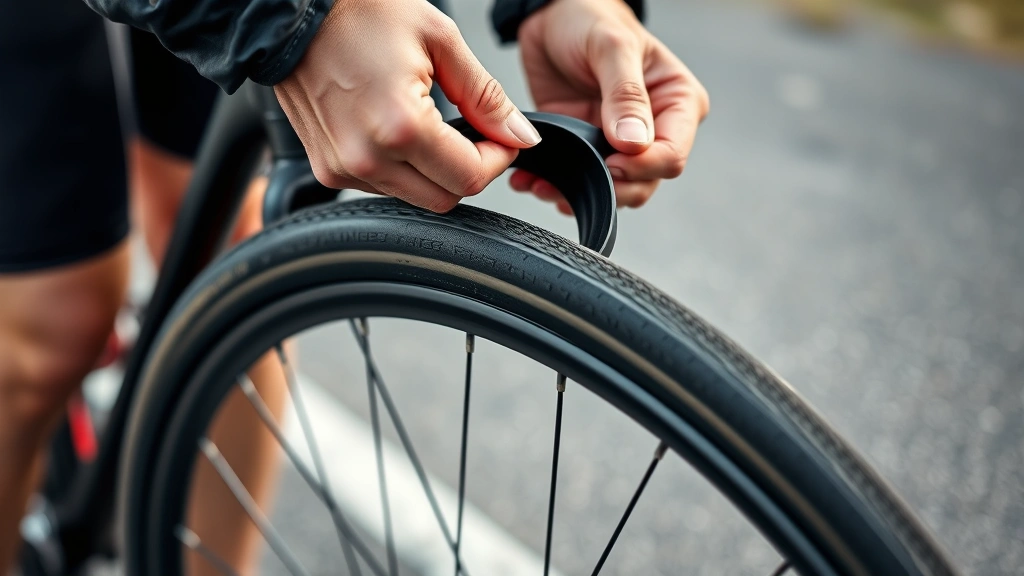
” alt=”Cyclist installing new inner tube into bike tire rim during roadside repair”/>
Before installing the replacement tube, perform a critical safety check on the tire itself. Inspect the entire interior surface by running your fingers along it carefully, feeling for any sharp objects embedded in the rubber. Check the sidewalls and tread area thoroughly. If you’re reusing the same tire (when only the tube was damaged), this inspection is especially important. If you find damage to the tire itself—such as cuts, bulges, or severe wear—replace the tire rather than just the tube, as a damaged tire can fail suddenly and cause accidents.
Partially inflate the new inner tube with a few pump strokes. This gives it enough structure to install without twisting or pinching. The tube should hold its shape but remain soft enough to position easily. Insert the valve through the rim hole first, then work the tube around the inside of the tire, ensuring it sits evenly without bunching or overlapping.
Begin seating the tire bead back onto the rim opposite the valve. Use your hands rather than tools when possible to avoid damaging the new tube. Work the tire bead back onto the rim gradually, moving around the wheel in both directions toward the valve. The last section near the valve will be the tightest; push the valve stem up into the rim to create slack, then work the final section of tire bead onto the rim.
Once the tire is fully seated, check that the tube isn’t pinched between the tire and rim. Look at the rim line (a thin line molded into the tire) all the way around the wheel—it should sit evenly on the rim with no bulges or dips. Pinched tubes are a common cause of immediate flat tires after repair.
Proper Inflation and Safety Checks

” alt=”Bicycle pump inflating tire to proper pressure with pressure gauge visible”/>
Proper inflation is critical for safety, performance, and tire longevity. Underinflated tires increase rolling resistance, reduce efficiency, and make pinch flats more likely. Overinflated tires provide a harsh ride, reduce traction, and may burst unexpectedly. Always inflate to the pressure range specified on your tire’s sidewall, using a pump with a reliable pressure gauge.
Insert the pump head onto the valve, ensuring a tight seal. For Presta valves, unscrew the locking nut at the top first, then open it by turning counterclockwise. Inflate slowly and steadily, checking the pressure periodically. Stop when you reach the middle of the recommended pressure range—for example, if the range is 80-100 PSI, aim for 90 PSI. This provides a safety margin in both directions.
Remove the pump carefully and check the valve connection for leaks. A small hiss is normal; persistent air escape indicates a loose connection. For Presta valves, turn the locking nut clockwise to close it. Press the valve tip gently to verify it holds pressure.
Pre-Ride Safety Checks:
- Spin the wheel freely – Ensure it rotates smoothly without rubbing on the frame or brake pads
- Check rim alignment – Sight along the rim to verify it’s not bent or twisted
- Verify brake function – Squeeze brake levers to confirm proper engagement
- Inspect the tire visually – Look for bulges, cuts, or misalignment of the bead
- Reinstall the wheel securely – Ensure quick-release levers are fully closed or bolts are tight
Reinstall the wheel in reverse order of removal. For quick-release wheels, ensure the lever closes with moderate resistance—it should require deliberate pressure but not be so tight that it’s difficult to operate. For bolt-on wheels, tighten both axle nuts evenly and firmly. Take a short test ride in a safe area before returning to normal cycling to confirm everything is working properly.
Common Problems and Solutions
Even experienced cyclists encounter challenges when changing tires. Understanding common issues and their solutions helps you resolve problems quickly and safely.
Tire Won’t Seat on Rim: This usually occurs when the tire bead is twisted or the tube is pinched underneath. Deflate completely, reposition the tube to sit evenly, and try again. Apply a small amount of soapy water to the bead to help it slide onto the rim more easily. Some tire-rim combinations are notoriously tight; patience and persistence are essential.
Valve Leaks After Installation: The valve may not be fully inserted into the rim hole, or the connection may be loose. Deflate the tire, check that the valve stem goes completely through the rim, and reinflate. If leaking persists, the valve itself may be damaged and the tube should be replaced.
Puncture Occurs Shortly After Repair: This indicates either a pinched tube during installation, a sharp object still in the tire, or damage to the tire itself. Remove the wheel again and inspect thoroughly. Look for the characteristic two-hole pattern that indicates a pinch flat—one hole on each side of the tube. If you find this, the tube was compressed between the tire and rim, and you’ll need to reinstall more carefully.
Pump Won’t Connect to Valve: Ensure you’re using the correct adapter for your valve type. Presta and Schrader valves require different pump heads. Some pumps have reversible heads that accommodate both types. If the pump head is correct but won’t seat properly, the valve may be bent or damaged.
Difficulty Removing Old Tire: If tire levers aren’t prying the bead away from the rim, you may need additional leverage. Use longer levers, space them closer together (every 4-6 inches instead of 12), or apply steady pressure rather than sudden jerking motions. For particularly stubborn tires, let the wheel sit for a few minutes—sometimes the bead relaxes slightly, making removal easier.
Preventive Maintenance Tips
Reducing the frequency of flats through preventive maintenance saves time and frustration. Regular care extends tire life and identifies problems before they cause failures.
Tire Inspection: Examine your tires weekly for embedded debris, cracks, or worn areas. Remove any thorns, glass, or sharp objects immediately with tweezers or needle-nose pliers. Look for bald spots or thin areas in the tread, which indicate the tire is approaching end-of-life and should be replaced soon.
Pressure Maintenance: Check tire pressure before every ride. Tires lose pressure gradually over time, even without punctures. A tire that was properly inflated last week may be 5-10 PSI lower this week. Maintaining proper pressure significantly reduces flat tire risk and improves ride quality and efficiency.
Tire Rotation and Replacement: Rotate tires between wheels periodically to even out wear patterns. Front tires typically wear faster than rear tires due to braking and steering forces. Replace tires when the tread is worn smooth or when sidewalls show signs of damage. Most quality tires last 2,000-5,000 miles depending on riding conditions and style.
Puncture-Resistant Products: Consider using puncture-resistant tires if you frequently encounter flats in your area. These tires incorporate special layers or compounds that resist penetration. Alternatively, Bicycling magazine reviews tire liners and sealants that provide additional protection. Tubeless tire systems with sealant can self-heal small punctures automatically.
Rim Tape Inspection: Ensure rim tape is intact and properly covering all spoke holes. Damaged rim tape allows the tube to contact sharp spoke ends, causing pinch flats. Replace rim tape if it’s cracked, peeling, or missing sections. Use quality cloth tape rather than cheap plastic alternatives for better durability.
Think of tire maintenance similarly to how you’d maintain other important systems—consistent care prevents emergency repairs. Just as home improvement projects benefit from planning, your cycling enjoyment improves with proactive tire care.
FAQ
What’s the difference between patching a tube and replacing it?
Patching works for small punctures in the tube itself and costs less, but it’s a temporary solution. Replacement is more reliable for roadside repairs and ensures you won’t experience another flat shortly after. Always carry a spare tube for long rides; patches are backup solutions. For learning more about making smart repair decisions, explore our DIY Nests Hub Blog for comprehensive guidance on various projects.
Can I use a different valve type than my rim requires?
No. The rim hole diameter is specific to each valve type. Using an incompatible valve may result in air leaks or inability to install the tube properly. Always match the valve type to your rim. If you need to change valve types, you’ll need new rims or use adapters, though adapters aren’t ideal for regular use.
How tight should the quick-release lever be?
The lever should require deliberate force to close but shouldn’t be so tight that it’s painful or requires a wrench. A properly adjusted quick-release closes with moderate resistance and creates a slight indentation on your palm. If it’s too loose, the wheel can come off during riding, creating a serious safety hazard.
Why does my new tire feel softer than it should despite proper inflation?
New tires sometimes feel softer because the tire material itself is more flexible than worn tires. This is normal and doesn’t indicate underinflation. Check the pressure with a gauge to verify it matches the recommended range. Additionally, the ride quality changes as the tire breaks in over the first 50-100 miles.
Is it safe to ride with a patched tube?
Yes, if the patch is applied correctly to a clean, roughened surface and allowed to cure fully (follow patch kit instructions). However, patches are temporary solutions best suited for getting home or to a bike shop. For regular riding, a replacement tube is more reliable. Some cyclists carry patches as emergency backup.
What should I do if I get multiple flats in the same area?
Multiple flats in one location suggest either debris embedded in the tire or a rim problem. Inspect the tire interior extremely carefully, running your fingers along the entire surface. Check the rim for burrs, cracks, or protruding spoke ends. If the rim tape is damaged, replace it. Consider switching to puncture-resistant tires if the area is particularly hazardous.
Can I change a tire without tire levers?
It’s possible but difficult and risks damaging the tire or rim. Tire levers are inexpensive (typically $5-15 for a quality set) and essential tools. Learning how to change a tire includes having proper tools, similar to how changing settings in software requires understanding the right menus and options. Invest in quality tire levers before you need them.
How do I know if my tire needs replacement rather than just a new tube?
Replace the tire if you find cuts longer than a quarter-inch, bulges in the sidewall, repeated punctures in the same spot, or visible wear through the tread to the underlying fabric. Small punctures in the tread can often be repaired with the tube replacement, but tire damage requires tire replacement for safety.


