How to Change Your Oil: Mechanic-Approved Steps
Learning how to change your oil is one of the most fundamental DIY car maintenance skills you can master. Regular oil changes are essential for keeping your engine running smoothly, extending vehicle longevity, and maintaining warranty coverage. Whether you drive a sedan, truck, or SUV, this straightforward process can save you hundreds of dollars annually while giving you confidence in your vehicle’s care. Many mechanics agree that owner-performed oil changes demonstrate proper vehicle stewardship and often catch other potential issues before they become expensive problems.
This comprehensive guide walks you through every step of the oil change process, from preparation and safety precautions to disposal and maintenance tracking. By following these mechanic-approved procedures, you’ll understand exactly what’s happening under your vehicle and develop skills that complement other DIY car repairs for beginners. Even if you’ve never performed this task before, our detailed instructions make the process accessible and safe.
Gathering Your Supplies and Tools
Before you start, assembling all necessary materials ensures a smooth, uninterrupted process. You’ll need the correct grade and quantity of motor oil for your specific vehicle—check your owner’s manual for the exact specification, typically listed as 5W-30, 10W-40, or similar ratings. Most vehicles require between 4 to 6 quarts for a complete oil change. Purchase a new oil filter that matches your vehicle’s make and model; using an incorrect filter can compromise engine protection and cause leaks.
Essential tools include a socket wrench set (typically 14mm, 15mm, or 17mm for drain plugs), an oil filter wrench for removing the old filter, and a drain pan with at least 8-quart capacity. You’ll also want jack stands or ramps to safely elevate your vehicle, ensuring adequate clearance under the engine. Gather old towels or shop rags for cleanup, a flashlight or work light for visibility, and safety glasses to protect your eyes from drips and splashes. A funnel designed for oil changes prevents spills and mess when adding fresh oil.
Don’t forget protective equipment: disposable gloves rated for oil contact, and wear clothes you don’t mind getting dirty. Have a waste oil container ready for disposal—never pour used oil down drains or into soil. Many auto parts stores accept used oil for free, making proper disposal convenient and environmentally responsible. Organizing these items before starting prevents frustration and keeps you focused on executing each step correctly.
Safety Preparation and Vehicle Setup
Safety is paramount when working under a vehicle. Start by parking on a level, solid surface away from traffic—a garage or flat driveway works perfectly. Engage the parking brake and turn off the engine, allowing it to cool for several minutes. Warm engines are preferable for oil flow, but extremely hot engines can cause severe burns. A good compromise is warming the engine for 2-3 minutes by running it, then letting it cool slightly.
Never rely solely on a jack to hold your vehicle. Always use jack stands rated for your vehicle’s weight, positioned on the frame or reinforced points specified in your owner’s manual. Place wheel chocks behind the rear wheels to prevent rolling. If using ramps instead, ensure they’re rated for your vehicle weight and positioned on level ground. Take time to verify stability before crawling underneath—this crucial step prevents serious injury.
Locate the oil drain plug underneath your engine, typically a bolt on the oil pan’s lowest point. Identify your oil filter location—usually mounted on the engine block’s side. Familiarize yourself with both locations before starting work. Consult your owner’s manual or an online service manual if you’re unsure; different vehicles have different layouts. Having a clear mental map prevents confusion and keeps you working efficiently and safely.
The Oil Draining Process
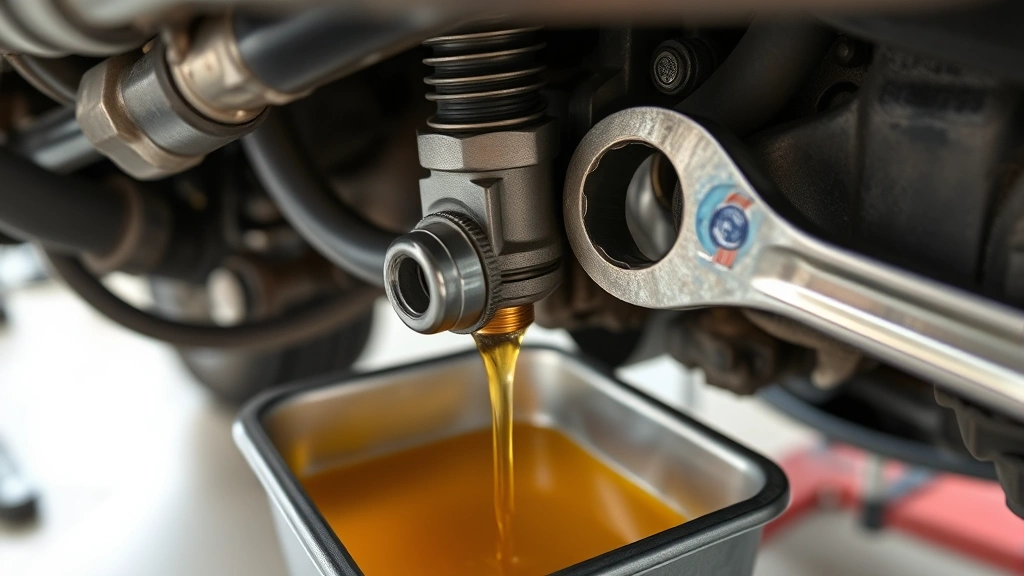
Position your drain pan directly under the drain plug—old oil flows downward quickly and can splash. Using your socket wrench, slowly loosen the drain plug by turning counterclockwise. Once hand-tight, carefully unscrew it the final few turns, allowing oil to drip into the pan. The oil will be hot if you warmed the engine, so work deliberately and avoid touching the plug or surrounding metal surfaces. Let the oil drain completely, which typically takes 5-10 minutes. You’ll notice the flow decreasing as the pan fills; some mechanics let it drain for longer to ensure complete evacuation.
While waiting for drainage, inspect the drain plug for damage or wear. If the plug has a rubber washer or crush washer, replace it with a new one—reusing old washers often causes leaks. Clean the drain plug with a cloth, removing any metal shavings or debris that accumulated since the last oil change. These particles indicate normal engine wear but shouldn’t be ignored; excessive shavings suggest deeper mechanical issues worth investigating.
Once oil has stopped dripping, carefully wipe the drain plug clean and reinstall it, hand-tightening initially to avoid cross-threading. Using your wrench, tighten it to the manufacturer’s specification—typically 25-35 foot-pounds of torque. Don’t overtighten; excessive force strips threads and causes persistent leaks. If you hear a crackling sound while tightening, stop immediately; you’ve likely cross-threaded the plug and should remove it carefully to reset. Proper installation of this single component prevents frustrating leaks that can damage your driveway and waste precious oil.
Replacing Your Oil Filter
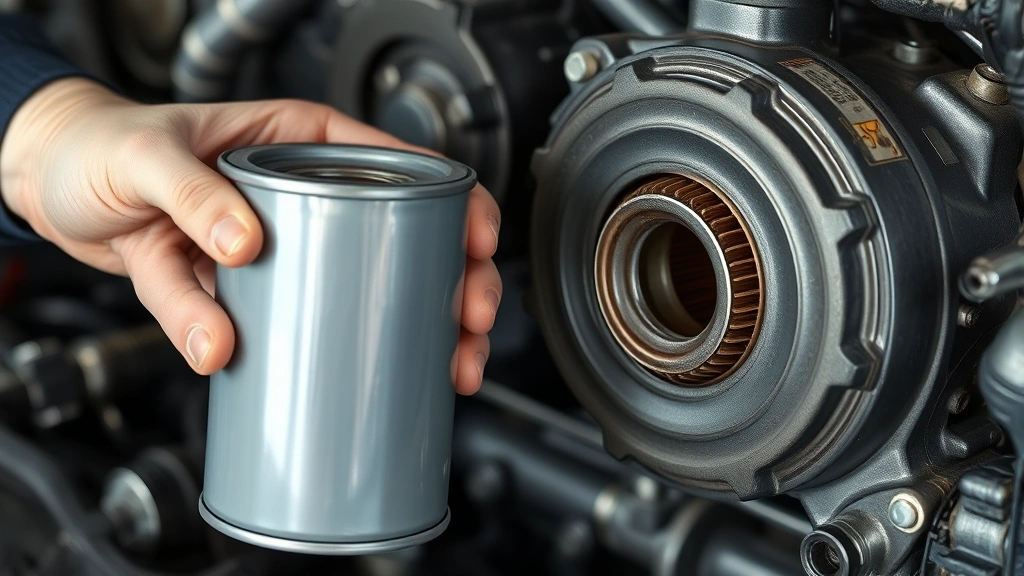
Locate your oil filter, which appears as a cylindrical canister on the engine’s side. Slide your drain pan underneath it to catch residual oil. Using an oil filter wrench, grip the filter firmly and turn counterclockwise. Filter wrenches come in various styles—band wrenches, cup wrenches, and pliers-style wrenches all work effectively. Turn slowly and steadily; rushing causes the filter to slip or collapse. Once loose, carefully unscrew the filter by hand, keeping the pan positioned to catch the old oil inside.
Inspect the filter’s rubber gasket—the seal that sits against the engine. This gasket should come off with the old filter. If it remains on the engine, remove it carefully; installing a new filter over an old gasket prevents proper sealing and causes leaks or pressure issues. Wipe the filter mounting surface clean with a cloth, removing any debris or old gasket residue. This creates a clean surface for the new filter’s gasket to seat properly.
Before installing the new filter, apply a thin layer of fresh oil to its rubber gasket. This ensures proper sealing and makes future removal easier. Screw the new filter onto the engine by hand, turning until the gasket contacts the surface. Then turn an additional 3/4 turn—not more. This moderate tightness creates a secure seal without overtightening, which damages the gasket and makes removal difficult next time. Some filters have tightening specifications marked on their label; follow those guidelines if provided. Proper filter installation prevents leaks and ensures your engine receives clean oil throughout the change interval.
Refilling and Checking Oil Levels
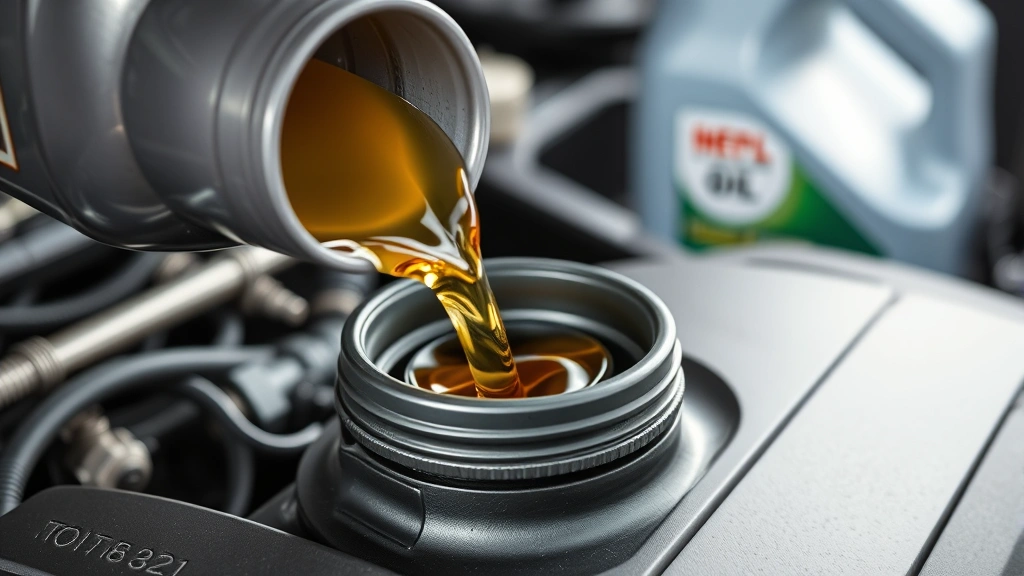
Locate your oil filler cap on top of the engine—it’s typically marked with an oil can symbol. Twist it counterclockwise and remove it, setting it somewhere clean. Insert your oil funnel into the opening, ensuring it fits securely. Begin pouring your new oil slowly and steadily into the funnel. Pour most of the recommended quantity, then pause to check the level. This staged approach prevents overfilling, which causes excessive pressure, leaks, and engine damage.
After adding most of the oil, replace the filler cap and wait a minute for oil to settle in the pan. Then remove the dipstick—a long rod with markings indicating minimum and maximum levels. Wipe the dipstick clean with a cloth, then reinsert it fully. Remove it again and check the level; the oil should reach the maximum line or fall between minimum and maximum marks. If low, add more oil in small increments, rechecking after each addition. Getting this right prevents engine damage from running too low or too high.
Overfilled engines experience pressure buildup, seal failure, and oil leaks. Underfilled engines suffer inadequate lubrication, increased friction, and accelerated wear. Take time to get this measurement exactly right. Some modern vehicles have electronic oil level sensors instead of dipsticks; consult your owner’s manual for checking procedures on these vehicles. Once satisfied with the level, secure the filler cap firmly and wipe up any spills with your cloth.
Proper Disposal and Maintenance Records
Lower your vehicle carefully using your jack, ensuring it descends evenly. Remove jack stands only after the vehicle rests fully on the ground. Start the engine and let it run for several minutes, checking your dashboard for warning lights. The oil pressure light should illuminate briefly at startup, then extinguish within seconds. If it remains lit, turn off the engine immediately and investigate the problem—likely causes include low oil level, incorrect filter installation, or clogged oil passages.
Inspect underneath your vehicle for leaks around the drain plug and filter area. Minor seeping is normal during the first few minutes; significant dripping indicates installation problems. Address any leaks before driving. Once satisfied everything works correctly, turn off the engine and let it cool for several minutes before checking the oil level one final time. Some oil remains in the pan during shutdown; rechecking after cooling gives an accurate final measurement.
Never dispose of used oil in household trash or pour it down storm drains. Used motor oil contains toxic compounds harmful to aquatic life and groundwater. Most auto parts retailers accept used oil containers for free recycling, as do many municipal hazardous waste facilities. Some mechanics and quick-lube shops accept oil from DIY customers for proper disposal. Call ahead to confirm acceptance and any container requirements.
Maintain detailed records of your oil changes, including the date, mileage, oil grade used, and filter type. These records prove you’ve performed required maintenance, which protects your vehicle’s resale value and demonstrates proper care to potential buyers. Many owner’s manuals include maintenance log pages for this purpose. Modern vehicles often track maintenance electronically, but manual records provide backup documentation. Record keeping takes moments but provides valuable reference information for future repairs and warranty claims.
Consider setting phone reminders or calendar notifications for your next oil change interval—typically every 3,000 to 10,000 miles depending on your vehicle and oil type. Synthetic oils often extend intervals compared to conventional oils. Consult your owner’s manual for the specific recommendation for your vehicle. Regular oil changes protect your engine investment and keep your vehicle running smoothly for years to come. Mastering this skill complements other maintenance tasks like learning to change a tire, building comprehensive vehicle care knowledge.
FAQ
How often should I change my oil?
Oil change intervals vary by vehicle and oil type. Conventional oil typically requires changes every 3,000 to 5,000 miles, while synthetic oils can extend intervals to 7,500 to 10,000 miles or more. Always consult your owner’s manual for manufacturer recommendations, as some modern vehicles specify longer intervals. Severe driving conditions—towing, frequent short trips, or extreme temperatures—may require more frequent changes.
Can I change my oil in cold weather?
Cold weather complicates oil changes because cold oil flows slowly and becomes thick. If possible, warm your engine first by running it for a few minutes, which thins the oil and promotes drainage. Never work under a vehicle on icy surfaces; ensure stable, level ground and use proper safety equipment. Cold oil changes take longer but are perfectly safe with patience and proper precautions.
What if I accidentally overfill the oil?
If you add too much oil, don’t panic. Turn off the engine and let it cool completely. Remove the dipstick and carefully siphon out excess oil using a clean tube or specialized oil extractor tool. These inexpensive tools remove oil without lowering the vehicle or accessing the drain pan. Rechecking the level frequently during removal prevents creating a new under-filled situation. Proper oil level is critical for engine health.
How do I know if my oil filter is installed correctly?
After installing the new filter, start your engine and check for leaks around the filter’s base. A properly installed filter shows no drips or seeping. If you notice leaking, turn off the engine immediately and tighten the filter slightly—often a quarter turn resolves the issue. Recheck after running the engine again. If leaking persists, remove the filter and inspect whether the old gasket remained on the engine; this common mistake causes filter leaks.
Is synthetic oil better than conventional oil?
Synthetic oils offer advantages including longer drain intervals, better performance in extreme temperatures, and improved engine protection. However, they cost more than conventional oils. Many modern vehicles specify synthetic or synthetic-blend oils for optimal performance. Your owner’s manual indicates the appropriate oil type for your vehicle. Some vehicles require synthetic oil; others accept either type. Follow manufacturer specifications rather than assuming one type is universally better.
Can I change my oil without a lift or ramps?
Changing oil on flat ground without elevation is possible but extremely difficult and unsafe. You need adequate clearance to access the drain plug and filter. Ramps or a jack with jack stands provide necessary height safely. Never crawl under a vehicle supported only by a jack—jack stands are essential safety equipment. If you lack proper lifting equipment, consider having a professional perform the service; safety should never be compromised for convenience.
What should I do with the old oil filter?
Old oil filters contain residual oil and should be disposed of properly. Some recycling centers accept them, and many auto parts stores will take them if you purchase a new filter from them. Some mechanics accept old filters for proper disposal. Never throw filters in regular trash. Drain any remaining oil from the filter into your waste oil container before disposal to minimize environmental impact.
How long does an oil change typically take?
A straightforward oil change usually takes 30 to 45 minutes for experienced DIYers, including setup, drainage, filter replacement, and refilling. First-time changers may require 60 to 90 minutes as they work carefully and double-check procedures. Taking your time ensures safety and proper execution. Rushing increases accident risk and potential mistakes that could damage your engine.


