Check ATF Fluid Level: Mechanic’s Guide
Automatic transmission fluid (ATF) is the lifeblood of your vehicle’s transmission system. Maintaining proper ATF levels is critical for smooth shifting, optimal hydraulic pressure, and preventing costly transmission damage. Whether you’re a seasoned mechanic or a dedicated DIY enthusiast, understanding how to check ATF fluid level correctly ensures your automatic transmission operates at peak performance. This comprehensive guide walks you through the process step-by-step, covering everything from preparation to troubleshooting common issues.
Your transmission relies on ATF not just for lubrication but also for power transmission, cooling, and clutch engagement. Low or contaminated fluid can lead to slipping gears, delayed engagement, overheating, and eventual transmission failure. Regular ATF level checks are a simple preventive maintenance task that takes only minutes but can save thousands in repair costs. This guide emphasizes safety, accuracy, and best practices used by professional mechanics worldwide.

Understanding ATF and Its Importance
Automatic transmission fluid serves multiple critical functions in your vehicle’s transmission system. Unlike engine oil, which primarily lubricates moving parts, ATF is a specialized hydraulic fluid engineered to transmit power, create pressure for gear engagement, cool internal components, and protect against wear and corrosion. Different vehicle manufacturers specify different ATF types—Dexron, Mercon, Chrysler ATF+4, and CVT fluids each have unique viscosity grades and additive packages designed for specific transmission designs.
The consequences of neglecting ATF levels extend far beyond simple lubrication failure. When ATF levels drop below the minimum mark, the transmission pump cannot maintain adequate hydraulic pressure, causing delayed shifts, harsh engagement, and slipping. Over time, this leads to increased friction, heat generation, and accelerated wear on transmission bands, clutches, and seals. Additionally, low fluid levels allow air to enter the hydraulic system, creating air pockets that compress unpredictably and cause erratic shifting behavior. Modern transmissions are precision-engineered systems where even a quart of fluid makes a measurable difference in performance.
Temperature management through ATF circulation is equally important. The transmission generates significant heat during operation, especially during towing, heavy acceleration, or city driving with frequent gear changes. ATF absorbs this heat and carries it to the transmission cooler (usually integrated into the radiator) where it dissipates. Insufficient fluid levels compromise this cooling function, allowing transmission temperatures to climb dangerously high and degrade the fluid’s protective properties.
Tools and Materials You’ll Need
Checking ATF fluid level requires minimal equipment, but using the correct tools ensures accurate readings and prevents damage to your transmission system. Here’s what you’ll need:
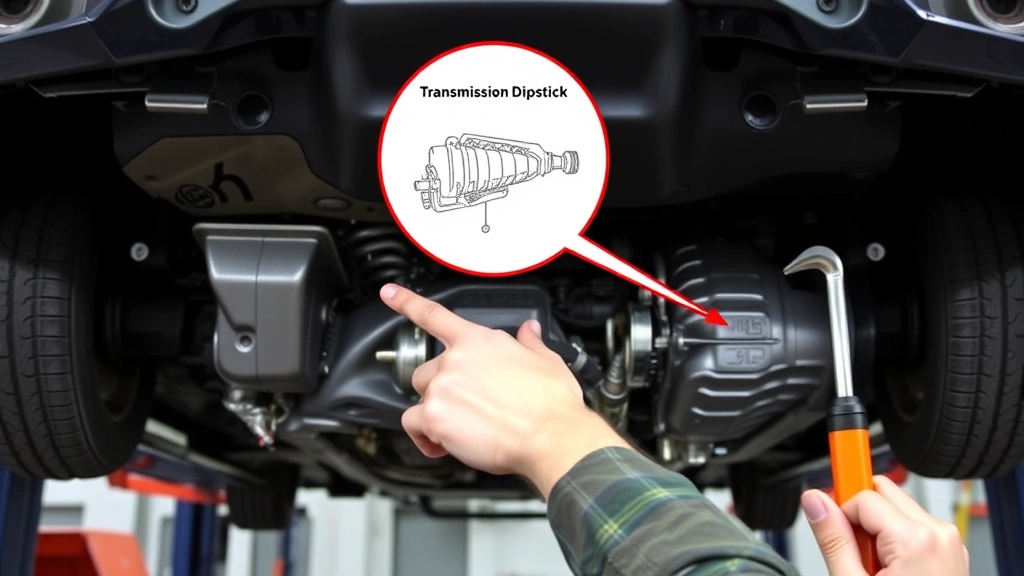
- Dipstick: The transmission dipstick is your primary measurement tool. Some vehicles have traditional pull-out dipsticks; others use electronic level sensors. Consult your owner’s manual to locate your transmission’s dipstick or access point.
- Clean lint-free cloth or paper towels: Use these to wipe the dipstick between measurements. Lint particles contaminating ATF can damage transmission components, so avoid using regular cloth that sheds fibers.
- Jack and jack stands (optional): Some vehicles require the transmission to be at a specific angle or lifted for accurate dipstick readings. Never rely solely on a floor jack—always use properly rated jack stands for safety.
- Funnel: If you need to add ATF, a transmission-specific funnel prevents spillage and keeps contaminants out of the fluid.
- Transmission fluid (correct type): Before purchasing, verify the exact ATF specification in your owner’s manual. Using incorrect fluid can cause shifting problems and transmission damage.
- Owner’s manual: Your vehicle’s manual contains manufacturer-specific instructions for checking ATF, including proper engine temperature, vehicle positioning, and acceptable fluid level ranges.
Safety equipment deserves special mention. Wear safety glasses to protect against splashing fluid, and nitrile gloves to keep ATF off your skin. Allow the engine adequate cool-down time before working underneath the vehicle—transmission fluid reaches operating temperatures of 200-250°F, causing severe burns on contact. If you’re unfamiliar with DIY car repairs, consider having a professional technician perform this check initially to learn proper procedure.
Preparation Steps Before Checking
Proper preparation is essential for accurate ATF level readings. Most manufacturers specify that ATF should be checked when the transmission fluid is at normal operating temperature (around 200°F), with the engine idling in Park on a level surface. This warm-fluid specification ensures the dipstick reading reflects actual operating conditions rather than cold-start viscosity variations.
Start by parking your vehicle on a completely level surface. Even a slight incline can cause inaccurate readings, as fluid pools toward the lower side of the transmission pan. If your driveway slopes, use a level tool to verify your vehicle is truly horizontal. Engage the parking brake and ensure the transmission is in Park (or Neutral for some vehicles—check your manual).
Warm up the engine to normal operating temperature by driving for 15-20 minutes. The engine coolant temperature gauge should reach the midpoint on the dash. This warming process is crucial because cold ATF is thicker and sits lower on the dipstick, giving false low readings. Conversely, ATF that’s too hot (above operating temperature) expands and reads higher than actual levels. If your transmission has recently been working hard (towing, highway driving), allow an additional 5-10 minutes of idle time for the fluid to stabilize.
Once the engine is warm, turn off the ignition and wait 2-3 minutes. This allows fluid that was circulating through the transmission cooler to return to the pan and settle. Some manufacturers specify checking while the engine is running at idle in Park—consult your specific manual. Never check ATF immediately after shutting down a hot engine, as fluid temperature continues rising momentarily before cooling begins.
Step-by-Step Checking Procedure
With your vehicle properly prepared, follow these precise steps to check ATF fluid level accurately:
- Locate the transmission dipstick: In most vehicles, the transmission dipstick is located near the engine’s back, often marked with a yellow or red handle. Some vehicles position it alongside the oil dipstick. Consult your owner’s manual if you cannot locate it. Modern vehicles with electronic transmission fluid level sensors may not have a traditional dipstick—these require specialized diagnostic equipment to check levels.
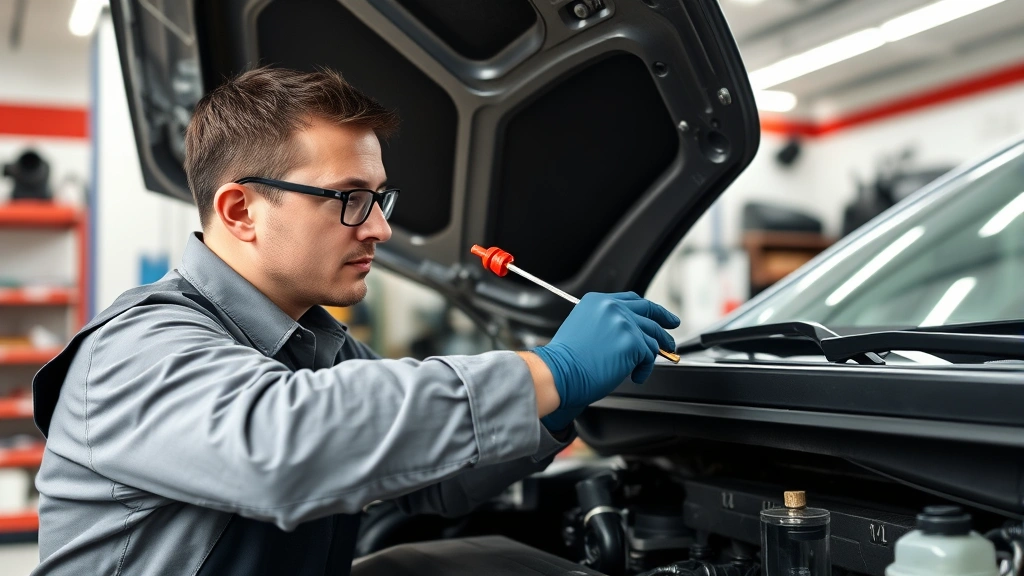
- Pull the dipstick straight out: Grasp the dipstick handle firmly and pull straight out with steady pressure. Twisting or angling can cause the dipstick to bind in its tube. If resistance is significant, rock it gently side-to-side while pulling.
- Wipe the dipstick completely: Using a clean, lint-free cloth, wipe the entire length of the dipstick. This removes old fluid residue and allows you to see the fresh fluid level clearly. Wipe from the tip toward the handle, not back and forth, to avoid re-depositing fluid.
- Reinsert the dipstick fully: Push the dipstick back into its tube until it seats completely. You should hear or feel a slight click or resistance as it reaches the bottom of the tube. Partial insertion gives inaccurate readings.
- Remove and read immediately: Pull the dipstick out again and read the fluid level immediately. The dipstick has two marks: minimum (ADD) and maximum (FULL). Your fluid should reach the FULL mark or fall between the two marks.
- Check fluid color and condition: While reading the level, observe the fluid’s appearance. Healthy ATF is bright red or amber (depending on type); dark brown or black fluid indicates oxidation and contamination requiring immediate fluid change.
If the level is below the minimum mark, you need to add ATF. Locate the transmission fluid filler cap (usually on top of the transmission) and carefully add the correct fluid type in small increments. Add approximately one-half to one quart, then wait a minute for it to settle into the pan before rechecking. This prevents overfilling, which is equally problematic as underfilling.
Interpreting Fluid Color and Condition
ATF color provides valuable diagnostic information about transmission health. Understanding these visual indicators helps you identify problems before they become expensive repairs:
Bright red or amber: This is the color of new, healthy ATF. Bright red fluid indicates the additives are still active and the fluid hasn’t oxidized. This is what you want to see.
Dark red or brown: Darkening indicates the fluid has oxidized and lost some protective properties. This typically occurs after 30,000-60,000 miles depending on driving conditions. While the transmission may still operate normally, consider scheduling a fluid change soon.
Dark brown or black: This indicates severe oxidation, thermal breakdown, or contamination. Black fluid smells burnt and has likely lost most of its protective additives. Transmission failure risk is significantly elevated—change the fluid immediately and have a professional inspect for internal damage.
Milky or cloudy: A milky appearance indicates water contamination, usually from coolant leaking into the transmission cooler or from moisture accumulation. This requires professional diagnosis and repair, as water promotes corrosion and reduces fluid’s hydraulic properties.
Burnt smell: A sharp, acrid smell indicates thermal breakdown. This occurs when transmission temperatures exceed the fluid’s thermal stability limit, usually from severe overloading, towing in hot conditions, or existing transmission problems. Have the transmission inspected professionally immediately.
Metallic shimmer or particles: Small amounts of fine metallic dust are normal wear particles. However, visible metal flakes indicate excessive internal wear and possible imminent transmission failure. Professional inspection is essential.
Common Mistakes to Avoid
Even experienced DIYers sometimes make errors when checking ATF. Avoiding these common mistakes ensures accurate readings and prevents transmission damage:
Checking cold fluid: The most frequent mistake is checking ATF without warming the engine. Cold fluid reads low on the dipstick, leading to unnecessary overfilling. Always warm the transmission to normal operating temperature.
Checking on an incline: Parking on even a slight slope causes fluid to shift, creating inaccurate readings. Always verify your vehicle is perfectly level using a level tool if necessary.
Overfilling the transmission: Excessive ATF creates pressure buildup, causes foaming, and can damage seals. Never fill above the FULL mark. Remember that fluid expands as it heats during operation.
Using incorrect fluid type: Mixing ATF types or using the wrong specification causes shifting problems, increased wear, and potential transmission failure. Always verify the exact type specified in your owner’s manual.
Contaminating the fluid: Allowing dirt, lint, or debris to enter during checking or refilling can cause transmission damage. Use lint-free cloths and keep all tools and containers clean.
Ignoring warning signs: Don’t dismiss burnt smells, dark fluid, or shifting problems as minor issues. These indicate transmission problems requiring professional attention.
Failing to consult the manual: Different vehicles have different checking procedures. Some require the engine running, others require it off. Some specify Park, others Neutral. Always follow your specific vehicle’s procedure.
When to Add or Change ATF
Understanding when to add fluid versus when a complete fluid change is necessary prevents unnecessary expense and ensures transmission longevity:
Adding fluid: If your level is between the minimum and maximum marks but slightly low, adding a half-quart or quart brings it to proper operating level. This is appropriate maintenance when fluid color is still healthy red/amber. However, if you’re adding fluid frequently (more than once per month), you likely have a leak requiring professional diagnosis.
Partial fluid change: If your ATF is moderately dark but not black, and you’re approaching your manufacturer’s recommended service interval (typically 30,000-60,000 miles depending on driving conditions), a fluid and filter change is appropriate. This removes accumulated wear particles and oxidized fluid while retaining some of the original fluid’s additives.
Complete fluid flush: If your ATF is dark brown or black, smells burnt, or shows signs of water contamination, a complete transmission fluid flush is necessary. This involves removing all old fluid from the pan and cooler lines, replacing the filter, and refilling with fresh fluid. Professional equipment that cycles new fluid through the transmission ensures complete contamination removal.
Consult your owner’s manual for manufacturer-recommended service intervals. Some newer vehicles specify longer intervals (100,000+ miles) due to improved fluid formulations, while others recommend more frequent changes, especially if the vehicle is used for towing or in severe driving conditions.
FAQ
How often should I check my ATF fluid level?
Check your ATF level at least monthly as part of regular vehicle maintenance. If you tow, drive in hot climates, or have an aging vehicle, check every two weeks. If you notice transmission performance changes, check immediately regardless of your normal schedule.
Can I check ATF with the engine off?
Some vehicles allow checking with the engine off, but most manufacturers specify checking with the engine running at idle in Park. Consult your owner’s manual for your specific vehicle’s procedure. Checking cold fluid always gives inaccurate low readings.
What happens if I overfill my transmission?
Overfilling causes excess pressure, foaming, seal damage, and shifting problems. If you accidentally overfill, have a professional remove the excess fluid immediately. Never operate the vehicle with overfilled transmission fluid.
Why is my ATF dark even with low mileage?
Premature darkening can indicate transmission overheating from towing, heavy traffic driving, or existing transmission problems. Have your transmission inspected by a professional, as dark fluid at low mileage suggests performance issues.
Can I mix different ATF types?
No. Mixing different ATF types can cause shifting problems, increased wear, and transmission damage. Always use the exact type specified in your owner’s manual. If you’re uncertain about previous fluid type, have a professional perform a complete fluid flush before adding new fluid.
Is transmission fluid leaking normal?
No. If you’re adding fluid monthly, you have a leak. Common leak sources include the pan gasket, dipstick seal, cooler lines, and shaft seals. Have a professional locate and repair leaks promptly, as transmission failure from low fluid levels is expensive.
How much does it cost to change ATF?
Partial fluid and filter changes typically cost $100-$300 depending on vehicle and shop rates. Complete transmission flushes cost $200-$500. Professional fluid changes are worthwhile investments compared to transmission repair costs of $1,500-$4,000+.
What’s the difference between transmission fluid and engine oil?
Transmission fluid is a specialized hydraulic fluid with different viscosity, additive packages, and properties than engine oil. Using engine oil in a transmission causes immediate damage. These fluids serve completely different functions and are not interchangeable.
External Resources:
SAE Automatic Transmission Fluid Standards
Automatic Transmission Service Group Technical Resources
NHTSA Vehicle Maintenance Guidelines
Motor Trend Automotive Technical Information
ALLDATA OEM Service Information Database
For additional DIY automotive knowledge, explore our DIY car repairs guide covering essential maintenance tasks. Learn how to use diagnostic tools like multimeters by reading our guide on checking amps using a multimeter, which helps you understand vehicle electrical systems. Visit the DIY Nests Hub Blog for more home and vehicle maintenance articles.


