How to Clean Aquarium: Expert Tips Inside
Maintaining a clean aquarium is essential for the health and longevity of your aquatic pets. A properly maintained tank creates a safe environment where fish and plants thrive, water chemistry remains balanced, and harmful bacteria are kept under control. Whether you’re a seasoned aquarium enthusiast or just starting your first tank, understanding the correct cleaning procedures will save you time, money, and potential fish health issues.
Aquarium cleaning isn’t just about aesthetics—it’s a critical component of responsible pet ownership. Regular maintenance prevents the buildup of toxic compounds like ammonia and nitrite, maintains adequate oxygen levels, and keeps your filtration system functioning at peak efficiency. This comprehensive guide walks you through every step of the process, from weekly spot cleanings to monthly deep cleanings, ensuring your aquatic ecosystem remains balanced and beautiful.
Why Regular Aquarium Cleaning Matters
Understanding the importance of aquarium maintenance helps you commit to a consistent cleaning schedule. Your tank’s ecosystem operates as a delicate balance between beneficial bacteria, fish waste, uneaten food, and decaying plant matter. When cleaning is neglected, waste accumulates and transforms into toxic compounds that endanger fish health. Regular maintenance prevents disease outbreaks and extends fish lifespan.
The nitrogen cycle—a fundamental process in all aquariums—relies on beneficial bacteria to convert ammonia into less toxic nitrite, then into nitrate. Excessive organic matter overwhelms this system, causing ammonia spikes that can kill fish within hours. Additionally, decaying food and waste reduce oxygen levels and create an environment where harmful bacteria flourish. A clean tank is a healthy tank.
Frequency of cleaning depends on tank size, fish load, and filtration capacity. Larger tanks with fewer fish require less frequent cleaning than small overcrowded tanks. However, even the best filters cannot eliminate the need for regular water changes and substrate maintenance. Most aquarium experts recommend weekly partial water changes of 20-30% combined with monthly deeper cleaning sessions.
Essential Tools and Supplies
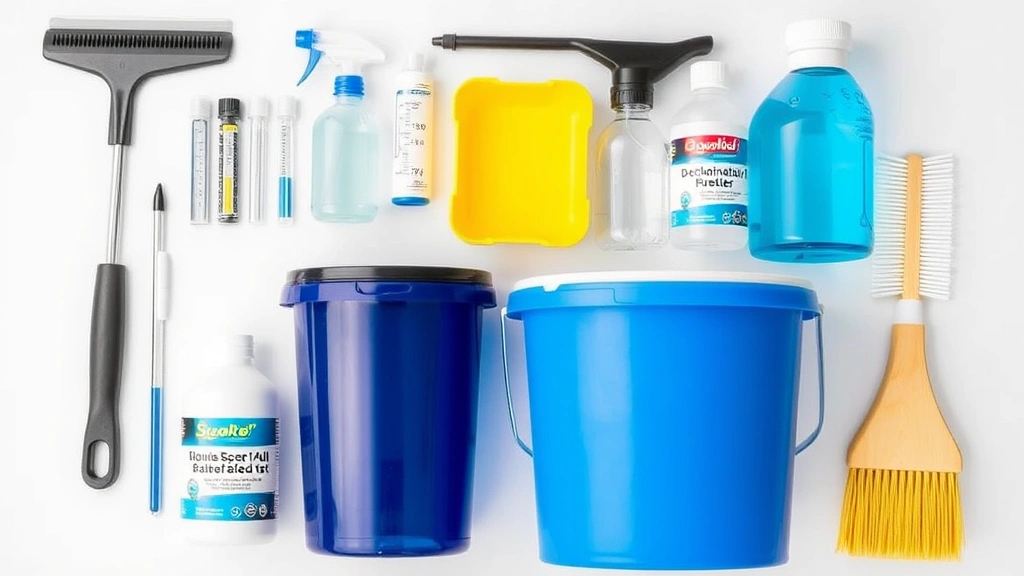
Before beginning any cleaning project, gather the proper tools. Having everything ready prevents interruptions and ensures you complete the job efficiently without stressing your fish. Here are the essential items you’ll need:
- Aquarium siphon or water changer: A dedicated aquarium siphon is crucial for removing water without harming fish. Never use household cleaning tools that may contain chemical residues.
- Algae scraper or brush: Specialized scrapers remove algae buildup from glass without scratching. Magnetic cleaners work excellently for glass tanks.
- Gravel vacuum: This tool simultaneously removes debris from substrate and extracts water, making it indispensable for tank maintenance.
- Filter cleaning supplies: Soft brushes and dedicated filter-cleaning containers prevent damage to beneficial bacteria colonies.
- Water test kit: Quality water testing equipment monitors ammonia, nitrite, nitrate, and pH levels.
- Buckets: Use dedicated aquarium buckets never exposed to chemicals or cleaning products.
- Dechlorinator: Municipal water contains chlorine harmful to fish—always treat tap water before adding it to tanks.
- Thermometer: Maintains awareness of water temperature during water changes.
Invest in quality tools designed specifically for aquariums. Using household cleaning supplies risks introducing harmful chemicals that damage the delicate biological balance. Most aquarium shops sell comprehensive cleaning kits containing everything needed for basic maintenance.
Weekly Maintenance Routine
Establishing a consistent weekly cleaning schedule prevents problems before they develop. This routine requires minimal time—typically 15-30 minutes—but delivers significant benefits for tank health. Begin by observing your tank for visible problems: excess algae, uneaten food, cloudy water, or unusual fish behavior.
Step 1: Perform a Partial Water Change
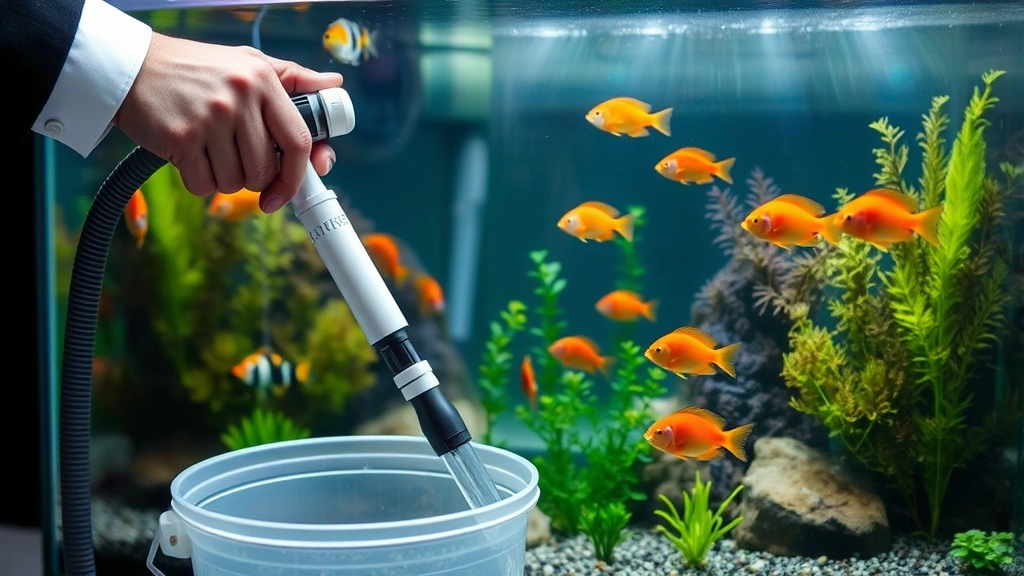
Remove 20-30% of tank water using your siphon or water changer. This removes dissolved waste products and replenishes minerals consumed by fish and plants. Position the siphon intake tube above the substrate to avoid disturbing the gravel or plants. Work methodically across the entire tank bottom, pausing when the siphon reaches your target water level.
Step 2: Vacuum the Substrate
Use a gravel vacuum to remove debris from the bottom layer while extracting water simultaneously. This dual-action tool prevents the accumulation of uneaten food and fish waste that degrades water quality. Move the vacuum slowly across all areas, especially in corners and behind decorations where debris collects.
Step 3: Clean Visible Surfaces
Wipe the front glass with an algae scraper or magnetic cleaner to maintain visibility and aesthetics. Remove visible algae buildup from plants, rocks, and decorations. Avoid using excessive force that might damage delicate plants or disturb fish.
Step 4: Refill with Treated Water
Prepare replacement water by treating tap water with dechlorinator according to product directions. Match the temperature of replacement water to existing tank temperature—temperature swings stress fish. Add water slowly to avoid disturbing substrate and creating turbidity.
Step 5: Check Equipment Function
Verify that filters, heaters, and air pumps operate normally. Listen for unusual sounds indicating pump problems. Check filter flow rate—reduced flow suggests clogging requiring filter cleaning.
Monthly Deep Cleaning Process
Monthly deep cleaning sessions maintain long-term tank health by addressing issues that weekly maintenance cannot handle. This more involved process takes 45-60 minutes but prevents the gradual accumulation of biofilm and organic matter that compromises water quality.
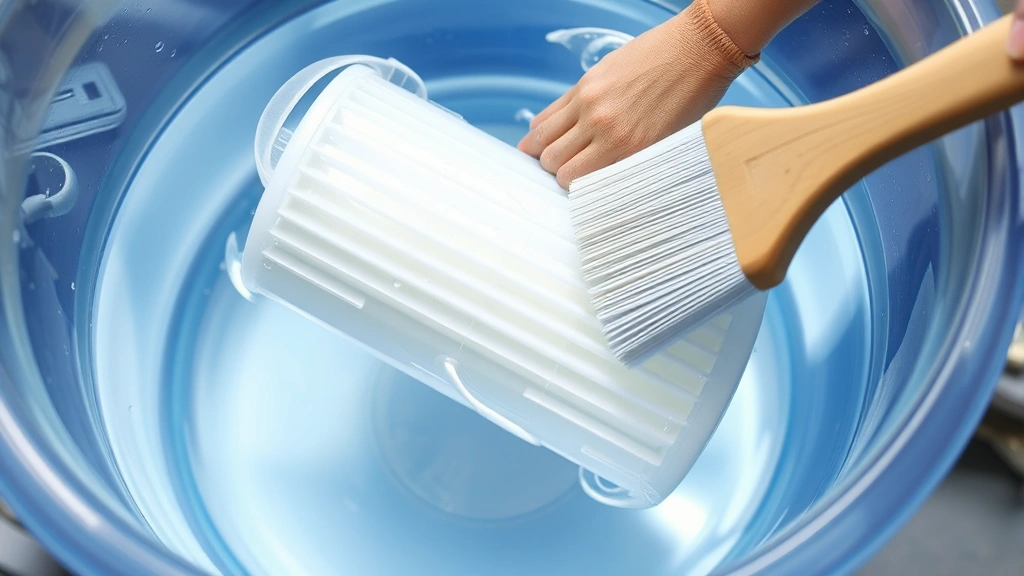
Filter Cleaning and Maintenance
Your filter harbors beneficial bacteria essential for the nitrogen cycle, so cleaning requires care. Remove filter media and rinse gently in a bucket of tank water—never use tap water containing chlorine. Inspect media for excessive debris accumulation; replace media only when it becomes rigid or clogged. Most mechanical media requires replacement every 3-4 weeks, while biological media lasts months.
Clean the filter intake tube and outflow areas where algae and debris accumulate. Check impeller for damage and verify proper water flow through the filter. A sluggish filter indicates cleaning is needed; a silent filter suggests mechanical failure requiring investigation.
Decoration and Plant Cleaning
Remove artificial decorations and rocks, scrubbing them gently with a soft brush to remove algae and biofilm. Avoid harsh chemicals—use only water or dedicated aquarium-safe cleaning solutions. For live plants, carefully remove dead leaves and stems, then replant firmly in substrate. Trim overgrown plants to maintain tank aesthetics and prevent shading of lower plants.
Glass and Acrylic Cleaning
Perform thorough cleaning of all visible surfaces. For stubborn algae, use specialized algae scrapers designed for your tank material. Acrylic tanks require gentler tools than glass to prevent scratching. Clean the back wall and side walls, not just the front viewing pane—algae buildup anywhere indicates water quality issues.
Substrate Inspection and Cleaning
While performing the gravel vacuum during weekly maintenance, you address the top layer. During monthly cleaning, vacuum more thoroughly, working slowly to remove deeper debris. This prevents the anaerobic conditions that produce harmful hydrogen sulfide gas. In planted tanks, be cautious not to damage plant roots.
Cleaning Different Tank Components
Different aquarium components require specific cleaning approaches. Understanding proper techniques prevents damage and maintains functionality.
Canister Filter Maintenance
Canister filters contain multiple media stages requiring individual attention. Disassemble the filter carefully, noting media order for proper reassembly. Rinse mechanical media (sponges, floss) thoroughly to remove trapped debris. Biological media requires only gentle rinsing in tank water—aggressive cleaning destroys beneficial bacteria colonies. Check seals and gaskets for cracks or hardening; replace if necessary to prevent leaks.
Power Filter Cleaning
Power filters require regular cartridge replacement and intake tube cleaning. Most manufacturers recommend cartridge replacement every 2-4 weeks depending on bioload. Clean the intake tube where algae and debris accumulate, restricting water flow. Inspect the motor housing for cracks or water damage.
Air Stone and Pump Maintenance
Air stones accumulate mineral deposits and algae that reduce air output. Soak them in a solution of equal parts white vinegar and water for 30 minutes, then rinse thoroughly. Replace air stones if soaking doesn’t restore full output. Check air tubing for cracks or kinks restricting flow.
Heater and Thermometer Care
Never immerse submersible heaters in cold water while powered on—allow them to cool first. Wipe heater surfaces gently to remove mineral deposits. Thermometers require only rinsing with tap water; check accuracy periodically against a second thermometer.
Water Testing and Chemistry
Cleaning maintains physical tank cleanliness, but water chemistry testing ensures biological health. Regular testing reveals problems before they harm fish, allowing corrective action.
Essential Water Parameters
Ammonia (NH3/NH4+): Should always measure 0 ppm in established tanks. Detectable ammonia indicates inadequate biological filtration or excessive bioload. Perform partial water changes and reduce feeding until ammonia returns to zero.
Nitrite (NO2-): Like ammonia, should measure 0 ppm in established tanks. Presence indicates the nitrogen cycle is incomplete or disrupted. This dangerous compound requires immediate attention through water changes and filter optimization.
Nitrate (NO3-): The final nitrogen cycle product, nitrate accumulates over time and requires removal through water changes. Levels below 40 ppm are generally safe; above 80 ppm indicates excessive bioload or insufficient water changes. Understanding the nitrogen cycle helps prevent toxic water conditions.
pH: Varies by species requirements but should remain stable. Sudden pH swings indicate water quality problems. Most freshwater fish tolerate pH between 6.5-7.5; saltwater fish require different ranges.
Water Hardness: Affects fish health and plant growth. Test both general hardness (GH) and carbonate hardness (KH) to understand your water chemistry. Adjust through water changes or chemical supplements if necessary.
Test water weekly initially, then reduce to biweekly or monthly once parameters stabilize. Comprehensive water testing guides help interpret results correctly.
Common Cleaning Mistakes to Avoid
Even well-intentioned aquarium keepers make mistakes that compromise tank health. Understanding common errors helps you maintain optimal conditions.
Overcleaning and Destroying Beneficial Bacteria
The most common mistake is excessive cleaning that destroys the beneficial bacteria colonies essential for the nitrogen cycle. Never clean filter media in tap water—chlorine kills bacteria. Don’t replace all filter media simultaneously; rotate old and new media to maintain bacterial populations. Avoid using chemical cleaners on tank surfaces.
Neglecting Dechlorination
Tap water contains chlorine that kills fish and bacteria. Always treat water with dechlorinator before adding to your tank. Some aquarists use aged water left sitting 24 hours, but dechlorination products work faster and more reliably. When performing water changes as part of maintaining your home’s water quality, remember aquariums require special care.
Ignoring Temperature Consistency
Adding water significantly cooler or warmer than tank temperature shocks fish and stresses their immune systems. Always match replacement water temperature to existing tank temperature before adding it. Use a thermometer to verify temperature before beginning water changes.
Overcleaning Glass While Fish Are Present
Aggressive scraping with fish in the tank causes stress. Perform thorough glass cleaning during water changes when fish are less disturbed. Use gentle motions and appropriate tools for your tank material.
Forgetting Decoration Cleaning
Decorations accumulate algae and biofilm that harbor harmful bacteria. Regular decoration cleaning prevents disease and improves water quality. Neglecting this task causes gradual water quality deterioration.
Seasonal Maintenance Checklist
Beyond weekly and monthly cleaning, seasonal maintenance addresses issues that develop over extended periods.
Spring Maintenance
After winter, inspect all equipment for damage or deterioration. Replace any worn hoses, check heater function thoroughly, and clean or replace air pump diaphragms. Test water parameters carefully as seasonal temperature changes affect bacterial activity. Prune overgrown plants and consider adding new ones for spring growth.
Summer Maintenance
High temperatures increase metabolism and bioload while reducing water oxygen content. Increase water change frequency and monitor ammonia and nitrite more closely. Consider adding an air pump or increasing air stone output to maintain adequate oxygenation. Check that heater thermostats function properly in reverse—preventing overheating.
Fall Maintenance
As temperatures cool, reduce feeding slightly as fish metabolism decreases. Inspect filter media more frequently as decaying plant matter increases bioload. Clean substrate thoroughly to remove accumulated plant debris. Prepare equipment for potential winter heating demands.
Winter Maintenance
Verify heater function constantly as temperature drops. Reduced water changes may be necessary in some climates, but monitor parameters closely. Inspect all equipment regularly for signs of stress or malfunction. Maintain consistent lighting and feeding schedules despite seasonal changes.
For similar maintenance guidance on household items, check our guide on how to clean an electric kettle and learn about DIY carpet cleaning techniques that emphasize proper maintenance. Visit the DIY Nest Hub Blog for comprehensive cleaning and maintenance guides.
FAQ
How often should I completely change aquarium water?
Never perform complete water changes in established tanks—this destroys beneficial bacteria essential for fish survival. Instead, perform partial water changes of 20-30% weekly. Complete water changes are only necessary when treating serious problems or setting up new tanks. Partial changes maintain bacterial colonies while removing accumulated waste.
Can I use regular cleaning supplies in my aquarium?
Absolutely not. Household cleaners contain chemicals toxic to fish and bacteria. Use only products specifically designed for aquariums. Even residue from household sponges or cloths can harm fish. Dedicate specific tools exclusively to aquarium use and keep them separate from household cleaning supplies.
Why is my aquarium water cloudy after cleaning?
Cloudiness immediately after cleaning usually indicates disturbed substrate particles that settle within 24 hours. If cloudiness persists beyond a day, it suggests bacterial bloom—excessive free-floating bacteria indicating water quality problems. Perform partial water changes and reduce feeding until water clears. Test ammonia and nitrite levels immediately.
What’s the best way to clean aquarium gravel without removing fish?
Use a gravel vacuum with fish in the tank, working slowly and carefully to avoid sucking up small fish. Position the intake tube above the substrate rather than pushing it deep, which reduces disturbance. For heavily planted tanks, vacuum around plants rather than directly on them to avoid damaging roots.
How do I know if my filter needs cleaning?
Reduced water flow is the primary indicator. Compare current flow to baseline output when the filter was new. Decreased flow suggests mechanical clogging. Additionally, if water quality parameters deteriorate despite regular maintenance, filter cleaning is warranted. Check for visible debris accumulation in intake tubes and filter housing.
Is vinegar safe for cleaning aquarium equipment?
White vinegar is safe for cleaning equipment outside the tank but must be thoroughly rinsed before returning equipment to water. Vinegar effectively removes mineral deposits from air stones and heaters. Never add vinegar directly to tank water—it alters pH and chemistry dangerously. Rinse treated items extensively in tap water, then in tank water before use.
What temperature should replacement water be?
Replacement water should match existing tank temperature within 2 degrees Fahrenheit. Temperature swings stress fish and can trigger disease outbreaks. Use a thermometer to verify replacement water temperature before adding it slowly to the tank. Rapid temperature changes cause more stress than the water change itself.


