How to Clean Washer with Vinegar and Baking Soda: Expert Tips Inside
Your washing machine works hard every single day, removing dirt and grime from your family’s clothes. But who cleans the cleaner? Over time, washing machines accumulate detergent residue, mineral deposits, mold, and mildew that can affect performance and create unpleasant odors. The good news is that you don’t need expensive commercial cleaners or professional services—simple household items like vinegar and baking soda can restore your machine to like-new condition.
This comprehensive guide walks you through proven methods for deep cleaning both front-load and top-load washers using natural, affordable ingredients. Whether you’re dealing with stubborn buildup, mysterious smells, or just want to maintain your appliance, these expert techniques will help you achieve professional-grade results without harsh chemicals.
Why Your Washing Machine Needs Regular Cleaning
Most homeowners assume that because washing machines use water and detergent, they automatically stay clean. This is a dangerous misconception. Your washer is actually one of the dirtiest appliances in your home, creating the perfect environment for bacterial growth and mold proliferation.
Several factors contribute to washer contamination. Detergent residue accumulates inside drum crevices and pipes, creating a sticky film that traps bacteria. Hard water minerals deposit on internal components, restricting water flow and reducing cleaning efficiency. Moisture trapped in rubber seals and the drum creates ideal conditions for mold and mildew growth. These problems manifest as musty smells, dingy-looking clothes, and reduced wash performance.
According to research from Consumer Reports, regular washer cleaning can extend appliance lifespan by 2-3 years and improve washing effectiveness by up to 40%. When you use vinegar and baking soda for this maintenance, you’re employing the same principles that professional appliance cleaners use, but at a fraction of the cost.
Regular cleaning also prevents expensive repairs. A buildup-related malfunction can cost $200-$500 in service calls, while a bottle of vinegar costs under $5. The preventative approach is always more economical and environmentally responsible than reactive repairs.
Understanding Vinegar and Baking Soda: The Dynamic Duo
Vinegar and baking soda have become staples in natural cleaning because they’re safe, effective, and backed by chemistry. Understanding how these ingredients work helps you use them optimally.
White Vinegar’s Cleaning Power: White vinegar contains 4-8% acetic acid, which dissolves mineral deposits, cuts through grease, and kills odor-causing bacteria. The acidic nature makes it particularly effective against hard water stains and soap scum. Vinegar is also a natural deodorizer that neutralizes musty smells rather than masking them with artificial fragrances.
Baking Soda’s Abrasive Action: Baking soda (sodium bicarbonate) is a mild abrasive that scrubs away stubborn buildup without scratching surfaces. As a base, it reacts with acidic vinegar to create a fizzing action that dislodges debris from hard-to-reach areas. Baking soda also absorbs and neutralizes odors at their source.
The Chemical Reaction: When vinegar and baking soda combine, they create sodium acetate, water, and carbon dioxide gas. This fizzing action is what makes the combination so effective—the bubbles physically lift grime and bacteria from surfaces. This is the same principle that makes these ingredients popular for DIY carpet cleaning and general household maintenance.
The beauty of this natural approach is that there are no toxic fumes, no harsh chemical residues left on your clothes, and no environmental impact from harmful runoff.
Supplies You’ll Need
Gathering the right supplies before you start ensures the process runs smoothly and efficiently. Most items are already in your home.
- White vinegar: Purchase the standard 5% white vinegar available at any grocery store. You’ll need 2-3 bottles for a thorough cleaning
- Baking soda: Standard baking soda from the baking aisle works perfectly. Have at least one box on hand
- Measuring cups: For accurate ingredient proportions
- Rubber gloves: Protect your hands during the cleaning process
- Spray bottle: Helpful for applying vinegar to specific areas
- Soft-bristled brush: A toothbrush or small cleaning brush reaches crevices without damaging rubber seals
- Microfiber cloths: Better than paper towels for wiping and don’t leave lint
- Bucket: For mixing solutions and soaking components
- Flathead screwdriver: Optional, for removing dispenser drawers on some models
Having everything assembled prevents interruptions and makes the job feel more manageable. Set aside 2-3 hours for a complete cleaning, though you can break it into shorter sessions if needed.
Step-by-Step Cleaning Process for Front-Load Washers
Front-load washers require specific attention because their design creates moisture pockets where mold thrives. The rubber gasket and sealed drum are particularly vulnerable to buildup.
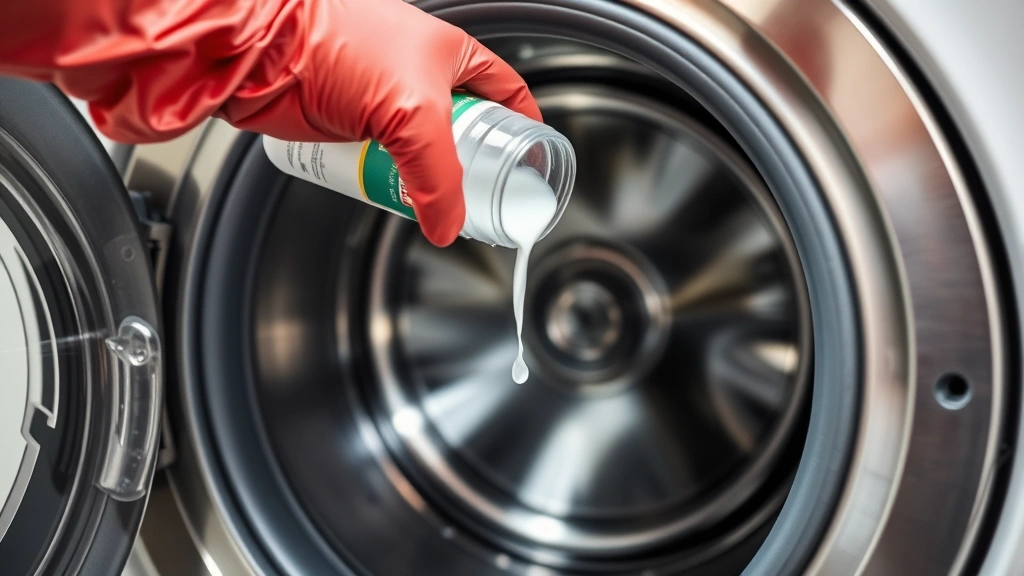
Step 1: Run a Hot Water Cycle with Vinegar
Start with an empty washer. Pour 2 cups of white vinegar directly into the drum. Set your washer to the highest temperature setting with the longest cycle available—typically the “sanitize” or “heavy duty” cycle. Run this cycle completely. The hot water combined with vinegar will begin breaking down mineral deposits and killing bacteria throughout the system.
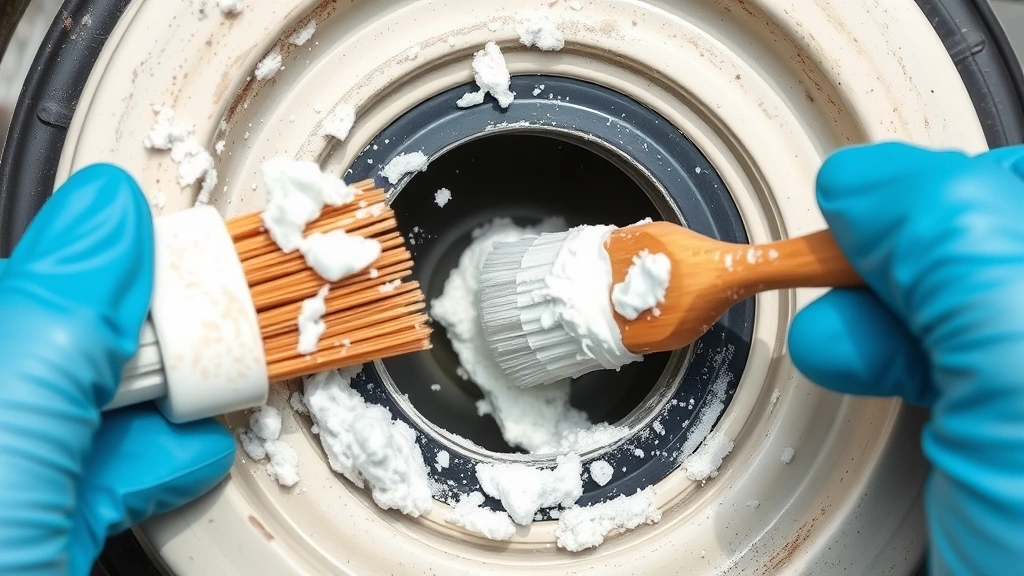
Step 2: Make a Baking Soda Paste
While the first cycle runs, prepare a cleaning paste by mixing half a cup of baking soda with a small amount of water until you achieve a spreadable consistency. This paste will tackle stubborn buildup in the rubber gasket and dispenser areas.
Step 3: Clean the Rubber Gasket
Once the vinegar cycle completes, focus on the rubber gasket that seals the door. This is where mold and mildew hide most frequently. Pull the gasket gently away from the drum to expose the crevices. Apply your baking soda paste liberally into all the folds and crevices. Use your soft-bristled brush to scrub thoroughly, working the paste into every area. You’ll likely find dark deposits and debris—this is completely normal.
Step 4: Run Another Cycle
After gasket cleaning, run another hot water cycle without any additives. This rinses away all the baking soda paste and any loosened debris. Your washer will smell noticeably fresher after this cycle.
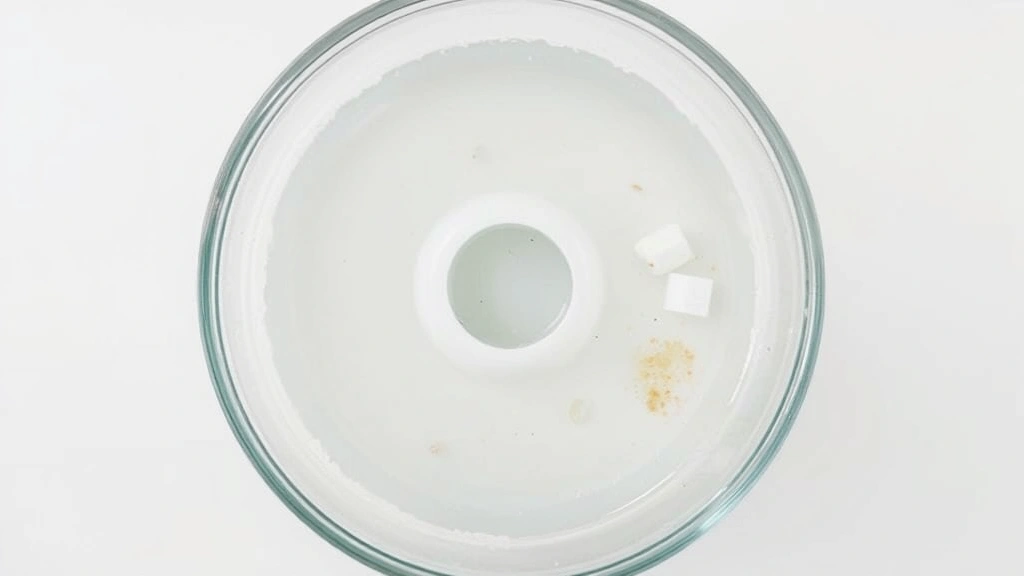
Step 5: Clean the Dispenser Drawer
Remove the detergent and fabric softener dispensers. Soak these in a bowl of equal parts vinegar and warm water for 15-20 minutes. Use your brush to scrub away buildup, then rinse thoroughly under running water. Reinstall them once completely dry.
Step 6: Final Polish
Wipe down the interior drum with a microfiber cloth dampened with vinegar. Pay special attention to any remaining visible deposits. This final step ensures no baking soda residue remains and leaves the drum sparkling clean.
Similar to how you’d maintain other household appliances, like following proper fan cleaning techniques, washer maintenance requires attention to detail and regular upkeep.
Step-by-Step Cleaning Process for Top-Load Washers
Top-load washers, particularly high-efficiency models, have different problem areas but benefit equally from vinegar and baking soda cleaning.
Step 1: Fill with Hot Water and Vinegar
Fill your top-load washer with hot water. As it fills, pour 2-3 cups of white vinegar into the drum. Select the hottest water temperature and longest wash cycle available. Allow the washer to agitate for about 5 minutes, then pause the cycle to let the vinegar solution soak for 30-45 minutes. This soaking time is crucial for dissolving mineral deposits and killing bacteria.
Step 2: Complete the Cycle
After soaking, resume the cycle and let it complete fully. The agitation combined with the vinegar solution will dislodge debris from internal components and the drum.
Step 3: Add Baking Soda
Run a second hot water cycle, but this time add half a cup of baking soda directly to the empty drum (no clothes). The baking soda will react with any remaining vinegar residue, creating that beneficial fizzing action that lifts additional grime.
Step 4: Target the Agitator
For top-load washers with a center agitator, this component often traps debris. Many agitators can be removed by twisting or lifting. Check your manufacturer’s manual for specific instructions. Once removed, soak it in equal parts vinegar and water for 20 minutes, scrub with your brush, and rinse thoroughly before reinstalling.
Step 5: Clean the Lid and Top Rim
Don’t forget the lid and the top rim where detergent residue accumulates. Spray these areas with vinegar and wipe thoroughly with a cloth. For stubborn buildup, apply baking soda paste and scrub gently.
Step 6: Final Rinse Cycle
Run one more hot water cycle with nothing added to ensure all cleaning residue is completely removed. Your washer is now thoroughly cleaned and ready for regular use.
Cleaning the Rubber Gasket and Seals
The rubber gasket deserves special attention because mold growth here directly affects your clothes and indoor air quality. This component requires a slightly different approach than the main drum.
The Gasket Problem: The rubber seal that creates an airtight closure traps moisture, lint, and detergent residue in its folds. Mold and mildew thrive in this environment, creating the musty smell that transfers to your clothes. On front-load washers, this is especially problematic because the door seals moisture inside between cycles.
Preventative Measures: After each load, wipe the gasket dry with a microfiber cloth. Leave the door open between cycles to allow air circulation. This simple habit prevents most gasket problems before they start.
Deep Cleaning Method: Create a thick paste using baking soda and vinegar (approximately 3:1 ratio). The mixture will fizz—this is exactly what you want. Apply this paste generously to the gasket, working it into every fold. Let it sit for 10 minutes, allowing the fizzing action to penetrate the buildup. Use your soft brush to scrub thoroughly, then spray with vinegar from your spray bottle to activate additional fizzing. Finally, wipe clean with a damp cloth and dry completely.
Stubborn Mold: For severe mold growth that resists baking soda and vinegar, you can temporarily use a stronger solution. Mix equal parts white vinegar and hydrogen peroxide (3% solution). Spray this combination onto the gasket and let sit for 15 minutes before scrubbing. This mixture is still natural and safe but more powerful than vinegar alone. Always test on an inconspicuous area first and ensure complete rinsing before running a load with clothes.
Tackling the Detergent Dispenser
The detergent dispenser is a critical area that many people overlook. This component handles concentrated detergent and fabric softener, making it prone to sticky buildup that harbors bacteria.
Removal and Soaking: Most dispensers pull straight out or twist counterclockwise. Check your manual if you’re unsure. Once removed, place the dispenser in a bowl and cover completely with white vinegar. Let it soak for 30 minutes. This soaking dissolves hardened detergent that’s impossible to scrub away when dry.
Scrubbing Process: After soaking, use your soft brush to scrub every crevice, hole, and channel where detergent accumulates. Pay special attention to the underside where liquid detergent drips. For narrow channels, wrap a cloth around a wooden stick and work it through to dislodge debris.
The Dispenser Housing: Don’t forget to clean the housing where the dispenser sits. Apply baking soda paste to this area, let it sit briefly, then scrub and rinse thoroughly. Dried detergent buildup here prevents proper dispenser function and can cause dispensing failures.
Reassembly: Ensure the dispenser is completely dry before reinstalling. Any moisture can cause it to stick or malfunction. Run a test cycle with water only to verify proper operation before using detergent again.
Monthly Maintenance Routine
Preventing heavy buildup is far easier than deep cleaning, so establishing a monthly maintenance routine keeps your washer in optimal condition year-round.
The 5-Minute Monthly Clean: Once a month, run a hot water cycle with 1 cup of white vinegar. This prevents mineral and detergent accumulation. No soaking required—just run the standard cycle. This simple step extends the time between deep cleanings significantly.
Gasket Inspection: Monthly, pull back the gasket and inspect for any visible mold or debris. Wipe with a vinegar-dampened cloth if needed. Catching problems early prevents them from becoming serious issues.
Odor Prevention: If you notice the beginning of a musty smell, immediately run a hot cycle with 2 cups of vinegar. Addressing odors early prevents them from becoming ingrained in the rubber components.
Dispenser Maintenance: Remove and rinse the detergent dispenser monthly with hot water, even if it looks clean. This prevents the slow accumulation that requires aggressive scrubbing later.
This approach to appliance care aligns with broader home maintenance philosophy that emphasizes prevention over crisis management.
When to Call a Professional
While vinegar and baking soda solve most washer problems, certain situations require professional intervention. Knowing when to call prevents damage and unnecessary expense.
Mechanical Issues: If you hear grinding noises, experience water leaks, or notice the drum won’t spin, these indicate mechanical problems beyond cleaning. A professional technician can diagnose bearing wear, pump failure, or motor issues.
Severe Mold: If mold growth returns within weeks of deep cleaning, or if you see extensive black mold throughout the interior, professional cleaning or replacement of components may be necessary. Persistent mold can indicate a drainage problem or design flaw that requires expert assessment.
Water Quality Issues: Extremely hard water that resists vinegar treatment might require professional descaling with industrial-strength solutions. Your technician can also recommend water softening systems for your home.
Warranty Considerations: Before using any cleaning method, check your warranty. Some manufacturers prohibit certain cleaning approaches. Professional cleaning services often provide documentation that satisfies warranty requirements.
Age and Cost Analysis: If your washer is over 10 years old and requires frequent repairs, replacement might be more economical than repair. A professional can assess whether your unit justifies continued investment.
Just as you’d call a professional for complex home security system installation, some appliance issues require expert knowledge and specialized equipment.
FAQ
Can I use apple cider vinegar instead of white vinegar?
While apple cider vinegar contains acetic acid, white vinegar is preferred because it doesn’t leave staining residue or odors. Apple cider vinegar’s color and additional compounds can transfer to clothes or leave sticky deposits. Stick with plain white vinegar for best results.
Is it safe to use vinegar and baking soda in high-efficiency (HE) washers?
Yes, absolutely. HE washers are particularly prone to residue buildup because they use less water. The vinegar and baking soda method is actually ideal for HE machines. Just use the amounts specified for your machine’s size—typically 2 cups vinegar and ½ cup baking soda for standard HE washers.
How often should I deep clean my washer?
For most households with average water quality and regular washer use, deep cleaning every 6 months is sufficient. If you have hard water, use a lot of detergent, or notice odors returning quickly, increase frequency to quarterly cleaning. Monthly vinegar cycles reduce the need for deep cleaning.
Can I clean my washer while clothes are inside?
Never run cleaning cycles with clothes inside. The vinegar and baking soda could stain fabrics or leave residue. Always run cleaning cycles on an empty washer. If you accidentally start a cycle with vinegar and clothes, immediately stop and remove the clothes, then run a rinse cycle.
Will vinegar damage my washing machine’s internal components?
No. The acetic acid in white vinegar is mild and won’t damage metal, rubber, or plastic components. Professional appliance cleaners use vinegar regularly. The concentration and short contact time in washing machine cycles pose no risk. If you’re concerned, check your manufacturer’s manual—most now specifically recommend vinegar cleaning.
What if my washer still smells after cleaning?
Repeat the deep cleaning process, paying extra attention to the gasket. Sometimes heavy buildup requires multiple treatments. If odors persist after two deep cleanings, the issue might be external—check that your home’s drain system isn’t backing up or that outdoor moisture isn’t entering the laundry room. Ensure the washer drains completely after each cycle.
Can I use baking soda and vinegar for a front-load washer’s dispenser drawer?
Yes, this is actually the best method. The vinegar soaking dissolves detergent buildup that’s hardened inside the narrow channels. Follow the same soaking and scrubbing process described in the dispenser section. The fizzing action of the combination reaches areas that dry scrubbing never could.
Is there a difference in cleaning a new washer versus an older one?
New washers typically require less aggressive cleaning because buildup hasn’t accumulated. Use the monthly maintenance routine for new machines to prevent heavy buildup from developing. Older washers might need stronger vinegar concentrations or longer soaking times for initial deep cleaning, but the basic process remains the same.
Can I combine vinegar with other natural cleaners?
Vinegar and baking soda are the optimal pairing. Adding other ingredients like lemon juice or essential oils can complicate the chemical reaction and may leave residues. Stick with this proven combination for best results. If you want fragrance, add a few drops of essential oil to the final rinse water only, not during the cleaning cycles.
What’s the environmental impact of using vinegar and baking soda versus commercial cleaners?
Vinegar and baking soda are infinitely more environmentally friendly. They’re biodegradable, non-toxic, and won’t harm aquatic ecosystems when they reach water treatment facilities. Commercial washer cleaners often contain harsh chemicals that require special disposal and can persist in the environment. By choosing natural methods, you’re protecting your family and the planet.


