How to Create a Shed: Pro Builder Tips Inside
Building a shed transforms your property into a more organized and functional space. Whether you need storage for garden tools, seasonal equipment, or a workshop retreat, a well-constructed shed adds value and utility to your home. This comprehensive guide walks you through every step of the process, from initial planning through final touches, using proven techniques that professional builders rely on.
Creating a shed requires careful planning, proper material selection, and attention to local building codes. Unlike casual DIY projects, shed construction demands structural integrity, weather resistance, and compliance with zoning regulations. By following this guide, you’ll understand the critical decisions that separate amateur attempts from professional-quality results.
Planning Your Shed Project
Before purchasing materials or breaking ground, establish a solid plan. Start by determining your shed’s purpose and size. A tool storage shed requires different dimensions than a workshop or equipment storage facility. Most residential sheds range from 8×10 feet to 12×16 feet, though size depends on available space and local zoning restrictions.
Check your local building codes and permit requirements immediately. Many jurisdictions require permits for structures over a certain size (typically 100-200 square feet). Review setback requirements, which specify how far your shed must sit from property lines. Ignoring these regulations can result in costly removals or fines. Contact your local building department or planning office to confirm all requirements before proceeding.
Create detailed sketches or use design software to visualize your shed. Include dimensions, door placement, window locations, and roof style. Professional builders always work from detailed plans because they prevent costly mistakes during construction. Your plan should show side views, front views, and overhead layouts. This planning phase also helps you create an accurate materials list and budget.
Select a location with good drainage and appropriate sun exposure. Avoid low-lying areas where water pools, as this causes foundation problems and wood rot. Consider proximity to your home, utilities, and trees. Overhanging branches create moisture issues and can damage roofing during storms. Security considerations may also influence placement near your property’s perimeter.
Foundation and Site Preparation
A solid foundation prevents structural failure and extends your shed’s lifespan significantly. Professional builders never skip this critical step. The most common options include concrete pads, gravel bases, pressure-treated skids, and concrete piers.
Concrete Pad Foundation: This is the gold standard for permanent sheds. Pour a 4-6 inch reinforced concrete pad slightly sloped for drainage. The slope should be approximately 1/8 inch per foot, directing water away from the structure. Use ASTM standards for concrete specifications. This foundation prevents frost heave in cold climates and eliminates ground moisture issues.
Gravel Base: For temporary or budget-conscious builds, a 4-6 inch compacted gravel base works adequately. Compact the gravel in layers using a hand tamper or plate compactor. This method drains well but requires periodic maintenance and doesn’t prevent frost heave.
Pressure-Treated Skids: These wooden runners distribute weight and allow airflow underneath. Use 6×6 or 8×8 pressure-treated lumber rated for ground contact. Place skids on compacted gravel or concrete piers. This approach balances cost and durability, though skids eventually require replacement.
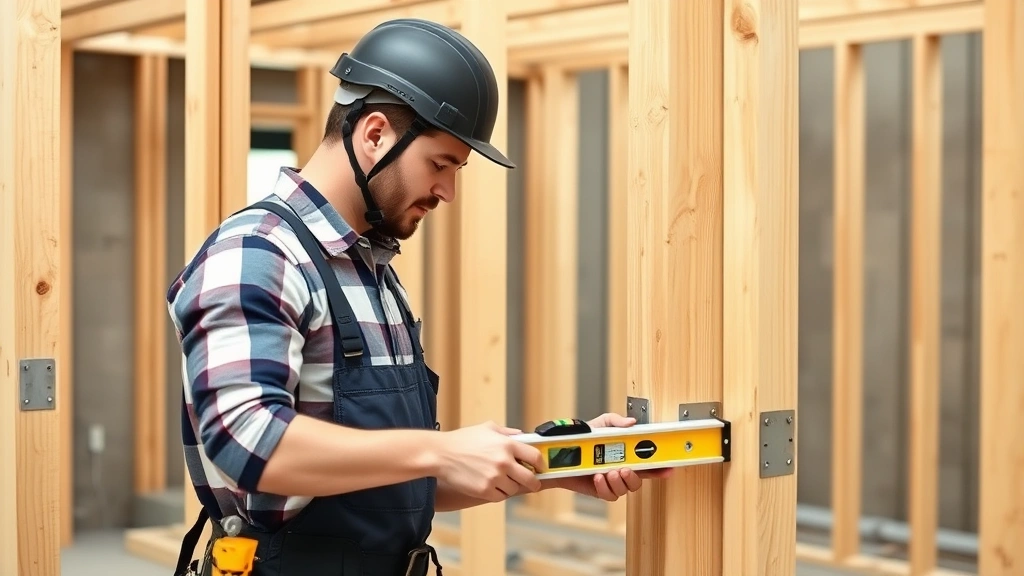
Before any foundation work, mark the site precisely using string lines and measuring tapes. Verify all corners are square using the 3-4-5 triangle method: measure 3 feet along one side, 4 feet along the adjacent side, and the diagonal should measure exactly 5 feet. Professional accuracy during this phase prevents frame misalignment later.
Clear vegetation from the site, removing grass, roots, and debris. Grade the area to ensure proper drainage. Compact the soil to prevent settling. If your area experiences heavy rainfall, consider installing a perimeter drain or swale to direct water away from the foundation. These details separate long-lasting structures from those that deteriorate prematurely.
Framing the Structure
Proper framing creates the shed’s skeleton and determines structural integrity. Use pressure-treated lumber for all components that contact the foundation or ground. Standard framing uses 2×4 lumber for walls, though 2×6 provides superior strength in snow-heavy regions.
Floor Framing: Build a rectangular frame using 2×6 or 2×8 rim joists with 2×4 floor joists spaced 16 inches on center. Brace the floor frame diagonally with 1×4 lumber to prevent racking. Connect all joints using galvanized bolts, not nails, as bolts resist the shear forces that cause frame failure. Proper floor construction ensures level surfaces and prevents sagging.
Wall Framing: Construct walls with 2×4 studs spaced 16 inches on center. Include king studs around door and window openings, plus header beams above openings to distribute loads. The header size depends on opening width; American Institute of Timber Construction guidelines provide specifications. Nail or bolt walls to the floor frame securely. Add diagonal bracing or sheathing to prevent racking and ensure the structure stands square.
Roof Framing: Gable roofs are most common for sheds, offering good water drainage and simple construction. Calculate rafter size and spacing based on roof pitch, snow load, and wind load for your region. Most residential sheds use 2×6 rafters spaced 24 inches on center. Install collar ties between opposing rafters to prevent spreading. Use hurricane ties or metal connectors to secure rafters to the top wall plate, not just nails.
All framing connections must resist wind uplift and snow loads. Use structural fasteners rated for your application. Galvanized nails, bolts, and metal connectors resist corrosion and maintain strength over decades. Avoid using regular steel fasteners that rust and weaken connections.
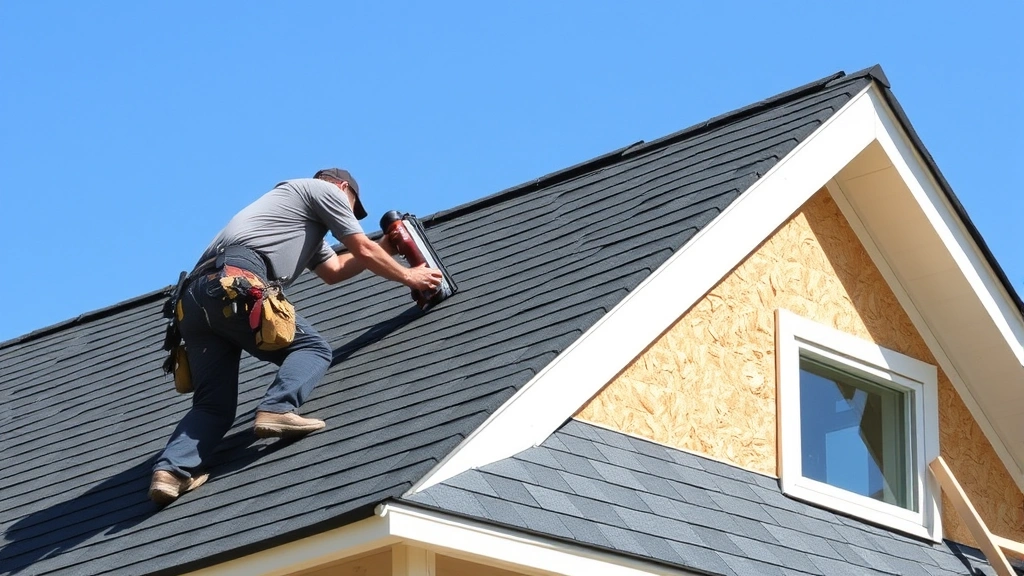
Roofing Installation
The roof protects everything inside, making quality installation essential. Start with proper ventilation by installing soffits and ridge vents to allow air circulation, preventing moisture buildup and extending roof life.
Sheathing and Underlayment: Install 1/2-inch exterior-grade plywood or OSB over rafters. Use galvanized ring-shank nails spaced 6 inches apart. Once sheathing is complete, install a quality underlayment—either felt or modern synthetic options. This layer provides secondary water protection and helps prevent ice damming in cold climates. Overlap underlayment at least 4 inches and nail with roofing nails.
Shingle Installation: Asphalt shingles are most popular for shed roofing. Start with a starter course of shingles along the eaves, nailed with 4 nails per shingle. Install subsequent courses with proper overlap (typically 5-5.5 inches) and stagger seams. Use roofing nails rated for your climate. In windy areas, nail all four corners plus the center. Professional roofers know that improper fastening causes premature failure and leaks.
Flashing Details: Install flashing around any roof penetrations (vents, chimneys, etc.) and along valleys where water concentrates. Flashing prevents water from entering the structure at vulnerable points. Use lead-free, corrosion-resistant flashing material. Improper flashing is the leading cause of roof leaks in both residential and shed construction.
Install gutters and downspouts to direct roof water away from the foundation. This prevents erosion and protects the foundation from moisture saturation. Gutters should be pitched slightly toward downspouts at approximately 1/8 inch per 10 feet.
Siding and Weatherproofing
Siding protects the frame and improves appearance. Options include wood, metal, vinyl, and composite materials. Each has advantages and maintenance requirements.
Wood Siding: Cedar or pine lap siding offers classic appearance and good insulation value. Install siding horizontally with proper overlap, typically 1.5 inches for 6-inch boards. Nail siding with galvanized or stainless steel fasteners to prevent rust staining. Wood requires regular maintenance—painting or staining every 3-5 years to prevent rot.
Metal Siding: Corrugated metal or steel panels install quickly and require minimal maintenance. Use fasteners with rubber washers to prevent water infiltration. Metal expands and contracts with temperature, so allow for this movement in installation. This option suits agricultural or industrial-style sheds.
Vinyl and Composite: These low-maintenance options resist rot and insects. Install according to manufacturer specifications, allowing for expansion. Vinyl is economical but less durable; composite materials cost more but last longer.
Before installing siding, apply house wrap or felt to the sheathing. This water-resistant layer provides additional weather protection. Overlap house wrap at least 6 inches and tape seams with construction tape. This detail prevents wind-driven rain from entering the wall cavity.
Install door and window casings with proper flashing to prevent water from entering around the frames. Caulk all joints with quality exterior caulk rated for your climate. Improper sealing allows water infiltration, which causes interior damage and structural rot.
Consider adding insulation if you’ll use the shed year-round or for temperature-sensitive storage. Fiberglass, mineral wool, or foam board insulation fit between studs. Cover insulation with vapor barrier and interior wall covering to complete the weatherproof envelope.
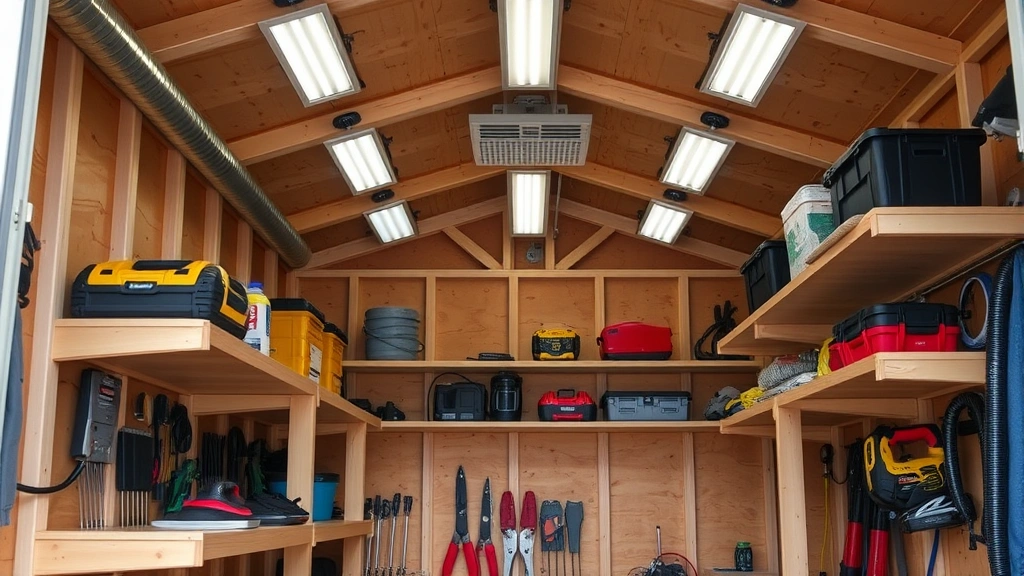
Interior Organization
Smart interior planning maximizes functionality and storage efficiency. Start by installing shelving systems that distribute weight properly. Wall-mounted shelves must be anchored to studs with appropriate fasteners. Floating shelves should be rated for their intended load and installed per manufacturer specifications.
Create zones for different storage categories: tools, seasonal items, equipment, and materials. Vertical storage maximizes limited space. Wall-mounted pegboards, tool racks, and hooks keep frequently used items accessible. Overhead loft storage uses space that would otherwise sit empty.
Ensure adequate lighting with LED fixtures that consume minimal power. Install a dedicated circuit if you plan to use power tools or equipment. Ventilation is equally important—adequate airflow prevents moisture buildup that causes mold and mildew. DIY building projects benefit from proper planning of utilities and organization systems.
Install a workbench if you’ll use the shed as a workshop. Anchor it securely to the floor or wall studs. Provide adequate overhead clearance for your intended activities. Consider climate control needs—insulation and ventilation become more important if you store sensitive materials or spend extended time inside.
Finishing Touches
Professional builders understand that finishing details determine whether a shed looks amateur or well-executed. Paint or stain all exterior wood surfaces to protect against weather damage. Choose exterior-grade products designed for your climate. Quality paint application includes proper surface preparation—cleaning, sanding, and priming before topcoats.
Install trim around doors, windows, and where siding meets the roof. Properly installed trim improves appearance and provides additional weather protection. Use galvanized or stainless fasteners that won’t rust and stain the siding.
Add landscaping around the shed’s perimeter. Grade the soil to slope away from the foundation, directing water away. Install edging and maintain adequate clearance between vegetation and the structure to allow air circulation and prevent moisture problems.
Create a maintenance plan. Inspect the roof annually for damaged shingles. Check siding and trim for cracks or rot. Clean gutters seasonally. Inspect the foundation for settling or water damage. Regular maintenance extends your shed’s lifespan and prevents costly repairs.
Document your construction with photos and keep all receipts and warranty information. This documentation helps with insurance claims and future maintenance or improvements.
FAQ
Do I need a building permit for a shed?
Most jurisdictions require permits for sheds over 100-200 square feet. Check your local building department’s requirements before starting. Permits ensure your structure meets safety codes and zoning regulations. Unpermitted structures can create problems when selling your home or filing insurance claims.
What’s the best foundation type for a shed?
Concrete pads provide the best long-term performance by preventing frost heave and moisture issues. Pressure-treated skids offer a balance of cost and durability. Gravel bases work for temporary structures but require maintenance. Your choice depends on climate, budget, and permanence of the structure.
How much does it cost to build a shed?
A basic 8×10 shed costs $1,500-$3,000 for materials if you do the work yourself. Larger sheds, premium materials, and professional labor increase costs significantly. Get detailed quotes from suppliers and compare material options to stay within budget.
Can I build a shed on my property line?
No. Setback requirements specify minimum distances from property lines, typically ranging from 5-15 feet depending on your jurisdiction. Violating setback requirements can result in costly removal. Always verify these requirements before choosing your site.
How long does a shed typically last?
A properly constructed and maintained shed lasts 20-30+ years. Regular maintenance, quality materials, and proper installation extend lifespan significantly. Neglected sheds deteriorate much faster, sometimes in just 10-15 years.
What tools do I need to build a shed?
Essential tools include a circular saw, drill, level, measuring tape, square, hammer, nail gun (optional but helpful), and safety equipment. You may want to rent specialized tools like a plate compactor for foundation preparation or a roofing nailer for shingle installation.
Should I hire professionals for any part of the project?
If you lack experience with roofing or electrical work, hiring professionals for those components is wise. Improper roofing causes leaks that damage everything inside. Electrical mistakes create fire and shock hazards. Foundation and framing work is manageable for competent DIYers with proper planning.


