DIY Nantucket Shed: Builder Tips and Plans
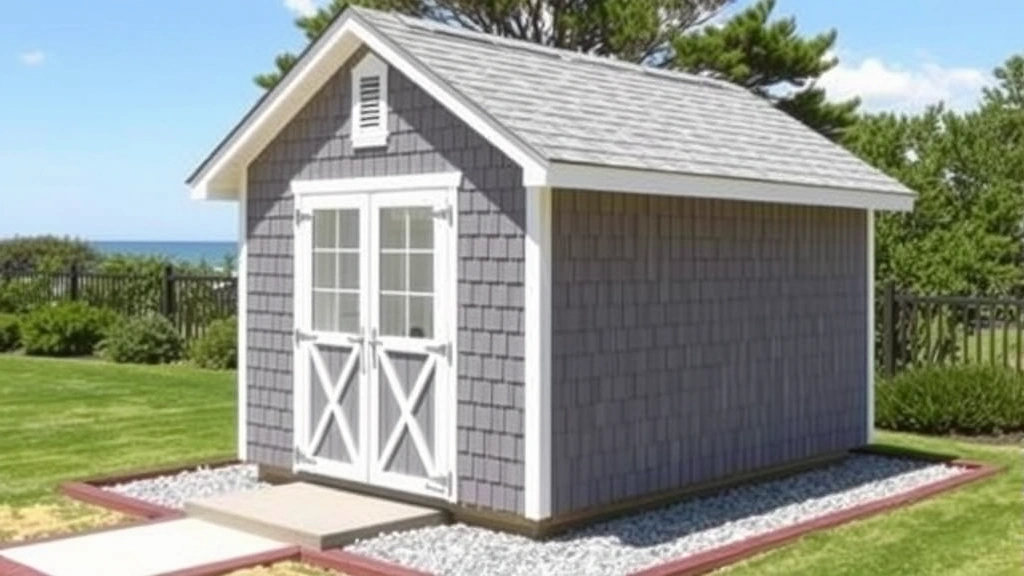
Building a Nantucket-style shed brings coastal charm and practical storage to your property. This distinctive architectural style, inspired by the historic maritime heritage of Nantucket Island, features weathered wood siding, peaked roofs, and traditional New England craftsmanship. Whether you’re looking to add curb appeal or create functional outdoor storage, a DIY Nantucket shed project combines timeless design with achievable construction techniques.
The appeal of Nantucket sheds lies in their elegant simplicity and versatility. These structures work equally well as garden storage, artist studios, pool houses, or guest cottages. With proper planning, quality materials, and attention to detail, even intermediate DIYers can successfully construct a Nantucket shed that becomes a stunning focal point for your outdoor space. This comprehensive guide walks you through the entire process, from initial design decisions to final weatherproofing.
Understanding Nantucket Shed Architecture
Nantucket sheds embody a distinctive architectural language that has evolved over centuries on the Massachusetts island. The style emphasizes clean lines, symmetrical proportions, and a harmonious relationship with the surrounding landscape. Key architectural features include steeply pitched roofs that shed water efficiently, typically ranging from 8:12 to 12:12 pitch, wooden siding with traditional batten-and-board construction, and often a central cupola or ventilation feature that provides both function and visual interest.
The color palette for authentic Nantucket sheds traditionally features weathered gray wood, white trim, and dark roofing materials. However, modern interpretations often incorporate soft coastal colors like pale blue, sage green, or cream. The beauty of this style lies in its flexibility—you can honor traditional aesthetics while adapting the design to your specific needs and property characteristics.
Before diving into construction, study existing Nantucket architecture through local preservation societies and architectural resources. Understanding proportional relationships between width, height, and roof pitch will help you design a shed that feels authentic and harmonious with your home. Most residential Nantucket sheds range from 8×10 to 12×16 feet, though larger versions can accommodate additional functions.

Planning and Permits
Successful shed construction begins with thorough planning and obtaining proper permits. Most jurisdictions require building permits for structures over 100-120 square feet, though regulations vary significantly by location. Contact your local building department or ICC (International Code Council) to understand specific requirements for your area, including setback distances from property lines, height restrictions, and foundation requirements.
Create detailed plans that include front, side, and rear elevations, a floor plan showing interior dimensions, a roof plan indicating pitch and material specifications, and a foundation detail. These drawings become essential for permit approval and provide a clear roadmap during construction. Many online resources offer Nantucket shed plans ranging from basic to highly detailed; alternatively, hire a local designer familiar with regional building codes to customize plans for your property.
Budget planning should account for permits, materials, tools, and potential labor assistance. A typical 10×12 Nantucket shed costs between $4,000-$8,000 in materials, depending on finish quality and local lumber prices. Building codes in coastal areas may mandate specific wind resistance ratings, moisture barriers, and ventilation requirements, so factor these into your material selection and budget.
Consider seasonal timing for your build. Spring and early fall offer ideal weather conditions for construction, while winter and summer extremes present challenges. Plan for adequate drying time between construction phases, particularly for foundations and finishes.
Foundation and Site Preparation
A solid foundation ensures your Nantucket shed remains level and protected from moisture for decades. The foundation type depends on your local frost line depth, soil conditions, and building code requirements. Most residential sheds use either a concrete slab-on-grade, concrete pier system, or treated wood skids elevated on concrete blocks.
Begin by selecting a well-drained site with southern exposure for light and air circulation. Clear vegetation and debris, then establish a level base using a transit level or laser level. For areas with significant frost heave risk, dig below the frost line and pour concrete footings. The American Institute of Architects provides detailed frost line maps by region.
If using a concrete slab, prepare the site with 4-6 inches of compacted gravel base, install perimeter forms at proper elevation, and pour concrete with a slight slope for drainage. Allow at least 7 days for full curing before beginning frame construction. For pier systems, space concrete piers 4-6 feet apart, ensuring they sit below the frost line and remain perfectly level.
Proper site drainage prevents water accumulation around your shed foundation. Grade the surrounding soil to direct water away from the structure, and consider installing a French drain or gravel perimeter if your property has poor drainage characteristics. This investment in foundation preparation prevents costly repairs and extends your shed’s lifespan significantly.
Framing the Structure
Framing creates the structural skeleton that supports your entire shed. For a traditional Nantucket shed, use pressure-treated lumber for the sill plates and floor frame, standard framing lumber for wall studs and roof trusses, and quality plywood for roof sheathing. Most residential sheds use 2×4 or 2×6 lumber for wall framing spaced 16 inches on center, providing strength while minimizing material costs.
Begin by securing pressure-treated sill plates to your foundation using concrete anchors spaced every 4-6 feet. Ensure the frame is perfectly square by measuring diagonals—they should be equal. Build wall frames flat on the ground, then tilt them up one at a time. This approach provides better control and safety than building walls in place.
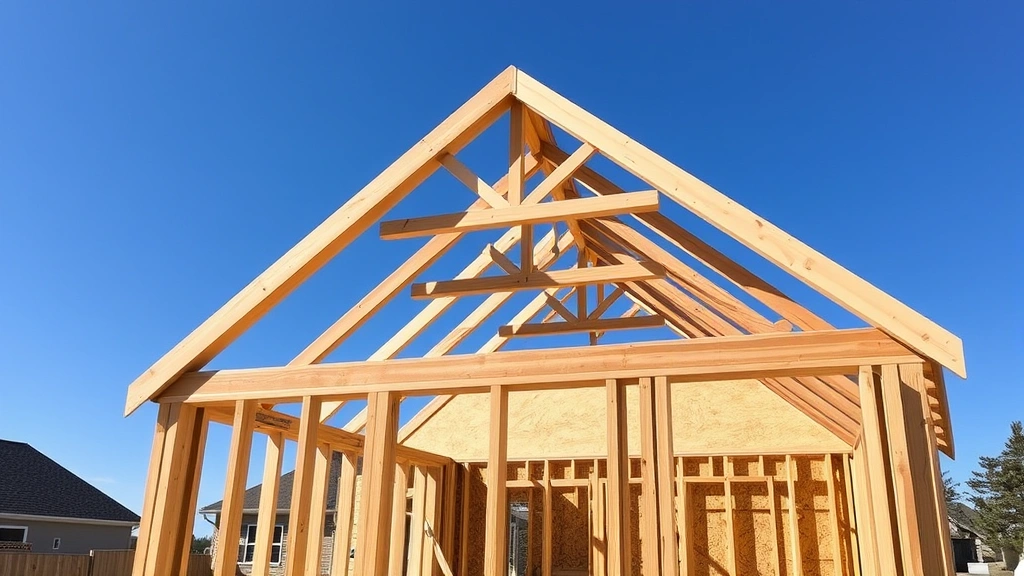
For Nantucket-style peaked roofs, calculate the rise-to-run ratio that creates your desired pitch. A 10:12 pitch (common for this style) requires careful rafter layout and bird’s-mouth cuts where rafters meet the top plate. Many builders prefer pre-fabricated roof trusses, which ensure consistent geometry and reduce on-site calculations. However, traditional stick-built roofs using individual rafters offer more design flexibility and authentic charm.
Install collar ties between opposing rafters to prevent spreading, and add collar tie bracing at every third or fourth rafter pair for structures over 12 feet wide. Ensure all connections use appropriate fasteners—galvanized nails or screws prevent rust staining and corrosion in coastal environments. Check your work frequently with a level to prevent compounding errors that become problematic during later construction phases.
Roofing Installation
The roof is your shed’s primary defense against weather, making proper installation critical. Begin with quality roof sheathing—typically 1/2-inch exterior-grade plywood or oriented strand board (OSB) fastened every 6 inches along rafters and every 12 inches in the field. Some builders prefer 1×6 or 1×8 boards for authentic appearance and superior ventilation, though this increases material costs.
Install roofing underlayment before shingles. Modern synthetic underlayment offers superior moisture protection compared to traditional felt, resists tearing during installation, and provides better grip for workers on steep roofs. Overlap underlayment according to manufacturer specifications, typically 4-6 inches on horizontal seams and 12 inches on vertical seams.
For authentic Nantucket aesthetics, consider architectural or premium asphalt shingles in gray, charcoal, or slate tones. These shingles have dimensional appearance that mimics traditional roofing materials while providing durability and affordability. Metal roofing offers exceptional longevity and low maintenance, making it increasingly popular for high-end coastal properties. Regardless of material choice, ensure proper ventilation using soffit vents and a ridge vent to prevent moisture accumulation and extend roofing life.
Flashing at roof penetrations, valleys, and edges prevents water infiltration—the primary cause of shed deterioration. Install flashing before shingles, overlapping materials in a shingled fashion so water flows downward and outward. Quality flashing costs little compared to the damage water intrusion causes.
Siding and Exterior Details
Exterior siding defines your shed’s character and provides weather protection. Traditional Nantucket sheds feature board-and-batten siding, 1×8 or 1×10 vertical boards covered with thin battens that hide gaps and provide visual rhythm. This style requires careful material selection and installation but creates authentic charm difficult to achieve with modern alternatives.
Alternatively, horizontal lap siding offers simpler installation while maintaining classic appeal. Cedar or pine shiplap provides natural beauty and weathers to attractive gray tones, though it requires regular maintenance. Engineered wood siding offers durability and lower maintenance at moderate cost, while fiber cement products provide exceptional longevity and paintability.
Install a quality house wrap or moisture barrier over your wall sheathing before siding, protecting framing from wind-driven rain while allowing vapor transmission. This step is essential in humid coastal environments where moisture management prevents rot and extends structure life. Leave small gaps between siding courses for thermal movement, and use stainless steel or galvanized fasteners to prevent rust staining.
Trim details elevate your shed from basic structure to architectural statement. Install 1×4 or 1×6 trim around windows and doors, add corner boards at vertical edges, and cap the structure with a cornice featuring lookouts and a simple soffit. White or cream trim contrasts beautifully with weathered gray siding, creating traditional Nantucket appearance. For security considerations and access points, install quality doors with sturdy hardware and appropriate lighting.
Interior Finishing and Organization
Interior finishing depends on your shed’s intended use. For basic storage, simple plywood walls and concrete floors suffice. For more refined uses like studios or guest cottages, consider drywall, painted finishes, and flooring upgrades. Insulation becomes important if you plan year-round use or climate-sensitive storage—standard fiberglass batts in walls and ceiling provide cost-effective thermal control.
Ventilation prevents moisture accumulation and odor problems common in enclosed storage spaces. Gable vents, soffit vents, or small windows provide passive air circulation. For active storage uses, consider adding a small ceiling fan or ensuring adequate cross-ventilation through strategically placed openings.
Organize interior space efficiently using wall-mounted shelving, pegboards, and built-in storage solutions. Vertical storage maximizes limited square footage while keeping frequently used items accessible. Install shelving 16-24 inches apart for flexibility, and anchor shelving securely to wall studs to safely support heavy items. For garden storage, ensure adequate space for tools, equipment, and seasonal items without overcrowding.
Lighting transforms your shed into a functional workspace. Simple LED fixtures provide bright, efficient illumination while consuming minimal power. Install outlets on interior walls for charging tools and powering equipment, ensuring proper grounding and weatherproofing for coastal environments where moisture and salt air accelerate corrosion.
Weatherproofing and Maintenance
Coastal environments present unique weathering challenges including salt spray, high humidity, and intense UV exposure. Protective coatings become essential for longevity. Exterior wood benefits from quality exterior paint or stain every 3-5 years, depending on exposure and product quality. Penetrating stains highlight wood grain and weather naturally, while paint provides superior protection and color consistency.
Seal all joints, gaps, and penetrations to prevent water infiltration. Use high-quality exterior caulk at corners, around windows and doors, and where different materials meet. Recaulk annually in coastal areas, as UV exposure and thermal cycling break down caulk faster than in protected environments.
Metal components require special attention in salty air environments. Use only stainless steel or hot-dipped galvanized fasteners, hinges, and hardware. Aluminum flashing should be separated from copper or steel components to prevent galvanic corrosion. Paint metal roof flashing annually to maintain protection.
Establish a maintenance schedule beginning immediately after construction completion. Inspect your shed seasonally, looking for caulk deterioration, paint failure, roof damage, and water staining. Address minor issues immediately to prevent expensive repairs. Regular maintenance protects your investment and ensures your Nantucket shed remains a beautiful property feature for decades.
For additional structural guidance, consult the American Wood Council for wood construction standards and local building code resources. Understanding proper material selection and installation techniques specific to coastal environments ensures your shed withstands the elements.
FAQ
Do I need permits to build a Nantucket shed?
Yes, most jurisdictions require building permits for structures exceeding 100-120 square feet. Permit requirements vary by location, so contact your local building department. Permits ensure your structure meets safety codes, zoning regulations, and setback requirements. Skipping permits creates liability issues and complicates future property sales.
What’s the best foundation for a shed in coastal areas?
Coastal properties benefit from either elevated concrete pier systems or slab-on-grade foundations with proper drainage. Pier systems keep structures above water during storms and allow air circulation underneath, reducing moisture problems. Ensure all concrete sits below your local frost line to prevent heaving during freeze-thaw cycles.
How much does a DIY Nantucket shed cost?
Material costs typically range from $4,000-$8,000 for a 10×12 structure, depending on finish quality and local lumber prices. Labor costs vary significantly if hiring help. Building permits, site preparation, and foundation work add $1,000-$3,000 depending on existing conditions. Budget conservatively and plan for contingencies.
Can I build a Nantucket shed in winter?
Winter construction is challenging but possible in mild climates. Frozen ground complicates foundation work, and cold temperatures affect material performance and worker safety. Spring and fall offer ideal conditions. If building in winter, plan for extended cure times for concrete and paint, and protect materials from precipitation.
What maintenance does a coastal Nantucket shed require?
Coastal sheds require annual inspection and maintenance. Recoat exterior finishes every 3-5 years, recaulk joints annually, inspect roofing for damage, and replace any corroded fasteners. Salt spray accelerates weathering, so more frequent maintenance than inland properties becomes necessary. Proper maintenance extends your shed’s lifespan significantly.
Should I insulate my Nantucket shed?
Insulation depends on intended use. For basic storage, insulation isn’t necessary. For climate-controlled storage, studios, or guest cottages, standard fiberglass batts in walls and ceiling provide cost-effective thermal control. Vapor barriers become important in humid coastal environments to prevent condensation and moisture damage.
What’s the best exterior finish for coastal environments?
Quality exterior paint or penetrating stain protects wood from salt spray and UV damage. Penetrating stains highlight wood grain and weather naturally to attractive gray tones. Paint provides superior protection and consistent color but requires more frequent recoating. Use products specifically formulated for coastal environments and reapply every 3-5 years.


