Driveway Paving Tips: Pro Advice for DIYers
A well-maintained driveway enhances your home’s curb appeal and protects your property from water damage and erosion. Whether you’re planning a complete replacement or tackling repairs, understanding professional paving techniques can save you thousands in contractor fees while ensuring a durable, long-lasting surface. This comprehensive guide covers everything DIY enthusiasts need to know about asphalt and concrete driveway installation, from site preparation to finishing touches.
Driveway paving demands precision, proper materials, and attention to drainage—the three pillars of a successful project. Many homeowners underestimate the importance of foundation work, which accounts for roughly 80% of a driveway’s longevity. By following industry best practices and learning from professional installers, you can achieve results comparable to commercial work while maintaining safety and structural integrity throughout your project.

Site Assessment and Preparation
Before ordering materials or renting equipment, conduct a thorough site assessment. Measure your driveway’s length, width, and existing surface condition. Look for signs of poor drainage, including standing water, cracks, or areas where vegetation grows—these indicate moisture problems that must be addressed before new paving begins. Check for utility lines (gas, electric, water) by contacting your local utility locating service, which is typically free and mandatory before excavation.
Clear the driveway of debris, vegetation, and loose asphalt or concrete. Remove large rocks and obstructions that could interfere with grading equipment. If you’re replacing an existing surface, you’ll need to decide whether to remove it completely or grind it down. Complete removal is preferable when dealing with severely damaged or unstable surfaces, as it allows you to address any underlying foundation issues. Grinding reduces waste and costs but doesn’t resolve deep structural problems.
Mark the driveway perimeter with chalk or paint, ensuring you maintain proper setback distances from property lines according to ICC (International Code Council) guidelines. Document the existing slope and any drainage patterns. Take photographs before beginning work for reference and insurance purposes. This preparation phase typically requires one to two days but prevents costly mistakes during installation.
Choosing Between Asphalt and Concrete
The material choice between asphalt and concrete significantly impacts durability, maintenance requirements, and initial costs. Asphalt typically costs 30-50% less upfront than concrete and is easier for DIYers to install, making it popular for residential projects. However, asphalt requires resealing every 2-3 years and typically lasts 15-20 years before requiring replacement. Concrete is more expensive initially but lasts 25-30 years with minimal maintenance, requiring only occasional cleaning and crack repairs.
Asphalt performs better in freeze-thaw climates and is more forgiving during installation, as minor variations don’t significantly affect appearance. Concrete offers superior load-bearing capacity and a cleaner aesthetic but shows stains and dirt more readily. In extremely hot climates, asphalt can soften and develop ruts under heavy vehicles, while concrete can develop spalling from salt exposure in northern regions. Consider your local climate, vehicle weight, and long-term maintenance willingness when making this decision.
For DIY projects, asphalt is generally more achievable without specialized equipment, though you’ll still need access to a paving compactor. Concrete requires careful formwork, proper mixing, and precise timing during the finishing process. Both materials demand excellent drainage planning—poor water management will compromise either surface within a few years, regardless of installation quality. Our guide on DIY basement finishing covers similar foundation principles applicable to exterior work.
Subgrade Foundation Requirements
The subgrade—the native soil beneath your driveway—is the critical foundation that supports everything above it. Inadequate subgrade preparation is the leading cause of premature driveway failure, as settling and movement directly translate to cracks and buckling. Subgrade must be compacted to 95% of maximum density as determined by ASTM standards, which typically requires a plate compactor or vibratory roller.
Begin by excavating to proper depth: typically 8-12 inches for asphalt (including base layer) and 4-6 inches for concrete (depending on climate and traffic). Remove any topsoil, organic matter, or soft material down to stable soil. Clay soils compact well but drain poorly; sandy soils drain quickly but offer less bearing capacity. If your soil is predominantly clay, consider adding gravel to improve drainage. Conversely, sandy soils may benefit from clay content to improve stability.
Water content affects compaction effectiveness—soil should be moist but not saturated. If it’s too dry, lightly spray the area; if too wet, allow it to dry before continuing. Make multiple passes with your compactor in overlapping patterns, working from the edges toward the center. Check compaction with a straightedge or level to identify low spots, which must be filled and recompacted. Proper subgrade work requires patience but prevents thousands in repairs later.
Base Layer Installation
The base layer distributes vehicle loads across the subgrade while providing drainage and frost protection. For asphalt driveways, use 4-6 inches of compacted crushed stone or recycled asphalt (RAP). For concrete, 2-4 inches of gravel or sand provides adequate support in most climates. The base material must be clean, well-graded (mixture of sizes from dust to 1-inch), and properly compacted to 95% density.
Spread base material in 2-3 inch lifts, compacting each layer before adding the next. This staged approach ensures uniform compaction throughout the base depth. Use a straightedge to check grade and slope as you build up the base—it’s much easier to adjust now than after paving. The base should slope at least 2% (1/4 inch per foot) toward drainage areas to shed water quickly. For a 20-foot-wide driveway, this means a 1-inch difference in elevation from center to edge.
Inspect the base layer carefully before beginning paving. Soft spots or areas that move under foot indicate inadequate compaction and must be reworked. Remove any debris, vegetation, or foreign material that could create weak points. A well-prepared base is invisible but absolutely essential—it’s the difference between a driveway lasting 20 years and one failing in 5 years. Don’t skip or rush this critical phase regardless of project timeline pressure.
Asphalt Paving Process
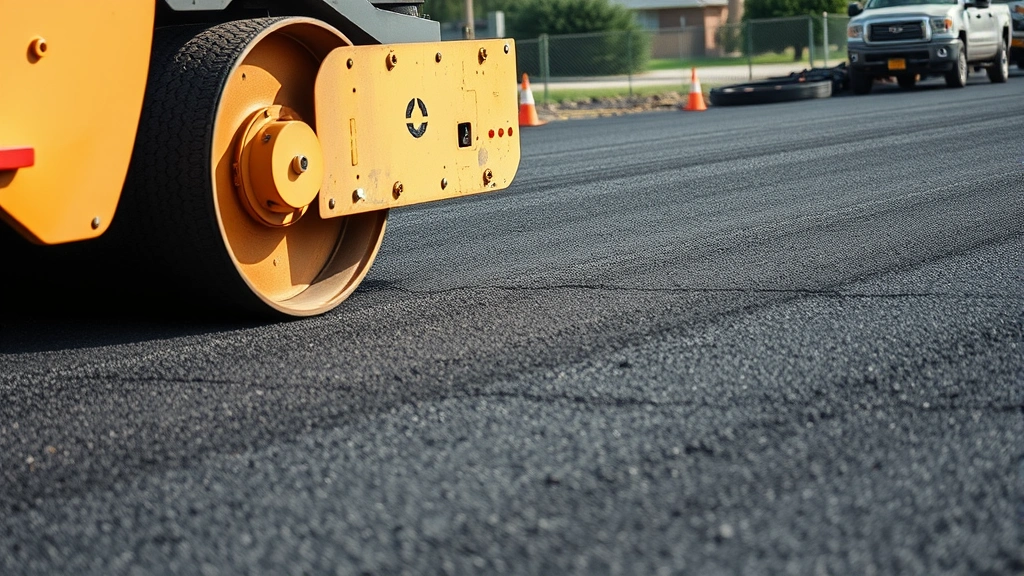
Asphalt paving requires specific equipment and timing. Hot mix asphalt (HMA) is delivered at 300-350°F and must be placed and compacted before cooling below 160°F. For small DIY projects, consider NAPA (National Asphalt Pavement Association) approved contractors for material delivery, or use cold-patch asphalt for repairs, though this won’t match professional hot-laid results.
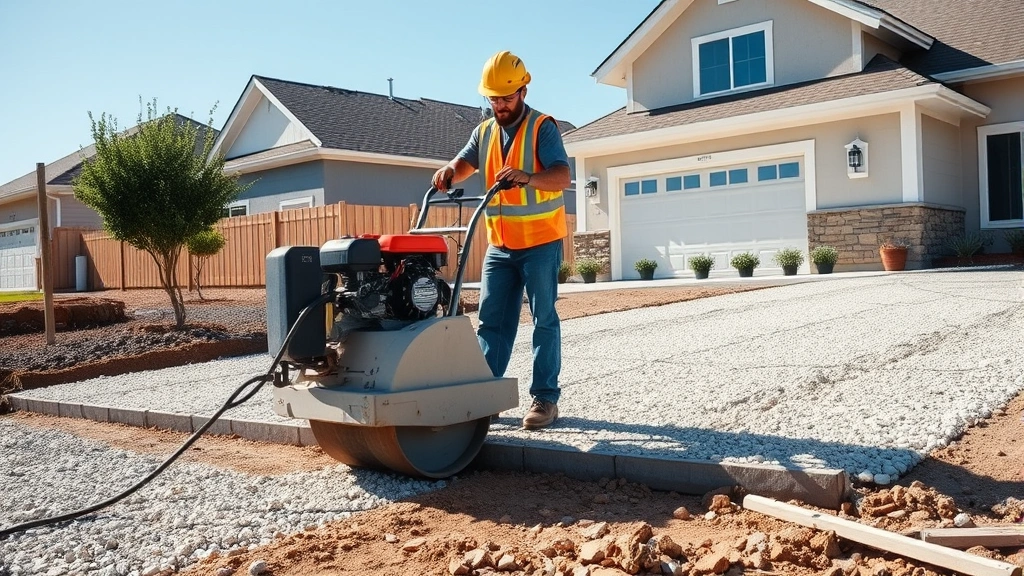
If attempting hot asphalt, coordinate with a local supplier for delivery timing. Rent a plate compactor (minimum 5,000 pounds) and have helpers ready—the work must proceed quickly. Spread asphalt in 2-3 inch layers using a shovel or small paver. Begin compacting immediately, working from edges toward the center in overlapping passes. Make at least 4-6 passes per layer, maintaining steady pressure. The surface should feel firm and well-bonded, with no visible movement under the compactor.
For DIYers, cold-patch asphalt works for filling potholes and cracks but won’t create an acceptable new surface. Alternatively, recycled asphalt (millings) can be compacted and used for temporary repairs or driveways where a rustic appearance is acceptable. If you lack heavy compaction equipment, consider renting a mini roller or consulting with local contractors about material delivery and basic placement while you handle finishing work. Many projects benefit from a hybrid approach combining professional material placement with DIY finishing tasks.
Concrete Paving Techniques
Concrete paving demands careful planning and execution. Calculate concrete volume needed using length × width × depth (in feet, then divide by 27 for cubic yards). A typical 20×40 foot driveway at 4 inches deep requires approximately 10 cubic yards of concrete. Order ready-mix concrete delivered by truck for projects this size—hand-mixing is impractical and produces inconsistent quality.
Build formwork using 2×4 lumber, staking it securely at proper grade and slope. The forms define edges and ensure uniform thickness. Use string lines to verify slope—2% minimum toward drainage. Concrete should arrive within 90 minutes of mixing and be placed immediately after delivery. Spread concrete evenly, working it into formwork corners with shovels or vibrating screeds. Use a gas-powered concrete vibrator to release air pockets and consolidate the mix.
Strike off excess concrete with a straightedge, using a sawing motion across the forms. The surface should be level with form tops and free of voids. Allow initial set (2-4 hours) before finishing. For a smooth surface, use a power trowel in circular motions once the concrete is firm enough to support the equipment without sinking. For a slip-resistant surface, use a broom finish before the concrete fully sets. Cover finished concrete with plastic sheeting and keep it moist for 7 days to prevent rapid drying, which causes cracking.
Saw control joints every 4-6 feet using a concrete saw 24-48 hours after placement. These joints direct cracking into predetermined locations, preventing random cracks. For added durability, consider adding fiber reinforcement or rebar mesh during placement, particularly in freeze-thaw climates where salt exposure is common. Proper concrete curing is absolutely critical—rushing this phase leads to surface scaling, cracking, and premature deterioration.
Drainage and Slope Calculations
Proper drainage is non-negotiable for driveway longevity. Water pooling on your driveway accelerates deterioration and creates safety hazards. The slope should direct water toward street gutters, storm drains, or landscaped areas designed for drainage. A 2% slope (1/4 inch per foot) is minimum; steeper slopes (up to 5%) are acceptable and even preferable in areas with heavy rainfall.
Calculate slope using rise over run: if your driveway is 20 feet wide and you want 2% slope, the rise is 20 × 0.02 = 0.4 feet or approximately 5 inches. Measure from the high edge to the low edge, checking every few feet to maintain consistent slope. Use a string line and level to verify. Crown your driveway (highest in center, sloping toward both sides) for superior drainage—this prevents water from running the entire driveway length.
Consider subsurface drainage if your property is in a low area or has clay soil. Perforated drain pipe installed beneath the base layer, running to daylight or a storm drain, removes water before it can damage the foundation. This is especially important in northern climates where freeze-thaw cycles accelerate water damage. For existing driveways with poor drainage, install French drains or swales adjacent to the surface to redirect surface water away from the paved area.
Sealing and Maintenance
Seal asphalt driveways 6-12 months after installation, then every 2-3 years thereafter. Sealcoat protects asphalt from UV radiation, oxidation, and water penetration—the primary causes of deterioration. Clean the driveway thoroughly, filling cracks larger than 1/4 inch with crack filler before sealing. Apply sealcoat with a squeegee or spray equipment, working in sections and maintaining wet edges to prevent lap marks.
Concrete requires less frequent maintenance but benefits from periodic cleaning and sealing every 2-3 years. Use mild detergent and pressure washing (below 3000 PSI to avoid damage) to remove dirt and stains. Seal concrete with acrylic or penetrating sealers to protect against salt, oil, and water penetration. Repair concrete cracks promptly using concrete crack filler to prevent water intrusion and expansion damage.
For both materials, remove standing water immediately and clear debris regularly. In snowy climates, use plastic shovels or snow blowers rather than metal tools, which can gouge and damage surfaces. Avoid rock salt; use calcium chloride or sand for traction. Repair potholes, cracks, and damaged areas within weeks of discovery to prevent small problems from becoming expensive failures. Regular maintenance extends driveway life by 50% or more, making it the best investment you can make post-installation.
For comprehensive home improvement guidance, explore our DIY Nests Hub Blog where we cover everything from exterior work to interior upgrades. If you’re planning broader home security improvements alongside your driveway project, check out our DIY home security guide for integrated property protection strategies.
FAQ
How long does a driveway paving project typically take?
Small driveways (under 500 square feet) take 2-4 days including site prep, base installation, and paving. Larger driveways may require 5-7 days. Concrete curing requires 7 days before allowing vehicle traffic, while asphalt can typically support vehicles within 48 hours of placement. Factor in weather delays—rain or extreme heat can extend timelines significantly.
What’s the cost difference between DIY and professional installation?
Professional asphalt paving costs $3-5 per square foot; concrete runs $6-12 per square foot. DIY projects reduce material costs by 20-30% but require equipment rental ($200-500 daily) and significant labor. For small repairs, DIY is economical; for full replacements, professional work often provides better value considering equipment, expertise, and warranty coverage.
Can I pave over an existing driveway?
Overlaying asphalt over old asphalt is possible but not recommended for severely damaged surfaces. Concrete over asphalt requires complete removal of the asphalt first. Concrete over concrete is acceptable if the existing surface is structurally sound and properly prepped. Overlaying masks underlying problems; addressing them before paving prevents future failure.
What equipment do I absolutely need to rent?
For asphalt: plate compactor (5,000+ pounds), wheelbarrow, shovel, and broom. For concrete: wheelbarrow, shovel, concrete mixer or ready-mix delivery, straightedge, level, and broom. Consider renting a power compactor for base layer work—hand tamping is inadequate for proper compaction.
How do I repair cracks in my driveway?
For asphalt cracks under 1/4 inch, clean and seal with crack filler. Larger cracks require complete removal and patching with cold-patch asphalt. For concrete, use concrete crack filler or caulk for cracks under 1/4 inch; wider cracks need professional repair or routing and sealing. Address cracks immediately to prevent water penetration and expansion damage.
What’s the best driveway material for freeze-thaw climates?
Asphalt performs better in freeze-thaw cycles because it’s more flexible and tolerates expansion/contraction better than concrete. However, concrete in properly designed installations with adequate drainage and air entrainment (tiny air bubbles) can perform well. Whichever material you choose, excellent drainage is essential in cold climates where water infiltration causes rapid deterioration.


