
Build a Shed Roof: Expert Tips for Success
A shed roof is one of the most rewarding DIY projects you can undertake, combining straightforward construction principles with practical functionality. Whether you’re adding storage to your property or creating a standalone structure, understanding the fundamentals of shed roof building ensures your project stands the test of time while protecting your investment from the elements.
This comprehensive guide walks you through every step of the process, from initial planning and material selection to final installation and weatherproofing. Whether you’re a seasoned builder or tackling your first major project, these expert tips will help you avoid common pitfalls and achieve professional-quality results.

Understanding Shed Roof Basics
A shed roof, also called a skillion or lean-to roof, features a single sloped plane that angles down in one direction. This design differs significantly from traditional pitched roofs with two slopes meeting at a peak. The simplicity of a shed roof makes it an excellent choice for DIY builders because it requires fewer materials, less complex framing, and straightforward installation techniques.
The primary advantage of a shed roof lies in its efficiency. Water naturally drains in one direction, reducing the likelihood of pooling and leaks. The single-slope design also maximizes interior headroom on one side of the structure, making it practical for workshops, storage areas, or covered walkways. Additionally, DIY beginner woodworking projects often incorporate shed roof elements, teaching fundamental framing techniques applicable to larger construction endeavors.
Understanding local building codes is essential before you begin. The International Code Council establishes standards for roof pitch, snow load capacity, and wind resistance that vary by geographic location. Your local building department can provide specific requirements for your area, ensuring your shed roof meets all safety regulations.
Planning and Design Considerations
Successful shed roof construction begins with thorough planning. Start by determining the appropriate roof pitch for your climate. Roof pitch refers to the angle of the slope, typically expressed as a ratio (such as 4:12, meaning four inches of rise for every twelve inches of run). Steeper pitches shed water and snow more effectively but require more materials and present greater installation challenges.
Climate significantly impacts your pitch decision. Regions with heavy snowfall require steeper pitches to prevent snow accumulation, while areas with minimal precipitation can accommodate gentler slopes. Most residential shed roofs use pitches between 3:12 and 6:12, balancing water drainage with construction practicality.
Calculate the total roof area by multiplying the width of your structure by the sloped length of the roof. This measurement determines material quantities and helps you estimate project costs. When measuring the sloped length, use the Pythagorean theorem or a framing calculator to account for the pitch angle—don’t measure only the horizontal distance.
Consider the overhang, which is the horizontal distance the roof extends beyond the wall. A 12 to 18-inch overhang provides adequate protection for walls and foundation while maintaining visual proportion. Larger overhangs offer greater protection but increase material costs and structural demands.
Essential Materials and Tools
Building a shed roof requires careful material selection. Dimensional lumber forms the structural framework, typically 2×6, 2×8, or 2×10 rafters depending on span and snow load requirements. Always select pressure-treated lumber for maximum durability and resistance to rot and insect damage. For non-structural components like nailers and blocking, standard dimensional lumber suffices.
Roof sheathing, typically 1/2-inch or 5/8-inch plywood or oriented strand board (OSB), provides the base for roofing material installation. Ensure sheathing meets local building codes and APA grading standards for structural performance. Install sheathing with 1/8-inch gaps between sheets to allow for expansion and prevent buckling.
Underlayment serves as a critical moisture barrier beneath roofing material. Synthetic underlayment offers superior performance compared to traditional felt, providing better tear resistance, longer lifespan, and improved water shedding. Install underlayment according to manufacturer specifications, typically with 4-inch overlap between courses.
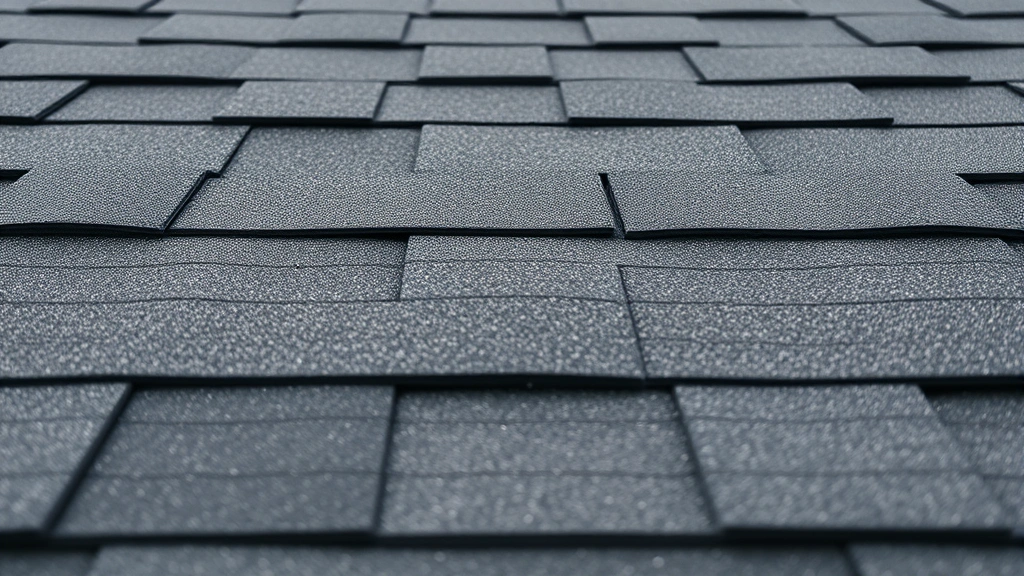
Roofing material options include asphalt shingles, metal panels, rubber membrane, or wood shakes, each with distinct advantages. Asphalt shingles remain the most economical choice for DIY projects, while metal roofing provides exceptional durability and longevity. When selecting material, consider climate conditions, maintenance requirements, and aesthetic preferences.
Essential tools include a circular saw, power drill, nail gun or hammer, tape measure, level, speed square, and safety equipment. Rent specialized tools like a pneumatic roofing nailer rather than purchasing if you lack existing equipment. Proper safety gear—including fall protection, work gloves, and eye protection—is non-negotiable when working at heights.
Building the Roof Frame
The roof frame forms the structural skeleton supporting all subsequent layers. Begin by determining rafter size using load tables from the National Frame Builders Association or consulting with a structural engineer. These resources account for snow loads, wind speeds, and span distances specific to your location.
Mark rafter spacing on the top plates of your shed walls, typically 16 or 24 inches on center. Use a speed square to mark the bird’s mouth cut—the notch where the rafter sits on the wall plate. This cut prevents the rafter from twisting and ensures proper bearing. Calculate the angle based on your roof pitch; a 4:12 pitch requires a specific angle different from a 6:12 pitch.
Create a rafter template by cutting the first rafter and test-fitting it before cutting multiple copies. This approach prevents material waste from measurement errors. Cut all rafters identically, then install them systematically from one end to the other, checking for plumb and level as you progress.
Install collar ties or rafter ties to prevent rafter thrust—the outward pressure that can push walls apart. These horizontal members, typically 1×4 or 1×6 lumber, connect opposing rafters approximately one-third down from the peak. Proper collar tie installation is essential for structural integrity, particularly in high-wind or heavy-snow regions.
Consider adding a ridge board at the highest point where rafters meet, though some builders prefer rafter-to-rafter connections without a board. A ridge board simplifies installation and provides a nailing surface for collar ties. Install it level and secure it with 16d nails, two per rafter.
Installing Sheathing and Underlayment
Once the frame is complete and verified for square and level, install roof sheathing. Start at the eaves and work toward the ridge, ensuring sheathing is continuous and properly fastened. Use 8d nails spaced 6 inches on edges and 12 inches in the field, or follow manufacturer specifications if using pneumatic fasteners.
Stagger sheathing seams to prevent continuous lines that can compromise structural performance. Leave 1/8-inch gaps between sheets to accommodate wood expansion from moisture absorption. In humid climates, these gaps prevent buckling and splitting.
After sheathing installation, inspect the surface for protruding nails, splinters, or irregularities that might damage underlayment or roofing material. Sand high spots and set any protruding fasteners flush with the surface.
Install underlayment by unrolling it perpendicular to the roof slope, starting at the eave and working upward. Overlap each course by 4 inches (or per manufacturer recommendations) and secure with cap nails every 12 to 18 inches. At valleys or transitions, overlap underlayment by 12 inches to ensure complete water shedding. Proper underlayment installation is critical for long-term roof performance; it serves as a backup moisture barrier if roofing material fails.
Applying Roofing Material
Asphalt shingle installation requires attention to detail and proper technique. Start at the eave with a starter course—shingles installed upside down with tabs facing the ridge. This course prevents water from entering under regular shingles during wind-driven rain.
Install the first course of regular shingles directly above the starter course, nailing four nails per shingle positioned above the cutouts. Subsequent courses offset by half a shingle width, creating a staggered pattern that enhances water shedding and visual appeal.
Maintain consistent nail placement and depth—nails should penetrate into sheathing without overdrive, which can tear the shingle surface. Underdrive nails prevent proper shingle security and can lead to blow-off in high winds. Most professionals use pneumatic nailers set for proper depth, minimizing installation errors.
At the ridge, install ridge cap shingles using two nails per cap, positioned to be covered by the next cap in the sequence. The final cap at the ridge peak should be nailed with nails covered by sealant or caulk to prevent water intrusion.
Metal roofing installation follows different principles but emphasizes similar water-shedding fundamentals. Metal panels typically overlap 1.5 inches and fasten through the high ribs using rubber-grommet fasteners. Follow manufacturer specifications precisely, as improper fastening or panel overlap leads to leaks and premature failure.
Ventilation and Moisture Control
Proper ventilation prevents moisture accumulation that can cause rot, mold, and premature deterioration. Even in uninsulated sheds, air circulation reduces condensation and extends roof life. Install soffit vents at the eave to allow fresh air intake, and ridge vents or gable vents for exhaust.
The general ventilation guideline recommends one square foot of ventilation for every 150 square feet of ceiling area (one square foot for every 300 square feet if soffit and ridge vents are balanced). This calculation ensures adequate air exchange without creating pressure differentials that might force moisture into the structure.
If your shed will be insulated—for a workshop or climate-controlled storage—install ventilation baffles between rafters to maintain air space between insulation and roof sheathing. This air gap prevents moisture from condensing on the underside of sheathing, a common cause of rot in poorly ventilated spaces.
Consider the relationship between your shed roof and the main house if it’s an attached structure. Building codes often require fire-resistance ratings for adjacent roofs; consult your local building department for specific requirements. Proper flashing and separation prevent fire spread and water intrusion at the connection point.
Common Mistakes to Avoid
Inadequate planning ranks among the most costly mistakes in shed roof construction. Rushing through design and material calculations leads to undersized framing, insufficient fastening, and material shortages mid-project. Invest time in detailed planning to prevent expensive corrections later.
Improper flashing installation causes the majority of roof leaks. Every penetration—whether a vent pipe, chimney, or edge condition—requires properly installed flashing that directs water away from vulnerable areas. Don’t skimp on flashing materials or installation quality; it’s among the most important elements determining roof longevity.
Insufficient fastening, particularly on shingles near edges and valleys, allows wind damage. Use the manufacturer’s recommended nail quantity and placement, erring toward slightly more fasteners rather than fewer. Undertaking comprehensive home improvement projects demands attention to fastening standards across all components.
Neglecting to account for snow load and wind resistance in your structural design creates safety hazards. Always consult local building codes and use appropriate rafter sizing tables for your geographic region. Undersized framing can collapse under heavy snow or fail in high winds.
Poor ventilation leads to moisture problems that aren’t apparent until significant damage occurs. Inadequate air circulation causes condensation, mold growth, and wood rot that compromise structural integrity over time. Proper ventilation design is an investment in roof longevity.
Mixing incompatible materials creates corrosion and premature failure. Galvanized nails in untreated wood, or aluminum flashing over treated lumber, cause chemical reactions that weaken fasteners and connections. Always verify material compatibility before installation.
Rushing the installation process, particularly in adverse weather, compromises quality. Rain or extreme temperature fluctuations during installation can affect material performance and fastener effectiveness. Plan your project for favorable weather conditions and allocate sufficient time for proper execution.
FAQ
What’s the ideal roof pitch for a shed in a snowy climate?
Snowy climates benefit from steeper pitches—typically 6:12 to 8:12—that promote snow shedding and prevent accumulation. Check your local building code for minimum pitch requirements; many jurisdictions specify minimum pitches based on anticipated snow loads. Steeper pitches reduce structural stress from snow weight and minimize ice dam formation.
How often should I inspect my shed roof for maintenance?
Inspect your shed roof twice annually—spring and fall—looking for damaged or missing shingles, deteriorated flashing, debris accumulation, and moss or algae growth. After severe storms or high winds, conduct additional inspections. Regular maintenance extends roof life significantly compared to neglected roofs.
Can I install a new roof over an existing one?
Building codes typically allow one layer of roofing over an existing layer, provided the existing roof is structurally sound and properly fastened. However, complete removal is often preferable, allowing inspection of underlying sheathing and replacement if damaged. Check local codes before proceeding with overlay installation.
What’s the difference between synthetic and felt underlayment?
Synthetic underlayment offers superior tear resistance, longer lifespan (15+ years versus 15 years for felt), better water shedding, and greater UV resistance. While more expensive initially, synthetic underlayment reduces warranty risks and provides better protection during installation and service life. Most modern roofing warranties require synthetic underlayment.
How do I prevent ice dams on my shed roof?
Ice dams form when warm air from inside melts snow on the roof, which refreezes at the eaves where temperatures are colder. Prevent ice dams through proper ventilation, adequate insulation if the space is heated, and ice-and-water shield installed at eaves during initial construction. Some builders install heat cables as a temporary solution, though proper ventilation is the permanent fix.
What’s the expected lifespan of asphalt shingles?
Quality asphalt shingles typically last 20-30 years in moderate climates, with premium products extending to 50 years. Lifespan depends on climate, installation quality, ventilation, and maintenance. Extreme temperature fluctuations, intense UV exposure, and poor ventilation reduce longevity. Metal roofing can exceed 50 years with minimal maintenance.
Do I need a building permit for a shed roof replacement?
Most jurisdictions require permits for roof replacement or new construction. Permits ensure work meets current building codes and that inspections verify proper installation. Skipping permits creates liability issues, complicates insurance claims, and may require costly corrections. Always check with your local building department before starting work.
How should I dispose of old roofing materials?
Contact local waste management facilities for disposal options. Many communities accept roofing materials at designated recycling centers. Some contractors recycle asphalt shingles into road surface material. Check with your building department or waste management provider for approved disposal methods in your area.


