DIY Shed Plans: How Far Apart Are Studs? Expert Tips
Building a shed from scratch requires understanding fundamental framing principles, and stud spacing is one of the most critical decisions you’ll make. Whether you’re constructing a small storage shed or a larger workshop structure, knowing the correct distance between studs directly impacts structural integrity, building code compliance, and long-term durability. This comprehensive guide walks you through everything you need to know about stud spacing, from standard measurements to regional variations and load-bearing considerations.
Stud spacing isn’t arbitrary—it’s determined by building codes, material strength, roof load capacity, and the specific purpose of your shed. Getting this right from the beginning prevents costly mistakes, ensures your shed withstands weather conditions, and makes the framing process more efficient. Whether you’re following DIY woodworking plans or adapting existing designs, understanding stud spacing will make you a more confident builder.
Standard Stud Spacing Measurements
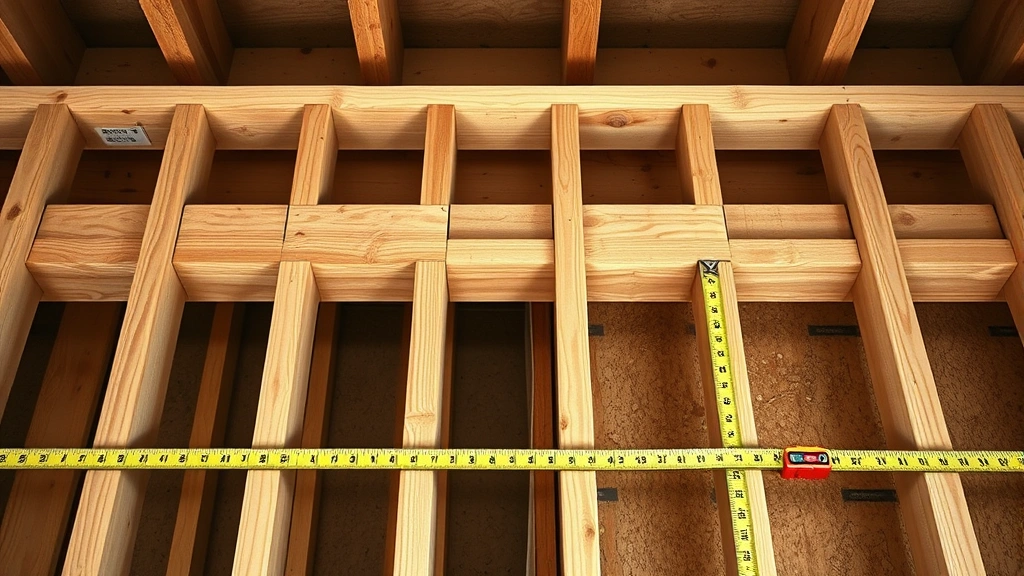
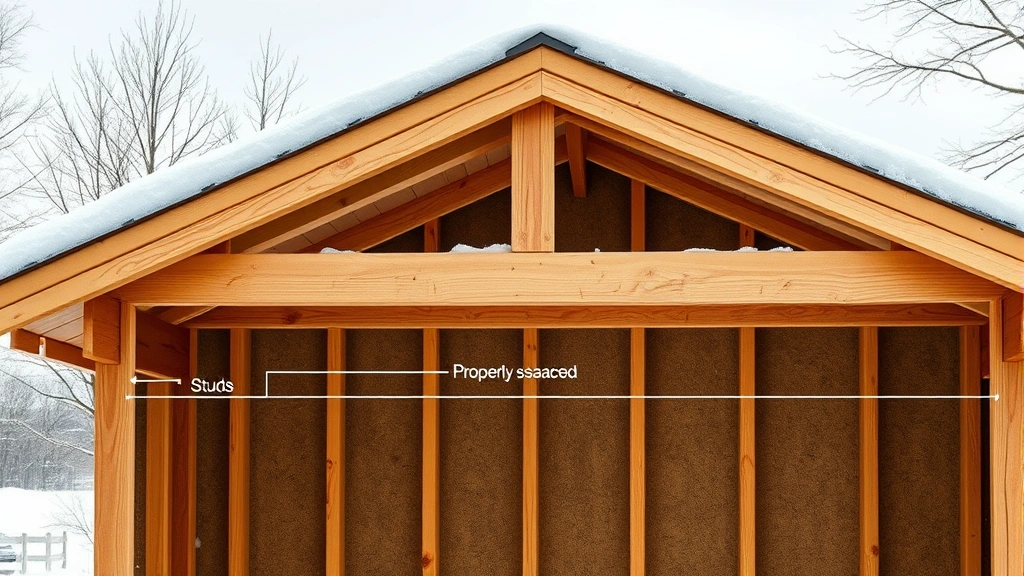
The most common stud spacing in residential and agricultural construction is 16 inches on center (O.C.), which means the distance measured from the center of one stud to the center of the adjacent stud is 16 inches. This spacing has become the industry standard because it aligns perfectly with standard sheet material dimensions like plywood and drywall, which typically come in 4-foot widths that divide evenly into 16-inch increments.
The second most prevalent spacing standard is 24 inches on center, which is increasingly popular for shed construction because it reduces material costs while still maintaining adequate structural support for most shed applications. With 24-inch spacing, you use approximately one-third fewer studs than 16-inch spacing, significantly reducing lumber expenses. However, 24-inch spacing requires slightly larger dimension lumber or may not be suitable for all climate zones and load conditions.
Some builders use 12-inch spacing for specialized applications where extra rigidity is needed, such as sheds designed to store heavy equipment, support significant roof loads in snow-prone regions, or withstand high wind speeds. This closer spacing provides enhanced lateral bracing and is sometimes required in areas with extreme weather conditions.
The distinction between “on center” and “face-to-face” spacing is important. On-center spacing measures from the middle of one stud to the middle of the next, while face-to-face spacing measures the actual gap between studs. With 2×4 lumber (which is actually 1.5 inches thick), 16-inch on-center spacing creates approximately 14.5 inches of open space between stud faces, and 24-inch on-center spacing creates roughly 22.5 inches of open space.
Building Codes and Regulations
Your local building department has final authority over stud spacing requirements, and these regulations vary by jurisdiction. The International Building Code (IBC) provides baseline standards that most jurisdictions adopt or adapt. According to the IBC, exterior walls in residential structures typically require studs spaced no more than 16 inches on center, though many jurisdictions allow 24-inch spacing under specific conditions.
Before finalizing your shed framing plans, contact your local building department to obtain specific requirements for your area. Some jurisdictions have adopted the National Fire Protection Association (NFPA) standards, while others maintain their own codes. Sheds are sometimes classified as agricultural buildings, which may have less stringent requirements than residential structures, but this varies significantly by location.
The American Wood Council provides comprehensive design specifications for wood construction that inform building codes nationwide. Their guidelines consider lumber grades, species, moisture content, and load conditions to determine safe spacing intervals. When in doubt, consulting these authoritative sources ensures your shed meets or exceeds minimum standards.
Building permits typically require submission of framing plans that clearly indicate stud spacing, lumber dimensions, and connection details. While this might seem bureaucratic, it protects your investment and ensures the structure is safe. Many jurisdictions allow simplified shed plans that follow prescriptive standards, which means if you follow established guidelines exactly, you don’t need engineering calculations or sealed plans from a professional engineer.
Load-Bearing and Environmental Factors
Determining appropriate stud spacing requires analyzing the loads your shed structure must support. Dead load refers to the permanent weight of the structure itself—framing, roofing materials, and siding. Live load includes temporary weights like snow accumulation, wind pressure, and anything stored inside the shed. Environmental loads encompass wind speed, seismic activity, and snow depth specific to your geographic location.
Snow load is particularly critical in northern climates. A shed roof in Minnesota might need to support 50 pounds per square foot of snow, while a similar structure in Georgia might only need to accommodate 10 pounds per square foot. Closer stud spacing (16 inches or tighter) becomes necessary in high-snow regions. The Federal Emergency Management Agency (FEMA) provides snow load maps by region, and your local building code specifies the design snow load for your exact location.
Wind resistance is another critical factor. Coastal areas and regions prone to severe storms require more robust framing. In these zones, 16-inch stud spacing is typically mandatory, and additional bracing, hurricane ties, and reinforced connections become necessary. Sheds designed for high-wind regions need stronger connections between the wall frame and foundation, and between the roof and walls, than those in calmer climates.
The roof pitch and configuration affect load distribution. Steeper roofs shed snow more readily and experience different wind pressures than low-pitch roofs. A steep gable roof concentrates loads differently than a simple shed roof, influencing the stud spacing requirements. Additionally, the span of rafters between walls determines how effectively the wall frame must support roof loads, which indirectly affects optimal stud spacing decisions.
Interior storage plans should influence your stud spacing choice. If you’re storing heavy equipment, tools, or materials on shelving systems, the walls experience additional concentrated loads. In these cases, closer stud spacing provides better support for heavy-duty shelving systems and prevents wall deflection over time. Conversely, a shed used primarily for seasonal storage of lightweight items can accommodate wider spacing.
How to Calculate Stud Quantity
Once you’ve determined the appropriate stud spacing for your shed, calculating the exact number of studs needed is straightforward. Start with the perimeter of your shed in linear feet. For example, an 8-foot by 10-foot shed has a perimeter of 36 linear feet (8+10+8+10).
Divide the perimeter by your chosen spacing interval. For 16-inch spacing, first convert 16 inches to feet: 16 ÷ 12 = 1.33 feet. Then divide: 36 ÷ 1.33 = approximately 27 studs. For 24-inch spacing: 24 ÷ 12 = 2 feet, so 36 ÷ 2 = 18 studs. Always round up to the nearest whole number and add a few extra studs for mistakes, damage, or future modifications.
Remember that corners require special attention. Most framing methods use three studs at corners (one on each wall plus one additional stud for nailing), which affects your final count. Additionally, openings for doors and windows require extra studs called “trimmers” and “cripples” on either side of the opening. When planning your shed layout, consider these additional studs in your material list to avoid shortages during construction.
Window and door headers also influence stud quantity. The header—a horizontal beam above openings—typically spans from one trimmer stud to another, and the size depends on the opening width and roof loads. Larger openings require stronger headers and often necessitate additional studs beside the opening to support the header adequately.
Professional builders often add 5-10% extra material to their calculations to account for waste, mistakes, and site-specific adjustments. For a small shed project, purchasing one or two extra studs is inexpensive insurance against supply chain issues or construction problems. Modern lumber yards often have liberal return policies, so slightly overordering is preferable to running short mid-project.
Installation Tips for Proper Spacing
Achieving consistent spacing during framing requires careful planning and accurate measurement. Start by snapping chalk lines on your top and bottom plates indicating stud locations. Use a tape measure to mark each stud location at regular intervals, and double-check measurements before cutting or installing any studs. A simple pneumatic nailer speeds up installation but doesn’t replace careful measuring—measure twice, nail once.
Use layout tools like story poles (marked wooden strips showing all stud locations) to transfer measurements accurately from one wall to the next. This ensures consistency across all walls and prevents the “drift” that occurs when errors accumulate across multiple studs. Professional framers rely on layout tools because they dramatically reduce mistakes and speed up the framing process.
When installing studs, maintain consistent vertical alignment using a level. Studs must be truly vertical (plumb) to ensure proper load distribution and to prevent walls from appearing wavy after siding installation. A 4-foot or 6-foot level works well for checking individual studs, while a laser level can check multiple studs simultaneously.
Secure each stud with appropriate fasteners—typically three 16-penny nails at the top and bottom of each stud for traditional framing, or two fasteners if using structural screws. Fastener type and quantity are specified in building codes and vary based on load conditions. Using fewer fasteners than required compromises structural integrity and violates building codes.
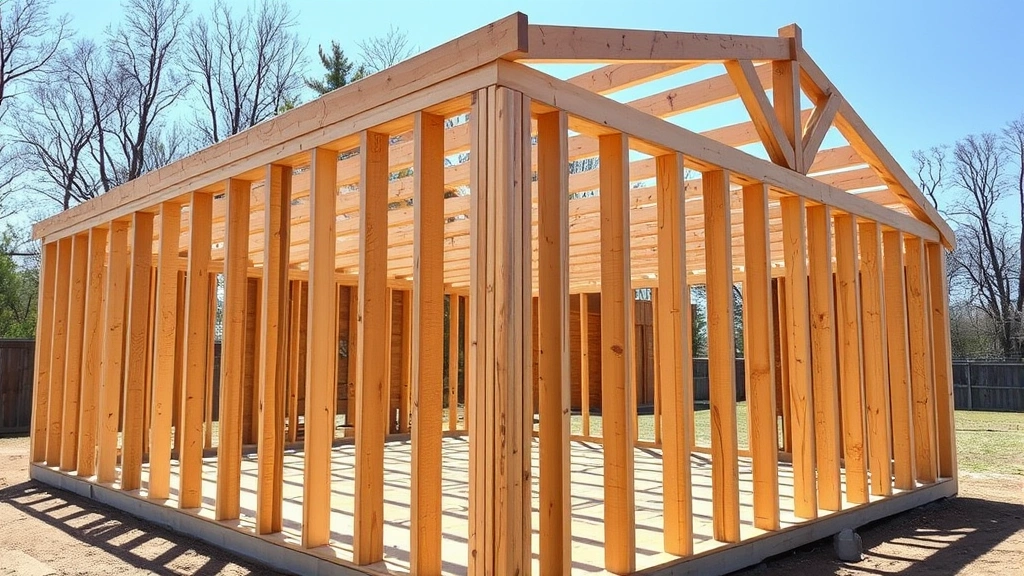
Consider temporary bracing during construction. Before installing wall sheathing, walls are structurally weak and prone to racking (leaning sideways). Temporary diagonal bracing prevents this and makes the overall structure more stable during construction. Once sheathing is installed, the sheathing itself provides lateral bracing, and temporary bracing can be removed.
Common Mistakes to Avoid
The most common mistake amateur builders make is inconsistent spacing. Varying the distance between studs creates weak points where loads concentrate, potentially causing wall failure. Even small variations accumulate, and what starts as a slight error at the first stud can result in significant discrepancies by the end of a 20-foot wall. Always measure from the same reference point (typically from the outside corner) to ensure consistency.
Another frequent error is using spacing that violates local building codes. Some builders assume that if 24-inch spacing works in one region, it’s acceptable everywhere. However, snow loads, wind speeds, and seismic requirements vary dramatically by location. What’s safe in Arizona might be inadequate in Vermont. Always verify your local requirements before finalizing your shed design.
Improper fastening is another critical mistake. Using too few nails, using the wrong size fasteners, or placing fasteners incorrectly significantly reduces structural capacity. Fasteners should penetrate the full depth of studs (at least 1.5 inches for 2×4 lumber) and should be spaced according to code. Skimping on fasteners to save money creates a false economy—a failed structure costs far more to repair than quality fasteners cost upfront.
Mixing lumber dimensions is problematic. If some studs are 2×4 and others are 2×6, the wall appears uneven after siding installation, and load distribution becomes uneven. Maintain consistent lumber dimensions throughout the wall frame unless design requirements specifically call for variation. Similarly, using warped or damaged lumber compromises structural performance—inspect all lumber before installation and reject pieces that don’t meet quality standards.
Neglecting to account for door and window headers is a common planning mistake. Many builders frame walls with consistent stud spacing without considering where openings will be located, then discover mid-project that the spacing conflicts with the desired opening location. Plan opening locations during the design phase and adjust stud spacing if necessary to minimize header complexity.
When working on building projects, overlooking ventilation requirements is another oversight. Adequate air circulation within wall cavities prevents moisture accumulation and prolongs structural life. Ensure your framing design allows for proper ventilation, especially in humid climates or sheds used for storage of items that generate moisture.
Regional Code Variations
Building codes vary significantly across North America, reflecting regional climate differences and construction traditions. In the Pacific Northwest, where heavy snow and rain are common, 16-inch stud spacing is typically mandatory for residential and agricultural structures. Coastal regions require similar spacing due to wind speed requirements, often with additional requirements for hurricane-resistant connections.
The Mountain West region experiences extreme snow loads, particularly at higher elevations. Some mountain communities require 12-inch stud spacing for all exterior walls due to anticipated snow loads exceeding 100 pounds per square foot. These requirements seem excessive until you consider that a 20-foot-wide shed roof covered with 4 feet of wet snow experiences enormous loads.
The Midwest and Great Plains experience severe wind events and occasional snow loads. Most jurisdictions in these regions allow 24-inch spacing for non-load-bearing walls and agricultural buildings, though 16-inch spacing is preferred for structures expected to store heavy items. Tornado and severe thunderstorm resistance is a consideration in some areas, leading to more stringent requirements than coastal wind codes.
Southern regions with mild winters and moderate winds often allow 24-inch spacing for shed construction. However, even in the South, local variations exist. Coastal Louisiana and Mississippi require special consideration for hurricane-force winds, leading to more stringent requirements than inland areas of the same states.
Before finalizing your shed design, research the specific requirements of your county or municipality. Contact your local building department and request the design snow load, basic wind speed, and any specific requirements for agricultural or storage buildings. This information is typically available online or through a simple phone call, and it’s free to obtain.
FAQ
Can I use 24-inch stud spacing for all shed construction?
Not necessarily. While 24-inch spacing is acceptable for many applications, it depends on your local building code, climate zone, intended use, and roof design. High-snow regions, coastal areas with strong winds, and sheds designed for heavy storage typically require 16-inch or tighter spacing. Always verify with your local building department before using 24-inch spacing.
What’s the difference between on-center and face-to-face spacing?
On-center spacing measures from the center of one stud to the center of the next stud. Face-to-face spacing measures the actual gap between stud surfaces. With 2×4 lumber, 16-inch on-center spacing creates approximately 14.5 inches of face-to-face spacing. Understanding this distinction is crucial for accurately calculating material quantities and ensuring proper sheathing alignment.
Do I need closer stud spacing if I’m storing heavy items in my shed?
Yes, heavier storage loads increase wall stresses. If you plan to install heavy shelving or store equipment that weighs significantly, consider 16-inch or tighter spacing rather than the standard 24-inch. Closer spacing provides better support for shelving systems and reduces wall deflection over time, preventing sagging or warping.
How do building inspectors verify stud spacing?
Building inspectors examine framing before sheathing is installed. They measure spacing at multiple points along each wall, check that studs are plumb (vertically true), verify that fasteners are properly placed, and ensure that all connections meet code requirements. Inspectors also review submitted plans to confirm that the actual construction matches the approved design.
Can I deviate from standard spacing if I use stronger lumber?
Building codes specify minimum standards based on standard lumber grades and dimensions. While using stronger lumber might theoretically allow wider spacing, building codes don’t typically permit this deviation without engineering calculations. Deviating from prescriptive code standards requires a professional engineer’s design, which is more expensive than simply following standard spacing guidelines.
What happens if my shed framing doesn’t meet code requirements?
If your shed doesn’t meet building code requirements, the building inspector will issue a notice of violation. You’ll be required to bring the structure into compliance, which might involve adding additional studs, reinforcing connections, or in severe cases, demolishing and rebuilding portions of the structure. This is far more expensive and time-consuming than building correctly from the start.
Should I hire a professional to design my shed framing?
For straightforward shed designs following standard dimensions and using prescriptive code requirements, most experienced DIYers can successfully frame a structure using published plans and local building codes. However, if your shed has unusual dimensions, complicated roof designs, or significant storage loads, hiring a structural engineer or experienced framer for design consultation is worthwhile. The modest design cost prevents expensive mistakes and ensures code compliance.
How does roof pitch affect stud spacing requirements?
Steeper roofs shed snow more readily and experience different wind pressures than low-pitch roofs, affecting load distribution on wall frames. Steeper roofs generally allow slightly wider stud spacing because loads are more evenly distributed, while very low-pitched roofs concentrate loads differently. Your building code specifies roof pitch considerations, or you should consult an engineer if using non-standard pitches.


