
Can You Build a Shed? Expert Tips Inside
Building a shed is one of the most rewarding DIY projects you can undertake. Whether you’re looking to create additional storage space, establish a workshop, or build a backyard retreat, a shed offers practical value and the satisfaction of hands-on construction. The question isn’t whether you can build a shed—it’s whether you’re willing to invest the time, effort, and resources to do it right.
Many homeowners hesitate before starting a shed project, wondering if they possess the necessary skills or understanding of construction principles. The truth is, with proper planning, the right tools, and access to quality guidance, most people can successfully build a functional shed. This comprehensive guide walks you through everything you need to know, from initial planning stages through final touches.
Assessing Your Skills and Experience Level
Before breaking ground on your shed project, honestly evaluate your current skill set and construction experience. If you’ve completed beginner woodworking projects, you likely possess foundational knowledge that transfers directly to shed building. Understanding basic carpentry, measuring accurately, and working safely with power tools are essential prerequisites.
First-time builders should start with smaller sheds—typically 8×10 feet or 10×12 feet—rather than ambitious 16×20 foot structures. Smaller projects teach you the fundamentals without overwhelming complexity. Consider whether you’ve worked with:
- Circular saws, miter saws, and power drills
- Levels and measuring tapes
- Fastening techniques like nailing and screwing
- Reading and interpreting construction plans
- Working at heights safely
If you lack experience with any of these areas, invest time in learning before starting. Watch instructional videos, take a local community college course, or work alongside an experienced builder. This preparation pays dividends in project quality and safety.
Planning Your Shed Project
Comprehensive planning separates successful projects from frustrating ones. Start by determining your shed’s purpose—storage, workshop, garden center, or recreational space. This decision influences size, ventilation requirements, and interior layout.
Check Local Building Codes and Regulations: Before any construction begins, contact your local building department or visit their website. Many jurisdictions require building permits for sheds exceeding certain square footage (often 120-200 square feet). Some areas have setback requirements—minimum distances from property lines. Understand zoning restrictions in your area. Obtaining proper permits protects your property investment and ensures your shed meets safety standards.
Select an appropriate location considering:
- Sun exposure and shade patterns
- Drainage and water runoff
- Proximity to trees (falling branches hazard)
- Utility line locations (call before digging)
- Access for delivery of materials and equipment
- Visibility and aesthetic impact on your property
Create detailed plans or source proven designs. Numerous resources provide shed plans with cutting lists and material specifications. Construction specification databases and manufacturer guides ensure your design incorporates industry standards.
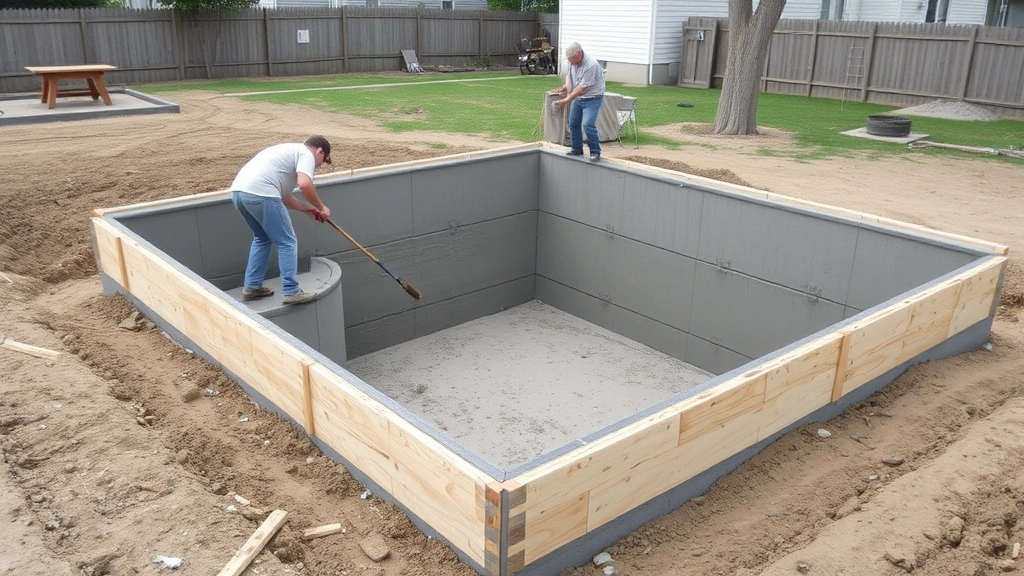
Foundation and Site Preparation
A solid foundation prevents structural problems, pest infiltration, and premature deterioration. Foundation options include concrete slabs, concrete piers, gravel beds, or wooden skids. Your choice depends on climate, soil conditions, and local codes.
Concrete Slab Foundation: This permanent option provides excellent protection and level support. Excavate 4-6 inches, add gravel base, install wooden forms, and pour concrete. Allow proper curing time before building on top. Concrete slabs require more initial investment but offer superior longevity.
Concrete Pier Foundation: Ideal for areas with freeze-thaw cycles, piers allow air circulation underneath, preventing moisture accumulation. Dig holes below frost line depth (varies by region—check regional frost depth requirements), set concrete piers, and attach wooden posts on top.
Gravel Bed Foundation: Simple and cost-effective, gravel bases work for temporary structures in well-draining locations. Excavate, compact soil, add 4-6 inches of compacted gravel, and level carefully. This option requires more maintenance than concrete alternatives.
Wooden Skid Foundation: Pressure-treated wooden beams create a portable foundation suitable for small sheds. Ensure beams are rated for ground contact and properly spaced to prevent sagging.
Regardless of foundation type, ensure the surface is level within 1/4 inch over 10 feet. Uneven foundations cause framing problems, door misalignment, and structural stress.
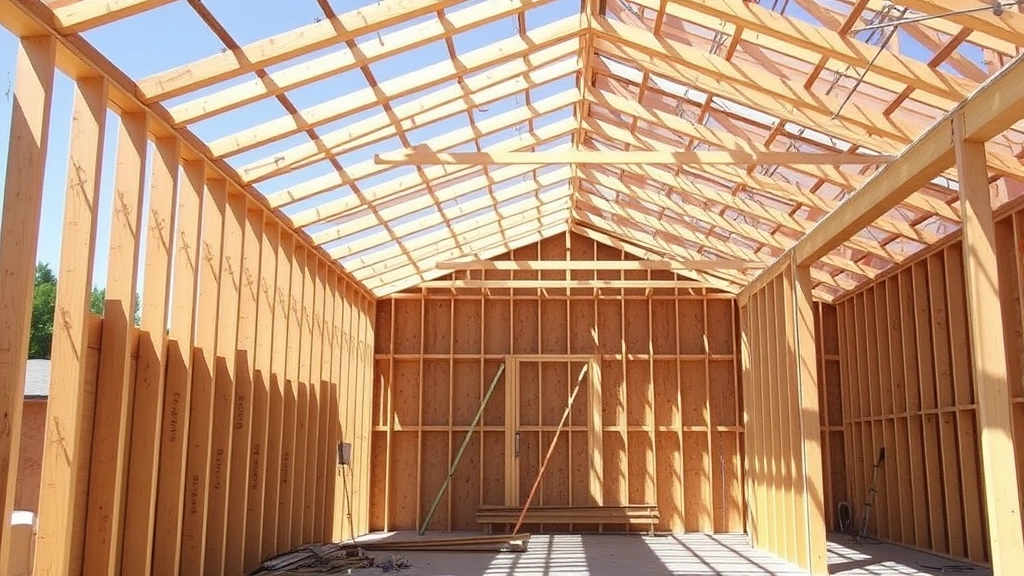
Framing the Structure
Framing forms your shed’s skeleton. Standard construction uses 2×4 lumber for wall studs spaced 16 inches on center. This spacing balances strength with material efficiency.
Wall Framing Process: Build wall sections on the ground, then raise them into position. Construct each wall as a rectangular frame with studs, top plate, and bottom plate. Add diagonal bracing or plywood sheathing for lateral stability. Space door and window openings accurately according to plans.
Key framing considerations:
- Use pressure-treated lumber for bottom plates contacting foundations
- Install proper blocking between studs for nailing attachment points
- Ensure all corners are square using the 3-4-5 triangle method
- Plumb walls vertically using a level
- Brace walls temporarily during construction to prevent collapse
- Consider additional DIY construction resources for advanced techniques
Roof framing typically uses either rafters or trusses. Trusses come prefabricated and are easier for beginners, while rafters require more calculation but offer design flexibility. Ensure roof pitch provides adequate drainage—typically 4:12 (4 inches rise per 12 inches horizontal run) or steeper for snow-prone regions.
Roofing Installation
The roof protects everything inside your shed. Proper installation prevents leaks and water damage. Standard roofing materials include asphalt shingles, metal panels, or cedar shakes.
Asphalt Shingle Installation: This most common option is affordable and relatively beginner-friendly. Install plywood or OSB sheathing over rafters, add underlayment, then nail shingles starting from the roof’s lower edge. Ensure proper overlap and use roofing cement at valleys and edges.
Critical roofing steps:
- Install drip edge along roof perimeter
- Add proper ventilation—soffit and ridge vents prevent moisture accumulation
- Use ice and water shield in freeze-thaw climates
- Seal penetrations like vent pipes with flashing and caulk
- Ensure gutters and downspouts direct water away from foundation
Safety is paramount when working at heights. Use proper scaffolding or ladder systems, wear non-slip footwear, and consider fall protection equipment. Never work on roofs during wet conditions or high winds.
Doors, Windows, and Finishing
Doors and windows provide access, light, and ventilation. Pre-hung door and window units simplify installation compared to building from scratch. Frame openings to match unit dimensions precisely.
Install doors with proper weatherstripping and threshold to prevent water infiltration and pest entry. Consider single or double doors depending on equipment you’ll store. Many shed owners add security features like locks to protect valuable tools and equipment.
Interior finishing depends on use. Workshop sheds benefit from:
- Shelving for organized tool storage
- Workbenches anchored to studs
- Electrical outlets for power tools (installed by licensed electrician)
- Adequate lighting—consider solar options or standard fixtures
Exterior finishing protects the structure and enhances appearance. Paint or stain wood siding, seal gaps with caulk, and maintain finishes annually. Metal roofs may require periodic cleaning and touch-ups.
Tools and Equipment Needed
Successful shed building requires appropriate tools. Essential equipment includes:
- Measuring and Layout: 25-foot tape measure, framing square, speed square, chalk line, level (4-6 feet)
- Cutting: Circular saw, miter saw, reciprocating saw, hand saw
- Fastening: Power drill/driver, hammer, pneumatic nailer (optional but valuable)
- Safety: Safety glasses, dust mask, work gloves, hearing protection, hard hat for overhead work
- Miscellaneous: Pencils, clamps, sawhorses, work lights, ladder or scaffolding
Tool rental is cost-effective if you don’t own specialized equipment. Many home improvement retailers rent miter saws, nail guns, and scaffolding systems at reasonable daily rates.
Common Mistakes to Avoid
Learning from others’ mistakes accelerates your success. Common shed-building errors include:
Inadequate Foundation Preparation: Skipping proper leveling causes structural problems. Invest time ensuring your foundation is perfectly level before framing begins.
Ignoring Drainage: Poor water management leads to rot and deterioration. Grade soil away from your shed, install gutters, and ensure downspouts direct water at least 4 feet away.
Skipping Permits: Building without required permits creates liability and resale issues. Obtain proper approvals before starting construction.
Improper Fastening: Using nails where screws are needed or insufficient fastening causes structural failure. Follow plans regarding fastener types and spacing.
Neglecting Safety: Rushing increases injury risk. Wear appropriate protective equipment, use tools correctly, and never work when fatigued or distracted.
Poor Material Selection: Using untreated lumber where pressure-treated is required leads to rot. Understand material requirements for your climate and shed purpose.
If you’re considering related projects, explore basement finishing techniques that share similar construction principles. Many skills transfer between different DIY building projects.
FAQ
How long does it take to build a shed?
Timeline varies based on shed size, your experience, and weather conditions. Small 8×10 sheds typically require 40-80 hours spread over 2-4 weeks. Larger structures may take 2-3 months. Proper planning reduces unexpected delays.
Do I need building permits for a shed?
Requirements vary by location. Most jurisdictions require permits for structures exceeding 100-200 square feet or with permanent foundations. Contact your local building department to determine requirements. Permits ensure code compliance and protect your investment.
What’s the most cost-effective foundation?
Gravel bed foundations are cheapest initially but require maintenance. Concrete piers offer good value for most climates, providing durability without full slab expense. Consider long-term costs rather than upfront price alone.
Can I build a shed without previous construction experience?
Yes, with proper preparation and resources. Start with smaller projects, invest in quality plans, and don’t hesitate to ask experienced builders for guidance. Taking a basic carpentry course accelerates your learning curve significantly.
What’s the best roofing material for a shed?
Asphalt shingles offer the best value and ease of installation for most homeowners. Metal roofing lasts longer but requires more installation skill. Cedar shakes provide aesthetic appeal but need regular maintenance. Choose based on your climate, budget, and maintenance willingness.
Should I hire professionals for any part?
Consider hiring licensed electricians if you need outlet installation or lighting. Professional roofers reduce safety risks if you’re uncomfortable working at heights. Foundation specialists ensure proper concrete work. Most framing, finishing, and basic tasks are achievable for dedicated DIYers.
How do I ensure my shed is level and square?
Use a 4-6 foot level to check all horizontal surfaces within 1/4 inch over 10 feet. Verify square corners using the 3-4-5 triangle method: measure 3 feet along one side, 4 feet along the adjacent side, and 5 feet diagonally. Adjust until measurements are accurate.


