
Build a Shed? Expert-Approved 10-Step Guide
Building a shed transforms your property while providing valuable storage, workspace, or hobby space. Unlike the Titanic, which took approximately 3 years to construct (1909-1912), a residential shed can be completed in just a few weekends with proper planning and preparation. Whether you’re a seasoned DIYer or tackling your first major project, this comprehensive guide walks you through every phase of shed construction, from initial site selection through final finishing touches.
The beauty of shed building lies in its scalability and accessibility. You don’t need advanced carpentry skills or expensive equipment to create a functional, attractive structure. This guide incorporates expert-approved techniques, safety protocols, and best practices that ensure your shed stands the test of time while maximizing your investment and effort.
Step 1: Choose Your Location and Plan
Selecting the right location is foundational to your shed’s success and longevity. Survey your property for areas that receive adequate drainage, avoid low spots where water pools, and consider proximity to utilities. The best shed locations balance accessibility with aesthetic integration into your landscape. Check that your chosen spot receives appropriate sunlight if you plan to use it as a workspace, but consider shade if storage is your primary goal.
Before breaking ground, consult ICC (International Code Council) resources for your region’s specific building requirements. Most areas require setback distances from property lines, typically ranging from 3 to 10 feet depending on local ordinances. Create detailed plans or download pre-made designs that match your vision and skill level. Your plans should include dimensions, material lists, electrical layouts if applicable, and structural details.
Consider climate factors in your design. Regions with heavy snow loads require steeper roof pitches and stronger framing. Areas prone to high winds benefit from reinforced connections and lower profile designs. Think about future expansion or modification needs when selecting your dimensions.
Step 2: Obtain Permits and Check Local Codes
Permit requirements vary significantly by jurisdiction. Many areas exempt small sheds (typically under 100-200 square feet) from permitting, while others require permits for structures above a certain size threshold. Contact your local building department or National Association of Home Builders to understand specific regulations affecting your project. Some municipalities require inspections at foundation, framing, and completion stages.
Building codes address critical safety elements including setbacks, foundation requirements, wind and snow load calculations, electrical safety, and accessibility standards. Skipping this step invites potential fines, complications when selling your property, and insurance issues. Most building departments offer free consultations to answer questions about your specific project.
Document all approvals and keep permits accessible during construction. Building inspectors may visit to verify compliance with approved plans. This protection ensures your structure meets safety standards and maintains your property’s insurability.
Step 3: Prepare Your Foundation
Your foundation determines whether your shed remains level and stable for decades or develops structural problems within years. Foundation options include concrete slabs, concrete piers, gravel beds, or concrete blocks. For most residential sheds, concrete piers or a gravel foundation provide excellent cost-to-benefit ratios.
Concrete piers involve digging holes below the frost line (depth varies by region, typically 12-48 inches) and setting concrete footings that support posts or beams above grade. This approach prevents frost heave—the upward movement of soil during freeze-thaw cycles that destabilizes structures. Gravel foundations work well in well-draining areas; compact 4-6 inches of gravel to create a level, stable base.
For concrete slab foundations, prepare subgrade by removing topsoil, compacting soil, and adding 4-6 inches of gravel base. Pour 4-6 inches of concrete reinforced with rebar or wire mesh. Ensure proper slope (1/8 inch per foot minimum) for drainage. Let concrete cure fully before proceeding—typically 7 days in normal conditions.
Measure diagonals from corner to corner to ensure your foundation is square. Measurements should be equal; if not, adjust corner positions until square. This step prevents racking (diagonal distortion) that complicates wall and roof installation.
Step 4: Build the Floor Frame
The floor frame sits atop your foundation and supports all interior loads. Use pressure-treated lumber rated for ground contact to resist rot and insect damage. Typical floor framing uses 2×8 or 2×10 rim joists with interior joists spaced 16 inches on center.
Begin by installing the perimeter rim joist, checking for level and square. Interior joists run perpendicular to the rim joist, attached with joist hangers or toe-nailed with 3-inch nails. Space joists consistently to ensure even support and prevent floor bounce. For sheds exceeding 12 feet in width, consider adding a center beam for additional support.
Install rim board blocking between joists at 4-foot intervals to prevent joists from twisting. This bracing significantly improves floor rigidity and prevents squeaking. Once framing is complete, install subflooring—typically 3/4-inch plywood with 1/8-inch expansion gaps between sheets. Nail or screw subflooring every 8 inches along joists and 12 inches at intermediate supports.
Proper floor framing prevents uneven settling and provides a stable base for wall installation. Take time to get this step right; correcting floor issues later is exponentially more difficult.
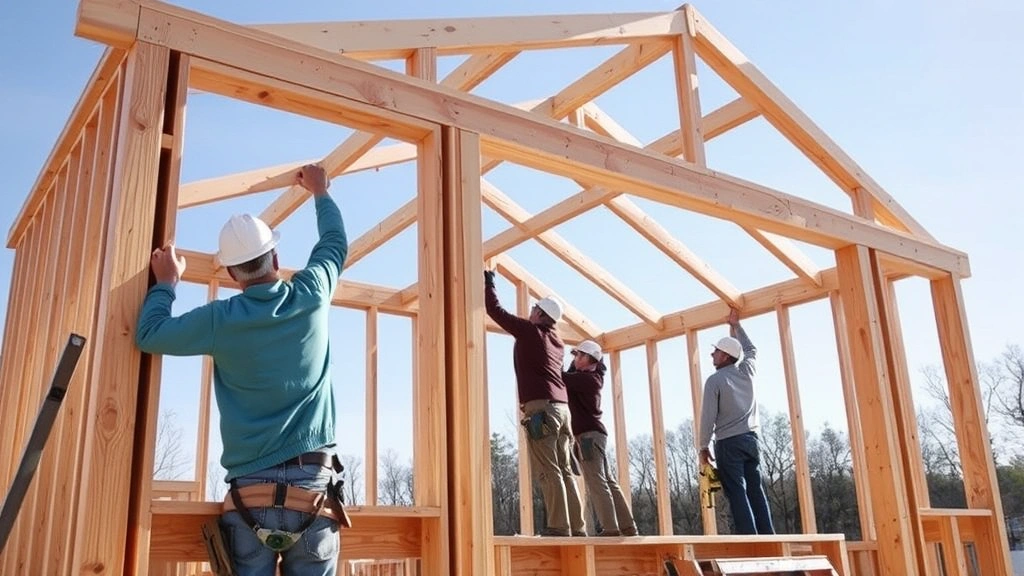
Step 5: Construct the Wall Frames
Wall framing creates the vertical structure supporting your roof and enclosing your shed. Standard wall framing uses 2×4 studs spaced 16 inches on center, with doubled top plates and single bottom plates. Calculate stud quantities based on wall length: divide total length by 16, add one for end studs, then multiply by number of walls.
Build wall sections flat on the floor before raising them. This approach is safer, more efficient, and ensures square, plumb walls. Create each wall section with bottom plate, studs, and top plate, then secure with 3-inch nails or 2.5-inch screws (two fasteners per connection). Add window and door openings with headers appropriately sized for load. The American Wood Council provides header sizing tables based on opening width and roof load.
After constructing all wall sections, raise them onto the floor frame one at a time. Brace each wall temporarily with diagonal supports while you secure it to the floor frame with 3-inch nails or bolts every 4 feet. Ensure walls are plumb (perfectly vertical) using a 4-foot level. Connect walls at corners by nailing through the end stud of one wall into the end stud of the adjacent wall.
Once all walls are raised and braced, install the second top plate, running it continuously across corners and wall intersections. This creates a rigid box that resists racking and distributes loads evenly to the foundation.
Step 6: Install the Roof Structure
Roof design significantly impacts your shed’s functionality and weather resistance. Common options include gable roofs (peaked), shed roofs (single slope), and gambrel roofs (barn-style). Gable roofs shed water effectively and provide attic space. Shed roofs are simpler and faster to build. Your roof choice affects material costs, construction complexity, and usable interior space.
For gable roofs, calculate rafter dimensions using ICC building code tables based on span, snow load, and wind load for your region. Rafters typically consist of 2×6 or 2×8 lumber, spaced 16 inches on center. Cut opposing rafters to matching angles and connect them with a collar tie near the peak to prevent spreading.
Install a ridge board at the peak where opposing rafters meet. Attach rafters to the top plate with framing angles and bolts, ensuring they’re firmly secured. Add collar ties every third rafter pair to brace the peak. Install ceiling joists or collar ties that span wall-to-wall to prevent outward thrust on walls.
For shed roofs, install ledger board at the higher wall and run rafters from this ledger to the opposite wall at a downward angle. Shed roofs simplify construction and reduce material costs compared to gable designs. Whatever roof style you choose, ensure proper ventilation to prevent moisture buildup and extend roof life.
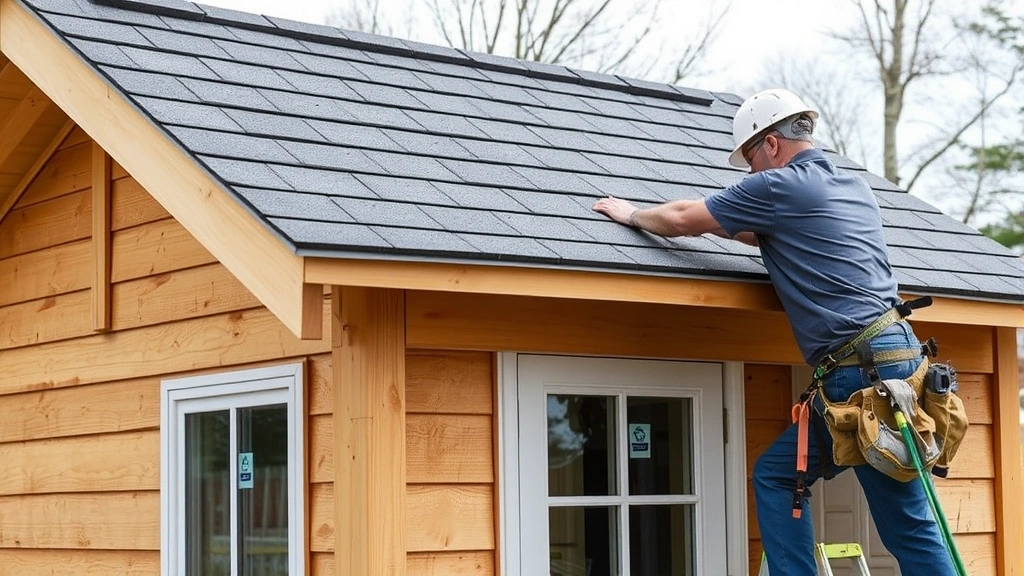
Step 7: Add Exterior Sheathing and Roofing
Exterior sheathing transforms your frame into a weather-resistant box. Use 1/2-inch plywood or oriented strand board (OSB) rated for exterior use. Install sheathing horizontally starting at the bottom, with staggered joints. Leave 1/8-inch gaps between sheets for expansion and nail every 8 inches along studs and blocking.
Wrap sheathed walls with weather-resistant barrier (house wrap or similar product) before installing siding. This layer prevents moisture infiltration while allowing vapor transmission. Overlap seams by 6 inches and seal with compatible tape. Install flashing around windows and doors to direct water away from openings.
Roof sheathing uses the same materials and installation techniques as wall sheathing. Once sheathing is secure, install roofing underlayment (typically 30-pound felt or synthetic material) with proper overlap. For asphalt shingles, nail underlayment every 12 inches along rows, overlapping each row by 2 inches.
Install roofing according to manufacturer specifications. Asphalt shingles are most common for residential sheds—economical, durable, and DIY-friendly. Nail each shingle with four galvanized nails driven through nail slots. Overlap shingles properly to ensure water sheds downward. Install ridge caps along the peak, sealing with roofing cement. For shed roofs, install drip edge along all roof edges and secure gutters to direct water away from your foundation.
Step 8: Install Windows and Doors
Windows and doors provide access, ventilation, and light while allowing you to control security and weather protection. Pre-hung doors and windows simplify installation—they arrive as complete units ready to set into openings. Measure your rough openings carefully to ensure proper fit.
Install doors first, as they’re typically larger and more complex. Set the pre-hung unit in the opening, shimming underneath and at corners to ensure it’s level and plumb. Nail through the frame into the rough opening, checking frequently that the door operates smoothly. Install flashing above the door to shed water away. Caulk around the exterior frame and install interior trim.
Windows install similarly—set in the rough opening, shim, level, and plumb, then nail through the frame. Install flashing above windows and caulk exterior seams. Interior trim covers gaps between the window frame and drywall or wall sheathing.
Consider your shed’s purpose when selecting windows and doors. Working sheds benefit from larger windows for natural light. Storage sheds might use smaller windows to minimize heat gain and maintain security. Ensure doors swing into useful spaces and don’t interfere with interior layout.
Step 9: Interior Finishing and Utilities
Interior finishing transforms your shed from basic structure to functional space. Install insulation if your region experiences cold winters or if you plan climate-controlled use. Fiberglass batts or blown-in cellulose work well for sheds. Install vapor barriers on the warm side of walls to prevent moisture infiltration.
Drywall or plywood interior walls provide finished appearance and additional structural bracing. Drywall requires taping and mudding—a learnable but time-intensive skill. Plywood offers quicker installation and rustic appeal. Whatever you choose, install it over studs or furring strips, creating finished surfaces that are easy to clean and maintain.
Electrical work requires permits and inspections in most areas. Install outlets and lighting on circuits protected by GFCI breakers. Run wiring through conduit or in stud cavities, securing every 4 feet. If you’re unfamiliar with electrical work, hire a licensed electrician. This investment ensures safety and code compliance.
Flooring options range from bare subflooring to finished surfaces. Concrete is durable and easy to clean. Plywood provides warmth and cost-effectiveness. Vinyl or rubber flooring offers durability with comfortable feel. Choose based on your shed’s primary use and climate.
Consider ventilation, especially if your shed houses equipment or tools that emit fumes. Install roof vents or gable vents to allow air circulation. For climate-controlled spaces, HVAC systems may be necessary—consult ASHRAE standards for appropriate sizing.
Step 10: Final Touches and Maintenance
Final touches transform your completed shed into a polished addition to your property. Paint exterior siding with quality exterior-grade paint suited to your climate. Choose colors that complement your home and landscape. Most exterior paints require two coats for optimal coverage and durability.
Install exterior trim, gutters, and downspouts to direct water away from your foundation. Gutters significantly extend your shed’s lifespan by preventing water damage to walls and foundations. Clean gutters regularly to maintain proper drainage.
Interior finishing includes trim work around doors and windows, shelving installation, and organization systems. Wall-mounted storage maximizes space in smaller sheds. Pegboard, shelving, and hooks create functional organization without permanent modifications.
Establish a maintenance routine to protect your investment. Inspect your roof annually for damaged shingles or flashing issues. Check siding for cracks or water damage. Verify that gutters drain properly and aren’t clogged. Seal any gaps around windows or doors where water might infiltrate. Repaint siding every 5-7 years depending on climate and paint quality.
Consider your shed’s future use when planning final touches. If you’re building a woodworking shop or hobby space, ensure adequate lighting and ventilation. For storage, maximize vertical space with shelving systems. If your shed serves as a workspace, proper workbenches and tool organization enhance functionality.
FAQ
How long does it take to build a shed?
Timeline varies based on shed size and your experience level. A small 8×10 shed typically requires 40-60 hours of work spread over 4-8 weekends. Larger sheds (12×16 or bigger) may require 80-120+ hours. Weather delays, permit waiting periods, and material availability extend overall project timelines. Professional builders typically complete standard sheds in 2-3 weeks working full-time.
What’s the difference between a shed and a garage?
Sheds are typically smaller (under 200 sq ft), used primarily for storage or hobbies, and don’t accommodate vehicles. Garages are larger, designed for vehicle storage, and require additional structural support and utilities. Garages typically require more extensive permits and inspections than sheds. Building codes often treat them differently regarding setbacks and utility requirements.
Can I build a shed without a permit?
Permit requirements vary by jurisdiction. Many areas exempt sheds under 100-200 square feet from permitting. However, local codes may still apply regarding setbacks, foundation requirements, and construction standards. Check with your local building department before assuming your shed is permit-exempt. Building without required permits can result in fines, complications when selling your property, and insurance issues.
What’s the best foundation for a shed?
Concrete piers work well in most climates, especially areas with freeze-thaw cycles. They’re cost-effective and prevent frost heave. Concrete slabs suit well-draining areas and provide excellent durability. Gravel foundations work for temporary structures or areas with excellent drainage. Your choice depends on climate, soil conditions, and budget. Frost-line requirements vary by region—consult local building codes for your area’s frost depth.
Do I need to insulate my shed?
Insulation depends on your climate and intended use. Climate-controlled spaces require insulation to maintain comfortable temperatures. Unheated storage sheds in mild climates don’t require insulation. Cold climates benefit from insulation to prevent moisture issues and protect stored items. If you might use your shed for hobbies or work, insulation increases comfort and usability year-round.
What’s the best siding material for a shed?
Vinyl siding is affordable and low-maintenance. Wood provides traditional appeal but requires regular maintenance. Metal siding is durable and weather-resistant. Fiber cement combines durability with aesthetic options. Your choice depends on budget, maintenance tolerance, and aesthetic preferences. Whatever you choose, ensure it’s rated for exterior use and properly installed with appropriate flashing and weather barriers.
Can I build a shed on a sloped lot?
Yes, but sloped lots require adjusted foundations. Pier foundations adapt easily to slopes by varying post heights. Concrete slabs require more extensive site preparation, including grading and drainage. Sloped sites offer advantages like natural drainage but require careful planning to prevent water pooling around your shed. Consult local building codes regarding slope limitations and drainage requirements.
How does my shed compare to building the Titanic?
While the Titanic required 3 years and thousands of workers, your shed takes weekends and personal effort. Both projects benefit from careful planning, quality materials, and attention to structural integrity. Unlike the Titanic, your shed should prioritize longevity and practical functionality over luxury, though both deserve respect for their engineering and construction complexity.


