
How Long Does It Take to Boil Chicken Thighs? Chef-Verified Time Guide
Boiling chicken thighs is one of the most straightforward cooking methods in the kitchen, yet timing remains a common source of confusion for home cooks. Whether you’re preparing ingredients for a DIY meal prep project or building a foundation for complex recipes, understanding the precise cooking duration ensures perfectly tender, safely cooked poultry every time. Chicken thighs are forgiving cuts that tolerate longer cooking times than breasts, making them ideal for beginners and experienced cooks alike.
The standard cooking time for boiling boneless, skinless chicken thighs is 12 to 15 minutes at a rolling boil, while bone-in thighs require 15 to 20 minutes. These timeframes guarantee that internal temperatures reach the safe minimum of 165°F (74°C) as established by the USDA Food Safety and Inspection Service. However, multiple variables influence exact cooking duration, including thigh size, starting temperature, water volume, and altitude. This comprehensive guide walks you through every factor affecting boiling time and provides professional techniques to achieve consistent results.
Understanding Chicken Thigh Anatomy and Boiling Basics
Chicken thighs differ significantly from breasts in composition and cooking behavior. The thigh muscle contains higher fat content and more connective tissue, which breaks down during extended cooking to create naturally tender, flavorful meat. This anatomical advantage means thighs remain moist and palatable even when slightly overcooked—a forgiving characteristic that makes them excellent for boiling applications.
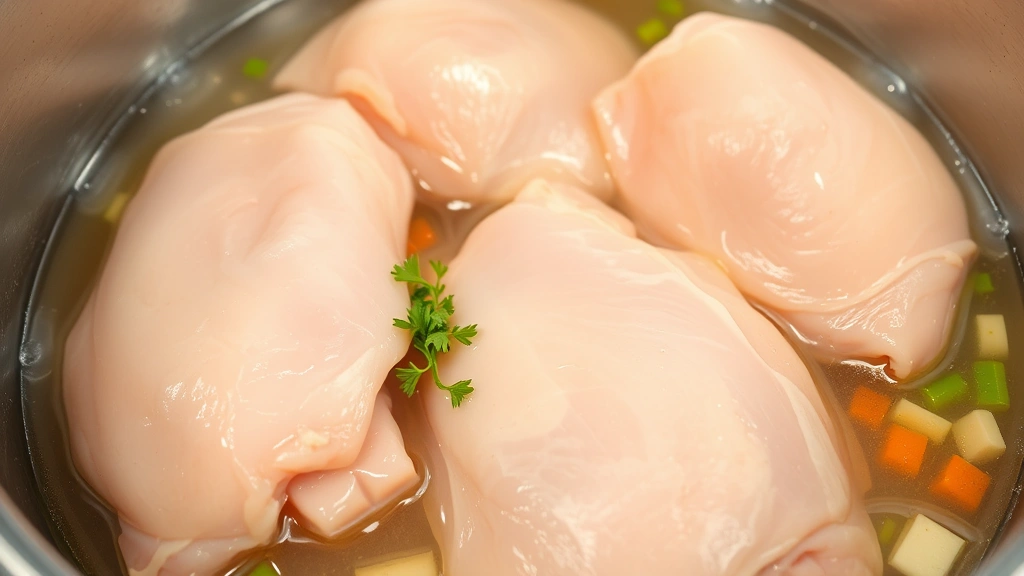
Boiling is a moist-heat cooking method that submerges meat in hot liquid, typically water or broth. This approach is ideal for building stocks and broths or preparing shredded chicken for meal components. The gentle, consistent heat of boiling ensures even cooking throughout the thigh without the risk of dry exterior surfaces common in dry-heat methods. Understanding how boiling transfers heat to poultry helps you anticipate timing adjustments based on your specific ingredients and equipment.
Two primary thigh categories exist: bone-in with skin and boneless skinless varieties. Bone-in thighs require longer cooking because bones conduct heat more slowly than surrounding meat, necessitating additional time for the interior to reach safe temperatures. Boneless skinless thighs cook faster due to reduced thermal mass and more uniform thickness. Recognizing which type you’re preparing is your first step toward accurate timing.
Standard Boiling Times by Thigh Type
Boneless Skinless Chicken Thighs: These cook fastest, requiring 12 to 15 minutes in a rolling boil. Most thighs of average size (approximately 4 to 6 ounces) reach 165°F in approximately 13 to 14 minutes. Start checking internal temperature at the 12-minute mark to avoid overcooking, which can toughen the meat slightly.
Bone-In Skin-On Chicken Thighs: The bone and skin insulate the meat, extending cooking time to 15 to 20 minutes. Larger bone-in thighs may require the full 20 minutes, while smaller specimens finish closer to 15 minutes. The bone’s center is the last area to reach safe temperature, so this is where you should verify doneness.
Chicken Thigh Pieces: If you’re cutting thighs into smaller chunks for quick-cooking applications, reduce time to 8 to 12 minutes depending on piece size. Uniform cutting ensures even cooking and eliminates timing variation across multiple pieces.
Frozen Chicken Thighs: Never boil chicken from frozen state. Thaw completely in the refrigerator (8 to 12 hours for standard thighs) or use the cold-water method (30 to 45 minutes with water changes every 15 minutes). Frozen thighs cook unevenly and may harbor cold spots where bacteria could survive, creating food safety risks.
Factors That Affect Cooking Duration
Thigh Size and Thickness: The most significant variable influencing boiling time is thigh dimensions. Large thighs (8+ ounces) may require 18 to 20 minutes for bone-in varieties, while small thighs (3 to 4 ounces) finish in 10 to 12 minutes. Thickness matters more than weight—a thin, spread-out thigh cooks faster than a compact, dense one of identical weight. Pounding thighs to uniform thickness before boiling creates predictable, consistent cooking.
Starting Temperature: Room-temperature chicken thighs cook approximately 2 to 3 minutes faster than refrigerated ones. If your thighs have been refrigerated, remove them 15 to 20 minutes before boiling to approach room temperature. This small adjustment reduces overall cooking time and promotes more even heat penetration.
Water Volume and Pot Size: Boiling in excess water (thighs fully submerged with 2 to 3 inches of liquid above) creates stable, consistent temperatures. Insufficient water causes temperature fluctuations as the chicken releases moisture, extending cooking time. Use a pot large enough that thighs occupy no more than two-thirds of the pot’s volume.
Water Temperature and Boil Intensity: A rolling boil (large bubbles breaking the surface continuously) cooks thighs faster than a simmer. However, excessive boiling at extremely high temperatures doesn’t reduce time significantly—the difference between a rolling boil and a hard boil is typically only 1 to 2 minutes. A rolling boil is ideal because it cooks efficiently without forcing excessive moisture loss.
Altitude: Water boils at lower temperatures at higher elevations, requiring extended cooking times. At 3,000 feet elevation, add approximately 5 minutes to standard times. At 5,000 feet, add 10 to 15 minutes. At 7,000+ feet, add 20+ minutes. Check the USDA Food Safety Guidelines for specific altitude adjustments in your region.
Broth Composition: Boiling in salted chicken broth versus plain water doesn’t significantly affect cooking time, though broth imparts superior flavor. Some cooks add aromatics like onion, garlic, and herbs, which don’t measurably change cooking duration but enhance the final product substantially.
Step-by-Step Boiling Instructions
- Prepare Your Equipment: Select a pot large enough to hold thighs comfortably submerged. A 3 to 4-quart pot accommodates 2 to 3 standard thighs efficiently. Fill with water or broth, leaving 3 to 4 inches of headspace to prevent boiling over.
- Heat the Liquid: Bring water to a rolling boil before adding chicken. This establishes consistent cooking from the moment thighs enter the pot and reduces overall cooking time by approximately 2 to 3 minutes compared to starting in cold water.
- Add Aromatics (Optional): Once water boils, add diced onion, celery, carrot, bay leaves, peppercorns, or fresh herbs. Let aromatics simmer for 2 to 3 minutes before adding chicken to develop flavor foundation.
- Carefully Add Thighs: Gently lower thighs into boiling water using tongs or a slotted spoon. Avoid splashing, which risks burns and causes temperature drops. Thighs should be fully submerged; adjust water level if necessary.
- Return to Rolling Boil: Allow water to return to a rolling boil, typically 1 to 2 minutes after adding chicken. The water temperature will dip when cold chicken enters, so maintaining heat is critical.
- Set Timer and Monitor: For boneless skinless thighs, set timer for 12 minutes. For bone-in thighs, set for 15 minutes. Monitor the pot occasionally to ensure consistent boiling without excessive evaporation.
- Perform Temperature Check: At the minimum time, remove one thigh and check internal temperature at the thickest point (center of bone for bone-in varieties). Temperature should read 165°F minimum. If below target, continue boiling and check every 2 minutes.
- Remove and Cool: Once safe temperature is confirmed, remove thighs with a slotted spoon and place on a clean plate. Allow 5 to 10 minutes resting time before shredding or further processing.

Temperature Testing and Doneness Verification
Relying solely on cooking time is risky because variables discussed above create legitimate timing variation. The only foolproof doneness indicator is internal temperature measurement using an instant-read thermometer. USDA poultry safety standards mandate 165°F (74°C) measured at the thickest point of the meat, away from bone.
Thermometer Placement Technique: For bone-in thighs, insert the thermometer probe into the meat at the inner thigh area where the thigh joins the drumstick—this is typically the thickest section and the last area to reach safe temperature. For boneless thighs, measure at the geometric center. Ensure the probe doesn’t contact bone, which conducts heat differently than meat and provides false readings.
Visual Doneness Indicators: While temperature is definitive, visual cues provide secondary confirmation. Fully cooked chicken thighs display opaque white or tan meat with no pink coloration. Juices running from the meat should be clear, not pink. The meat should shred easily with a fork. These indicators confirm temperature readings but shouldn’t replace them.
Carryover Cooking: Chicken continues cooking slightly after removal from heat due to residual internal temperature. This carryover effect is minimal in boiling (perhaps 1 to 2 degrees) compared to roasting, so remove thighs when they reach exactly 165°F rather than pulling at 163°F and relying on carryover to finish cooking.

Advanced Boiling Techniques for Optimal Flavor
Broth-Based Boiling: Replace plain water with homemade or quality store-bought chicken broth to infuse thighs with rich flavor. Low-sodium broth provides better control over final salt content. Broth-boiled chicken works exceptionally well for meal planning and storage because the cooking liquid becomes a flavorful component for soups, sauces, and grains.
Aromatics and Herb Infusions: Create a flavor-building liquid by combining broth with onion quarters, carrot chunks, celery pieces, fresh thyme, rosemary sprigs, bay leaves, and black peppercorns. Simmer aromatics for 5 minutes before adding chicken to extract maximum flavor. This approach adds 0 to 2 minutes to total cooking time but dramatically improves final taste.
Salt Management: Salt the boiling water or broth (approximately 1 to 2 teaspoons per quart) to season the chicken during cooking rather than after. This creates more evenly seasoned meat throughout rather than surface-only seasoning. Start with 1 teaspoon per quart and adjust based on broth saltiness to avoid oversalting.
Gentle Simmering for Tender Results: While rolling boils cook faster, maintaining a gentle simmer (small bubbles occasionally breaking the surface) for 18 to 22 minutes produces slightly more tender results. The reduced agitation prevents meat from toughening, though the time investment may not justify the minimal texture improvement for most applications.
Ice Bath Cooling: For meal prep or salads where you want tender chicken thighs that stay firm, transfer cooked thighs to an ice bath immediately after reaching safe temperature. This halts cooking instantly and firms the meat’s exterior, preventing overcooking and creating better texture for shredding or chunking.
Common Mistakes and How to Avoid Them
Starting with Cold Water: Many home cooks place thighs in cold water and heat together. This extends cooking time by 5 to 8 minutes and creates uneven cooking. Always bring water to a rolling boil before adding chicken.
Overcrowding the Pot: Placing too many thighs in one pot drops water temperature excessively, extending cooking time and creating hot spots. Follow the guideline of filling the pot no more than two-thirds full and allowing 1 to 2 inches of space between thighs.
Skipping Temperature Verification: Timing alone cannot guarantee food safety because variables create legitimate variation. Always verify 165°F internal temperature, particularly when feeding vulnerable populations like young children, elderly individuals, or immunocompromised people. This mirrors the approach professional kitchens use for quality control in their operations.
Boiling Frozen Thighs: This is a critical safety error. Frozen centers may not reach safe temperature while outer portions overcook. Thaw completely using refrigerator or cold-water methods before boiling.
Ignoring Altitude Adjustments: Cooks at higher elevations often experience mysteriously undercooked chicken because water boils at lower temperatures. Verify your elevation and add appropriate time increases to standard guidelines.
Using Insufficient Water: Boiling in barely enough water to cover thighs creates temperature instability and uneven cooking. Maintain 2 to 3 inches of liquid above thighs throughout cooking, adding hot water if evaporation becomes excessive.
Continuous Lid Removal: Opening the pot frequently to check progress drops temperature and extends cooking time. Set a timer and resist checking until the minimum time has elapsed.
Discarding Cooking Liquid: The broth remaining after boiling contains valuable collagen, gelatin, and flavor compounds. Save this liquid for pantry staples like soups, sauces, and grain cooking. Refrigerate for up to 3 days or freeze for up to 3 months.
FAQ
Can I boil chicken thighs in a slow cooker or instant pot?
Yes, both appliances work well. Instant Pot on high pressure cooks boneless thighs in 8 minutes and bone-in thighs in 12 minutes (plus 5 to 10 minutes pressure build-up). Slow cookers on low require 4 to 5 hours for tender results. Traditional stovetop boiling offers more control and faster results for most applications.
What’s the difference between boiling and poaching chicken thighs?
Boiling and poaching are technically different: boiling uses a rolling boil (212°F) while poaching uses gentle simmering (160 to 180°F). Poaching takes longer (18 to 25 minutes) but produces slightly more tender results. For most home cooking, the distinction is minimal, and “boiling” is used colloquially for both methods.
How long can I store boiled chicken thighs?
Refrigerate cooked thighs in an airtight container for 3 to 4 days. Freeze for up to 3 months. Store cooking liquid separately for maximum storage life. Thighs stored in their cooking liquid last slightly longer (up to 5 days refrigerated) due to the protective broth layer.
Can I boil chicken thighs with skin on?
Yes, skin-on thighs are commonly boiled. The skin prevents some moisture loss and adds flavor, though it becomes flabby rather than crispy. If you prefer crispy skin, boil skinless thighs and crisp the skin separately in a skillet, or roast instead of boiling.
Why are my boiled chicken thighs tough?
Toughness typically results from overcooking beyond 20 to 22 minutes for bone-in thighs. Check internal temperature precisely rather than relying on time alone. If you must boil for extended periods (for broth-making), accept that meat becomes stringy rather than firm, which works well for shredding applications.
Should I salt the boiling water?
Yes, salt the water or broth at 1 to 2 teaspoons per quart. This seasons the chicken during cooking rather than only at the surface. Adjust based on broth saltiness to avoid oversalting—taste the liquid before adding thighs if unsure.
Can I reuse the cooking liquid multiple times?
Reusing cooking liquid is not food-safe unless it’s been properly refrigerated and used within 3 days. For best results, use fresh liquid for each batch. However, you can save all cooking liquids together to create a rich stock for soups and sauces.
What size pot is best for boiling chicken thighs?
A 3 to 4-quart pot accommodates 2 to 3 standard thighs with optimal spacing. For larger batches, use a 5 to 6-quart pot to maintain the guideline of filling no more than two-thirds full. Larger pots reduce the risk of boiling over and maintain more stable temperatures.