
Build a Shed in a Weekend? Expert Tips Inside
Building a functional shed in just 48 hours might sound ambitious, but with proper planning, the right materials, and a solid team, it’s entirely achievable. Whether you need storage for garden tools, outdoor equipment, or seasonal items, a weekend shed project can save you thousands compared to purchasing a pre-built structure. The key lies in understanding what’s realistic, preparing thoroughly beforehand, and knowing which corners you can safely cut without compromising safety or durability.
This comprehensive guide walks you through the entire process—from initial planning to the final touches. We’ll cover realistic timelines, essential materials, step-by-step construction phases, and expert strategies that professional builders use to maximize efficiency. You’ll also discover how proper preparation during the week before your build can dramatically reduce actual construction time, making that weekend deadline not just possible but genuinely manageable for DIY enthusiasts of all skill levels.

Is a Weekend Shed Build Really Possible?
The short answer is yes, but with important caveats. A basic 8×10 foot shed with simple construction can realistically be completed in a weekend if you follow strategic planning. However, the timeline depends heavily on several factors: your experience level, the complexity of your design, weather conditions, and how much preparation happens beforehand.
Professional contractors often complete small sheds in 2-3 days because they’ve streamlined every process. As a DIY builder, you’ll likely need the full weekend, especially if you’re tackling beginner woodworking projects for the first time. The distinction between a rushed, shoddy build and a solid structure often comes down to whether you’ve completed critical prep work during the week preceding your build.
Consider this realistic breakdown: Friday evening through Sunday evening gives you roughly 36-40 working hours. A foundation might take 2-4 hours, framing 8-12 hours, roofing 6-8 hours, and finishing work 4-6 hours. These estimates assume you’re not encountering major complications and that your site is already prepared.

Pre-Build Planning and Preparation
The secret to successful weekend building is doing 60% of the work before Saturday morning arrives. This preparation phase is absolutely non-negotiable if you want to stay on schedule.
Site Preparation (Complete by Friday afternoon): Your building location should be cleared, leveled, and marked out. Remove grass, rocks, and debris. Check local ICC building codes for setback requirements—most jurisdictions require sheds to be set back 3-5 feet from property lines. Measure twice, mark with stakes and string, and verify square corners using the 3-4-5 triangle method. This prevents Saturday morning surprises that derail your schedule.
Material Ordering and Organization: Order all materials by Wednesday, allowing time for delivery. Organize them by construction phase at your building site. Pre-cut materials whenever possible through your lumber supplier—this single step can save 4-6 hours of construction time. Create a detailed materials list organized by phase: foundation materials separate from framing lumber, roofing materials grouped together, and hardware organized in labeled containers.
Tool Checklist and Testing: Gather every tool you’ll need Friday evening. Test power tools to ensure they’re functioning properly. Charge all batteries. A dead drill battery at 2 PM Saturday is a schedule killer. Set up a clean, organized tool station near your work area.
Permits and Inspections: Check with your local building department about permit requirements. Some jurisdictions require permits for structures over certain sizes; others waive them for accessory buildings under 200 square feet. Professional builder associations recommend getting written confirmation of exemptions before beginning work.
Materials and Tools You’ll Need
For a standard 8×10 shed with basic construction, here’s what you’ll need:
Foundation Materials:
- Concrete piers or a gravel/concrete pad (avoid full concrete slabs for weekend projects)
- Pressure-treated lumber for sill plates (2×6 or 2×8)
- Concrete mix if pouring footings
- Landscape fabric and gravel for drainage
Framing Materials:
- Pre-cut wall studs (2×4, typically 16 inches on center)
- Pressure-treated rim board for sill plates
- 2×4 or 2×6 for roof rafters
- 3/8-inch plywood for wall sheathing and roof decking
- 16d, 10d, and 8d nails or 2.5-inch screws
Roofing Materials:
- Asphalt shingles (simplest option for weekend builds)
- Roofing felt or synthetic underlayment
- Aluminum drip edge and flashing
- Roofing nails
Essential Tools:
- Circular saw or miter saw (pre-cutting reduces on-site time)
- Cordless drill/driver with multiple batteries
- Impact driver for fastening
- Pneumatic nail gun (significantly faster than hand nailing)
- Level, tape measure, speed square
- Ladder or scaffolding
- Safety equipment: hard hat, safety glasses, work gloves, dust mask
Renting a pneumatic nail gun and compressor (roughly $30-50 for the weekend) will save you 3-4 hours compared to hand nailing. This investment pays for itself in time savings alone.
Foundation: The Critical First Step
A proper foundation prevents rot, settling, and structural failure. You have several weekend-friendly options:
Concrete Pier Method (Recommended for Speed): This is the fastest option for weekend builds. Set concrete piers at each corner and midway along the sides (typically 4-6 feet apart). Dig holes 2-3 feet deep below your frost line—critical for preventing frost heave damage. Place concrete piers, allow 30 minutes of curing time, then set treated rim boards on top. This approach takes 2-3 hours total and provides excellent drainage and longevity. The Concrete Institute provides detailed specifications for proper frost depths by region.
Gravel Pad Method (Fastest Option): For temporary structures or non-permanent sheds, a 4-6 inch gravel pad compacted over landscape fabric works quickly. Excavate 6 inches, add landscape fabric, then 6 inches of compacted gravel. This takes 1-2 hours but requires occasional maintenance and isn’t suitable for permanent installations in freeze-thaw climates.
Concrete Slab (Not Recommended for Weekend Builds): While permanent and durable, pouring and curing a concrete slab typically requires a full week, making it incompatible with weekend construction timelines.
Once your foundation is set, install pressure-treated sill plates, securing them with bolts or concrete anchors. Verify that your foundation is level and square—this single step prevents countless framing problems downstream.
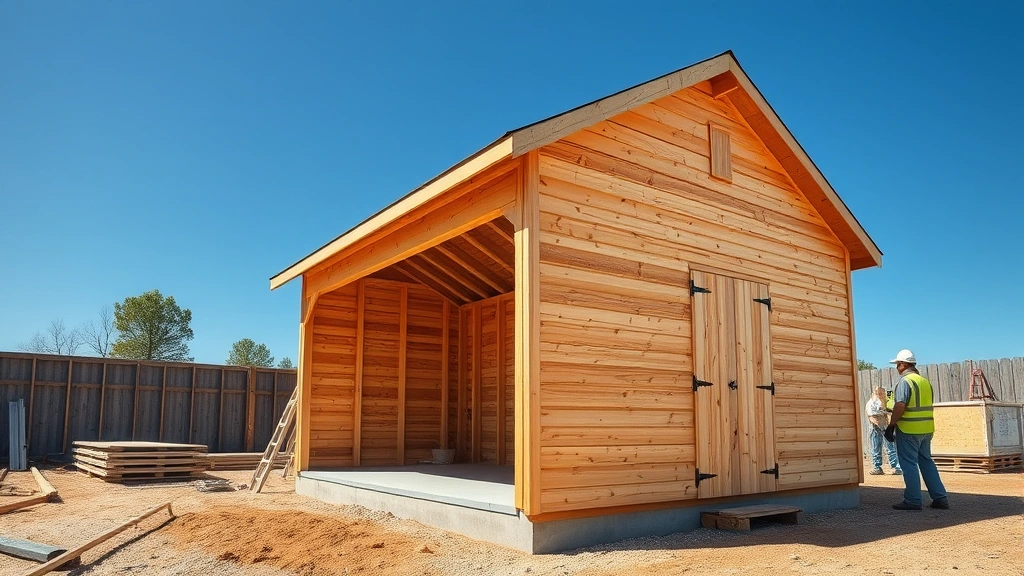
Frame Construction Strategy
This is where your weekend build gains momentum. Pre-assembled wall panels are the game-changer for speed. Rather than building walls in place, construct them flat on the ground, then tilt them up and secure them. This approach cuts framing time roughly in half.
Wall Panel Assembly (Saturday morning): Lay out studs on the ground in the configuration of each wall. Mark stud positions on top and bottom plates before assembly. Use a pneumatic nail gun to secure studs with 3 nails per connection (2 on one side, 1 on the other for shear strength). A basic 8×10 shed requires four wall panels. With two people working efficiently, you can frame all walls in 4-5 hours. The National Frame Builders Association provides detailed specifications for proper nailing patterns and stud spacing.
Tilting and Securing Walls (Saturday afternoon): With wall panels complete, tilt them vertical one at a time and secure to the foundation with bolts or hurricane ties. Brace walls temporarily with diagonal 2x4s until the roof structure provides permanent bracing. This phase takes 2-3 hours for a small shed.
Roof Framing (Saturday evening/Sunday morning): For simplicity and speed, use a gable roof design with pre-cut rafters. Cut rafters to length beforehand (your lumber supplier can do this). Assemble pairs on the ground, then lift and secure to the top plates. A simple gable roof for an 8×10 shed requires approximately 8-10 rafter pairs, taking 3-4 hours to install. Ensure proper overhang (typically 12-18 inches) for weather protection.
Install roof decking (3/8-inch plywood) immediately after rafters are secured. Use 8d nails spaced 6 inches apart along edges and 12 inches in the field. This typically takes 2-3 hours and should be completed before Sunday evening.
Roofing and Weather Protection
Getting the roof weather-tight before Monday morning is essential. Asphalt shingles are the fastest roofing option for weekend projects.
Underlayment Installation (Sunday morning): Roll out roofing felt or synthetic underlayment over your plywood decking. Secure with cap nails every 12 inches. Install drip edge along eaves and gables. This protective layer prevents water penetration if your shingles aren’t completely finished. Takes approximately 1-2 hours.
Shingle Installation (Sunday afternoon): Start at the eaves and work upward. Snap chalk lines every 5 inches to keep courses straight. Use roofing nails (4 per shingle) at proper heights. A pneumatic roofing nailer dramatically speeds this process. For an 8×10 shed with roughly 800 square feet of roof surface, expect 3-4 hours for shingle installation.
Critical Safety Note: Working at height on a sloped roof requires proper fall protection. Use roof jacks, safety harnesses, or work only on low-slope roofs if you’re inexperienced with heights. Many weekend shed projects are delayed by injuries that could have been prevented with proper safety equipment.
If you cannot complete roofing by Sunday evening, ensure your structure is at least partially weather-protected. Temporary tarping is acceptable if necessary, though it indicates you may need to extend your timeline slightly.
Final Touches and Safety Considerations
If your shed isn’t fully enclosed by Sunday evening, prioritize weather protection over aesthetics. Doors, windows, and siding can be completed the following weekend without compromising the structure’s integrity.
Essential Finishing Work (If Time Permits): Install a door frame and basic door. Add a simple ramp or step for access. These elements take 2-3 hours but dramatically improve functionality and safety. Consider how your shed fits into your overall home and property security planning—a shed with proper locking mechanisms prevents theft of tools and equipment.
Safety Inspections Before Occupancy: Before storing anything in your new shed, verify that:
- The structure is level and square
- The roof is completely weather-tight with no gaps or leaks
- All fasteners are properly seated and secure
- There are no protruding nails or sharp edges
- Ventilation exists to prevent moisture buildup
- Electrical work (if any) meets code requirements
Post-Build Maintenance Considerations: Plan for ongoing maintenance within your first year. Check for any settling, re-tighten bolts that may have loosened, inspect roofing for any missed nails, and ensure drainage around the foundation is functioning properly. These checks prevent small issues from becoming major structural problems.
Your weekend shed project is just the beginning. You might later want to expand your DIY capabilities—learning about basement finishing or house painting techniques will complement your newfound construction knowledge. For those interested in the creative side, beginner woodworking projects can be undertaken once your shed is complete. Additionally, understanding flooring installation techniques helps if you decide to add a concrete or wooden floor to your shed later.
FAQ
Can I really build a shed in one weekend with no construction experience?
A basic shed is possible with thorough preparation, but expect the project to take slightly longer than for experienced builders. Recruit experienced friends to help, focus on simple designs, and prioritize learning proper safety techniques. Your first weekend shed may extend into a second day, which is completely acceptable.
What size shed can realistically be completed in a weekend?
An 8×10 foot shed is the practical maximum for a single weekend. Smaller 6×8 or 4×8 sheds are faster. Larger structures (10×12 or bigger) typically require a full week or more, especially if you’re including more complex features like windows or electrical work.
What should I do if weather turns bad during my weekend build?
Have a contingency plan. Temporary tarping can protect framing and materials. If rain is forecast for Sunday, prioritize roofing work for Saturday to ensure weather protection. Some projects are worth extending into a second weekend rather than rushing in poor conditions and creating safety hazards.
Do I need a building permit for a weekend shed project?
Permit requirements vary by jurisdiction. Most areas exempt accessory buildings under 120-200 square feet from permits, but some require them regardless of size. Contact your local building department before starting. Building without required permits can result in fines and complications when selling your property.
What’s the most important preparation step before starting?
Site preparation and material organization are critical. A level, cleared, and properly marked foundation site prevents hours of frustrating adjustments. Pre-ordered and pre-cut materials that arrive organized by construction phase keep your momentum going throughout the weekend.
Should I hire professionals for any part of the project?
For most DIY builders, handling the foundation and framing yourself is realistic. If roofing at height makes you uncomfortable, hiring a professional roofer for Sunday afternoon is a reasonable compromise that keeps your project on track while maintaining safety. Many successful weekend sheds are partnerships between DIY work and professional services for specialized tasks.
What’s the cost difference between a weekend DIY shed and purchasing a pre-built structure?
A basic 8×10 DIY shed costs $1,500-2,500 in materials. Pre-built sheds of similar size typically cost $3,000-6,000 or more. Your weekend of labor essentially saves you $1,500-3,500, making this one of the highest-value DIY projects available. The skills you develop also transfer to other DIY home projects.