Smoking Chicken: Time & Tips from Pitmasters
Smoking chicken is both an art and a science that transforms ordinary poultry into tender, flavorful masterpieces. Whether you’re a seasoned pitmaster or a backyard enthusiast just starting your smoking journey, understanding the fundamentals of timing, temperature control, and technique will dramatically improve your results. The question of how long it takes to smoke a chicken doesn’t have a one-size-fits-all answer—it depends on several critical variables including smoker type, ambient temperature, chicken size, and desired doneness level.
This comprehensive guide draws from decades of pitmaster experience and scientific cooking principles to help you achieve restaurant-quality smoked chicken every time. We’ll explore the exact timing formulas, temperature management strategies, and pro tips that separate mediocre results from championship-quality poultry. By the end, you’ll understand not just how long to smoke a chicken, but why each step matters and how to troubleshoot common issues that arise during the smoking process.
How Long Does It Take to Smoke a Chicken?
The smoking time for chicken typically ranges from 2.5 to 3.5 hours at a consistent temperature of 225-250°F (107-121°C), though this varies based on several interconnected factors. A whole chicken weighing 4-5 pounds generally requires approximately 3 hours at 225°F, translating to roughly 30-40 minutes per pound. However, pitmasters have discovered that chicken reaches its peak tenderness and flavor development at different intervals depending on how you approach the smoking process.
For chicken halves or split birds, reduce your timing to approximately 1.5-2.5 hours. Bone-in chicken breasts typically finish in 1.5-2 hours, while thighs and drumsticks may require 2-3 hours due to their higher fat content and denser muscle structure. The USDA food safety guidelines mandate that poultry reach an internal temperature of 165°F (74°C) at the thickest part of the thigh, away from bone. This is your non-negotiable safety benchmark, though many pitmasters prefer pulling chicken at 170-175°F for enhanced tenderness.
Professional competition pitmasters often employ the 3-2-1 method adapted for chicken, though this technique originated with ribs. This involves smoking at a lower temperature initially, then increasing heat midway through, which can actually reduce total cooking time while improving texture. The critical insight is that chicken cooks faster than beef or pork, so monitoring internal temperature becomes more important than strictly adhering to time estimates.

Temperature Guidelines for Smoked Chicken
Maintaining consistent smoker temperature is perhaps the single most important factor determining both your cooking time and final product quality. The ideal smoking temperature range for chicken is 225-250°F, with 240°F representing the sweet spot for most pitmasters. At 225°F, you’ll achieve maximum smoke penetration and develop deeper color on the skin, though cooking times extend toward the upper end of our estimates. At 250°F, you’ll reduce cooking time by 20-30 minutes while still achieving excellent smoke flavor and color development.
Temperature consistency matters more than absolute temperature. Fluctuations of even 20-30 degrees can extend cooking times unpredictably and create uneven cooking patterns. Invest in a quality reliable thermometer system with dual probes—one monitoring smoker chamber temperature and another tracking internal meat temperature. Many experienced pitmasters use wireless thermometers allowing real-time monitoring from inside their homes, reducing the temptation to constantly open the smoker door.
Cold weather smoking requires temperature compensation. In freezing conditions, expect to add 20-50% more time to your cooking estimate. Conversely, smoking in hot weather (above 85°F) can accelerate cooking time by 15-25%. Wind exposure also significantly impacts temperature stability—position your smoker in a sheltered location and consider building a wind barrier for outdoor winter smoking sessions.
The carryover cooking effect is crucial to understand. Chicken continues cooking internally even after removal from heat, typically gaining 5-10°F in carryover temperature. Professional pitmasters often pull chicken at 160-162°F internally, allowing carryover cooking to reach the 165°F safety threshold while preventing overcooking. This technique maintains juiciness and prevents the dry, stringy texture that plagues many smoked chicken attempts.
Preparation and Seasoning Strategies
Proper preparation dramatically influences both cooking time and flavor development. Begin with fresh, high-quality chicken—heritage breed birds or air-chilled options typically outperform mass-produced, water-retained supermarket poultry. Remove the chicken from refrigeration 30-45 minutes before smoking to ensure more even cooking. Cold meat requires additional time to reach target temperature, potentially extending your smoking duration by 15-20 minutes.
Dry brining—salting the chicken 12-24 hours in advance—is a game-changer that most casual smokers overlook. This process allows salt to penetrate muscle fibers, enhancing moisture retention and seasoning throughout the meat. Use approximately 1 teaspoon of kosher salt per pound of chicken, rubbing it directly onto skin and under any lifted skin areas. Refrigerate uncovered to allow skin to dry, which promotes crispier, more flavorful skin during smoking.
Pat the chicken completely dry before placing in the smoker. Excess surface moisture evaporates during the initial cooking phase, extending your total smoking time. Some pitmasters use paper towels to thoroughly dry the bird, while others employ compressed air or even hair dryers on cool settings. This step alone can reduce smoking time by 10-15 minutes while improving bark development and smoke ring formation.
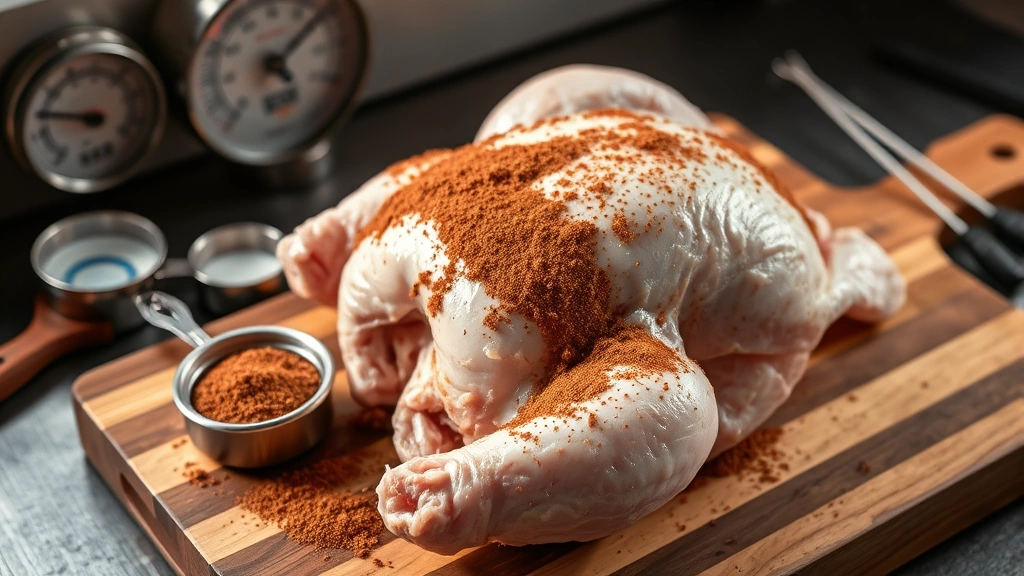
Apply your rub immediately before smoking for maximum flavor impact. A balanced dry rub should include salt, sugar, paprika, garlic powder, onion powder, black pepper, and optional spices like cayenne, cumin, or smoked paprika. Avoid rubs with excessive sugar content (above 15% by weight) as they can burn at smoking temperatures, creating bitter flavors and dark, burnt patches. Allow rubs to adhere for 5-10 minutes before placing in the smoker, giving flavors time to bond with the meat surface.
Smoking Techniques from Professional Pitmasters
Championship pitmasters employ several advanced techniques that optimize both cooking time and flavor development. The low-and-slow approach at 225°F maximizes smoke absorption, creating deeper pink smoke rings and more pronounced smoky flavor. This method requires patience but rewards you with exceptional results after approximately 3-3.5 hours for whole birds. This technique works particularly well when you’re exploring DIY projects and techniques for home entertaining.
The hot-and-fast method smokes at 275-300°F, reducing total time to 1.5-2 hours for whole chickens. While this accelerates cooking, some flavor nuance develops more slowly, though the technique still produces excellent results. Many competition pitmasters use this method when time constraints exist, accepting slightly less smoke penetration in exchange for efficiency.
The reverse-sear technique
Spritzing—lightly misting chicken with liquid every 30-45 minutes—is a debated technique with legitimate advantages and disadvantages. Proponents argue that spritzing maintains moisture and promotes bark development, while critics contend it disrupts smoke adhesion and extends cooking time. If you choose to spritz, use a mixture of apple juice, cider vinegar, and butter rather than water alone, which offers flavor benefits beyond simple moisture.
Brining liquid injection, distinct from dry brining, involves injecting flavored liquid directly into the meat 2-4 hours before smoking. This technique, borrowed from competition barbecue traditions, guarantees internal seasoning and moisture retention. Use a meat injector to distribute injection liquid evenly throughout the bird, focusing on thighs and breasts while avoiding bone areas that can splinter and contaminate the injection chamber.
Wood Selection and Smoke Management
Wood species profoundly influence both smoking time and flavor profile. The best woods for chicken include apple, cherry, pecan, and oak—all producing mild, slightly sweet smoke that complements poultry without overwhelming delicate flavors. Avoid heavy hardwoods like hickory and mesquite for whole chickens, as their assertive smoke flavors can overpower chicken’s subtle taste in extended smoking sessions.
Wood moisture content affects smoking efficiency and temperature stability. Dry wood (moisture content below 20%) produces cleaner smoke and maintains more consistent temperatures than wet wood, which creates thick, acrid smoke that deposits bitter flavors. Season your smoking wood for 6-12 months before use, or purchase pre-seasoned varieties from reputable suppliers. Wet wood also requires longer burning-in periods before achieving stable temperatures, extending your total smoking duration.
Smoke management involves balancing smoke quantity and quality. Thin blue smoke—barely visible, light blue smoke—represents ideal conditions and produces superior flavor. Thick white smoke indicates incomplete combustion, creating harsh, unpleasant flavors and extending cooking time as the smoker works harder to maintain temperature. Many pitmasters use smoke generators or tubes for the first 1.5-2 hours of chicken smoking, then switch to direct wood for the remaining time, optimizing flavor without overdoing smoke intensity.
Wood chunk size influences burn rate and temperature stability. Smaller chunks (fist-sized or smaller) burn faster but provide less sustained smoke, requiring more frequent additions. Larger chunks burn longer and more steadily, reducing temperature fluctuations. For chicken smoking, medium-sized chunks represent the optimal compromise, typically requiring 1-2 additions throughout the cooking process depending on your smoker type.
Troubleshooting Common Smoking Problems
Understanding what goes wrong helps you diagnose and prevent issues that extend cooking times or compromise quality. Stalled chicken—when internal temperature plateaus for extended periods—occurs when evaporative cooling overwhelms heat input, most commonly at 150-160°F. If your chicken stalls for more than 30 minutes, increase smoker temperature by 10-15°F or wrap the bird loosely in butcher paper to reduce evaporative cooling while maintaining smoke exposure.
Uneven cooking typically results from improper smoker arrangement or hot spots. Place chicken in the coolest zone of your smoker, away from direct heat sources. Rotate birds 180 degrees every 45 minutes if your smoker exhibits temperature variations. Many pitmasters use heat deflectors or water pans to even out temperature distribution, though this adds complexity to the setup process.
Bitter flavors indicate excessive smoke or incomplete combustion. Reduce smoking wood quantity, increase airflow to promote complete combustion, or switch to milder wood species. If bitterness persists, you may be smoking too long—reduce total smoking time by pulling chicken earlier and finishing under higher heat to crisp skin without additional smoke exposure.
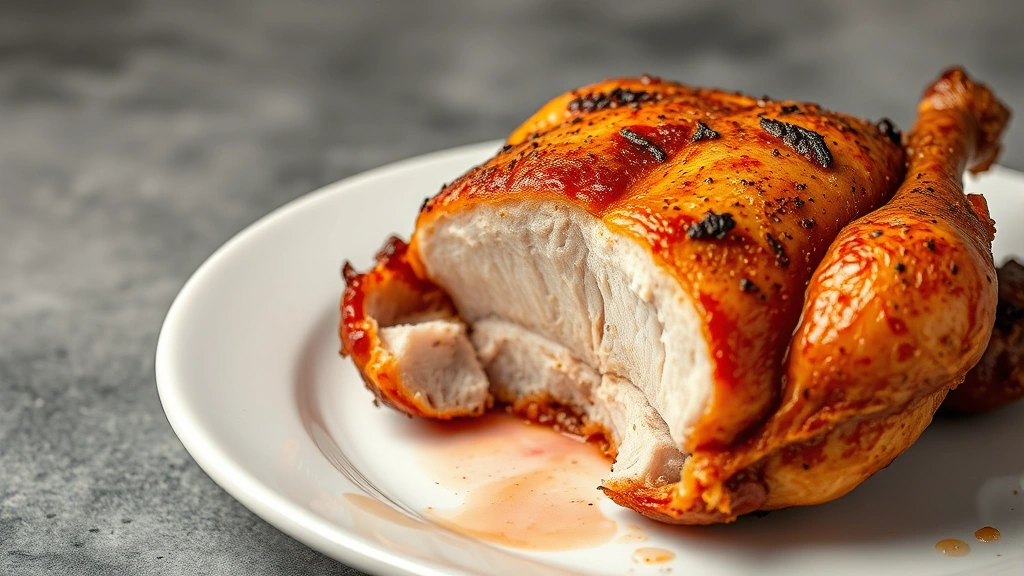
Rubbery skin results from either excessive moisture or overcooking. Ensure your chicken is thoroughly dry before smoking, and pull it at the correct internal temperature rather than cooking longer hoping for additional color. If skin remains pale after reaching 165°F internally, finish under direct high heat (375-400°F) for 5-10 minutes to develop color and crispness without drying the meat.
Dry meat typically indicates overcooking, though occasionally results from insufficient brining or injection. Always use a reliable meat thermometer and pull at 165-170°F internal temperature. If meat is dry despite proper temperature, increase your dry brine time to 24 hours or add injection liquid to future smoking sessions. Some pitmasters also increase spritzing frequency or reduce smoker temperature to extend cooking time, allowing more gentle heat penetration.
Comparing Smoker Types and Their Impact on Timing
Different smoker designs require timing adjustments based on their heating and smoke distribution characteristics. Offset barrel smokers typically require longer cooking times (3-3.5 hours) due to indirect heat arrangement and slower heat recovery after door openings. These traditional designs excel at producing smoke flavor but demand more active temperature management throughout the smoking process.
Vertical drum smokers, like the popular 55-gallon barrel designs, offer faster, more even cooking (2.5-3 hours) due to superior heat circulation and distribution. These compact smokers also require less fuel and maintain temperature more consistently than offset designs, making them ideal for beginners seeking predictable results. Their smaller internal volume means temperature spikes occur more readily, requiring careful airflow management.
Pellet smokers provide the most consistent temperature maintenance and fastest cooking times (2-2.5 hours), with digital controls managing fuel and airflow automatically. However, some traditionalists argue that pellet-generated smoke lacks the complexity of wood-fired smoke. For busy home cooks, pellet smokers reduce active monitoring requirements while delivering consistent results that rival traditional methods.
Charcoal kettle grills converted to smoker operation typically require 2.5-3 hours for whole chickens, though temperature stability demands constant attention. These budget-friendly options work well for small batches but lack the capacity and heat retention of dedicated smoker designs. Consider building a dedicated smoking station if you plan regular smoking sessions, as this investment pays dividends through improved results and reduced stress.
Gas smokers, though less traditional, provide rapid temperature recovery and consistency ideal for poultry. Most gas smokers require only 2-2.5 hours for whole chickens due to efficient heat distribution. While some purists dismiss gas smoking, the reliable results and reduced active management make them practical choices for busy households seeking convenience without sacrificing quality.
Understanding your specific smoker’s characteristics—including heat distribution patterns, temperature recovery speed, and fuel consumption rates—allows you to develop timing estimates tailored to your equipment. Keep detailed notes on cooking times, final temperatures, and environmental conditions for several smoking sessions, creating a personalized reference guide that accounts for your smoker’s unique behavior patterns.
FAQ
What’s the most reliable way to know when smoked chicken is done?
Internal temperature is the gold standard—insert a meat thermometer into the thickest part of the thigh without touching bone, targeting 165°F (74°C) minimum for food safety. Many pitmasters prefer 170-175°F for superior tenderness. Color, texture, and juices running clear provide secondary indicators but can be misleading, so always verify with temperature measurement.
Can I smoke chicken faster without compromising quality?
Yes, using the hot-and-fast method (275-300°F) reduces time to 1.5-2 hours while maintaining excellent flavor. The reverse-sear technique (low-temperature smoking followed by high-heat finishing) also optimizes both timing and texture. Ensure your chicken is properly prepared with dry brining and thorough drying for best results regardless of temperature selection.
How far in advance can I prepare chicken for smoking?
Dry brining works best when applied 12-24 hours before smoking, so prepare your bird up to a full day in advance. Remove from refrigeration 30-45 minutes before smoking to ensure even cooking. Injection liquid can be prepared days ahead and refrigerated, applied 2-4 hours before smoking begins.
Does chicken size significantly affect smoking time?
Absolutely. A 3-pound bird may finish in 2-2.5 hours while a 6-pound bird requires 3.5-4 hours at identical temperatures. Always base timing estimates on your specific bird’s weight, using the 30-40 minutes per pound guideline as a starting point. Bone-in versus boneless pieces also affect timing—boneless breasts cook 30-40% faster than bone-in thighs.
What’s the difference between smoke ring and smoke flavor?
Smoke ring—the pink layer beneath the surface—indicates smoke penetration but doesn’t necessarily correlate with flavor intensity. Thin blue smoke produces excellent flavor with minimal visible ring, while thick white smoke creates prominent rings with potentially harsh flavors. Focus on achieving proper smoke color rather than maximizing ring depth.
Should I use a water pan while smoking chicken?
Water pans moderate temperature swings and add humidity, potentially reducing cooking time by 10-15 minutes. However, they’re optional rather than essential. If using one, fill with water, apple juice, or broth for subtle flavor enhancement. Empty and refill every 45-60 minutes as evaporation depletes liquid.
Can I smoke multiple chickens simultaneously?
Yes, but allow extra time—multiple birds require 15-25% longer cooking due to increased heat demand and reduced air circulation. Arrange birds on separate racks with space between them, rotating trays if your smoker has uneven heat distribution. Monitor each bird individually with separate thermometers rather than assuming uniform doneness.
What’s the best way to store leftover smoked chicken?
Refrigerate smoked chicken in airtight containers for up to 4 days, or freeze for up to 3 months. Shred meat for storage to maximize space and simplify reheating. Reheat gently at low temperature (275°F) with light spritzing to restore moisture, or incorporate into soups, salads, and sandwiches where slight drying is less noticeable.
Whether you’re enhancing your home entertainment setup with a dedicated smoking station or simply improving your backyard cooking skills, mastering smoked chicken opens doors to hosting impressive gatherings and impressing family with restaurant-quality results. The techniques and timing guidelines presented here represent decades of collective pitmaster experience, tested and refined through countless smoking sessions.
Remember that smoking is both science and art—while temperature and timing provide the framework, your personal preferences, local conditions, and equipment characteristics create infinite variations on the fundamentals. Start with the guidelines provided, document your results carefully, and adjust future sessions based on your specific circumstances. Within a few smoking sessions, you’ll develop the intuition and knowledge to produce exceptional smoked chicken consistently, regardless of external variables. The investment in understanding these principles pays dividends every time you fire up your smoker.


