Build a Shed? Expert Tips for Beginners
Building a shed is one of the most rewarding DIY projects you can undertake. Whether you’re creating additional storage space, a workshop, or a garden retreat, constructing your own shed gives you complete control over design, materials, and functionality. Unlike DIY basement finishing projects that require extensive structural modifications, a shed offers a more manageable introduction to construction for beginners.
The timeline for completing a shed varies significantly based on size, complexity, and your experience level. Most small to medium sheds (8×10 to 10×12 feet) take between 3 to 8 weeks to complete when working weekends and evenings. This comprehensive guide will walk you through every stage of the process, from planning and site preparation to finishing touches, ensuring your shed is built safely and to last.
Before you grab a hammer, understanding the fundamentals of shed construction—including proper foundation work, framing techniques, roofing systems, and local building codes—is essential. This knowledge will save you time, money, and potential rework down the line.
Planning Your Shed Project and Obtaining Permits
The first and most critical step in any shed-building project is thorough planning. Before breaking ground, you need to understand local zoning regulations, setback requirements, and whether your project requires permits. Many jurisdictions have specific rules about shed placement relative to property lines, typically requiring 5 to 10 feet of clearance from boundaries. Check with your local International Code Council (ICC) for building code standards in your area.
Create detailed plans that include dimensions, materials specifications, and foundation design. Sketch your shed layout on graph paper or use free online design tools to visualize the final product. Document the intended use—storage only versus workspace—as this affects ventilation and electrical requirements. Most jurisdictions require permits for structures larger than 200 square feet or those with electrical systems.
Contact your local building department early in the planning phase. Permit requirements typically include submitted plans, proof of property ownership, and payment of permit fees. While permits add time (usually 1-2 weeks for approval) and cost ($50-$500 depending on location), they ensure your shed meets safety standards and protects your property value. Many homeowners working on DIY home security upgrades find that permitted structures also qualify for better insurance coverage.
Measure your property carefully and mark the shed location with string and stakes. Verify utility locations by calling 811 (Call Before You Dig) to identify buried gas, electric, and water lines. This free service prevents dangerous and costly accidents during foundation excavation.

Site Preparation and Foundation Work
Proper site preparation is foundational to your shed’s longevity. Begin by clearing the area of vegetation, rocks, and debris. Level the ground as much as possible, removing high spots and filling low areas. For small sheds, a slight slope (1-2%) away from the structure aids water drainage.
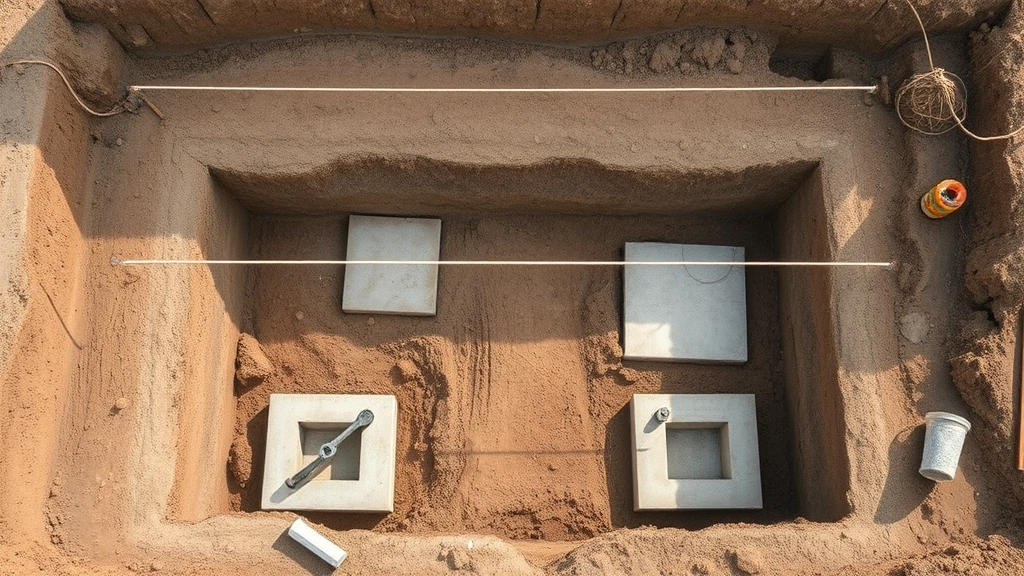
Foundation choices significantly impact your timeline and long-term maintenance. The three primary options are:
- Gravel or crushed stone beds: Most affordable and fastest (1-2 days), suitable for small, non-permanent structures. Requires annual maintenance as gravel shifts.
- Concrete piers or blocks: Moderate cost and effort (3-5 days), provides good elevation and drainage. Posts sit on concrete footings extending below the frost line.
- Concrete slab: Most durable option (5-7 days due to curing time), best for permanent installations and climates with freeze-thaw cycles. Requires excavation, gravel base, and concrete finishing.
For most beginner projects in northern climates, concrete piers are ideal. Dig holes 3-4 feet deep—below your local frost line to prevent frost heave—and place concrete footings with adjustable posts. This creates proper ventilation underneath and protects against moisture damage.
Allow concrete to cure fully (typically 7 days) before framing. This waiting period doesn’t mean idle time; use it to organize materials, review framing plans, and gather tools. Many builders use this phase to assemble wall panels in a shop environment, accelerating on-site construction when foundation curing completes.
Framing Basics for Shed Construction
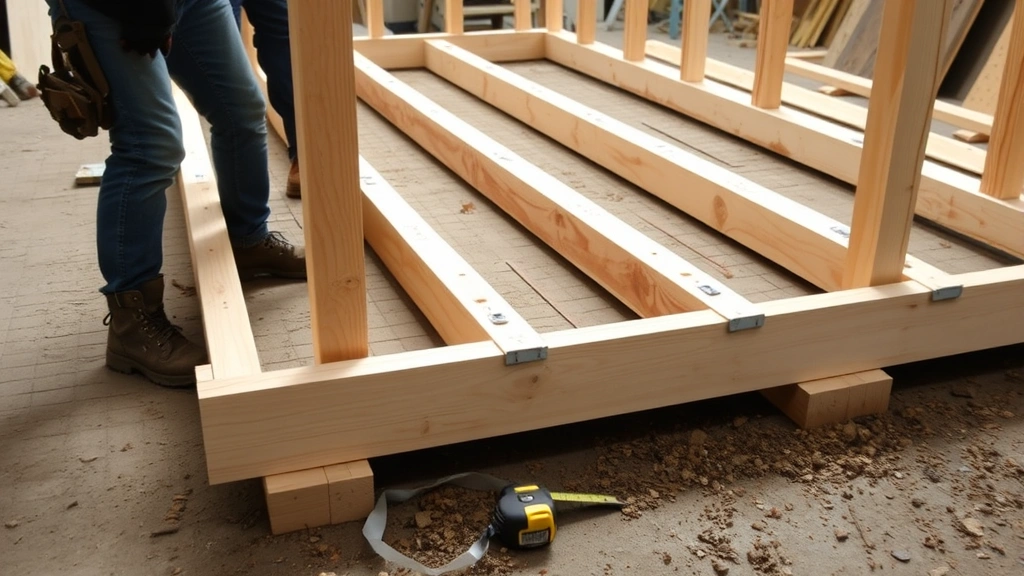
Shed framing follows standard residential construction principles but at a simplified scale. Most sheds use standard 2×4 lumber for walls and 2×6 or 2×8 lumber for roof rafters. Understanding proper spacing, bracing, and connections prevents structural failure and ensures your shed withstands wind and snow loads.
Begin by installing the rim board (band board) on your foundation, securing it with concrete anchors or treated lumber fasteners. Build wall frames on the ground, including top and bottom plates with studs spaced 16 inches on center. This spacing accommodates standard sheathing widths and provides adequate support. Frame door and window openings with proper headers—doubled 2x4s or larger lumber depending on opening width.
Wall bracing is critical for racking resistance. Install diagonal bracing (let-in braces or X-bracing) or use structural sheathing like plywood applied at 45-degree angles. These elements prevent walls from leaning under wind loads. Before raising walls, ensure corners are square by measuring diagonals; they should be equal length.
Raise walls carefully, securing them to the rim board with 3-inch deck screws or 16d nails. Install temporary diagonal bracing from top plates to ground stakes as you work. Brace multiple walls simultaneously to maintain squareness. This phase typically requires two people and takes 2-3 days for a standard 10×12 shed.
Install roof trusses or rafters once walls are fully braced and secured. Pre-fabricated trusses (ordered from suppliers) save significant time and ensure proper engineering. If building rafters on-site, calculate proper rise and run based on your roof pitch—12:12 (45 degrees) is common and attractive, though 6:12 or 8:12 are easier to work on safely. Secure rafters with metal framing connectors and multiple fasteners per connection.
Roofing Systems and Installation
Your roofing choice affects both timeline and weather protection. Shingles are most common for DIY projects, offering decent durability (20-25 years) at moderate cost. Metal roofing takes longer to install but lasts 40-70 years with minimal maintenance. For beginners, asphalt shingles are recommended as they’re forgiving and require standard tools.
Install roof sheathing (usually ½-inch plywood or OSB) over rafters, securing with 1¼-inch nails or screws spaced 6 inches apart. Ensure sheathing is properly supported and doesn’t overhang excessively. Check local NFPA building standards for snow load requirements in your region, which determine sheathing thickness and rafter spacing.
Install underlayment (roofing felt or synthetic) over sheathing, overlapping courses by 4-6 inches and securing with roofing nails. This layer provides secondary water protection if shingles fail. Add drip edge along eaves and gables, which directs water away from fascia boards.
Shingle installation begins at the eave line using starter strips or full shingles with the tar strip facing upward. Nail shingles with four nails per shingle, positioned above the tar strip. Stagger shingle courses so seams don’t align vertically. Work upward toward the ridge, installing hip and ridge caps last. A typical 10×12 roof takes 1-2 days for an experienced DIYer; budget 2-3 days if learning as you go.
Ensure proper ventilation by installing soffit vents and a ridge vent or gable vents. Ventilation prevents moisture accumulation and prolongs roofing life. This is often overlooked by beginners but is critical for shed longevity.
Siding, Windows, and Finishing Touches
With the roof weathertight, you can work on siding without weather concerns. Siding options include plywood sheets, board-and-batten, lap siding, or metal panels. Plywood is fastest (1-2 days) and least expensive; lap siding is more attractive but time-intensive. Install siding from bottom to top, overlapping courses to shed water downward.
Before siding, install windows and doors. Frame openings must be square and properly sized. Install flashing around windows—metal or rubber pieces that direct water away from the frame. Secure windows with shims and fasteners, ensuring they open and close smoothly. Proper window installation prevents future water damage and air leaks.
Install door frames using similar techniques, with flashing above the door. Hang doors on quality hinges and install latches or locks. Consider ramps if your shed will house heavy equipment or if accessibility is important. These finishing elements typically take 2-3 days for a standard shed.
Paint or stain exterior surfaces to protect wood from UV damage and moisture. Use exterior-grade primers and paints rated for your climate. Two coats typically provide adequate protection, though some finishes require three. Allow proper drying time between coats (check manufacturer specifications).
Interior finishing depends on intended use. Workshops benefit from shelving, workbenches, and electrical outlets. Storage sheds need organized shelving systems. Install 2×8 or 2×10 shelving on wall studs using heavy-duty brackets. Run electrical conduit if adding lighting or outlets, ensuring all work complies with local electrical codes and is inspected before closing walls.
Essential Tools and Materials Checklist
Successful shed building requires both the right tools and materials. Before starting, gather these essential items:
Power Tools: Circular saw or miter saw (cutting lumber), power drill-driver (fastening and drilling), reciprocating saw (optional but useful), nail gun (pneumatic or cordless), and level (essential for squaring and plumbing).
Hand Tools: Hammer, adjustable wrench, socket set, tape measure (25-foot minimum), speed square, combination square, chalk line, pencil, and handsaw for finishing cuts.
Safety Equipment: Safety glasses, work gloves, dust mask, ear protection, and steel-toed boots. Don’t skip these—construction injuries are preventable with proper protection.
Materials Estimate for 10×12 Shed: 40-50 2x4x8 lumber pieces (walls and framing), 12-16 2x6x12 or 2x8x12 pieces (rafters), 40-50 sheets plywood/OSB (sheathing and siding), roofing materials (shingles, underlayment, flashing), nails and screws (50 lbs mixed), concrete for foundation (10-15 bags or 2-3 cubic yards), and finishing materials (paint, stain, sealant).
Many beginners find that planning material purchases carefully reduces waste and cost. Order materials for each phase rather than buying everything upfront, which prevents storage issues and allows adjustments based on progress.
Timeline Breakdown by Project Phase
Understanding realistic timelines helps you plan your shed project effectively. Here’s a typical schedule for a 10×12 shed built by one or two people working weekends:
Week 1-2: Planning and Permits (10-14 days) – Finalize design, obtain permits, and order materials. Much of this happens while waiting for permit approval, so the actual work time is minimal.
Week 3: Site Prep and Foundation (7-10 days) – Clear and level site, excavate and set footings, pour concrete. If using gravel, this reduces to 2-3 days. If using a concrete slab, extend to 10-14 days including curing.
Week 4-5: Framing (10-14 days) – Build and raise walls, install roof structure. This phase is weather-dependent; wet conditions slow progress significantly.
Week 6: Roofing (5-7 days) – Install sheathing, underlayment, and shingles. Weather is critical here; schedule this during dry forecasts.
Week 7: Siding and Doors (7-10 days) – Install windows, doors, and exterior siding. Flashing installation is critical to prevent future leaks.
Week 8: Finishing (3-5 days) – Paint, stain, interior organization, and final details. This phase is weather-independent and can extend based on interior complexity.
Total Timeline: 4-8 weeks depending on complexity, experience level, and weather conditions. Full-time work compresses this to 2-3 weeks; leisurely weekend projects may extend to 10-12 weeks.
Unlike calculating how long it takes to walk 6 miles, shed construction has numerous variables affecting duration. Weather delays, material availability, permit processing, and skill development all impact your actual timeline. Build flexibility into your schedule and don’t rush critical phases like foundation curing or roofing in poor weather.
FAQ
Do I need a permit to build a shed?
Most jurisdictions require permits for sheds larger than 200 square feet or those with electrical systems. Check your local building department. Permits ensure code compliance and protect your property value. Unpermitted structures may affect insurance claims or future home sales.
What’s the best foundation for a shed?
Concrete piers are ideal for most climates—they provide good drainage, prevent frost heave, and are manageable for DIYers. Concrete slabs work well in stable climates but require more initial work. Gravel is cheapest but requires annual maintenance.
Can I build a shed alone?
Yes, though having a helper accelerates work significantly, especially during wall raising and roof installation. Solo building is possible with temporary bracing, creative problem-solving, and patience. Budget extra time for solo projects.
What’s the most common beginner mistake?
Skipping proper foundation work. Many beginners rush this phase, leading to settling, rot, and structural problems. Invest time in proper footings and drainage—it’s foundational to shed longevity.
How much does building a shed cost?
A basic 10×12 shed costs $1,500-$3,500 in materials, depending on finishes and your region. Permits, tools, and site preparation add $200-$500. Compare this to purchasing a pre-built shed ($2,000-$5,000) or hiring contractors ($5,000-$15,000+), and DIY building offers excellent value.
Should I hire an electrician for shed wiring?
Local codes vary. Many jurisdictions allow homeowners to run circuits in their own structures, though permits and inspections are typically required. Hire a licensed electrician if you’re uncomfortable with electrical work—mistakes create fire and shock hazards.
What’s the best roofing material for a shed?
Asphalt shingles offer the best value for DIYers—moderate cost, decent durability (20-25 years), and straightforward installation. Metal roofing lasts longer (40-70 years) but requires more skill. Consider your climate’s snow and wind loads when choosing.
How do I prevent water damage in my shed?
Proper foundation drainage, quality roofing with correct flashing, and good ventilation are essential. Ensure water drains away from the structure, install gutters and downspouts, and maintain a slight slope. Avoid ground-level storage of valuable items, and consider a dehumidifier in humid climates.
Can I modify my shed design mid-project?
Minor modifications are manageable, but major changes (size, roof pitch, foundation type) are costly and time-consuming. Finalize plans before obtaining permits and starting construction. If modifications become necessary, check permit requirements—some jurisdictions require permit amendments.
What’s a realistic timeline for my first shed?
Budget 8-12 weeks for a first-time shed project working weekends. This allows time for learning, problem-solving, and weather delays. Experienced builders complete similar projects in 4-6 weeks. Factor in permit processing time, which typically adds 1-2 weeks to the overall timeline. Don’t rush—quality construction prevents future repairs and ensures your shed lasts decades.


