How to Build a Deck: Expert Tips Inside
Building a deck transforms your outdoor space into a functional entertaining area and adds significant value to your home. Whether you’re a seasoned DIYer or tackling your first major project, understanding the fundamentals of deck construction ensures a safe, durable, and beautiful result. This comprehensive guide walks you through every step of the process, from initial planning and material selection through final finishing touches.
A well-built deck can last 15-20 years or more with proper maintenance and quality materials. The key to success lies in meticulous planning, adherence to local building codes, and attention to structural details that many homeowners overlook. By following expert techniques and best practices, you’ll create an outdoor space that becomes the centerpiece of your home’s exterior living areas.
Planning and Obtaining Permits
Before purchasing a single board, invest time in proper planning. Check with your local building department to understand zoning restrictions, setback requirements, and whether your project requires permits. Most jurisdictions require permits for decks, and skipping this step can result in costly fines, difficulty selling your home, or forced removal of the structure.
Create a detailed plan that includes deck dimensions, height, load capacity, and material specifications. Many building departments provide standard deck plans or accept plans from professional designers. Your design should account for local snow loads, wind resistance, and soil conditions. The International Code Council (ICC) publishes the International Building Code (IBC), which most jurisdictions adopt as their standard. Familiarize yourself with the specific codes in your area, as they vary by region.
When submitting for permits, include detailed drawings showing post spacing, beam sizing, joist layout, and railing specifications. This documentation protects you legally and ensures your deck meets safety standards. Permit costs typically range from $50 to $500 depending on your location and deck size, a worthwhile investment for compliance and safety.
Materials and Tools You’ll Need
Selecting appropriate materials is crucial for deck longevity. Pressure-treated lumber remains the most affordable option, offering good durability when properly installed. Alternatively, consider composite decking, which requires less maintenance but costs more upfront. Cedar and redwood provide natural beauty but demand regular staining and sealing.
Essential materials include:
- Pressure-treated posts (4×4 or 6×6 depending on load)
- Pressure-treated beams (2×8, 2×10, or 2×12)
- Pressure-treated joists (2×6, 2×8, or 2×10)
- Decking boards (2×6, 2×8, or composite materials)
- Galvanized or stainless steel fasteners (never use regular nails)
- Concrete footings (bags or ready-mix)
- Post bases and joist hangers (galvanized metal)
- Flashing and moisture barriers
Tool requirements include a circular saw, miter saw, power drill, level, tape measure, square, and safety equipment. Renting specialized equipment like a post-hole digger or power auger saves time and effort. Quality tools ensure precision and reduce frustration throughout the project.
Site Preparation and Layout
Proper site preparation prevents future problems with settling, rot, and structural failure. Clear the deck area of vegetation, rocks, and debris. Mark the deck outline using string and stakes, ensuring corners are square by measuring diagonals—they should be equal if your layout is accurate.
Check the ground slope and drainage patterns. Ideally, your deck should slope slightly away from your house to prevent water pooling. If your yard slopes toward the house, consider installing a drainage system or adjusting your deck design. Identify underground utilities by calling your local utility locating service before digging any holes.
Determine post spacing based on your design and local code requirements. Posts typically space 6-8 feet apart, though this varies based on beam size and load requirements. Mark post locations with chalk or paint, double-checking measurements before proceeding.
Installing Foundation Posts
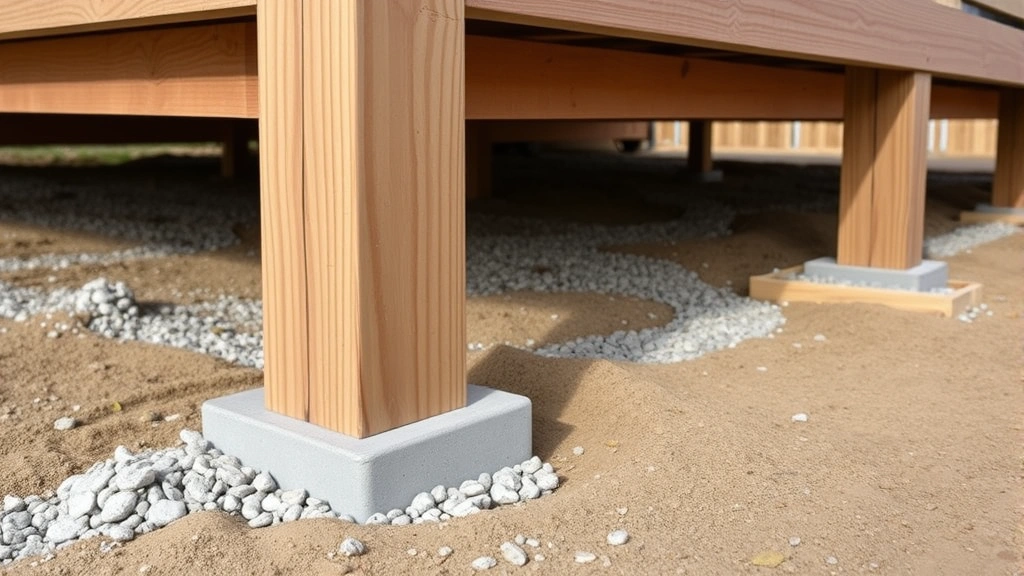
A solid foundation prevents the most common deck failure: post settling and rot. Posts must rest on footings that extend below the frost line—typically 3-4 feet deep in cold climates, though your local building code specifies the exact depth. Frost heave causes posts to shift upward during winter, destabilizing the entire structure.
Dig holes for concrete footings using a post-hole digger or power auger. The hole depth should reach below the frost line, and the diameter should accommodate the footing size, typically 12 inches wide. For added stability, make holes slightly wider at the bottom to create a bell shape that resists frost heave.
Place 4-6 inches of gravel at the bottom of each hole for drainage. Insert concrete footings (either pre-made or hand-poured) so they sit slightly above grade. This prevents water from pooling around the post base. Set post bases in the wet concrete before it hardens, ensuring they’re level and properly positioned.
Once concrete cures (typically 24-48 hours), install 4×4 or 6×6 posts using adjustable post bases that allow for minor height adjustments. Posts must be perfectly vertical—check with a level in two directions. Cut posts to the correct height after the beam is installed, not before, as this allows for better leveling adjustments.
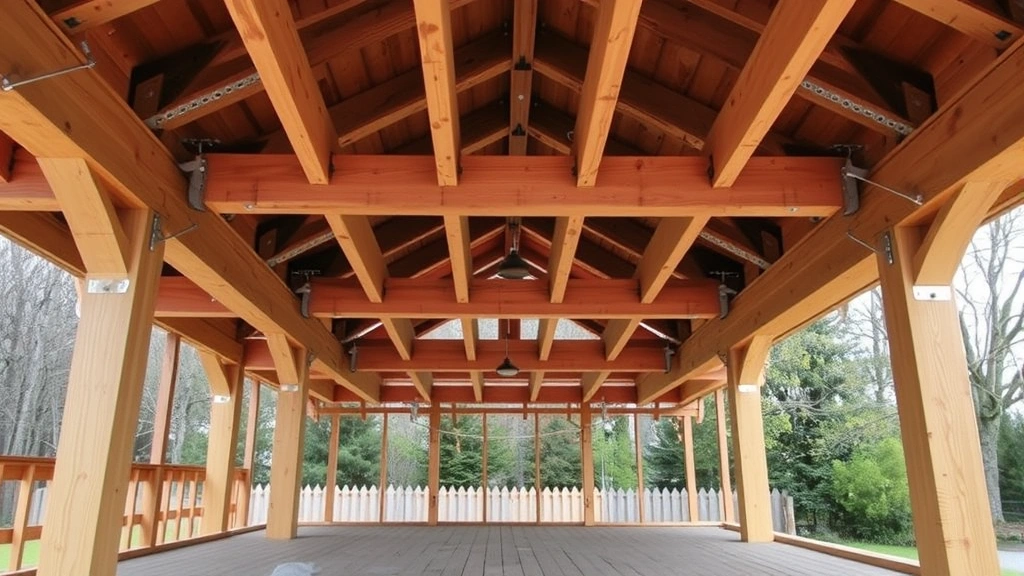
Building the Frame Structure
The frame—consisting of beams and joists—bears all the weight your deck supports. Beam sizing depends on span, post spacing, and load requirements. The American Wood Council (AWC) provides span tables that specify maximum beam and joist spans based on lumber grade and species. Never guess at these calculations; undersized framing causes sagging and structural failure.
Install beams by bolting or bracketing them to posts using galvanized hardware. Beams should be level and properly supported at each post. Check levelness with a long level or transit, making adjustments at post bases as needed. Proper beam installation is critical—this is where many DIY deck failures originate.
Joists attach perpendicular to beams using joist hangers, which distribute weight more effectively than toe-nailing. Space joists 16 inches on center for standard residential decks, though 12-inch spacing provides additional strength for high-traffic areas. Use galvanized joist hangers and fasteners rated for exterior use; standard hardware rusts and fails prematurely.
Rim joists complete the frame perimeter, connecting the ends of joists and providing a finished edge. Ensure all framing members are level and properly aligned before proceeding to decking installation. Poor framing at this stage becomes increasingly difficult and expensive to correct later.
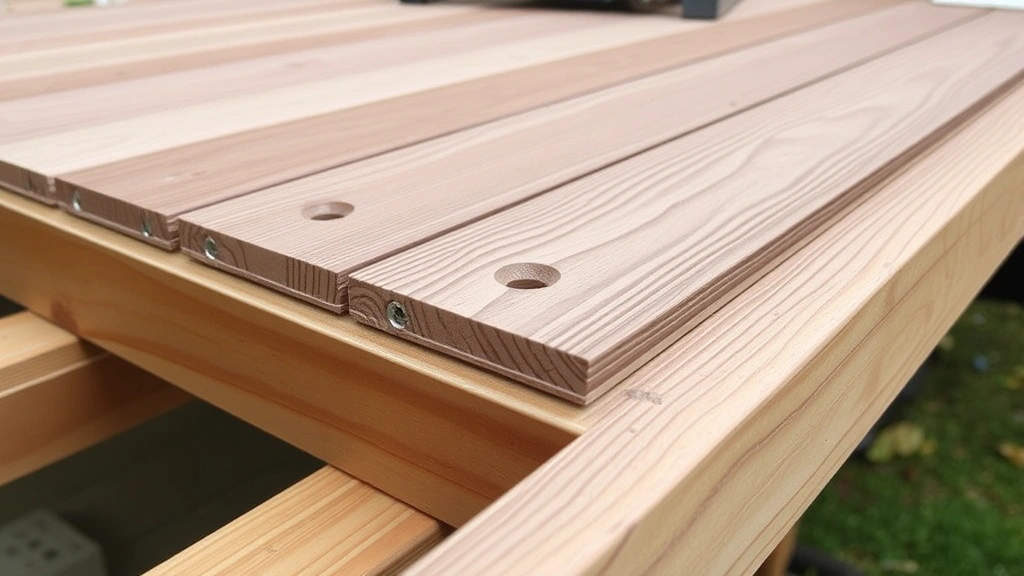
Decking Installation
Decking boards are the visible surface and significantly impact aesthetics and durability. Space boards 1/8 inch apart to allow water drainage and wood expansion. Stagger board joints so they don’t align across multiple rows, which weakens the structure and appears less attractive.
Use corrosion-resistant fasteners—stainless steel or galvanized—driven flush with the board surface. Many builders prefer hidden fastening systems that eliminate visible screw heads, creating a cleaner appearance. Pre-drill holes to prevent splitting, especially near board ends.
Maintain consistent spacing between boards using spacer blocks or shims. Uneven spacing looks unprofessional and can trap debris and moisture. For composite decking, follow manufacturer guidelines carefully, as installation requirements differ significantly from pressure-treated lumber. Composite materials expand more with temperature changes and require different fastening techniques.
Cut boards to length before installation, making straight, clean cuts with a miter saw. For boards that require angle cuts (around stairs or irregular edges), use a circular saw with a fine-toothed blade. Sand any rough edges to prevent splinters and improve safety.
Adding Railings and Stairs
Railings serve critical safety functions and must comply with building codes. Most jurisdictions require railings on decks elevated more than 30 inches above ground. Railings must withstand 200-pound horizontal force without failing and have balusters spaced so a 4-inch sphere cannot pass through—preventing child entrapment.
Install railing posts securely to the deck frame using bolts or lag screws, not nails. Posts should not flex or move when pressure is applied. Horizontal rails connect posts and support balusters. Baluster spacing is critical for safety; measure carefully to ensure consistent spacing that meets code requirements.
Stairs require careful calculation to ensure safe dimensions. Rise (vertical step height) must be consistent, typically 7-8 inches, while run (horizontal depth) should be 10-11 inches. Calculate the number of steps by dividing total rise by your step height. Stairs that don’t meet these standards create tripping hazards and fail inspection.
Stair stringers—the angled boards supporting steps—must be sturdy and properly fastened. Cut stringers carefully using a circular saw, creating consistent notches for treads. Attach treads securely with corrosion-resistant fasteners. Ensure stair railings and handrails meet code requirements, typically 34-38 inches high with specific grip diameter specifications.
Finishing and Maintenance
Proper finishing protects your investment and extends deck life. Pressure-treated lumber benefits from staining and sealing, though many manufacturers claim treatment alone provides adequate protection. A quality exterior stain-sealer penetrates wood, protecting against UV damage and moisture absorption that causes warping and rot.
Wait 3-6 months after construction before staining pressure-treated lumber, allowing treatment chemicals to cure and excess moisture to evaporate. Choose stains rated for exterior use, preferably semi-transparent or solid formulations that provide better protection than clear finishes. Apply stain according to manufacturer instructions, typically requiring reapplication every 2-3 years.
Regular maintenance extends deck life significantly. Clean debris from surfaces and between boards to prevent moisture accumulation. Inspect fasteners annually, tightening any that have loosened. Check for signs of rot, particularly in shaded areas that retain moisture. Replace compromised boards promptly to prevent structural issues.
For composite decking, maintenance is minimal but still necessary. Clean surfaces regularly with mild soap and water. Some composite materials may fade slightly over time; this is normal and doesn’t affect functionality. Follow manufacturer guidelines for your specific product, as different composites have different care requirements.
Consider your deck as an extension of your home requiring seasonal attention. In fall, clear leaves and debris. Before winter, ensure proper drainage and address any structural issues. In spring, inspect for winter damage and refresh finishes as needed. This proactive approach prevents costly repairs and keeps your deck safe and attractive.
FAQ
How long does it take to build a deck?
A typical 12×16 foot deck takes 3-5 days for experienced builders or 1-2 weeks for DIYers working weekends. Timeline depends on deck size, complexity, site conditions, and whether you’re waiting for concrete to cure. Permit approval adds 2-4 weeks before construction begins.
Do I need a permit for my deck?
Most jurisdictions require permits for decks, especially those elevated more than 30 inches or covering more than 200 square feet. Permits ensure compliance with building codes and protect you legally. Contact your local building department to determine requirements for your specific situation.
What’s the best decking material?
Pressure-treated lumber offers the best value and is easiest for DIY installation. Composite materials reduce maintenance but cost more upfront. Cedar and redwood provide natural beauty but require regular maintenance. Choose based on your budget, climate, and maintenance preferences. Research leading composite manufacturers for product comparisons.
How deep should post footings be?
Post footings must extend below the frost line, typically 3-4 feet in cold climates. Your local building code specifies the exact depth for your area. Footings that don’t reach below frost line experience heaving during winter freeze-thaw cycles, destabilizing the deck.
Can I build a deck myself?
Yes, many homeowners successfully build decks with proper planning and attention to detail. Start with beginner woodworking projects to develop skills. Understanding building codes and following proper techniques is essential. Consider hiring professionals for complex elements like stairs or if you’re uncomfortable with structural calculations.
How often should I stain my deck?
Most decks require restaining every 2-3 years, depending on climate and sun exposure. Decks in shaded areas may last 3-4 years between applications. Clean your deck annually and inspect the finish; when water no longer beads on the surface, it’s time to restain.
What fasteners should I use?
Always use galvanized, stainless steel, or deck-specific fasteners rated for exterior use. Regular nails and screws rust, staining wood and weakening connections. Choose fastener length based on material thickness; fasteners should penetrate at least 1.5 inches into the supporting member.
How much weight can a deck support?
Standard residential decks are designed for 40 pounds per square foot of live load, plus the weight of the structure itself. This accommodates typical furniture and foot traffic. Hot tubs and other heavy items may require reinforced framing. Calculate your specific requirements based on intended use and consult safety standards for guidance.
Is pressure-treated lumber safe?
Modern pressure-treated lumber uses copper-based preservatives considered safe for residential use. Older lumber treated with arsenic-based chemicals (pre-2004) should be handled carefully. Wash hands after handling, don’t burn treated lumber, and follow manufacturer guidelines for finishing and maintenance.


