How to Build a Bookshelf: Carpenter’s Guide
Building a bookshelf is one of the most rewarding DIY projects for beginners and experienced woodworkers alike. Whether you’re looking to create additional storage in your home office, bedroom, or living room, a custom-built bookshelf offers both functionality and aesthetic appeal that store-bought options rarely match. This comprehensive guide walks you through every step of the process, from selecting materials to finishing touches, ensuring your project succeeds regardless of your skill level.
A well-constructed bookshelf requires careful planning, proper tool selection, and attention to structural integrity. Unlike decorative furniture, bookshelves must support significant weight—sometimes exceeding 100 pounds per shelf. Understanding load-bearing principles, wood selection, and fastening methods ensures your bookshelf remains safe and stable for years to come. This guide emphasizes safety-conscious construction practices aligned with International Building Code standards for residential structures.
Tools and Materials You’ll Need
Before beginning any woodworking project, gather all necessary tools and materials. Essential tools include a miter saw or circular saw for cutting, a power drill with both drilling and driving bits, a level for ensuring proper alignment, a measuring tape, a carpenter’s square, and clamps for holding pieces during assembly. A stud finder becomes invaluable when securing structures to walls, as it identifies wall studs that provide maximum support.
For materials, you’ll need wood boards (typically 1×10 or 1×12 for shelves), vertical supports or sides, wood screws (2.5 inches for frame assembly), wood glue, wood filler, sandpaper in various grits (80, 120, 220), and finishing materials such as stain or paint. If wall mounting, acquire appropriate anchors—lag bolts for studs, or heavy-duty toggle bolts and expansion anchors for drywall-only mounting. The American Wood Council provides detailed specifications for wood strength ratings that help determine appropriate shelf depths and weight capacities.
Safety equipment is non-negotiable. Always wear safety glasses when cutting or drilling, use hearing protection around power tools, and consider a dust mask when sanding. A first aid kit should be accessible, and proper ventilation is essential when applying finishes.

Choosing the Right Wood
Wood selection dramatically impacts your bookshelf’s durability, appearance, and weight capacity. Common choices include pine, oak, maple, and birch. Pine is budget-friendly and lightweight but softer and more prone to denting. Oak provides durability and attractive grain patterns but is heavier and more expensive. Maple and birch offer excellent strength and fine grain, making them ideal for visible, high-load applications.
Consider the difference between solid wood and plywood. Solid wood boards are more attractive and stronger but prone to warping if humidity fluctuates significantly. Plywood offers dimensional stability and is lighter, making it suitable for larger shelves. Edge-banding hides plywood edges for a finished appearance. For load-bearing shelves, avoid particleboard—it lacks the structural integrity needed for book weight.
Wood moisture content affects stability. Purchase wood from climate-controlled suppliers and allow it to acclimate to your home’s humidity for several days before construction. This prevents warping after assembly. Check that boards are straight by sighting along their length; twisted or cupped boards create unstable shelves.
Planning Your Design
Proper planning prevents costly mistakes and ensures structural adequacy. Measure your wall space carefully, accounting for baseboard height and ceiling irregularities. Most interior walls have studs spaced 16 inches apart—knowing this determines anchor placement and shelf span capacity.
Sketch your design including overall dimensions, shelf height spacing, and shelf depths. Standard shelf spacing ranges from 10 to 12 inches for paperback books, 12 to 15 inches for hardcovers, and 15+ inches for oversized volumes or mixed collections. Shelf depth typically ranges from 8 to 12 inches for books, though deeper shelves (14-16 inches) accommodate decorative items alongside books.
Calculate load capacity using wood thickness, span between supports, and wood species. A 1-inch thick pine shelf spanning 36 inches safely supports approximately 50-75 pounds; the same oak shelf supports 100-150 pounds. National Wood Flooring Association publications contain detailed load tables for various wood species and configurations. When in doubt, use additional support brackets or reduce shelf span.
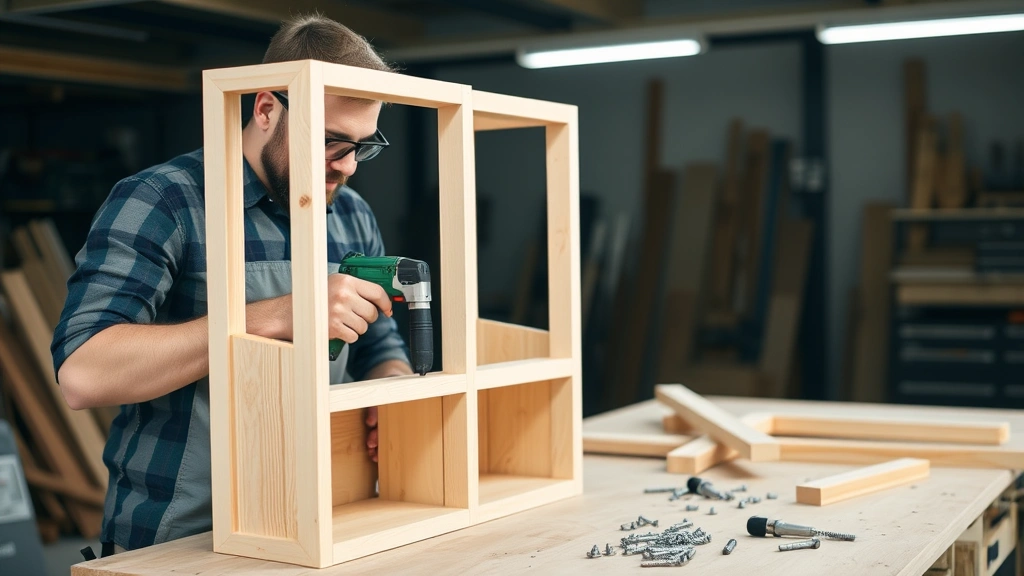
Building the Frame
The frame provides structural support for shelves. For wall-mounted designs, vertical supports (typically 1×2 or 1×4 boards) attach directly to wall studs. Begin by marking stud locations with your stud finder, then mark vertical support positions with a level to ensure plumb installation.
If building a freestanding bookshelf, construct a sturdy frame using 2×4 lumber for sides and top/bottom rails. Use mortise and tenon joints or pocket hole joinery for strong connections. Pocket holes, created with a specialized jig, hide fasteners and provide excellent strength—ideal for visible surfaces. Assemble the frame using wood glue and 2.5-inch wood screws, checking for square with a carpenter’s square and confirming diagonal measurements are equal.
Reinforce the frame with diagonal bracing if the bookshelf height exceeds 48 inches. This prevents racking (parallelogram distortion) under load. Cross-bracing on the back, even if later covered, significantly increases rigidity. Ensure the frame is square before moving forward; a twisted frame creates uneven shelf surfaces that look unprofessional and may cause books to slide.
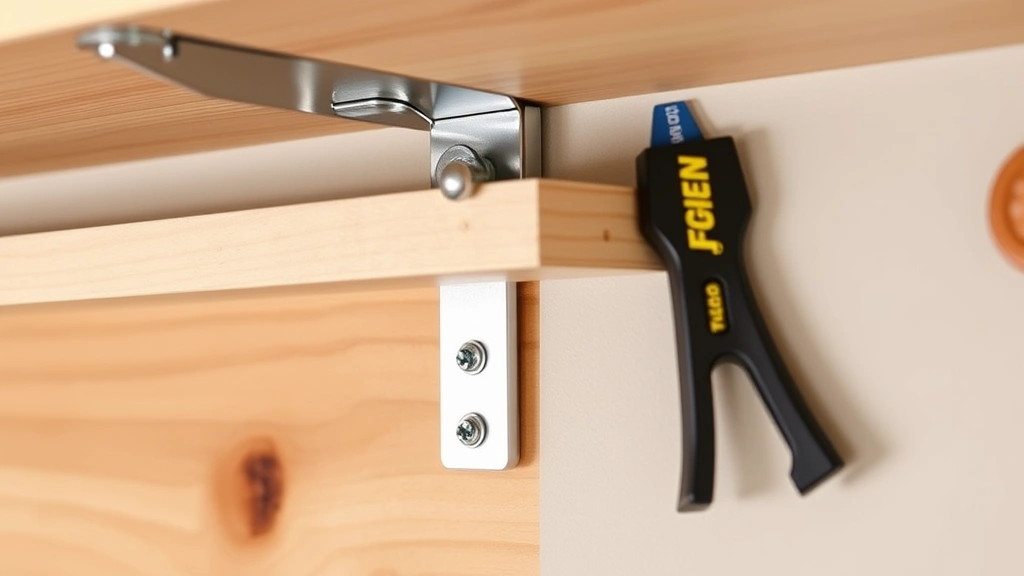
Installing Shelves
Shelves mount using several methods, each with distinct advantages. Shelf pins inserted into pre-drilled holes offer adjustability and clean aesthetics. Drill holes in vertical supports at regular intervals (typically 1.5 inches apart) using a dowel jig to ensure alignment. Holes should be 1/4 inch or 5/16 inch depending on pin diameter, and approximately 3/4 inch deep.
Shelf brackets provide visible support and enhance load capacity for deep shelves. Install brackets at 16-24 inch intervals along the shelf length, fastening securely to wall studs when possible. Heavy-duty brackets rated for your expected load are essential—check manufacturer specifications.
For floating shelves with concealed supports, install a steel rod or wooden cleat into wall studs, then slide the shelf over the support. This creates a seamless appearance but offers less adjustability. Ensure the support is perfectly level before sliding the shelf—any tilt becomes obvious once loaded.
Before finalizing shelf placement, test stability by applying downward pressure. Shelves should not deflect noticeably or feel springy. If movement occurs, either reduce the shelf span or add additional support. Remember that books concentrate weight unevenly, so conservative load estimates prevent catastrophic failure.
Wall Mounting and Anchoring
Proper wall anchoring is critical for safety. Always mount vertical supports to wall studs using 3-inch lag bolts or structural screws. Studs provide reliable support for shelves containing 100+ pounds of books. Mark stud locations, then drill pilot holes slightly smaller than your fastener diameter to prevent wood splitting.
For areas between studs, use heavy-duty anchors rated for your shelf’s weight. Toggle bolts support 75-150 pounds per anchor depending on bolt size and drywall thickness. Expansion anchors work well for 50-100 pound loads. Never rely solely on drywall fasteners for bookshelf mounting—drywall alone cannot safely support book weight without anchors.
Install at least two anchors per shelf, spaced as far apart as possible to maximize support. When using multiple anchors, distribute weight evenly to prevent tilting. Check anchors periodically, especially during the first month after installation—drywall may settle, requiring anchor tightening.
For masonry walls common in basements or older homes, use concrete anchors or masonry screws appropriate for your wall type. The Construction Documents Library contains installation guidelines for various wall types and anchor systems.
Finishing Your Bookshelf
Finishing transforms raw wood into an attractive, protected surface. Begin with sanding, starting with 80-grit paper to remove saw marks and surface imperfections, progressing to 120-grit for smoothness, and finishing with 220-grit for a silky feel. Sand with the grain to avoid visible scratches. Fill screw holes and gaps with wood filler matching your wood species, sanding smooth once dry.
Choose between stain and paint based on desired appearance. Stain enhances wood grain while providing color, available in numerous shades from light oak to dark walnut. Apply stain evenly with a brush or cloth, following manufacturer instructions for drying time between coats. Polyurethane topcoat protects stained wood and enhances durability—water-based polyurethane dries quickly with minimal odor, while oil-based polyurethane offers superior durability but requires longer drying time.
Paint provides uniform color and excellent protection, particularly important for kitchens or humid areas where moisture might affect wood. Use quality interior paint in semi-gloss or satin finish for easy cleaning. Apply primer first, then two coats of paint, sanding lightly between coats for adhesion.
Consider your home’s décor when selecting finishes. A bookshelf serves as a design element, and color choice should complement surrounding furniture and wall color. Natural wood finishes work well in traditional or rustic settings, while painted bookshelves suit contemporary or transitional designs. Better Homes & Gardens offers numerous design inspiration galleries for bookshelf styling and finishing ideas.
FAQ
How long does it take to build a bookshelf?
A simple wall-mounted bookshelf takes 4-8 hours including planning, cutting, assembly, and finishing. More complex designs or freestanding units may require 12-20 hours. Finishing time varies significantly—stain and polyurethane may require 3-7 days for complete drying, while paint typically dries within 24-48 hours. The learning curve for woodworking skills affects timeline; experienced builders work faster than beginners.
What’s the maximum weight a bookshelf can safely hold?
Weight capacity depends on wood species, thickness, span between supports, and mounting method. A typical 1-inch thick hardwood shelf spanning 36 inches between supports safely holds 100-150 pounds. Pine shelves of the same dimensions hold 50-75 pounds. Wall-mounted shelves anchored to studs can hold significantly more than those relying on drywall anchors alone. Always consult load tables specific to your wood type and configuration.
Can I build a bookshelf without wall studs?
Yes, but with limitations. Heavy-duty drywall anchors support 75-150 pounds per anchor. For lighter book collections, this may suffice. However, if you need greater capacity, consider building a freestanding bookshelf instead—it requires no wall anchoring and offers maximum load capacity. Alternatively, locate studs using a stud finder and position shelves accordingly.
What’s the best wood for a bookshelf?
Hardwoods like oak, maple, and birch offer superior durability and strength. Pine is budget-friendly but softer. Plywood provides stability and is lighter than solid wood. Your choice depends on budget, desired appearance, and expected load. For high-quality results, hardwoods justify their higher cost through longevity and attractive grain patterns.
How do I prevent shelves from sagging?
Prevent sagging by using appropriate wood thickness, limiting shelf span, installing additional supports, and distributing weight evenly. Calculate load capacity before assembly using wood species and dimensions. Add support brackets at 16-24 inch intervals, or use adjustable shelf pins with properly spaced holes. Regular books-only shelves rarely sag if properly designed; sagging usually indicates undersized materials or excessive weight.
Should I stain or paint my bookshelf?
Stain highlights natural wood grain and works well for attractive hardwoods or rustic designs. Paint offers uniform color, easier cleaning, and excellent protection in humid areas. Consider your home’s décor, the wood species, and maintenance preferences. Both options are durable when properly applied with appropriate topcoats.
How much does it cost to build a bookshelf?
Material costs range from $50-200 for a simple wall-mounted shelf to $300-800 for a large freestanding unit, depending on wood selection and hardware. If you lack tools, initial investment increases; many DIYers already own basic power tools. Budget additional costs for finishing materials and fasteners. Building your own bookshelf typically costs 40-60% less than purchasing comparable furniture.
Building a bookshelf represents an excellent entry point into woodworking, combining straightforward techniques with visible, functional results. Following this guide ensures a safe, attractive bookshelf that serves your storage needs for decades. Whether you’re finishing basement spaces or enhancing living areas, custom bookshelves add character and value to your home. Take time planning your design, invest in quality materials, and don’t rush assembly—the results will reward your effort with a piece of furniture you’ll proudly display.


