How to Build a Shed: Expert DIY Guide
Building a shed is one of the most rewarding DIY projects you can undertake. Whether you need extra storage, a workshop, or a garden retreat, a well-constructed shed adds functionality and value to your property. This comprehensive guide walks you through every step of the process, from planning and foundation work to roofing and finishing touches. With proper planning, the right materials, and attention to detail, you can create a sturdy structure that will serve you for decades.
The time investment for shed construction varies significantly based on size, complexity, and your experience level. A small 8×10 shed typically takes 2-4 weeks for a dedicated DIYer, while larger or more complex designs may require 6-8 weeks. Understanding the process beforehand helps you schedule your time effectively and avoid costly mistakes. This guide provides the knowledge you need to build confidently, whether this is your first construction project or you’re expanding your skills from previous work like building a house.
Planning and Permits
Before you purchase a single board, invest time in thorough planning. Start by determining your shed’s purpose—storage, workshop, garden studio, or hobby space. This decision influences size, ventilation, electrical needs, and interior layout. Most residential sheds range from 8×10 to 12×16 feet, though you can build larger or smaller depending on your needs and lot space.
Check local zoning regulations and building codes. Many municipalities require permits for structures over 100-120 square feet, while others have different setback requirements from property lines. Contact your local building department to understand regulations in your area. The International Code Council (ICC) provides model building codes that most jurisdictions follow, though local amendments vary. Obtaining proper permits ensures your structure meets safety standards and protects your property investment.
Create detailed plans showing dimensions, materials, roof pitch, foundation type, and any special features. You can purchase pre-made plans, use online design tools, or hire a designer. If you’re tackling a larger renovation project alongside your shed, understanding basement finishing principles can help with ventilation and moisture control in your shed as well.
Budget planning is critical. Material costs typically range from $2,000-$8,000 for a basic 12×16 shed, depending on finishes and location. Create a detailed materials list and obtain quotes from multiple suppliers. Factor in tools you may need to purchase or rent, such as circular saws, nail guns, and scaffolding.
Site Preparation and Foundation
Choose your site carefully. Select level ground with good drainage, away from trees that drop debris and roots that damage foundations. Ensure the location receives adequate sunlight if you’ll work inside, and consider prevailing winds for ventilation. Verify utility locations before excavation using your local call-before-you-dig service.
Foundation type determines your shed’s longevity. Common options include:
- Concrete slab: Most durable, best for permanent structures. Requires excavation, gravel base, rebar, and proper drainage slope.
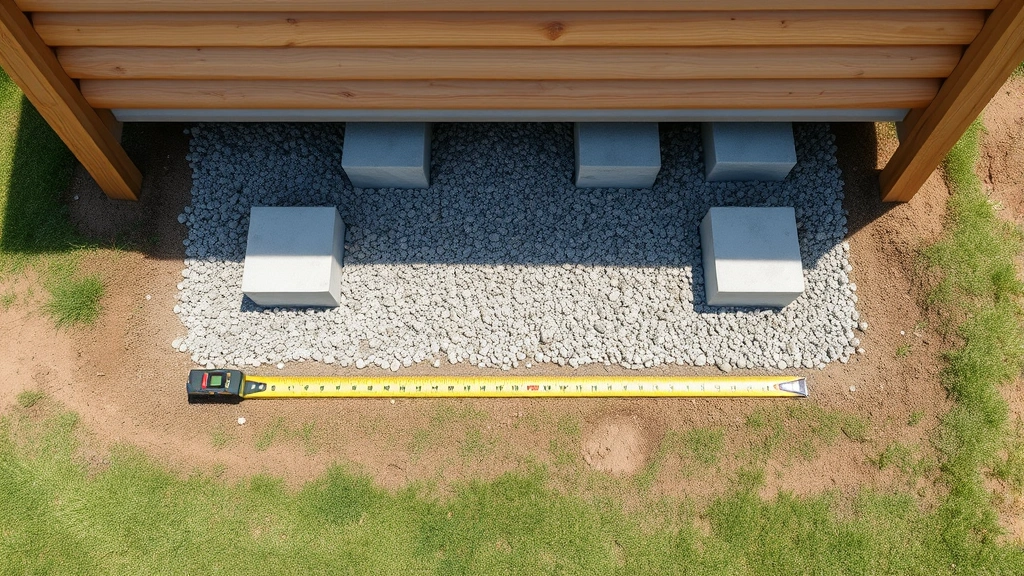
- Concrete pier blocks: Affordable and suitable for most climates. Blocks elevate the structure, improving ventilation and preventing rot.
- Gravel base: Budget-friendly but requires regular maintenance and doesn’t work in wet climates.
- Treated wood skids: Portable option for temporary sheds, but less durable than other methods.
For concrete slabs, excavate 4-6 inches deep, add a 4-inch gravel base for drainage, then pour 4 inches of concrete with proper slope (1/8 inch per foot) for water runoff. Use a concrete reference guide to ensure proper mix and curing. For pier blocks, space them 4 feet apart in a grid pattern, ensuring they’re level using a laser level.

Framing the Structure
Framing creates your shed’s skeleton. Use pressure-treated lumber for the base and untreated dimensional lumber for walls and roof. Standard framing uses 2×4 lumber spaced 16 inches on center, providing strength while minimizing material costs.
Begin by building the floor frame on your foundation. Use pressure-treated 2x4s, securing them with concrete anchors if using a slab. Ensure corners are square using the 3-4-5 triangle method: measure 3 feet on one side, 4 feet on the adjacent side—if the diagonal measures 5 feet, you’re square. Add floor joists, typically 2×6 or 2×8 lumber spaced 16 inches apart, depending on span and load requirements.
Next, construct wall frames on the ground, then raise them into place. Build each wall as a complete unit with top and bottom plates, studs, and headers for door and window openings. Include diagonal bracing or sheathing to maintain structural integrity. Use galvanized or stainless steel fasteners to prevent rust and corrosion.
Roof framing typically uses either rafters (traditional method) or trusses (pre-engineered). Rafters require more skill but offer design flexibility. Trusses are faster to install but less customizable. Most residential sheds use a simple gable or shed roof with 4:12 to 6:12 pitch (4-6 inches of rise per 12 inches of horizontal run). Steeper pitches shed snow better; shallower pitches require less material.
Install collar ties and ceiling joists to prevent rafter thrust from pushing walls outward. Use hurricane ties and proper nailing patterns as specified in building codes. The National Frame Builders Association provides detailed framing guidelines for residential structures.
Roofing Installation
A quality roof is essential for protecting your shed’s contents. Start with proper roof sheathing—typically 1/2-inch plywood or OSB—installed perpendicular to rafters and secured with 8-penny nails spaced 6 inches apart at edges and 12 inches in the field.
Install roofing underlayment, a critical moisture barrier. Modern underlayment is typically synthetic, offering superior durability compared to traditional felt. Overlap courses by 4-6 inches and secure with roofing nails. This layer prevents moisture from reaching the wood sheathing if shingles are breached.
Asphalt shingles are the most popular roofing material for sheds due to cost and ease of installation. Architectural shingles offer better appearance and durability than three-tab shingles. Metal roofing is increasingly popular, offering longevity (40+ years) and superior weather resistance, though it costs more initially. Wood shakes provide rustic aesthetics but require significant maintenance.
Install flashing around any penetrations (vents, chimneys) to prevent leaks. Flashing should overlap roofing materials properly—shingles above flashing on walls, shingles below flashing on roof. Install gutters and downspouts to direct water away from your foundation, preventing erosion and moisture issues.
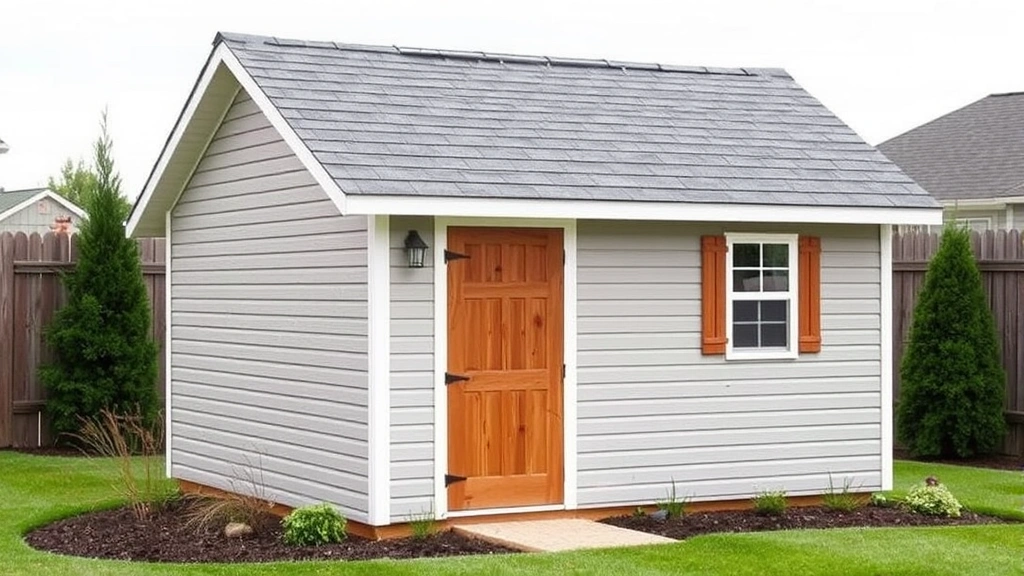
Siding and Finishing
Siding protects your framing and defines your shed’s appearance. Popular options include:
- Wood siding: Classic appearance, requires regular maintenance (painting or staining every 5-7 years). Pine, cedar, and redwood are common choices.
- Vinyl siding: Low maintenance, durable, affordable. Limited color options compared to painted wood.
- T1-11 plywood: Budget-friendly, quick installation. Requires regular sealing to prevent moisture damage.
- Board-and-batten: Attractive vertical design, good water shedding. Slightly more expensive than horizontal options.
- Metal siding: Durable, low maintenance, industrial appearance. Excellent for commercial or modern aesthetics.
Install house wrap or felt paper before siding to create a secondary moisture barrier. Overlap horizontal courses by at least 1.25 inches. Leave 1/4-inch gaps at corners and openings for expansion and contraction. Secure siding with galvanized or stainless fasteners appropriate for your material type.
Paint or stain your shed to match your home and protect exposed wood. Use exterior-grade paint rated for your climate. Proper preparation—cleaning, priming, and two finish coats—ensures longevity. Consider how your shed’s appearance affects your home’s curb appeal and overall property aesthetic.
Doors and Windows
Doors and windows provide access, light, and ventilation. Standard single doors are 32-36 inches wide; double doors accommodate larger equipment. Pre-hung doors simplify installation—just ensure rough openings are square and properly sized. Weatherstrip around doors to prevent air and water infiltration.
Windows improve usability and reduce the need for artificial lighting. Install them high on walls to maximize wall space for storage. Ensure windows have proper flashing and are sealed against moisture. If security is a concern, consider polycarbonate panels or wire-reinforced glass instead of standard panes.
Ventilation prevents heat buildup and moisture accumulation. Install soffit vents near the eaves and gable vents near the roof peak to create passive air circulation. If you’ll store moisture-sensitive items, consider adding a small exhaust fan or dehumidifier, similar to solutions used in basement finishing projects.
Interior Storage Solutions
Maximize your shed’s utility with smart storage design. Wall-mounted shelving, pegboards, and hooks organize tools and supplies efficiently. Install shelving at varying heights to accommodate different items. Heavy-duty shelving rated for your load capacity prevents collapse and injury.
Consider a workbench if you’ll use your shed as a workshop. Mount it along the wall to preserve floor space. Ensure adequate lighting—LED shop lights are affordable and energy-efficient. If you need electrical outlets, hire a licensed electrician to run circuits safely and to code.
Climate control may be necessary depending on what you store. Insulation (fiberglass batts, spray foam, or rigid foam) keeps temperatures stable and reduces condensation. Vapor barriers prevent moisture from migrating into insulation. For tools and equipment, maintaining moderate temperatures extends their lifespan.
Long-Term Maintenance
Regular maintenance preserves your shed’s structural integrity and appearance. Inspect the roof annually, particularly after storms, and replace damaged shingles promptly. Clean gutters twice yearly to prevent water damage. Check siding and caulking for gaps or deterioration, recaulking as needed.
Wood sheds benefit from periodic staining or painting. Most exterior finishes last 5-7 years before requiring reapplication. Inspect the foundation and framing for signs of rot, pest damage, or settling. Address moisture issues immediately—condensation or water stains indicate ventilation problems or roof leaks.
Lubricate door hinges and locks annually. Check that doors and windows operate smoothly and seal properly. Trim vegetation around your shed to improve air circulation and reduce pest habitat. For detailed construction maintenance guidance, consult the American Society of Home Inspectors resources.
FAQ
How long does it take to build a shed?
Construction time varies based on size and complexity. A basic 8×10 shed typically requires 2-4 weeks for an experienced DIYer, while 12×16 sheds take 4-8 weeks. Larger structures, complex roofs, and extensive finishing work extend timelines. This is comparable to understanding how long it takes to build a house, though on a much smaller scale.
Do I need a permit to build a shed?
Most jurisdictions require permits for structures over 100-120 square feet or those with permanent foundations. Check local building department requirements—permits ensure your structure meets safety codes and protect your property investment. Unpermitted structures may affect insurance claims or property sales.
What’s the best foundation for a shed?
Concrete slabs provide maximum durability and protection from moisture and pests. Concrete pier blocks offer good balance between cost and performance. Gravel bases work for temporary structures in dry climates but require regular maintenance. Choose based on your climate, intended permanence, and budget.
Should I insulate my shed?
Insulation is beneficial if you’ll work in your shed year-round or store temperature-sensitive items. It also reduces condensation issues. For storage-only sheds in moderate climates, insulation is optional but still recommended for temperature stability and moisture control.
What roofing material lasts longest?
Metal roofing lasts 40-70 years, far exceeding asphalt shingles (15-25 years) or wood shakes (20-40 years). Metal costs more upfront but offers superior longevity and requires minimal maintenance. For budget-conscious builders, quality asphalt architectural shingles provide good value with 20+ year lifespans.
Can I build a shed without a concrete foundation?
Yes, though concrete provides the best protection. Gravel bases, treated wood skids, or pier blocks are viable alternatives. However, structures without solid foundations experience more moisture problems, pest issues, and settling. At minimum, elevate your shed several inches above grade for ventilation and protection.
Is it cheaper to build or buy a shed?
Building typically costs less than purchasing a pre-made shed, especially for larger structures. DIY construction also provides customization options and the satisfaction of completing a significant project. However, pre-made sheds save time and labor. Compare material costs against your time value before deciding.
What tools do I need to build a shed?
Essential tools include a circular saw, power drill, level, measuring tape, square, and hammer. Additional tools like a miter saw, nail gun, and scaffolding accelerate work. Many tools can be rented affordably. Start with quality basics—poor tools frustrate your efforts and compromise results.
How do I prevent rot in my wooden shed?
Use pressure-treated lumber for all ground-contact areas. Install proper drainage around the foundation, ensuring water slopes away from the structure. Maintain adequate ventilation to prevent moisture accumulation. Paint or stain exterior wood every 5-7 years. Address any water intrusion immediately before rot establishes.
Can I add electricity to my shed?
Yes, but hire a licensed electrician to ensure proper installation to code. Running circuits from your home’s main panel requires proper wire sizing, conduit protection, and breaker protection. Adding electrical capability increases functionality for workshops but adds to initial construction costs.


