
Masonry Tools: Must-Have List for DIYers
Masonry work stands as one of the most rewarding yet technically demanding DIY projects you can undertake. Whether you’re laying a brick patio, building a stone retaining wall, or repairing mortar joints on an existing structure, having the right tools makes the difference between a professional-looking result and a frustrating disaster. This comprehensive guide walks you through every essential masonry tool a DIYer needs, from basic hand tools to specialized equipment that transforms your projects from amateur to expert-quality.
Many homeowners underestimate the importance of proper masonry tools, assuming they can improvise with generic hardware store items. The reality is that masonry-specific tools are engineered for the unique properties of brick, stone, and mortar. They’re designed to handle the weight, texture, and precision requirements that general-purpose tools simply cannot accommodate. Investing in quality masonry tools early saves you money, time, and countless hours of frustration as you develop your skills and tackle increasingly ambitious projects around your property.
Essential Hand Tools for Every Masonry Project
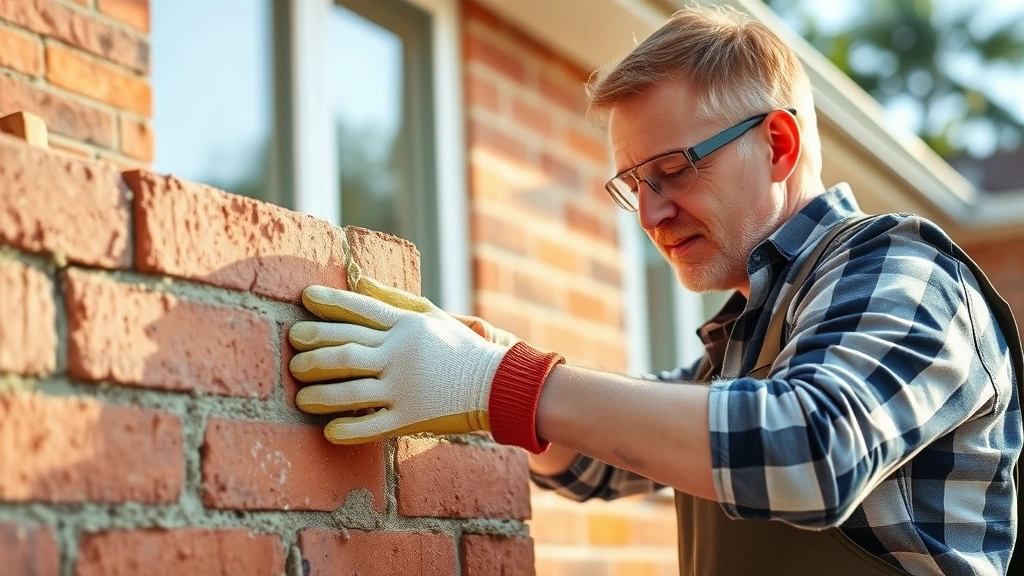
The foundation of any masonry toolkit consists of hand tools that have remained largely unchanged for centuries because they work so effectively. The brick trowel is your most important tool—a flat, pointed steel blade mounted on a wooden or fiberglass handle that you’ll use for applying mortar, spreading material, and scraping excess. Quality matters tremendously here; a well-balanced trowel reduces fatigue and improves precision. Look for trowels with a 10-inch to 12-inch blade length for most residential work.
The pointing trowel serves a different purpose than the brick trowel, featuring a smaller, more triangular blade designed for detail work, joint finishing, and repair work. Many experienced masons carry both trowels simultaneously, switching between them as the work demands. You’ll also need a margin trowel, a tiny rectangular blade perfect for scooping mortar and working in tight spaces where larger trowels won’t fit.
A quality mason’s hammer or brick hammer combines a flat striking surface with a chisel end, allowing you to shape and trim bricks with precision. The weight distribution matters significantly—too heavy and you’ll exhaust yourself; too light and you won’t generate sufficient force. A 16-ounce hammer provides the sweet spot for most DIYers. When you’re planning how long your masonry project takes, account for extra time if you’re using basic tools rather than specialized equipment.
The jointing tool or joint raker creates consistent, professional-looking mortar joints. These tools come in various profiles—concave, V-shaped, and weathered—each producing different aesthetic effects. A concave jointer works well for most applications, shedding water effectively while providing visual appeal. The grout bag, resembling a pastry bag, allows you to fill joints with mortar cleanly and precisely, essential for achieving uniform joint appearance.
Don’t overlook the humble masonry brush and broom. You’ll spend considerable time cleaning excess mortar, dust, and debris from your work. A stiff-bristled masonry brush removes dried mortar effectively without damaging brick or stone, while a broom handles broader cleanup tasks. These tools prevent mortar from curing in places you don’t want it, which becomes exponentially harder to remove once set.
Mortar and Material Preparation Equipment
Properly preparing mortar and materials determines whether your masonry work succeeds or fails. A mortar mixing tub or wheelbarrow serves as your mixing vessel. Professional masons often prefer large plastic tubs that facilitate mixing and allow you to maintain proper mortar consistency throughout your project. The tub should be large enough to handle a full batch without spillage, yet manageable for a single person to maneuver.
A mixing paddle or mortar mixer attachment for your power drill dramatically improves mortar consistency compared to hand mixing. The paddle should be heavy-duty, designed specifically for thick mortar rather than paint mixing paddles, which lack the strength and blade design needed for masonry materials. When finishing basement spaces with masonry components, proper mortar consistency becomes even more critical for moisture resistance.
A masonry sponge differs from regular sponges—it’s denser and more abrasive, specifically engineered to clean mortar from brick and stone without causing damage. Natural sea sponges work best, though synthetic options exist. You’ll need multiple sponges because they wear quickly, and using a worn sponge creates more problems than it solves.
The mason’s level is absolutely critical for ensuring your masonry work is plumb and level. A 4-foot level provides the best balance of accuracy and manageability for most residential projects. Some experienced masons prefer 2-foot levels for tighter work, but having both available covers all situations. The level must be accurate—check it periodically against known level and plumb references to ensure reliability.
A masonry straightedge, typically a long aluminum or wood beam, helps you verify that your brickwork forms a true plane. This tool catches high and low spots that might not be obvious to the naked eye, essential for achieving professional results. A 6-foot straightedge covers most residential wall sections effectively.
Specialized Cutting and Shaping Tools
When you need to cut brick or stone to fit your project, general cutting tools won’t suffice. A brick chisel or cold chisel combines with your mason’s hammer to cut bricks to required dimensions. The chisel blade should be wide enough to make clean cuts without spalling or cracking the brick excessively. Proper technique matters—strike the chisel sharply and decisively rather than tapping gently, which tends to crack bricks unpredictably.
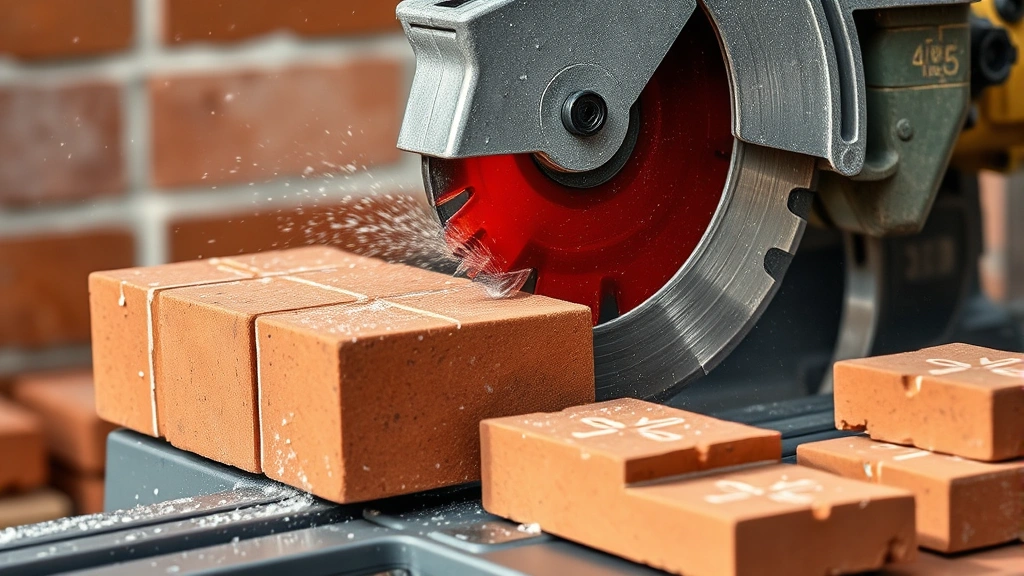
For more precision, a wet saw with a masonry blade makes clean, accurate cuts with minimal material waste. These saws use water cooling to prevent blade overheating and reduce dust, creating safer working conditions. If you’re tackling a substantial project with numerous cut pieces, renting a wet saw costs far less than wasting materials with hand-cut errors. Many equipment rental companies offer daily rentals at reasonable rates, making this option accessible for weekend warriors.
A masonry drill bit paired with your power drill allows you to drill holes in brick or stone for anchors, fasteners, or mechanical connections. These specialized bits feature carbide tips that resist the abrasive nature of masonry materials. Standard metal drill bits dull almost instantly when used on brick, so investing in proper masonry bits saves frustration and time.
The grinder with a masonry wheel performs finishing work, shaping brick edges, and smoothing rough surfaces. A 4-inch angle grinder with a masonry wheel handles most residential applications. Always wear proper safety equipment when using powered grinding tools, as masonry dust poses serious respiratory hazards. When considering protecting your home, remember that proper safety practices during construction protect your family’s long-term health.
Safety Gear and Protective Equipment
Masonry work generates significant dust, sharp materials, and heavy objects that demand comprehensive safety protection. A dust mask or respirator is non-negotiable—masonry dust contains silica particles that cause serious lung damage with prolonged exposure. An N95 mask provides basic protection for light work, but a P100 respirator with proper fit testing offers superior protection for heavy cutting or grinding. Replace filters regularly, as clogged filters reduce both protection and breathing comfort.
Safety glasses protect your eyes from flying chips when cutting or chiseling brick. Look for impact-resistant lenses that meet ANSI Z87.1 standards. Many professionals prefer safety glasses with side shields for maximum protection. If you’re grinding, a full face shield provides additional protection beyond standard safety glasses.
Heavy-duty work gloves protect your hands from sharp brick edges, hot mortar, and abrasive materials. Leather gloves offer good dexterity and durability, though some masons prefer cut-resistant synthetic gloves for better grip and moisture resistance. Avoid thin cotton gloves—they offer inadequate protection for serious masonry work.
Steel-toed boots with puncture-resistant soles protect your feet from dropped bricks and sharp debris. Masonry projects create hazardous ground conditions, and proper footwear prevents injuries that could sideline you for weeks. Invest in boots rated for construction work rather than casual work boots.
A dust collection system or shop vacuum with HEPA filtration captures airborne particles at the source when using power tools. This approach proves more effective than relying solely on personal protective equipment, creating a safer working environment for everyone nearby. Position your vacuum near cutting or grinding operations to minimize dust spread.
Power Tools for Advanced Masonry Work
While hand tools suffice for smaller projects, power tools accelerate work and improve consistency on larger applications. A rotary hammer drill differs from standard power drills, using percussion in addition to rotation to bore through masonry efficiently. These tools make drilling anchor holes for fasteners or creating openings for utilities far faster than hand chisels. The percussive action requires proper technique to avoid damaging surrounding masonry.
A concrete mixer beats hand-mixing mortar every time when working on substantial projects. Small electric mixers handle residential volumes efficiently, producing consistent mortar throughout your project. The mixer’s rotating drum ensures uniform moisture distribution and proper ingredient blending. This equipment investment pays for itself through time savings and improved results on projects requiring multiple batches.
A power washer cleans completed masonry work and removes efflorescence—white mineral deposits that sometimes appear on new brickwork. Use low pressure settings to avoid damaging mortar joints or the brick itself. High-pressure washing can force water into masonry, potentially causing freeze-thaw damage in cold climates.
The angle grinder mentioned earlier becomes essential for finishing work, grinding mortar joints smooth, and shaping brick edges. The versatility of this tool makes it valuable for numerous applications beyond masonry, justifying the investment if you undertake regular home improvement projects. Proper training and safety practices are absolutely essential when operating angle grinders.
Measuring and Layout Instruments
Precision in masonry starts with accurate layout and measurement. A tape measure at least 25 feet long handles most residential measurements, though a 50-foot tape proves useful for larger projects. Metal tape measures resist stretching and damage better than fabric versions, essential durability for job site conditions.
A mason’s line or chalk line establishes straight reference lines across your work surface. Professional masons stretch mason’s line between reference points to maintain consistent coursing (horizontal brick rows). A chalk line snapped across surfaces creates visible guides for layout. Both tools are essential for achieving straight, professional-looking brickwork.
A plumb bob verifies that vertical surfaces are truly plumb, essential for walls and columns. Drop a plumb bob from the top of your work, comparing the string to the surface below. Any deviation indicates areas requiring adjustment. Many modern masons use laser levels for precise alignment, though traditional plumb bobs remain reliable and require no batteries.
A laser level projects vertical and horizontal reference lines, eliminating the need for traditional levels and plumb bobs for many applications. These tools accelerate layout work, particularly on large projects. Battery-powered versions offer convenience, though they require regular battery replacement and periodic recalibration to maintain accuracy. According to the International Code Council, proper leveling and plumbing are fundamental requirements for all structural masonry work.
A corner square or speed square helps verify right angles during layout and cutting. These tools ensure that corners are truly square, preventing the frustration of trying to fit pieces that don’t align properly. Accuracy at the layout stage prevents cascading errors throughout your project.
Reference your local masonry contractor association guidelines for specific measurement and layout requirements in your region, as building codes vary by location. Many areas require specific joint widths, coursing heights, and mortar specifications detailed in local building codes.
FAQ
What’s the minimum tool investment for a DIY masonry beginner?
Start with a brick trowel, margin trowel, mason’s hammer, mortar mixing tub, level, tape measure, and mason’s line. This basic set costs $100-150 and handles small projects like repairing mortar joints or laying a small patio. Add specialized tools as your skills develop and projects grow larger.
Can I use regular concrete mixing equipment for masonry mortar?
While concrete mixers can handle mortar, mortar requires different mixing approaches than concrete due to its higher water content and finer ingredients. Dedicated mortar mixers or smaller concrete mixers work better. Ensure whatever equipment you use can handle the thicker consistency without straining the motor.
How often should I replace masonry tools?
Quality tools last for years with proper care. Trowels eventually bend or develop chips that make them unsuitable for professional work, typically lasting 2-3 years of regular use. Brushes wear out faster, requiring replacement every season or two. Inspect tools regularly, replacing those showing damage or wear that affects performance.
Are expensive masonry tools worth the investment?
Quality tools from reputable manufacturers cost more initially but provide better balance, durability, and performance that make your work easier and results better. A high-quality trowel from a professional manufacturer costs $40-60 versus $10-15 for a budget option, but lasts three times longer and feels significantly better in hand. For tools you’ll use frequently, quality matters.
Do I need different tools for stone versus brick masonry?
Most tools work for both materials, though stone masonry sometimes requires heavier hammers and chisels due to stone’s greater hardness. Stone cutting often demands a wet saw more than brick work. The fundamental tools remain the same, with material-specific variations depending on your specific project requirements.
What’s the best way to maintain masonry tools?
Clean tools immediately after use before mortar dries on them—dried mortar becomes nearly impossible to remove without damaging the tool. Rinse metal tools and allow them to dry completely before storage to prevent rust. Store tools in a dry location, protecting wooden handles from moisture that causes swelling and cracking. Sharpen chisels and keep blade edges in good condition for optimal performance.


