How to Build a Deck: Expert Steps & Tips for Success
Building a deck is one of the most rewarding DIY projects you can undertake, transforming your outdoor space into a functional entertainment area while adding significant value to your home. Whether you’re planning a small intimate gathering space or a large multi-level structure, understanding the fundamentals of deck construction is essential for creating a safe, durable, and beautiful addition to your property. This comprehensive guide will walk you through every step of the process, from initial planning and material selection to finishing touches and maintenance.
A well-constructed deck requires careful attention to local building codes, proper material selection, and precise execution of structural elements. The difference between a deck that lasts 20 years and one that fails within a few years often comes down to understanding proper construction techniques, choosing quality materials, and following established safety guidelines. This article breaks down the entire process into manageable sections, providing expert insights and practical tips that will help you avoid common mistakes and build a deck you’ll enjoy for decades.
Planning Your Deck & Obtaining Permits
Before you purchase a single board or dig a single hole, proper planning is absolutely critical. Start by measuring your available space and determining the size and shape of your deck. Consider how you’ll use the space—will it accommodate a dining table, lounge chairs, or a hot tub? Think about traffic flow, sun exposure, and proximity to your home’s main exit. Most homeowners find that decks between 12×16 feet and 16×20 feet provide excellent functionality without overwhelming the yard.
Next, you’ll need to check local building codes and zoning regulations. Every municipality has specific requirements regarding deck construction, including setback distances from property lines, height restrictions, railing specifications, and post spacing. Contact your local building department or visit their website to understand these requirements. Many jurisdictions require permits for decks higher than 30 inches off the ground, and some require them for all decks regardless of height.
Obtaining a building permit is not optional—it’s a legal requirement in most areas and serves important safety functions. The permit process typically involves submitting detailed plans showing deck dimensions, post locations, material specifications, and structural details. You may need to hire a professional engineer or architect to stamp your plans, depending on deck size and local requirements. The inspection process ensures your deck meets safety standards and won’t create liability issues when you sell your home.
Create a detailed sketch or use deck design software to visualize your project. Note the location of existing utilities, trees, and structures. Determine the deck’s height based on your door threshold and desired slope for water drainage. Plan for stairs if the deck is more than 30 inches high, as this is required by code. Consider future maintenance access and whether you’ll need to stain or seal the deck—this affects material choices and design.
Choosing Materials & Tools
Material selection significantly impacts your deck’s longevity, maintenance requirements, and overall cost. The three main categories are pressure-treated lumber, composite materials, and tropical hardwoods. Pressure-treated lumber is the most economical choice and has been treated with preservatives to resist rot and insect damage. Modern treatments are safer than older arsenic-based formulations and provide excellent durability when properly maintained.
Composite decking combines wood fibers with plastic polymers, offering reduced maintenance and improved longevity. While composite materials cost 2-3 times more than pressure-treated lumber, they don’t require staining or sealing, rarely splinter, and resist fading and staining. Tropical hardwoods like ipe or cumaru are extremely durable and naturally resistant to rot and insects, but they’re expensive and difficult to cut and fasten.
For structural components, use pressure-treated lumber rated for ground contact. For decking boards and railings, you have more flexibility. If budget is primary, pressure-treated lumber works well when sealed regularly. If maintenance concerns you, composite decking is worth the investment. Many homeowners choose pressure-treated lumber for structural elements and composite for visible decking surfaces as a cost-effective compromise.
Essential tools for deck building include a power drill, circular saw or miter saw, level, tape measure, speed square, and impact driver. Rent or purchase a post hole digger for foundation work. You’ll also need safety equipment: work gloves, safety glasses, dust masks, and hearing protection. For fastening, invest in stainless steel or hot-dipped galvanized screws and bolts—these resist corrosion and prevent staining on light-colored materials.
Before starting construction, review beginner woodworking fundamentals to familiarize yourself with proper tool use and safety practices. If you’re tackling a larger project, consider how your deck building experience might lead to other home improvement projects.
Building the Foundation & Posts
The foundation is the most critical structural element of your deck. Improper foundation work leads to settling, shifting, and eventual structural failure. Posts must sit on footings that extend below the frost line—typically 36-48 inches in northern climates. Check your local building code for specific requirements in your area, as frost line depth varies significantly by region.
Start by locating post positions based on your approved plans. Spacing between posts typically ranges from 6-8 feet, depending on joist size and span. Mark post locations with chalk or string lines. Dig holes using a post hole digger or power auger, ensuring holes extend below the frost line and are large enough to accommodate the footing method you’re using.
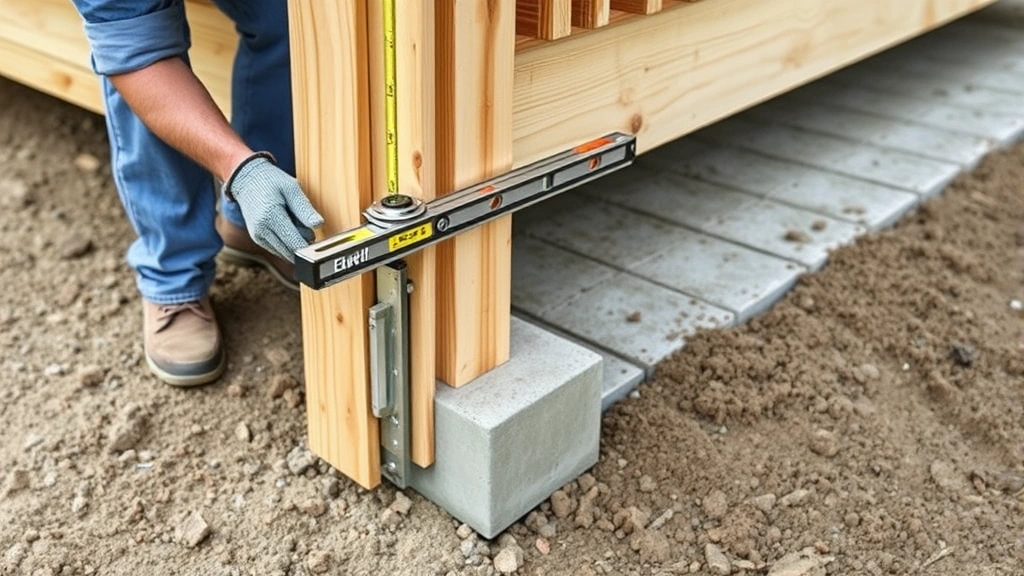
For footings, you have two main options: concrete piers and concrete footings. Concrete piers sit on top of the ground and support posts elevated above soil, which is ideal in areas with significant frost heave. Concrete footings are holes filled with concrete that extend below the frost line, providing stable support in most climates. Pour concrete into holes and insert posts while concrete is still wet, ensuring posts are perfectly vertical using a level. Concrete should be mounded slightly above ground level to promote water drainage away from the post base.
Posts should be 6×6 or 4×4 pressure-treated lumber, depending on span and load requirements. Secure posts to footings using post bases or by embedding them directly in concrete. Post bases are preferable as they elevate wood above concrete, reducing moisture contact and extending post life. Ensure all posts are perfectly plumb (vertical) before concrete sets, as correcting this later is extremely difficult.
Allow concrete to cure fully—typically 48-72 hours—before proceeding with construction. During this time, verify that posts haven’t shifted and remain perfectly vertical. Trim posts to the correct height once concrete has cured and you’ve installed your ledger board and confirmed the deck’s height.
Framing the Deck Structure
Once posts are set, install the ledger board, which connects your deck to the house and carries half the deck load. The ledger board is perhaps the most critical component because improper installation causes water damage to your home’s rim joist and band board. Install flashing over the ledger board to direct water away from the house, using a metal Z-flashing that slides under house siding and sits on top of the ledger board.
Attach the ledger board to the house using ½-inch bolts spaced 16 inches apart, fastening directly into the rim joist or band board. Use washers under bolt heads and nuts to prevent them from pulling through the wood. Never fasten a ledger board to brick veneer, vinyl siding, or house wrap alone—these don’t provide structural support. Remove siding and flashing to access the house framing, install proper flashing, and then reinstall siding over the flashing.
Install rim joists and band boards around the perimeter of your deck, connecting to posts and the ledger board. These carry the weight of decking boards and railings. Use 2×10 or 2×12 lumber depending on your deck’s design and load requirements. Install main beams parallel to the house, typically using doubled 2×10 or 2×12 lumber, supported by posts at intervals determined by your plans.
Space floor joists 16 inches on center (O.C.) for most decking materials, or 12 inches O.C. for thinner or softer materials. Use joist hangers to connect joists to rim joists and beams—this is much stronger than toe-nailing. Ensure joists have adequate slope for water drainage, typically 1/8 inch per foot. Use galvanized or stainless steel fasteners throughout to prevent rust staining and material degradation.
Before installing decking, double-check that all framing is square, level, and properly supported. Walk across the structure and listen for any flexing or creaking, which indicates inadequate support or fastening. Make corrections now rather than after decking is installed.
Installing Decking & Railings
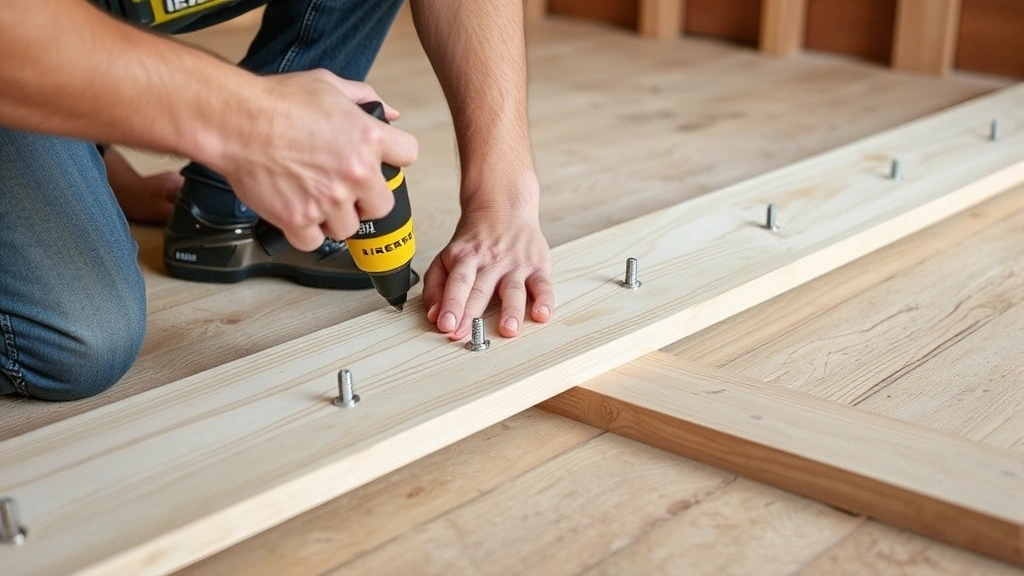
With framing complete and inspected, install decking boards perpendicular to joists. Start at the ledger board and work toward the edge, maintaining consistent spacing between boards for water drainage and thermal expansion—typically 1/8 to 3/16 inch depending on material type. Use spacers to maintain consistent gaps and prevent boards from shifting during installation.
Fasten decking boards with two screws per joist, using 2½-inch stainless steel or hot-dipped galvanized screws. Screws are superior to nails as they hold better, resist popping, and are easier to remove if corrections are needed. Pre-drill screw holes to prevent splitting, especially near board ends. Stagger joints so they don’t align across adjacent boards, distributing loads more evenly.
For the first and last rows of decking, drill pilot holes to prevent splitting. Consider the visual appearance of your deck—you may want to hide fasteners with edge boards or use hidden fastening systems for a cleaner look. Whatever method you choose, ensure all fasteners are secure and won’t work loose over time.
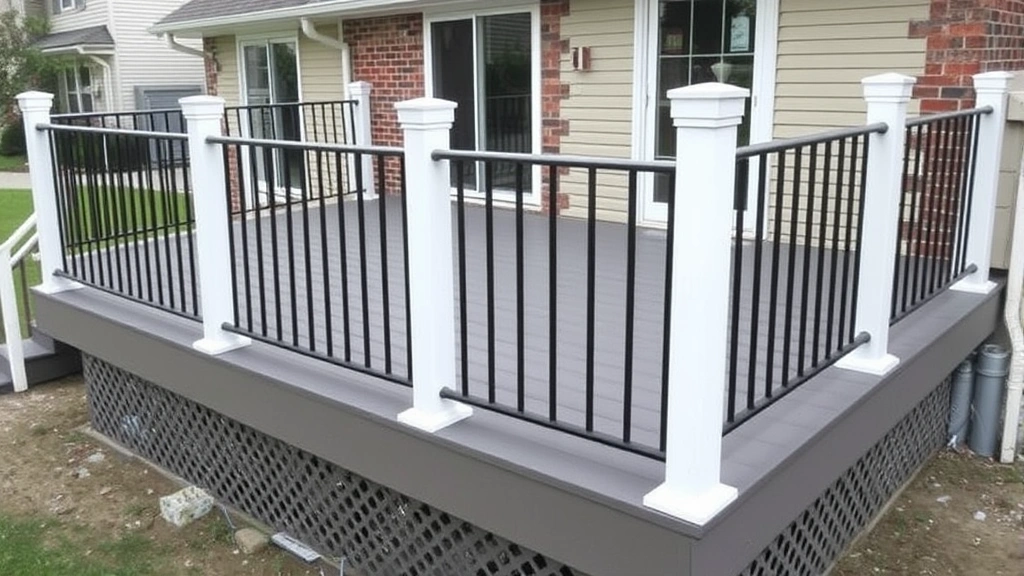
Railings are required by code if your deck is higher than 30 inches off the ground. Railings must withstand 200 pounds of horizontal force and have balusters (vertical supports) spaced no more than 4 inches apart to prevent a sphere 4 inches in diameter from passing through. This spacing prevents children from getting their heads stuck between balusters.
Install railing posts at intervals determined by your design, typically 4-6 feet apart, and securely fasten them to the deck framing or posts. Install top and bottom rails between posts, then add balusters spaced 4 inches apart. Ensure all railing components are secure and won’t shift under load. Sand all surfaces smooth to prevent splinters, particularly on railings that people will touch frequently.
Finishing & Sealing Your Deck
Proper finishing extends your deck’s life and maintains its appearance. Before applying finish, allow new pressure-treated lumber to weather for 3-6 months so it can dry completely. For composite decking, follow manufacturer recommendations regarding finish requirements. Most composites require minimal finishing, though some benefit from occasional cleaning and UV protection products.
For pressure-treated lumber, sand the deck surface lightly to open the wood grain and remove surface splinters. Use 80-120 grit sandpaper and a power sander for efficiency. After sanding, clean the deck thoroughly with a deck cleaner to remove dirt, mildew, and mill glaze. Allow to dry completely before applying finish.
Choose between stain and sealer based on your preferences. Stains add color while providing water protection, while clear sealers protect without changing the wood’s appearance. Semi-transparent stains show wood grain while providing color; solid stains provide more color coverage but hide wood grain. Apply finish with a brush, roller, or sprayer, following manufacturer instructions regarding temperature, humidity, and drying time.
Most deck finishes require reapplication every 2-3 years to maintain protection. Plan maintenance into your annual home care routine. Regular cleaning and prompt finish touch-ups prevent more extensive repairs later. If you’re planning a larger home improvement project after your deck, explore resources like home addition budgeting to plan multiple projects efficiently.
Long-Term Maintenance Tips
Regular maintenance keeps your deck safe and beautiful for decades. Clean your deck at least twice yearly, removing leaves, debris, and organic growth that promotes rot and mildew. Use a pressure washer on low settings to avoid damaging wood, or scrub with a deck brush and mild detergent. Remove standing water and ensure proper drainage around posts and under the deck.
Inspect your deck annually for signs of damage: soft spots indicating rot, loose fasteners, cracked boards, or damaged railings. Address problems immediately to prevent them from worsening. Replace damaged boards promptly and tighten any loose fasteners. In northern climates, remove snow and ice promptly to prevent moisture damage and reduce slip hazards.
Protect your deck from excessive moisture by maintaining gutters and downspouts that direct water away from the structure. Ensure ground beneath the deck drains properly and isn’t holding standing water. Trim tree branches that hang over the deck to reduce shade, moisture accumulation, and debris. The more sunlight your deck receives, the drier it will stay and the longer it will last.
Consider the long-term cost of different materials when planning maintenance. While pressure-treated lumber requires regular sealing and staining, composite materials require minimal maintenance. Over a 20-year period, composite decking often proves more economical despite higher initial costs when you factor in labor and materials for regular maintenance of wood decking.
Document your deck’s construction and maintenance history. Keep records of materials used, fastener specifications, finish products applied, and maintenance performed. This information proves valuable if you need to make repairs or replacements years later, and it demonstrates proper maintenance to potential home buyers if you ever sell your property.
FAQ
How deep should deck footings be?
Deck footings must extend below your area’s frost line to prevent frost heave, which causes posts to shift and damage the structure. Frost line depth varies from 12 inches in warm climates to 48+ inches in cold northern regions. Check your local building code for specific requirements in your area, as this is one of the most critical safety requirements.
Can I build a deck without a permit?
Building without a permit is illegal in most jurisdictions and creates serious liability issues. If you sell your home, unpermitted work can complicate the sale and result in requirements to remove the deck. Permits ensure your deck meets safety codes and won’t create structural or safety hazards. The cost and time investment in obtaining a permit is far less than potential consequences.
What’s the best material for a beginner deck builder?
Pressure-treated lumber is the best choice for beginner deck builders because it’s affordable, forgiving, and widely available. It doesn’t require specialized tools or techniques, and mistakes are less expensive to correct than with premium materials. Once you’ve gained experience with pressure-treated lumber, you can explore composite or exotic wood options for future projects.
How often should I seal my deck?
Most wood deck finishes require reapplication every 2-3 years, depending on climate, sun exposure, and foot traffic. Before resealing, clean the deck thoroughly and allow it to dry completely. In northern climates with significant weather variation, annual inspection and touch-ups extend the time between major refinishing projects.
Why do my deck boards crack and split?
Cracking and splitting typically result from moisture fluctuations and wood movement. Pressure-treated lumber expands when wet and shrinks when dry. This movement causes stress that leads to splitting, especially if boards are fastened too tightly or fasteners are placed too close to board ends. Maintain proper spacing between boards, use appropriate fasteners, and keep your deck sealed to minimize moisture fluctuations.
Do I need railings on my deck?
Building codes require railings on decks higher than 30 inches off the ground. Railings must be at least 36 inches high and withstand 200 pounds of horizontal force. Balusters must be spaced no more than 4 inches apart. These requirements exist to prevent falls and injuries, so they’re not optional even if your deck seems safe without railings.
Can I attach a deck to my house without a ledger board?
No. The ledger board is essential for structural integrity and safely connecting your deck to your house. It must be properly flashed to prevent water damage to your home’s rim joist and band board. Improper ledger board installation causes catastrophic failures and expensive water damage. Never skip this critical component or compromise on its installation quality.


