

Install Crown Molding? Carpenter’s Guide Here!
Crown molding transforms any room by adding architectural elegance and visual sophistication to the junction where walls meet ceilings. Whether you’re updating a single room or undertaking a whole-home renovation, learning how to add crown molding is an achievable DIY project that yields professional results. This comprehensive guide walks you through every step, from material selection to final installation, ensuring your project succeeds whether you’re a seasoned carpenter or tackling this for the first time.
Crown molding installation requires precision, proper tools, and understanding the geometry of angled cuts. The most challenging aspect isn’t the physical labor but rather mastering the miter saw angles and ensuring tight joints at corners. With patience and attention to detail, you’ll create seamless transitions that enhance your home’s interior design while adding genuine value to your property.
Understanding Crown Molding Basics
Crown molding sits at an angle rather than vertically or horizontally, creating the distinctive decorative profile that frames your ceiling. This angled positioning—typically between 38 and 52 degrees depending on the molding style—is what makes installation both challenging and visually striking. Understanding this geometry is fundamental to successful installation and proper cutting.
Different crown molding styles serve various aesthetic purposes. Traditional styles feature ornate details and deeper profiles, perfect for formal dining rooms and living areas. Contemporary designs offer cleaner lines and simpler profiles, ideal for modern homes and minimalist spaces. Colonial and Victorian styles provide historical authenticity for period homes. When selecting your molding style, consider your home’s existing architectural character and your personal design preferences.
The profile of crown molding refers to its cross-sectional shape when viewed from the side. Complex profiles with multiple curves and details require more precise cutting and installation but create more dramatic visual impact. Simpler profiles are more forgiving during installation and work well in casual spaces. Your choice should balance aesthetic goals with your skill level and available tools.
Crown molding materials include solid wood, MDF (medium-density fiberboard), polyurethane, and plywood-based options. Solid wood provides authentic beauty and can be stained or painted, making it ideal for visible, high-traffic areas. MDF offers affordability and stability, resisting warping better than solid wood in humid environments. Polyurethane provides moisture resistance and is excellent for kitchens and bathrooms. When planning your basement finishing project, moisture-resistant materials become especially important.
Tools and Materials You’ll Need
Successful crown molding installation depends on having the right tools. A power miter saw (chop saw) is essential—preferably a 12-inch model that can handle your molding width and perform compound cuts. A coping saw enables you to cut curved joints for inside corners, a technique that produces superior results to traditional mitering. A stud finder locates wall framing for secure fastening, preventing future sagging or separation.
Additional critical tools include:
- Nail gun or hammer—pneumatic finish nailers work faster than hand-nailing
- Level—ensures molding runs straight and true along the wall
- Tape measure—accuracy in measurements prevents costly mistakes
- Pencil—mark cut lines and stud locations clearly
- Safety glasses and dust mask—protect against wood dust and flying debris
- Ladder or scaffolding—provides safe access to ceiling height
- Caulk gun—applies paintable caulk for gap concealment
- Sandpaper or sanding block—smooths cut edges before installation
Material requirements depend on your room dimensions and molding choice. Calculate linear footage by measuring all walls and adding 10-15% for waste and cutting errors. For fastening, use finish nails (typically 2-2.5 inches long) that won’t create visible nail holes. For joints and gaps, invest in quality paintable caulk that matches your molding material and paint color. Consider purchasing a complete woodworking guide for additional carpentry techniques applicable to this project.
Safety equipment shouldn’t be overlooked. Working at ceiling height introduces fall risks, so ensure your ladder is stable and consider using scaffolding for extended projects. Wear safety glasses when using power tools, and always use a dust mask when cutting wood to protect your respiratory system.
Measuring and Planning Your Layout
Accurate measurement is the foundation of successful crown molding installation. Start by measuring all walls in your room, recording each measurement twice to catch errors. Mark the locations of all wall studs using your home improvement techniques and a stud finder, as these provide the solid backing necessary for secure fastening.
Identify all inside and outside corners in your room layout. Inside corners (where two walls meet going inward) require coped joints or miter joints. Outside corners (protruding corners) use simple miter cuts. Rooms with complex layouts featuring multiple corners demand more preparation time but yield the most impressive results.
Before cutting any material, create a test fit using scrap pieces. Install these test pieces at an actual corner in your room to verify your cut angles and joint fit. This practice run prevents expensive mistakes with your actual molding and builds confidence in your technique.
Establish a starting point—typically a corner that’s most visible when entering the room. Plan your cuts so that any necessary adjustments or imperfections occur in less visible areas. If a room isn’t perfectly square (common in older homes), adjust your layout to accommodate these irregularities gracefully.
Cutting Crown Molding Correctly
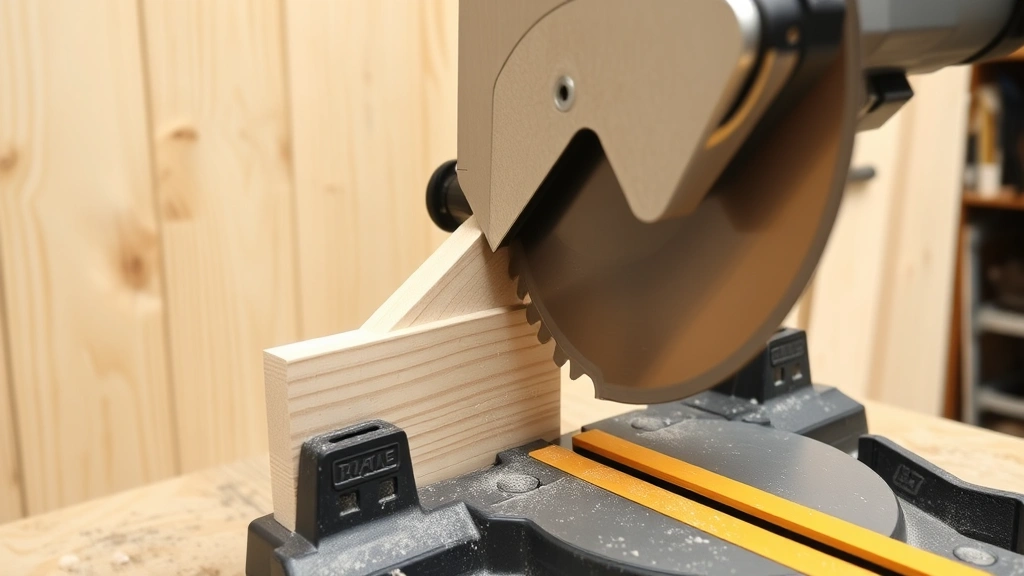
Crown molding presents unique cutting challenges because it installs at an angle. Understanding how to position the molding on your miter saw is critical. Most crown molding sits flat against the saw’s table and back fence simultaneously—this is called “standing” the molding rather than laying it flat.
For outside corners, use a simple 45-degree miter cut. Set your miter saw to 45 degrees and cut both pieces with the molding in the same position relative to the saw. Test-fit these pieces before proceeding to ensure they form a tight joint.
Inside corners require coped joints for professional results. Rather than mitering both pieces, cut one piece square and install it first. The second piece is cut using a coping saw to match the profile of the first piece, creating an interlocking joint that accommodates slight wall irregularities better than mitered corners.
To create a coped cut, first make a 45-degree miter cut on the inside corner piece. This reveals the profile of the molding. Using a coping saw, carefully cut along this profile line, removing the 45-degree miter piece and leaving a profile that matches the molding’s face. This technique requires practice but produces superior results.
Compound cuts (angles in two directions simultaneously) are necessary where crown molding meets sloped ceilings or in rooms with unusual geometry. Most modern miter saws feature dual-angle adjustment capability, allowing you to set both miter and bevel angles. Reference your specific molding manufacturer’s guidelines for compound cut angles, as these vary based on crown molding profile and installation angle.
According to the International Code Council, while crown molding isn’t directly regulated by building codes, the structural components it attaches to must meet code requirements. Ensure your wall framing and fastening methods comply with local building standards.

Installation Techniques and Methods
Begin installation at your predetermined starting corner. If beginning with an inside corner, install the coped piece first, then fit the profiled piece against it. Use a level to ensure the molding runs horizontally—even slight deviations become obvious when viewed from across the room.
Drive finish nails through the molding into wall studs, spacing fasteners approximately 16 inches apart. Use at least two nails per stud location for security. For areas between studs, use construction adhesive in addition to nails for extra holding power. This combination prevents future movement or separation.
When installing crown molding around door frames and windows, plan your cuts so transitions occur naturally. Measure carefully to determine where cuts should occur and whether you need to create custom angles to accommodate these architectural features.
For rooms with cathedral or vaulted ceilings, crown molding becomes more complex. The angle of installation changes as you move along the wall, requiring compound cuts that adjust to match the ceiling slope. Many installers choose simpler molding profiles for these situations, as complex profiles become difficult to cut at varying angles.
Temporary support during installation prevents molding from sagging before adhesive and nails set. Use shims or temporary braces to hold molding in position while fastening. Once nails are driven and adhesive is dry, remove these temporary supports.
Reference the National Wood Flooring Association and the Architectural Woodwork Institute for detailed installation specifications and best practices specific to your molding material and style.
Finishing and Trim Work
After installation, inspect all joints for gaps or misalignments. Small gaps (less than 1/8 inch) can be concealed with paintable caulk. Apply caulk smoothly, feathering it into the joint and wiping away excess with a damp cloth before it dries.
Sand any rough edges or visible cut marks using fine-grit sandpaper (120-150 grit). A sanding block helps maintain consistent pressure and prevents gouging the molding surface. Pay special attention to the edges of coped cuts, which often require smoothing for a finished appearance.
For stained finishes, apply stain according to the manufacturer’s instructions, typically using a brush or cloth. Test stain color on a scrap piece first to ensure it matches your expectations. Multiple coats may be necessary to achieve desired depth of color.
Painting requires proper surface preparation. Fill any nail holes with paintable wood filler, sanding smooth once dry. Apply primer if the molding is unfinished or if you’re making a significant color change. Two coats of quality paint typically provide excellent coverage and durability.
For a polished appearance, caulk any gaps between the molding and ceiling, and between the molding and wall. This creates seamless transitions that enhance the visual impact of your installation. Use 100% acrylic latex caulk for flexibility and paintability.
Once caulk and paint are fully cured, step back and admire your work. Professional-looking crown molding elevates your entire room’s appearance and provides a refined finishing touch that ties your interior design together beautifully.
FAQ
What’s the best way to handle inside corners when installing crown molding?
Coped joints provide superior results compared to mitered inside corners. Cut one piece square and install it, then use a coping saw to cut the second piece’s profile to match the first piece’s face. This interlocking joint accommodates wall irregularities and creates seamless transitions that look professional.
How do I determine the correct miter saw angle for my crown molding?
Most crown molding uses 45-degree miter cuts for outside corners. However, the exact angle depends on your specific molding profile and installation angle. Check your molding manufacturer’s specifications or test-fit scrap pieces to verify correct angles before cutting expensive material.
Can I install crown molding on textured ceilings?
Yes, but textured ceilings require extra preparation. The molding must sit firmly against the ceiling to prevent gaps. You may need to sand high spots in the texture where the molding will sit, or use shims to bridge texture variations and ensure solid contact between molding and ceiling.
What fastening method works best for crown molding installation?
Combination fastening provides the strongest hold. Use finish nails driven into wall studs, supplemented with construction adhesive between fasteners. This dual approach prevents future movement or separation while keeping the installation relatively straightforward.
How should I finish gaps between crown molding and walls or ceilings?
Paintable acrylic latex caulk works best for concealing gaps. Apply it smoothly, feathering it into the joint, and wipe away excess with a damp cloth before it dries. Once cured, sand lightly and paint to match your molding and surrounding surfaces.
Is crown molding installation a DIY-friendly project for beginners?
Crown molding installation is achievable for DIYers with patience and attention to detail. Start with simpler molding profiles in rooms with fewer corners. Once you master basic techniques, you can tackle more complex projects. Don’t hesitate to consult detailed guides or seek advice from experienced installers for challenging situations.
For comprehensive home improvement knowledge beyond crown molding, explore our DIY Nests Hub Blog for additional projects and techniques that enhance your living space.