How to Adjust Truss Rod: Luthier-Approved Techniques for Perfect Neck Relief
The truss rod is one of the most misunderstood components in guitar and bass construction, yet mastering its adjustment is essential for any instrument owner or aspiring luthier. Located inside the neck of most stringed instruments, this metal rod counteracts the tremendous tension created by steel strings pulling on the wooden neck. Improper adjustment can result in fret buzz, high action, dead spots, and ultimately an unplayable instrument. Understanding how to adjust truss rod correctly separates casual players from those who take their craft seriously.
Professional luthiers spend years perfecting this skill, and while the process may seem intimidating, the fundamentals are learnable for dedicated DIY enthusiasts. This comprehensive guide walks you through the exact techniques used in professional shops, complete with safety considerations and troubleshooting strategies. Whether you’re working on a vintage acoustic, modern electric, or bass guitar, these principles apply universally.
Understanding Your Truss Rod System
Before attempting any adjustment, you must understand what a truss rod does and how it works. The truss rod is essentially a reinforced metal rod that runs through the neck of your instrument, typically positioned in a channel beneath the fretboard or alongside it. Its primary function is to create counter-tension against the pull of the strings, which exert enormous force—often 200 pounds or more on electric guitars alone.
Modern instruments typically feature one of three truss rod configurations. Single-action rods, the oldest design, tighten to add back-bow (reduce relief) but cannot actively remove relief when loosened. Dual-action rods, the most common today, can both add and remove relief by tightening in either direction. Two-way rods provide the greatest control and are preferred by professional luthiers. Understanding which type your instrument has is crucial before making any adjustments.
The truss rod access point varies significantly. Some guitars feature a headstock adjustment (most common on Fenders and modern instruments), while others have a body-end adjustment requiring neck removal. Vintage instruments and some acoustic guitars may have heel adjustments accessed through the body. Always consult your instrument’s documentation to locate the adjustment point before proceeding. Forcing an adjustment at the wrong location can cause irreversible damage to your instrument’s neck.
Neck relief refers to the slight forward bow naturally present in guitar necks. This curvature is intentional and necessary—it allows the strings to vibrate without contacting frets, particularly in the middle of the neck. A perfectly straight neck would actually cause fret buzz because strings vibrate in an arc. The ideal relief is typically between 0.010 and 0.015 inches, though this varies by player preference and playing style.
Essential Tools and Preparation
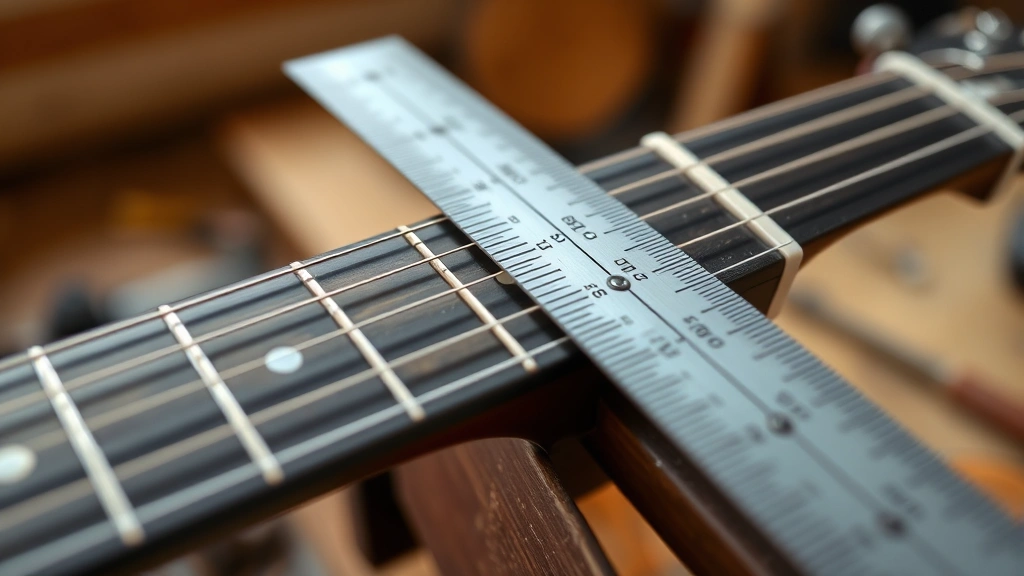
Proper tools make the difference between a successful adjustment and a damaged instrument. You’ll need a quality straightedge—preferably a 24-inch metal straightedge designed for luthier work, though a quality level can work in a pinch. This straightedge must be perfectly straight; even slight warping will give false readings. A feeler gauge set provides precise measurement of neck relief, allowing you to measure the gap between your straightedge and the neck at specific points.
Regarding the adjustment tool itself, never use improvised tools like pliers or adjustable wrenches. Most truss rods require either a hex key (Allen wrench) or a specialized truss rod wrench. Using the wrong tool can strip the adjustment nut, rendering the truss rod permanently inoperable. Professional luthiers often use torque-limiting wrenches to prevent over-tightening, though careful hand-feel works for experienced adjusters. Always use the correct size tool provided by your instrument manufacturer.
Additional preparation involves creating a stable work environment. Place your instrument on a padded work surface or neck rest, ensuring the neck can be examined straight and level. Good lighting is essential—you’ll be looking for minute gaps between your straightedge and the frets. Many professionals use a light source positioned at a low angle along the neck to highlight any relief or backbow. Document your starting point by photographing the truss rod position and taking initial measurements; this provides a reference if something goes wrong.
Before touching the truss rod, ensure the instrument is at room temperature. Temperature changes affect wood expansion and contraction, which can alter neck relief measurements. Similarly, let freshly strung instruments settle for several days before adjusting the truss rod, as string tension stabilizes gradually. This patience prevents unnecessary adjustments and ensures accurate measurements.
How to Measure Neck Relief Accurately
Accurate measurement is the foundation of successful truss rod adjustment. Begin by capo-ing the first fret and pressing down the last fret (usually the 20th or 22nd, depending on your instrument). This simulates string tension and creates the playing geometry you’re actually adjusting for. With the neck in this position, place your straightedge along the top of the frets, running from the headstock toward the body.
Examine the gap between the straightedge and the frets. If you can slide a feeler gauge under the straightedge at the 7th to 9th frets while the first and last frets remain in contact, you have healthy relief. A gap of 0.010 to 0.015 inches is ideal for most playing styles. Smaller gaps suit faster playing and lower action, while slightly larger gaps accommodate aggressive playing with thicker picks. Players who explore DIY instrument maintenance often find their preferences through experimentation.
If the straightedge rocks between the first fret and middle frets without the last fret touching, your neck has excessive relief (too much forward bow). Conversely, if the straightedge rocks between the middle frets and the last fret, your neck has backbow (insufficient relief or backward bow). These conditions require opposite corrections: excessive relief requires tightening the truss rod, while backbow requires loosening it.
Take multiple measurements across different positions—at the 1st, 7th, 12th, and last frets. This comprehensive approach reveals whether relief is consistent or if high spots exist in specific areas. Some necks develop irregular relief patterns due to wood movement or construction variations. Document all measurements before making any adjustments, establishing a clear baseline for your work.
Step-by-Step Adjustment Process
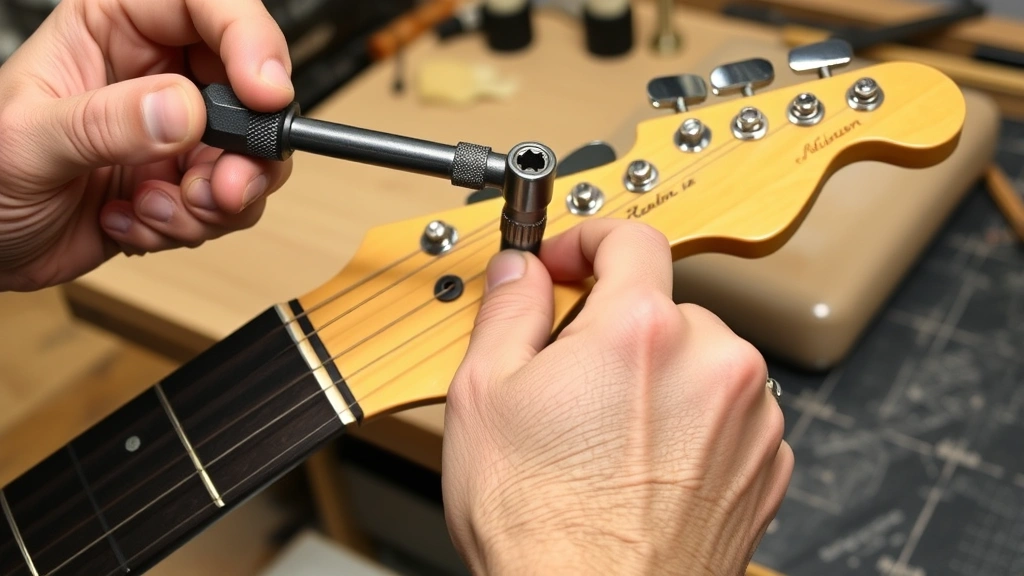
The actual adjustment process demands patience and incremental changes. Locate your truss rod access point—headstock, body end, or heel—and remove any covers or plugs. Apply a small amount of penetrating oil around the truss rod nut if it appears corroded or stuck. Wait several minutes before attempting to turn it; forcing a stuck nut causes stripped threads.
Position yourself comfortably with clear visibility of the adjustment nut. Using your correctly-sized tool, turn the nut in quarter-turn increments only. This conservative approach prevents over-correction. Tighten (clockwise on most instruments, though some older models reverse this) to reduce relief or remove backbow. Loosen (counterclockwise) to increase relief. After each quarter-turn, wait 30 seconds for the wood to respond to the change, then recheck your measurements.
The neck responds gradually to truss rod changes because wood is viscoelastic—it deforms slowly under stress. Waiting between adjustments prevents over-correction and allows you to feel the resistance increasing. As you approach proper adjustment, resistance will increase noticeably. Stop immediately if you feel grinding, crunching, or sudden resistance changes; these indicate internal damage. Most properly functioning truss rods turn smoothly with moderate hand pressure.
Continue making quarter-turn adjustments, measuring after each change, until you achieve your target relief. This methodical approach typically requires 3-6 adjustments for a neck that’s significantly out of spec. Once you’ve reached your goal measurement, re-tighten the truss rod nut fully (applying moderate pressure, not excessive force), reinstall any covers, and let the instrument rest for 24 hours before final evaluation.

Professional luthiers often make final micro-adjustments after playing the instrument for several hours. String tension and temperature changes during playing can slightly alter relief. If minor adjustments are needed after this settling period, repeat the process using single-eighth-turn increments for fine-tuning.
Common Mistakes and How to Avoid Them
The most catastrophic mistake is over-tightening the truss rod. Many inexperienced adjusters assume “tighter is better,” leading to stripped threads, bent truss rods, or crushed wood channels. The truss rod only needs moderate hand pressure—if you’re using significant force, something is wrong. Never use power tools, pipe wrenches, or impact tools on truss rods. This enthusiasm mirrors mistakes made in DIY car repairs, where over-torquing fasteners causes permanent damage.
Another common error involves making adjustments without proper measurement. Some players adjust “by feel” or based on visual inspection alone, leading to inconsistent results. Always use a straightedge and feeler gauge; your eyes deceive you on small gaps. Similarly, never adjust a truss rod on an instrument with broken or missing strings, as this eliminates the tension the rod is designed to counteract. The measurement becomes meaningless without proper string tension.
Adjusting too quickly between measurements causes over-correction. The wood neck needs time to respond to truss rod changes. Making multiple full turns in rapid succession results in overcorrection, requiring you to reverse adjustments and repeat the process. This extended timeline frustrates beginners and increases the risk of mistakes. Patience yields better results than speed.
Temperature-related mistakes also plague inexperienced adjusters. Measuring a neck in a cold garage then playing the instrument in a warm room causes apparent relief changes. Always allow instruments to acclimate to the playing environment before final adjustments. Similarly, never adjust a truss rod immediately after string changes; let the neck stabilize under new tension for at least 24 hours.
A frequently overlooked mistake involves adjusting only the truss rod when other issues exist. Fret wear, high frets, or nut problems cannot be corrected by truss rod adjustment alone. If relief is perfect but you still have fret buzz or high action, the issue lies elsewhere. Proper diagnosis prevents wasted effort and frustration.
Troubleshooting Adjustment Issues
If your truss rod turns but doesn’t affect neck relief, the internal mechanism may be damaged or disconnected. This sometimes occurs in older instruments or those subjected to rough handling. Have a professional luthier inspect the neck; attempting further adjustments risks additional damage. This situation requires professional intervention rather than continued DIY attempts.
Resistance that suddenly increases during adjustment indicates you’ve reached the mechanical limit. Stop immediately; continuing applies dangerous pressure that can snap the truss rod. If you haven’t achieved your target relief before hitting this limit, the neck may require fret leveling or other professional intervention. Document where resistance increased and consult a professional luthier.
If the truss rod nut spins freely without resistance, the internal rod may be broken or the connection stripped. This requires professional neck work; do not continue adjusting. Attempting to force further adjustment will only worsen the problem. Professional luthiers can replace internal truss rods, but this is a significant repair beyond DIY scope.
Uneven relief—where one side of the neck has more relief than the other—indicates a twisted neck or uneven truss rod installation. Single-action rods cannot correct twists; this situation requires professional assessment. Some luthiers can correct minor twists through careful heat application and clamping, but this specialized work demands expertise.
If you achieve proper relief but fret buzz persists in specific areas, individual fret height issues exist. This requires fret leveling, crowning, and dressing—professional services beyond truss rod adjustment. Similarly, if you achieve proper relief but action remains unacceptably high, nut or bridge issues likely exist rather than neck geometry problems. Proper diagnosis prevents chasing non-existent solutions.
Long-Term Maintenance and Monitoring
After successfully adjusting your truss rod, regular monitoring ensures the adjustment remains stable. Check neck relief every 3-6 months, particularly if you live in a climate with significant seasonal humidity variations. Wood responds to humidity changes, and relief may shift slightly over time. Catching these shifts early allows minor adjustments before problems develop.
Humidity control prevents excessive truss rod adjustments. Maintaining 45-55% relative humidity in your playing and storage environment minimizes wood movement. This stability reduces the need for frequent adjustments and extends the lifespan of your instrument. Professional musicians often use humidifiers or dehumidifiers to maintain consistent conditions.
Document your adjustment history. Record the date, measurements before and after, and the number of turns required. This documentation reveals patterns—if you consistently need to tighten the rod every few months, excessive humidity or string tension may be the culprit. Patterns inform preventive measures, whether that means environmental controls or string gauge adjustments.
Inspect the truss rod access area regularly for corrosion or debris. Moisture entering the adjustment channel causes rust and makes future adjustments difficult. Keep the area clean and dry. If you notice corrosion, apply penetrating oil and allow it to sit before attempting adjustment. This preventive care maintains accessibility for future adjustments.
Never leave the truss rod at the extreme end of its range. If you’ve tightened it significantly to remove excessive relief, consider whether backing it off slightly improves playability while maintaining acceptable relief. Truss rods function best somewhere in their middle range, not at mechanical extremes. This balanced positioning maximizes longevity and adjustment flexibility.
FAQ
How often should I adjust my truss rod?
Most well-maintained instruments require truss rod adjustments only 1-2 times yearly, typically with seasonal humidity changes. If you’re adjusting more frequently, investigate environmental factors or string tension issues rather than continuing reactive adjustments. Regular monitoring prevents the need for major corrections.
Can I adjust a truss rod on an acoustic guitar the same way as an electric?
The adjustment process is identical, but acoustic guitars often have body-end or heel adjustments requiring more disassembly. The measurement and adjustment principles remain consistent. Consult your specific guitar’s documentation, as some vintage acoustics have unusual configurations requiring professional service.
What if my truss rod won’t turn at all?
A stuck truss rod typically indicates corrosion or debris. Apply penetrating oil and let it soak for 24 hours before attempting adjustment with the correct tool. Never force a stuck nut; excessive pressure strips threads or breaks the rod. If it remains stuck after soaking, professional intervention is necessary.
Is it safe to adjust a truss rod myself, or should I always use a professional?
Safe adjustment is absolutely achievable with proper tools, accurate measurement, and patience. However, if you lack confidence, have never worked on instruments before, or your guitar is valuable or vintage, professional service is worthwhile. The cost of professional adjustment (typically $50-150) is minimal compared to repair costs from mistakes.
How do I know if my neck needs a truss rod adjustment versus other repairs?
Measure your neck relief first. If relief is outside the 0.010-0.015 inch range and fret buzz or high action improves when you manually adjust the neck, truss rod adjustment is likely needed. If relief is correct but problems persist, other issues like fret wear, nut problems, or bridge issues are responsible. Proper diagnosis prevents unnecessary adjustments.
Can I damage my guitar by adjusting the truss rod?
Yes, improper adjustment can cause serious damage. Over-tightening strips threads, cracks wood, or breaks the rod. Using wrong tools damages the adjustment nut. However, careful quarter-turn adjustments with proper measurement and patience are safe. The key is respecting the tool’s power and working methodically rather than aggressively.
What’s the difference between relief and backbow?
Relief is a forward bow in the neck (strings sit higher in the middle). Backbow is a reverse bow (the middle dips lower than the ends). Excessive relief causes high action; backbow causes fret buzz. Your straightedge and feeler gauge measurements reveal which condition exists, determining whether to loosen or tighten the truss rod.
External Resources:


