How to Oil Hair: Stylist-Approved Method for Healthy, Lustrous Locks
Hair oiling is a time-honored practice that transforms dry, damaged, and lifeless strands into silky, nourished hair. Whether you’re dealing with frizz, breakage, or simply want to enhance your natural shine, applying oil correctly makes all the difference. This comprehensive guide reveals professional techniques used by stylists worldwide to maximize the benefits of hair oils while avoiding common mistakes that leave hair greasy or weighed down.
Understanding how to apply oil to hair properly requires knowledge of your hair type, the right product selection, and precise application methods. From pre-shampoo treatments to scalp massages and mid-length conditioning, each technique serves a specific purpose in your hair care routine. Let’s explore the stylist-approved approaches that deliver visible results within weeks.

Understanding Hair Oil Benefits
Hair oils serve multiple critical functions in maintaining strand health and scalp vitality. Professional stylists recognize that natural oils penetrate the hair cuticle, providing deep moisture that regular conditioners cannot achieve. The benefits extend beyond aesthetics—proper oiling strengthens hair structure, reduces protein loss during washing, and creates a protective barrier against environmental damage.
The scalp produces sebum naturally, but factors like harsh shampoos, heat styling, and chemical treatments strip this protective layer. When you apply oil to hair strategically, you’re essentially restoring what modern hair care practices remove. Coconut oil, argan oil, and jojoba oil contain fatty acids and vitamins that repair damaged keratin and seal the hair cuticle, preventing moisture loss.
Scientific research published through the International Association for Dental Research demonstrates that certain oils reduce protein loss by up to 50% compared to untreated hair. This is particularly important for color-treated, chemically processed, or heat-damaged hair that’s already compromised.

Choosing the Right Oil for Your Hair Type
Not all oils work equally for every hair type. Selecting the appropriate oil determines whether your hair becomes nourished or greasy. Fine, thin hair requires lightweight oils that won’t flatten strands, while thick, curly, or coarse hair benefits from heavier, more occlusive oils.
For Fine and Thin Hair: Use lightweight oils including argan oil, jojoba oil, or grapeseed oil. These absorb quickly without leaving residue. Coconut oil is generally too heavy for fine hair unless heavily diluted.
For Normal Hair: Coconut oil, almond oil, and light sesame oil work beautifully. These provide moisture without overwhelming your natural texture.
For Thick, Curly, or Coarse Hair: Reach for heavier oils like coconut oil, shea butter-infused oils, or avocado oil. These penetrate dense hair structures and provide the moisture these textures demand. Castor oil is also excellent for curl definition.
For Oily Scalp with Dry Ends: Apply oils only to mid-lengths and ends, avoiding the scalp entirely. Consider lightweight options like grapeseed or sunflower oil.
Understanding your specific hair needs helps you maximize results. If you’re interested in other beauty applications, check out our guides on how to apply highlighter and how to apply cream blush for complete beauty knowledge.
Pre-Shampoo Oil Treatment Method
The pre-shampoo oil treatment, known as an oil mask or conditioning treatment, is one of the most effective stylist-recommended techniques. This method protects hair from the stripping effects of shampoo while deeply conditioning strands.
Step-by-Step Pre-Shampoo Application:
- Start with dry or damp hair. Damp hair allows better oil distribution, though dry application works well for intensive treatments.
- Section your hair into 4-6 manageable sections using clips. This ensures even coverage and prevents missing areas.
- Pour approximately 1-3 tablespoons of oil into your palm (amount varies by hair length and thickness).
- Rub palms together to warm the oil slightly, which improves penetration.
- Beginning at ear level, apply oil to the mid-lengths of each section, working downward toward the ends. Avoid the scalp initially unless you have a dry scalp.
- Use a wide-tooth comb to distribute oil evenly through each section. This prevents clumping and ensures thorough coverage.
- Once mid-lengths and ends are coated, apply a small amount to your scalp, massaging gently in circular motions.
- Leave the oil on for 20-30 minutes for regular treatments, or 1-2 hours for intensive conditioning. Overnight treatments are acceptable for very damaged hair.
- Shampoo thoroughly to remove all oil residue. Use a clarifying shampoo if regular shampoo leaves your hair feeling slick.
Professional stylists emphasize that patience during the application phase prevents over-oiling. It’s easier to add more oil than to remove excess, so start conservatively and adjust based on your hair’s response.
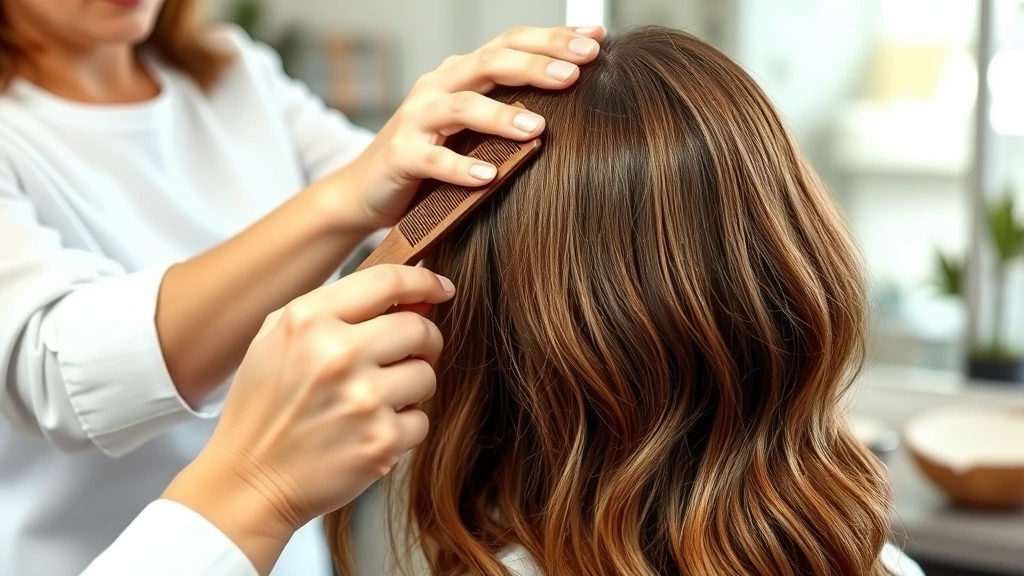
Scalp Massage Technique
Direct scalp oiling addresses dryness, flaking, and itching while promoting healthy hair growth. The scalp massage technique combines oil application with therapeutic massage that stimulates blood circulation.
Begin by parting your hair into sections using a rattail comb. Pour oil directly onto small sections of scalp, working systematically from front to back. Use your fingertips—never nails—to massage the oil into your scalp using slow, circular motions. Apply moderate pressure, moving from the temples toward the crown, then down the back of the head.
This massage should last 5-10 minutes and feels genuinely relaxing. The increased blood flow delivers more oxygen and nutrients to hair follicles, supporting stronger growth. Many stylists recommend scalp massage once or twice weekly for optimal results.
For individuals with sensitive scalps, dilute your chosen oil with a lighter carrier oil at a 1:1 ratio. This reduces potential irritation while maintaining benefits. After the massage, leave the oil on for at least 30 minutes before shampooing.
Mid-Length and Ends Application
Hair ends are the oldest part of your hair and suffer the most damage from heat styling, chemical treatments, and environmental exposure. Targeting these areas with oil prevents split ends and maintains smoothness.
The mid-length and ends application differs from full-hair oiling. After shampooing and conditioning, apply a small amount of oil to damp (not dripping wet) hair. Focus exclusively on the area from your ears downward, avoiding the scalp and roots.
Distribute oil by running your fingers through hair or using a wide-tooth comb. The goal is light, even coverage rather than saturation. Excessive oil at roots causes greasiness, so restraint is essential. For styling purposes, this technique works beautifully before blow-drying, creating smoothness and reducing frizz naturally.
Professional stylists often recommend leaving a small amount of oil on damp hair rather than completely drying hair first. This seals moisture into the hair shaft while the cuticle is still slightly open and receptive.
Overnight Oil Mask Treatment
Overnight treatments deliver intensive conditioning for severely damaged, dry, or chemically treated hair. This method requires planning but produces dramatic results within one week of consistent use.
Apply oil generously to damp hair following the pre-shampoo method outlined earlier. Use approximately 2-4 tablespoons depending on hair length and thickness. Work systematically through each section, ensuring thorough saturation from scalp to ends.
To protect your pillowcase and bedding, wrap hair in a microfiber towel or silk scarf. Microfiber is preferable because it’s breathable and won’t absorb all your oil. Silk reduces friction that causes breakage and frizz.
Leave the treatment on overnight or for 8+ hours. In the morning, shampoo thoroughly with warm water. You may need to shampoo twice to remove all residual oil. Follow with your regular conditioner to restore moisture balance.
Overnight treatments work exceptionally well for curly hair, which tends toward dryness. They’re also valuable before important events when you want your hair looking its absolute best. Just ensure you shampoo completely, as incomplete oil removal appears dull and greasy.
Common Mistakes to Avoid
Applying Oil to Soaking Wet Hair: Water and oil don’t mix effectively. Apply oil to damp or dry hair for better penetration and distribution.
Using Too Much Oil: More isn’t better. Excess oil weighs hair down, creates greasiness, and requires multiple shampoo cycles to remove. Start with small amounts and add gradually.
Neglecting the Scalp: While you shouldn’t oil your scalp if it’s naturally oily, dry scalps benefit tremendously from targeted oiling. Don’t assume all scalps should be avoided.
Leaving Oil on Too Long in Daily Wear: If you’re oiling hair you plan to wear down immediately, keep application light and time-limited. Overnight treatments are designed for staying in; daytime applications should be minimal.
Choosing the Wrong Oil for Your Hair: Heavy oils on fine hair create flatness and greasiness. Lightweight oils on coarse hair may not provide sufficient moisture. Match oil weight to your hair type.
Skipping the Comb: Applying oil with your fingers alone creates uneven coverage and clumping. A wide-tooth comb distributes oil evenly throughout the hair shaft.
Not Shampooing Thoroughly: Incomplete oil removal leaves hair looking dull and feeling sticky. Use warm water and clarifying shampoo when necessary.
Frequency and Maintenance Schedule
Optimal oiling frequency depends on your hair type, condition, and lifestyle. Professional stylists recommend different schedules for different needs:
Healthy Hair: Oil treatment once weekly or bi-weekly. This maintains natural shine and prevents damage without over-conditioning.
Damaged or Processed Hair: Oil treatment 1-2 times weekly. Chemically treated, colored, or heat-damaged hair needs more intensive care.
Dry Hair: 2-3 times weekly or even daily light applications to mid-lengths and ends. Dry hair loses moisture rapidly and benefits from frequent nourishment.
Oily Hair: Light oil application to ends only, once weekly or bi-weekly. Focus on preventing split ends without adding scalp oil.
Curly Hair: 1-2 times weekly. Curls require more moisture than straight hair due to their structure, which prevents natural sebum from traveling down the hair shaft.
Track how your hair responds to different frequencies. Some people thrive with weekly treatments while others do better with bi-weekly applications. Consistency matters more than frequency—regular oiling produces better results than sporadic intensive treatments.
For complete hair and beauty care knowledge, explore our DIY Nests Hub Blog for additional styling and skincare guidance.
FAQ
How long should I leave oil in my hair?
For pre-shampoo treatments, 20-30 minutes is standard for regular conditioning. Intensive treatments can stay 1-2 hours. Overnight treatments (8+ hours) work for severely damaged hair. Daily light applications to damp hair can stay until blow-drying.
Can I oil my hair before going out?
Yes, but apply very lightly to mid-lengths and ends only. Use minimal oil—about 2-3 drops on damp hair. This adds shine and smoothness without appearing greasy. Avoid scalp application for daytime wear.
What’s the best oil for damaged hair?
Coconut oil and argan oil are top choices for damaged hair. Coconut oil provides deep protein conditioning, while argan oil adds shine and smoothness. For very damaged hair, combine both oils or use them alternately.
Will oiling my hair make it greasy?
Only if you use too much or choose an oil too heavy for your hair type. Start with small amounts and match oil weight to your hair. Fine hair needs lightweight oils; thick hair tolerates heavier oils.
How often should I oil my scalp?
If your scalp is dry or flaky, oil it 1-2 times weekly. If your scalp is naturally oily, skip scalp oiling and apply oil only to mid-lengths and ends. Listen to your scalp’s signals.
Can I mix different oils together?
Absolutely. Mixing oils allows you to customize treatments for your specific needs. Combine a heavier oil with a lighter one to balance penetration and weight. For example, mix coconut oil with jojoba oil for balanced conditioning.
What’s the difference between oil and leave-in conditioner?
Oils are pure fats that seal moisture into hair. Leave-in conditioners contain water, oils, and other conditioning ingredients. Oils provide deeper sealing; leave-in conditioners offer lighter conditioning suitable for daily use.
Should I oil my hair before or after coloring?
Oil your hair 1-2 days before coloring to protect your scalp from irritation. Wait 48 hours after coloring before oiling to allow color molecules to fully set. Then begin regular oiling to maintain color and condition.
Can I use cooking oil on my hair?
Some cooking oils work—coconut and argan oils are food-grade and hair-safe. However, use only pure, unrefined versions. Most refined cooking oils contain additives unsuitable for hair. Stick to oils specifically intended for hair care.
How do I remove excess oil from my hair?
Shampoo with warm water and clarifying shampoo if needed. For emergency situations, dry shampoo absorbs excess oil temporarily. Prevention through proper amounts is easier than removal.
Additional Resources: For comprehensive beauty care guidance, explore our guides on DIY homemade facial scrub, DIY face masks, and DIY body scrubs for complete skincare knowledge.
For professional standards and best practices in hair care, reference the Beauty Schools Directory and Professional Beauty Association for certified techniques. The National Center for Biotechnology Information provides peer-reviewed research on hair oil benefits and efficacy.
Mastering how to apply oil to hair transforms your hair care routine from basic maintenance to professional-level conditioning. By understanding your hair type, selecting appropriate oils, and following proper application techniques, you’ll achieve the lustrous, healthy hair that stylists create. Consistency and patience yield visible results within 2-4 weeks of regular oiling treatments.


