Can You Build a Pergola? Expert Tips Inside
A pergola can transform your outdoor space into a stunning retreat that combines functionality with aesthetic appeal. Whether you’re looking to create shade for entertaining guests or establish a romantic garden feature, building a pergola is an achievable DIY project that doesn’t require extensive construction experience. This comprehensive guide walks you through everything you need to know about pergola construction, from planning and material selection to installation and finishing touches.
The beauty of pergola projects lies in their flexibility. You can construct a simple, open-roof design that provides dappled shade, or build a more elaborate structure with integrated lighting and climbing plants. Understanding the fundamentals of pergola design and construction ensures your finished project is both beautiful and structurally sound. Let’s explore how you can successfully build your own pergola and create an outdoor space you’ll love.
Understanding Pergola Basics and Design Styles
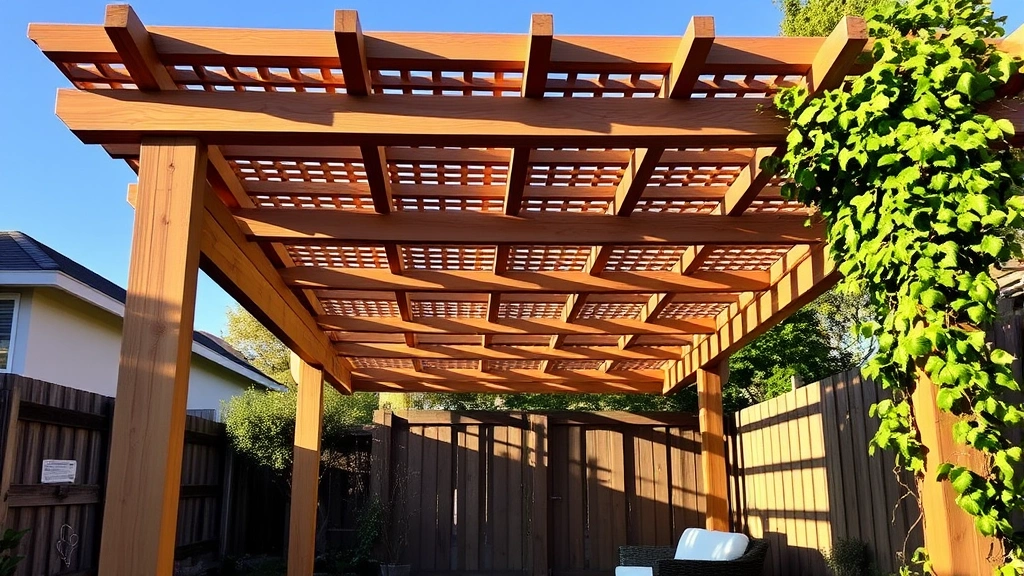
A pergola is an open-roof garden structure featuring a framework of beams and cross-lattice that creates partial shade while allowing air circulation. Unlike a gazebo or pavilion, a pergola doesn’t provide complete weather protection, making it ideal for mild climates and seasonal use. The open design allows vines and climbing plants to flourish, adding natural beauty and additional shade as vegetation matures.
When exploring pergola designs, you’ll encounter several popular styles. The traditional pergola features evenly spaced parallel beams with perpendicular slats creating a grid pattern overhead. Modern pergolas often incorporate clean lines and minimalist aesthetics, while cottage-style designs embrace ornate details and curved elements. understanding woodworking fundamentals helps you appreciate the structural considerations behind each design choice.
Size considerations are critical when planning your pergola. Standard residential pergolas range from 8×8 feet for intimate seating areas to 12×16 feet for larger entertaining spaces. Taller pergolas, typically 8-10 feet in height, provide better headroom and improved air circulation. The depth of your beams and spacing between slats affects both the shade intensity and the visual weight of the structure. According to the International Code Council, outdoor structures must comply with local building codes, so verify requirements in your area before beginning construction.
Essential Tools and Materials You’ll Need
Building a pergola requires both power and hand tools. Essential power tools include a miter saw for precise angle cuts, a drill-driver for fastening, and a circular saw for ripping lumber. A level is absolutely critical for ensuring posts are perfectly vertical and beams are properly aligned. You’ll also need a tape measure, carpenter’s square, and pencil for accurate layout work.
Material selection significantly impacts your pergola’s longevity and appearance. Pressure-treated lumber offers excellent rot resistance and is the most economical choice, though it requires periodic staining. Cedar and redwood provide natural beauty and decay resistance but demand regular maintenance. Composite materials eliminate painting and staining requirements, though they typically cost more initially. Metal pergolas, constructed from aluminum or steel, offer durability and modern aesthetics but require welding expertise or professional fabrication.
For a typical 12×10-foot pergola, you’ll need approximately:
- Four 4×4 posts (10-12 feet long) for vertical support
- Two 2×10 or 2×12 beams for main structural support
- Multiple 2×6 or 2×8 pieces for cross-beams and joists
- 1×6 or 1×8 lumber for decorative slats
- Galvanized or stainless steel fasteners (bolts, lag screws, joist hangers)
- Concrete mix for post footings
- Exterior wood stain or sealant
Fastening hardware deserves special attention. Galvanized bolts and lag screws resist corrosion better than standard steel fasteners. Joist hangers distribute load more effectively than nails alone, enhancing structural integrity. Using the correct fastener size and spacing prevents structural failure and ensures your pergola withstands wind and snow loads appropriate to your climate zone.
Planning Your Pergola Project
Successful pergola construction begins with thorough planning. Start by selecting your location, considering sun exposure, prevailing winds, and proximity to utilities. A site receiving morning sun but afternoon shade often works best for comfortable entertaining spaces. Check for underground utilities before digging post holes—call your local utility locating service to identify buried lines.
Create detailed drawings showing dimensions, post locations, and material specifications. Your drawing should include the pergola’s footprint, post spacing (typically 8-10 feet apart), and beam depths. Calculating load requirements ensures structural safety. understanding structural principles from foundation work applies to pergola design as well. Posts must be adequately spaced to support the roof load without excessive deflection.
Local building codes may require permits for pergola construction. While many jurisdictions exempt small, freestanding structures under certain square footages, attached pergolas or those exceeding specified dimensions typically require permits and inspections. Contact your local building department to determine requirements. Obtaining permits ensures your project meets safety standards and won’t create issues when selling your home.
Climate considerations influence material selection and design. In areas with heavy snow loads, stronger beams and closer post spacing become necessary. High-wind regions demand more robust fastening and potentially deeper post footings. Coastal environments require corrosion-resistant materials due to salt spray exposure. Understanding your local climate ensures your pergola performs reliably year-round.
Foundation and Post Installation
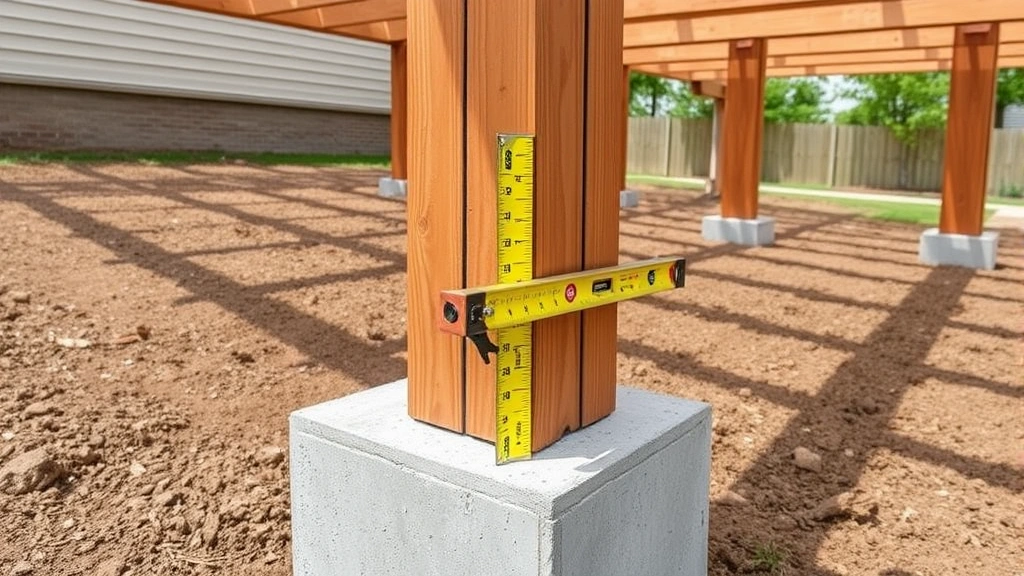
Proper post installation creates the foundation for your entire pergola structure. Posts must be absolutely vertical and firmly anchored to resist wind forces and support roof loads. Begin by marking post locations using string lines and a measuring tape. Ensure corners are square by measuring diagonals—equal measurements confirm 90-degree angles.
Dig post holes 2-3 feet deep, or below your local frost line if applicable. Frost lines vary by region; Building Science resources provide regional frost depth information. Posts installed above the frost line can heave during freeze-thaw cycles, compromising structural integrity. For areas with shallow frost lines, deeper holes prevent this movement.
Insert posts into holes and temporarily brace them with 2x4s clamped at right angles. Check plumb (vertical alignment) in both directions using a 4-foot level. Once perfectly vertical, pour concrete around the post base. Use quality concrete mix and fill to ground level, slightly mounded for drainage. Allow concrete to cure for 48 hours before removing temporary bracing or applying structural loads.
Post footings can alternatively use concrete footings—holes dug below frost line with concrete poured around the post base, or metal post bases set in concrete footings with the post attached above ground. This second method simplifies post installation and allows easier replacement if wood decay occurs. Whichever method you choose, ensure posts are protected from ground moisture through proper drainage and periodic inspection.
Connecting posts to beams requires careful attention. Lag screws driven through beams into posts work for lighter structures, but through-bolts provide superior strength for larger pergolas. Drill pilot holes slightly smaller than fastener diameter to prevent splitting. Tighten bolts firmly but avoid over-tightening, which can crush wood fibers and reduce grip strength.
Building the Frame and Roof Structure
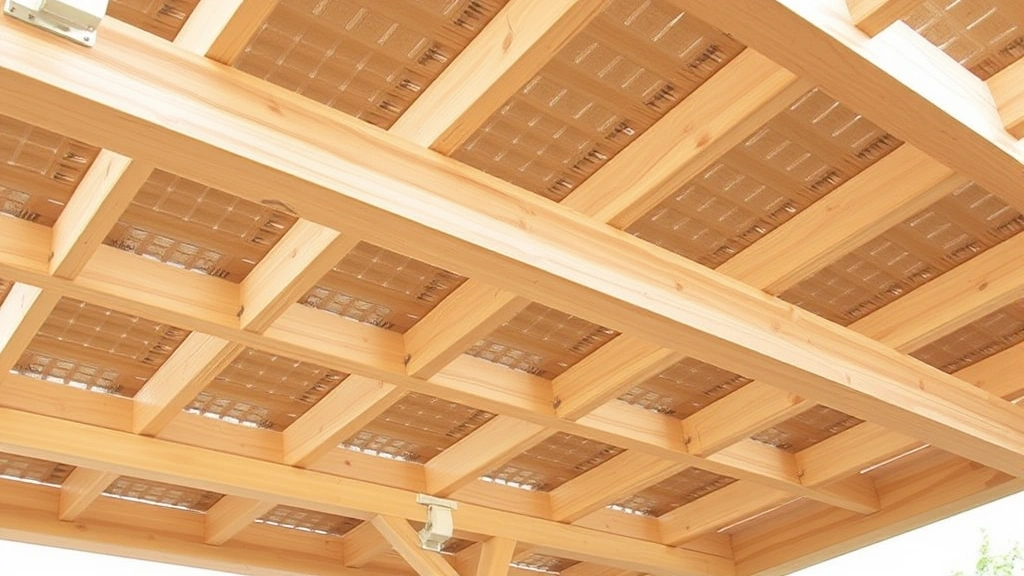
With posts installed, attach primary beams spanning between posts. These beams carry the primary load and must be properly sized for your pergola’s dimensions and local snow/wind loads. Beams should be supported at both ends, typically with through-bolts or large lag screws. Check that beams are level using a 4-foot or longer level.
Secondary beams run perpendicular to primary beams, typically spaced 2-4 feet apart depending on your design aesthetic and desired shade intensity. These beams are typically smaller (2×6 or 2×8) and attach to primary beams using joist hangers, which distribute load more effectively than nails. Joist hangers come in various sizes—select the correct size for your lumber dimensions to ensure proper support.
The decorative roof slats create the pergola’s distinctive appearance while providing partial shade. 1×6 or 1×8 boards work well for slats, typically spaced 6-18 inches apart depending on desired shade and aesthetic preference. Closer spacing provides more shade but reduces airflow and visual lightness. Arrange slats in parallel rows running perpendicular to secondary beams, or create a grid pattern by adding perpendicular slats for visual interest.
Attach slats using galvanized screws or bolts, typically two fasteners per connection point. Screws are easier to install than bolts but require pre-drilling to prevent splitting. For larger pergolas, consider using bolts for superior holding power. Space fasteners at least 1.5 inches from board edges to prevent splitting.
Curved or angled roof elements add visual sophistication but require more complex joinery. understanding how plants interact with structures helps inform these design choices—curved elements can create interesting shadow patterns and accommodate climbing vines more naturally. Miter joints (45-degree angle cuts) at corners create clean, professional-looking connections.
Finishing Touches and Maintenance
After structural completion, finishing your pergola enhances both appearance and longevity. Sand all exposed wood surfaces, particularly edges and tops where water collects. Apply exterior-grade stain or sealant to protect wood from UV damage and moisture penetration. Multiple thin coats penetrate better than single thick applications. Plan on resealing every 2-3 years depending on your climate and wood type.
Paint offers another finishing option, completely covering wood grain while providing excellent protection. Semi-transparent stains preserve wood character while protecting against weathering. For pressure-treated lumber, wait 6-12 months before staining to allow proper drying. Composite materials require minimal finishing—simply clean periodically with mild soap and water.
Adding climbing vines transforms your pergola into a living structure. Clematis, jasmine, and climbing roses provide beautiful flowers and fragrance. Grapevines create dense shade while producing fruit. Install trellising or horizontal wires to guide vine growth. Vines typically require 1-2 seasons to establish and provide substantial coverage.
Lighting enhances evening enjoyment. String lights create ambient atmosphere for entertaining, while downlights illuminate seating areas. Install electrical wiring during construction for cleaner appearance and easier installation. Low-voltage LED systems offer safety and energy efficiency for outdoor use.
Regular maintenance preserves your pergola’s beauty and structural integrity. understanding home maintenance principles applies to outdoor structures as well. Inspect fasteners annually, tightening any that have loosened. Remove debris from horizontal surfaces to prevent moisture accumulation. Trim climbing vines to prevent excessive weight and damage. Replace any deteriorated wood promptly to prevent structural compromise.
According to the National Wood Flooring Association, exterior wood structures benefit from periodic professional inspection, particularly after severe weather events. High winds can loosen fasteners, and heavy snow loads can cause permanent beam deflection if not properly designed. Addressing issues promptly prevents costly repairs and extends your pergola’s lifespan significantly.
Consider adding complementary elements to enhance your outdoor space. Shade cloths provide additional coverage during extremely hot weather. Outdoor furniture arrangement creates distinct functional zones within your pergola’s footprint. Privacy screens or lattice panels modify sight lines and wind exposure. exploring other outdoor DIY projects can inspire integrated landscape design.
FAQ
Do I need a building permit for a pergola?
Building permit requirements vary by jurisdiction. Most areas exempt small, freestanding pergolas under specific square footage (often 200 square feet), but attached structures or those exceeding size limits typically require permits. Contact your local building department before starting construction to confirm requirements and avoid potential code violations.
How much does it cost to build a pergola?
Material costs for a basic 12×10-foot pergola typically range from $800-$1,500 using pressure-treated lumber, or $2,000-$4,000 with cedar or composite materials. Labor costs add significantly if hiring professionals. DIY construction saves labor expenses but requires tool investment if you lack basic equipment.
How long does a pergola last?
Properly constructed and maintained pergolas last 15-25 years or longer. Pressure-treated lumber typically lasts 15-20 years, while cedar or composite materials can exceed 25 years with proper maintenance. Regular sealing, fastener inspection, and prompt repairs extend lifespan considerably.
Can I attach a pergola to my house?
Yes, pergolas can attach to existing structures, creating transition spaces between indoor and outdoor areas. Attached pergolas require additional considerations—ensure attachment points are structurally sound, typically bolting to rim joists or beams rather than siding. Attached structures more likely require permits, so verify local requirements.
What’s the best wood for pergolas?
Pressure-treated lumber offers excellent value and rot resistance but requires regular maintenance. Cedar and redwood provide natural beauty and decay resistance but demand periodic sealing. Composite materials eliminate painting and staining requirements but cost more initially. Your choice depends on budget, climate, and maintenance preferences.
How much shade does a pergola provide?
Pergola shade depends on slat spacing and orientation. Wider spacing (12-18 inches) provides dappled shade, reducing sun exposure by 30-50%. Closer spacing (6-8 inches) blocks 50-70% of direct sunlight. Adding climbing vines increases shade substantially once established, potentially blocking 70-90% of direct sun.
Can I build a pergola on concrete?
Yes, pergolas can be installed on concrete surfaces using concrete anchors or mounting brackets. This option works well for patios or deck areas where excavating is impractical. Ensure concrete is in good condition and properly graded for drainage. Use corrosion-resistant mounting hardware to prevent rust staining.


