Carving Spiral Ham: Chef’s Expert Techniques
Spiral ham has become a centerpiece staple for holiday meals and special gatherings, offering convenience with its pre-sliced bone structure. However, mastering the art of carving a spiral ham properly ensures you maximize yield, maintain presentation quality, and serve your guests with confidence. Whether you’re preparing for a family dinner or hosting a large celebration, understanding the correct techniques transforms what many home cooks find intimidating into a straightforward, impressive skill.
The beauty of spiral ham carving lies in its systematic approach. Unlike whole hams that require more aggressive butchering, spiral-cut hams have been professionally scored and partially separated, allowing home carvers to work with the existing cuts rather than against them. This guide walks you through professional-grade techniques that respect the ham’s structure while maximizing usable meat for your table.
Understanding Spiral Ham Structure and Selection
Spiral ham comes in two primary cuts: bone-in and boneless varieties. The bone-in spiral ham, also called a shank or butt ham, retains the leg bone structure that provides stability during carving and contributes flavor to broths and stocks. The butt end contains the hip bone and marbling of fat that keeps meat moist, while the shank end offers leaner meat with a more manageable bone configuration.
Before carving, examine your ham’s exterior. Quality spiral hams display a golden-brown glazed surface with even scoring patterns running perpendicular to the bone. The meat should feel firm when pressed gently, not soft or mushy. If you’ve glazed your ham yourself as part of preparing your home for entertaining, allow the glaze to set completely before carving to prevent smudging.
The scoring creates natural separation lines between meat sections. These pre-cut channels are your roadmap for efficient carving. A properly scored spiral ham typically has 15-20 individual slices already partially separated, making your job significantly easier than working with a whole, uncut ham. Understanding this structure prevents you from fighting against the ham’s grain and bone placement.
Essential Tools for Proper Carving
Professional carving requires specific equipment designed for precision and safety. The foundation of any carving toolkit is a sharp carving knife—typically 8-10 inches long with a thin, flexible blade. Unlike chef’s knives used for chopping, carving knives feature a narrower profile that allows you to follow the ham’s contours and bone structure without excessive force.
Your carving fork is equally important. A two-pronged fork with a guard (the metal extension protecting your hand) stabilizes the ham while you work, preventing dangerous slipping. The guard isn’t merely protective; it positions your hand at a safe distance from the blade and provides leverage for controlling the ham’s movement.
Additional essential tools include:
- Cutting board—preferably with a groove or well to catch drippings; at least 18 inches long
- Honing steel—to maintain blade sharpness throughout carving; sharpen before you begin
- Paper towels or cloth napkins—for wiping the blade between cuts, maintaining visibility
- Serving platter—warmed to keep slices at proper serving temperature
- Meat thermometer—to verify ham has reached safe internal temperature (140°F for pre-cooked spiral ham)
Before you start, sharpen your carving knife thoroughly. A dull blade requires excessive pressure, increasing slip risk and producing ragged, unattractive slices. Run the blade along a honing steel 5-6 times on each side, maintaining a 15-degree angle.
Preparation Steps Before You Begin
Proper preparation determines carving success. Remove your spiral ham from refrigeration 20-30 minutes before carving. Cold ham is more brittle and prone to breaking apart; room temperature meat slices cleanly with minimal crumbling. If your ham has been sitting out longer, ensure it hasn’t exceeded 2 hours at room temperature for food safety.
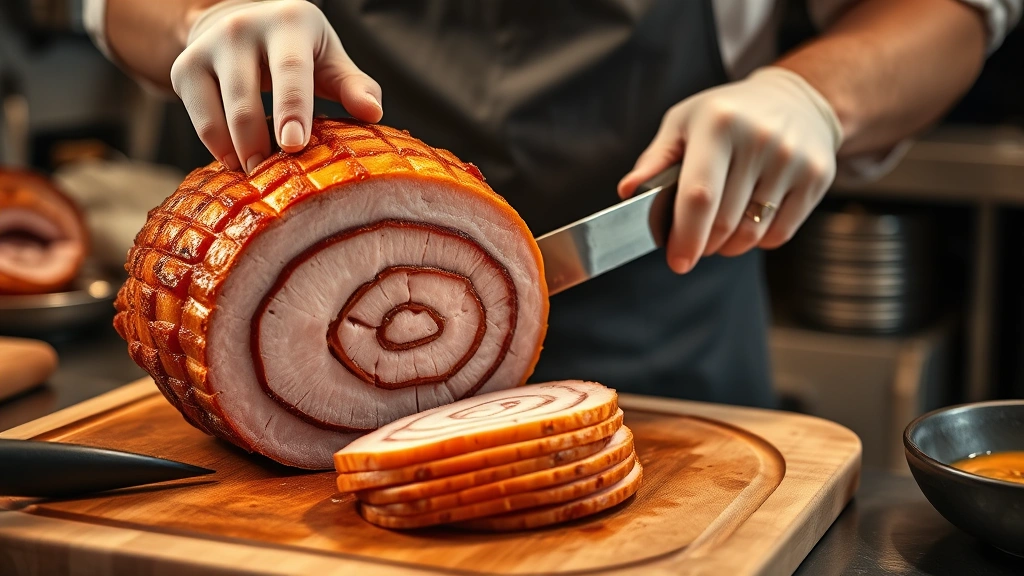
Place the ham on your cutting board with the cut side down and the bone facing left (if you’re right-handed). This positioning allows your carving fork to stabilize the ham comfortably while your knife hand maintains proper angle and control. The groove or well in your cutting board should be positioned to catch drippings away from your work area.
Inspect the exterior glaze. If it’s hardened significantly, you can carefully score the surface with shallow cuts (¼-inch deep) following the existing spiral pattern. This prevents glaze from splintering and marring your presentation. Wipe away any glaze fragments with a damp cloth before beginning.
Position your body correctly: stand with your feet shoulder-width apart, dominant side toward the cutting board. Keep your back straight and elbows at roughly 90 degrees. This ergonomic positioning prevents fatigue during longer carving sessions and maintains control over the blade.
Step-by-Step Carving Technique
Begin by removing the meat above the bone in a single piece, if possible. Locate the natural seam between meat and bone running along the ham’s length. Insert your carving knife parallel to the bone at this seam, using smooth, confident strokes rather than sawing motions. Let the blade do the work; excessive pressure indicates a dull knife requiring resharpening.
Work your knife gradually deeper, following the bone’s contour. Once you’ve penetrated about halfway through, use your carving fork to gently lift the section you’re separating. The goal is a clean separation with minimal meat left on the bone. This single-piece removal gives you a stable platform for slicing individual portions.
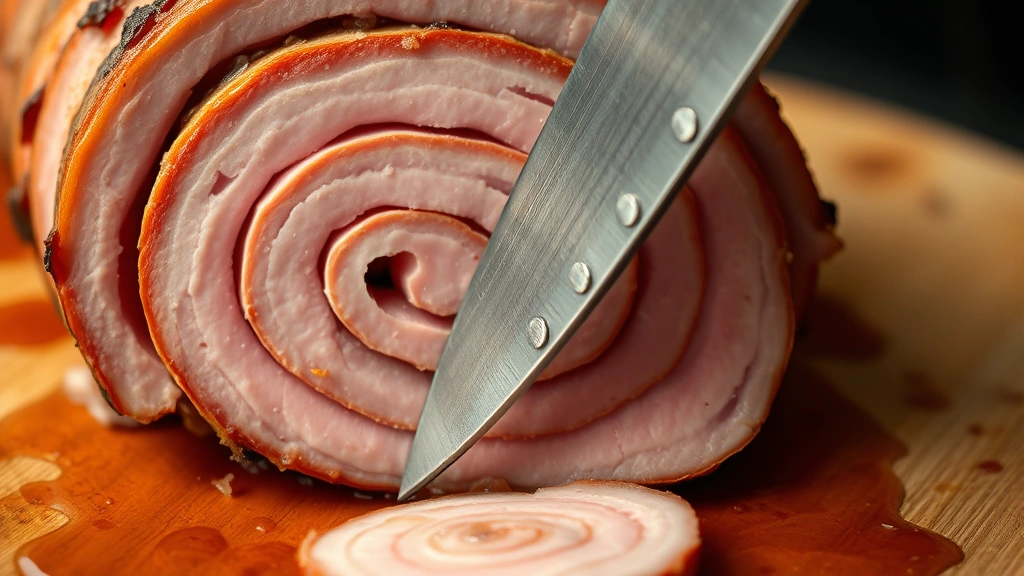
Once the major meat section is free, place it on your cutting board with the exterior skin-side up. You’ll notice the spiral scoring is now fully visible on the cut surface. Begin slicing perpendicular to these score lines, maintaining consistent thickness—typically ¼ to ½ inch for spiral ham. Thinner slices (¼ inch) work better for serving at room temperature, while thicker slices retain heat better for hot presentations.
Use smooth, downward strokes with your entire blade length, not just the tip. Saw motions create ragged edges and compress the meat, affecting texture. The blade should slice through the meat with minimal resistance; if you feel significant resistance, stop and sharpen before continuing.
After removing slices from the major section, return to the bone. Additional meat remains in pockets around the bone structure. Use your carving knife to carefully separate these sections, following the bone’s shape. These irregular pieces are perfect for chopped ham applications, soups, or bean dishes—don’t waste them.
Check your progress frequently. Well-carved spiral ham should yield slices that maintain their shape and structure, not falling apart or showing excessive juice loss. If slices are crumbling, your ham may be too cold; pause and allow additional warming time.
Maximizing Yield and Presentation
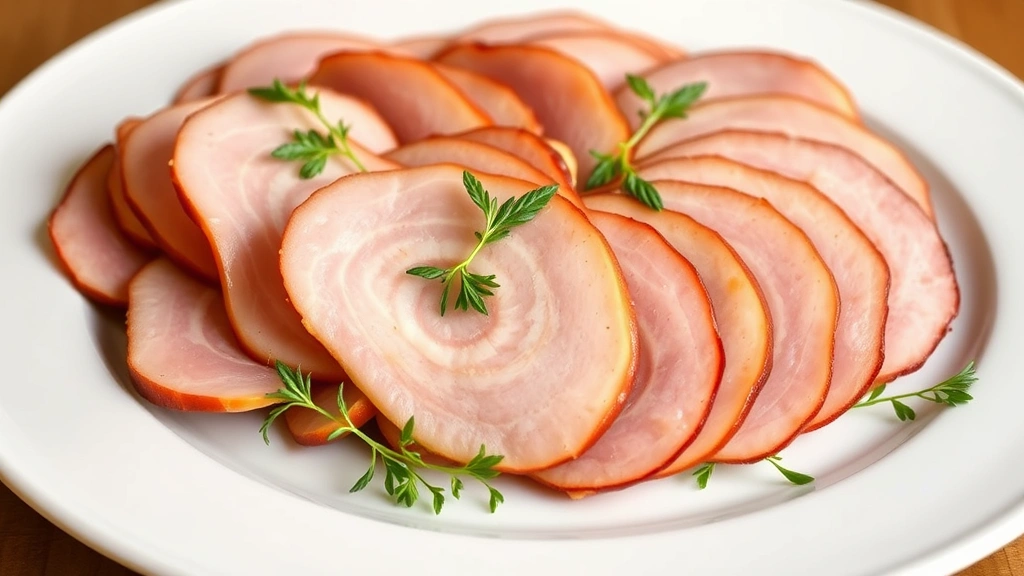
Professional carvers understand that presentation and yield go hand-in-hand. Arrange slices on your warmed serving platter slightly overlapping, creating a cascading presentation that looks abundant while keeping slices from drying out. The exterior fat cap should face outward, showcasing the ham’s quality.
For formal presentations, maintain consistent slice thickness and arrange them in a fan pattern or spiral matching the ham’s original cut. This visual organization signals careful preparation and respects your guests. For casual family meals, a simple overlapping arrangement works equally well while maintaining food safety.
Maximize yield by utilizing every portion. The bone itself becomes stock for soups or beans—a resource worth 2-3 cups of flavorful liquid. Trim any remaining meat scraps and reserve for fried rice, quiches, or that DIY Nests Hub Blog has covered extensively in meal planning guides. Skilled carvers achieve 70-75% usable sliced meat from the total ham weight, with remaining portions going to secondary applications.
Keep carved ham moist by covering unused portions with plastic wrap or foil immediately after slicing. If serving over extended periods, keep slices on the platter covered until guests approach, then refresh with freshly carved pieces from the remaining ham section.
Safety Considerations During Carving
Carving involves sharp blades and requires focused attention. Never carve while distracted—put phones away and request guests wait in adjacent rooms rather than crowding your workspace. Your concentration directly impacts safety for yourself and anyone nearby.
Always cut away from your body and other people. Position the carving fork with its guard protecting your hand, maintaining at least 3 inches of clearance between your hand and the blade path. Your non-dominant hand should never be in the blade’s trajectory; use the fork exclusively for stabilization.
If your hand slips, immediately release the knife rather than attempting to catch it. Let it fall safely away from your body. A dropped knife is far safer than a caught knife, which can cause serious injury. Never attempt to grab a falling blade.
Keep your cutting board stable. Place a damp towel underneath to prevent shifting. Unstable surfaces are the primary cause of carving accidents. If your board moves during carving, stop and secure it before continuing.
Wash your hands and all surfaces that contacted raw or undercooked ham with hot soapy water. While spiral hams are pre-cooked, cross-contamination risks remain valid. This is especially important if you’re also preparing other dishes in your kitchen simultaneously.
Maintain blade hygiene by wiping with paper towels between cuts. This prevents glaze buildup, which creates slipping hazards and reduces cutting efficiency. A clean blade is also a safer blade.
Storage and Using Leftover Ham
Properly stored ham remains safe and delicious for extended periods. Wrap leftover slices tightly in plastic wrap or store in airtight containers. Refrigerated ham maintains quality for 3-4 days. For longer storage, freeze in vacuum-sealed bags for up to 2 months, though quality begins declining after 4-6 weeks.
Ham bone makes exceptional stock. Place the bone in a large pot with water, onion, celery, and carrot. Simmer for 2-3 hours, then strain and cool. This stock forms the foundation for split pea soup, bean dishes, and vegetable soups. Frozen ham stock keeps for 3-4 months.
Leftover ham slices work beautifully in numerous applications: fried rice, quiches, salads, sandwiches, and casseroles. Chopped ham becomes a key ingredient in traditional dishes like scalloped potatoes with ham or Hawaiian pizza. The versatility of leftover spiral ham means minimal waste and maximum value from your initial investment.
When reheating leftover ham, avoid high heat, which dries the meat. Gentle warming in a 325°F oven with a small amount of glaze or broth keeps slices moist. Microwave reheating works for individual servings but tends to toughen larger quantities.
FAQ
What temperature should spiral ham reach before carving?
Spiral hams sold in the United States are pre-cooked and safe to eat cold. If you’ve heated your ham, verify it reaches an internal temperature of 140°F using a meat thermometer. Insert the thermometer into the thickest part of the meat without touching bone. Allow 10-15 minutes after removing from heat for accurate readings.
Can I carve a frozen spiral ham?
Frozen ham should thaw completely in the refrigerator before carving, typically 24-48 hours depending on size. Carving frozen or partially frozen ham produces ragged slices and increases injury risk. The blade can slip on frozen surfaces, and the meat will crumble rather than slice cleanly.
How do I know if my carving knife is sharp enough?
A properly sharp carving knife should slice through paper with minimal pressure. If you struggle to cut paper, your blade needs sharpening. You can also perform the tomato test: a sharp knife slices tomato skin cleanly without crushing the flesh. If your blade crushes the tomato, sharpen before carving ham.
What’s the best way to store carved ham slices?
Store slices in airtight containers separated by parchment paper, or wrap tightly in plastic wrap. Keep refrigerated at 40°F or below for up to 4 days. For longer storage, freeze in vacuum-sealed bags for up to 2 months. Thaw frozen ham in the refrigerator overnight before using.
Can I carve a spiral ham in advance of serving?
Yes, carving 1-2 hours before serving works well. Cover carved slices with plastic wrap and refrigerate to keep them fresh and prevent drying. Remove from refrigeration 15 minutes before serving to bring slices to appropriate temperature. Carving too far in advance (more than 4 hours) risks quality degradation.
What should I do if the meat starts falling apart while carving?
Falling-apart meat indicates the ham is too cold. Stop carving, cover the ham loosely with foil, and allow 15-20 minutes additional warming at room temperature. Test with a practice slice before resuming full carving. Alternatively, your knife may be dull; perform a sharpness test and hone if necessary.
Are there external resources for ham carving safety?
The USDA Food Safety and Inspection Service provides comprehensive guidance on safe ham handling and storage. The National Center for Home Food Preservation offers detailed information on proper storage techniques. Additionally, the North American Meat Institute maintains resources on proper meat carving and handling practices for home cooks.


