Change Aspect Ratio in Premiere Pro: Expert Guide
Adobe Premiere Pro stands as the industry standard for professional video editing, offering creators powerful tools to manipulate every aspect of their projects. One of the most fundamental adjustments you’ll make is changing the aspect ratio—the proportional relationship between a video’s width and height. Whether you’re repurposing content for social media, adapting footage for different platforms, or correcting filming mistakes, mastering aspect ratio changes in Premiere Pro is essential for any video editor.
Aspect ratio affects how your video appears on different screens and platforms. A 16:9 widescreen format looks drastically different from a 9:16 vertical format used on TikTok or Instagram Reels. Understanding how to properly adjust this setting ensures your content displays correctly, maintains visual quality, and reaches your intended audience without letterboxing or unwanted cropping. This comprehensive guide walks you through every method for changing aspect ratios in Premiere Pro, from sequence settings to export configurations.
Understanding Aspect Ratio Basics
Before diving into the technical steps for changing aspect ratios, it’s crucial to understand what aspect ratio actually means and why it matters. Aspect ratio is expressed as a ratio—typically written as two numbers separated by a colon, such as 16:9 or 4:3. The first number represents the width, while the second represents the height. A 16:9 aspect ratio means the video is 16 units wide for every 9 units tall, creating a wider, more cinematic appearance.
Different platforms and delivery methods demand different aspect ratios. When you’re working on creative projects, understanding these requirements prevents the need for time-consuming revisions. YouTube traditionally uses 16:9, while Instagram Stories and TikTok prefer 9:16 vertical formats. Broadcasting standards vary by region—North American television uses 16:9, while some international standards may differ slightly.
The aspect ratio you choose affects not only how your video looks but also how much of your footage is visible. Changing from a wider ratio to a narrower one may require cropping, potentially losing important visual information. Conversely, changing to a wider ratio might introduce black bars (letterboxing) or require scaling that reduces image quality. These are critical considerations when planning your editing workflow.
Changing Sequence Settings
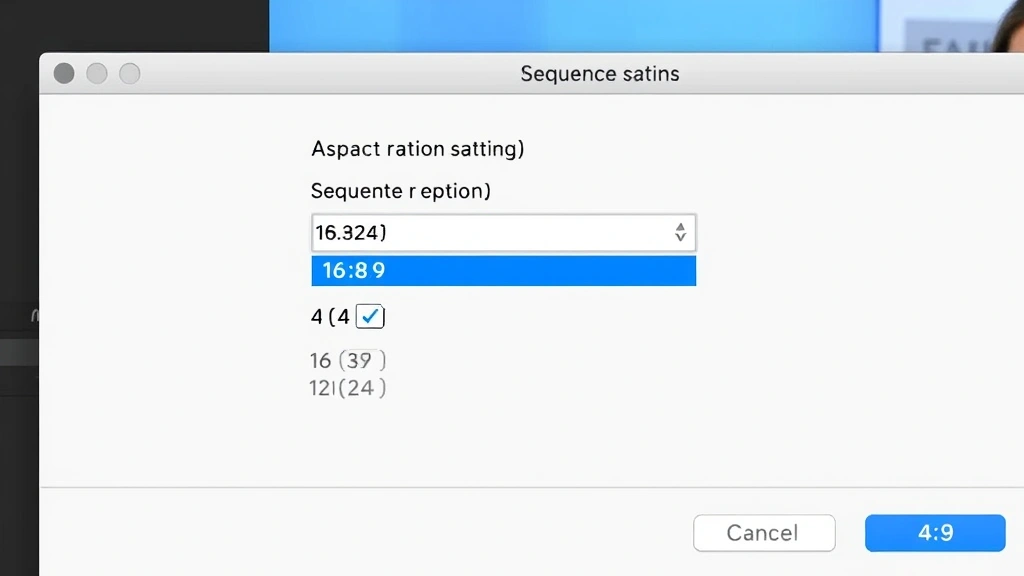
The most direct way to change aspect ratio in Premiere Pro is through the Sequence Settings dialog. This method establishes the aspect ratio for your entire editing project from the ground up. Start by accessing the Sequence menu from the top menu bar, then select “Sequence Settings.” A dialog box appears displaying your current sequence parameters.
Within the Sequence Settings window, you’ll find the frame size settings. Look for the preset dropdown menu that likely shows your current format—perhaps “1920×1080” or “3840×2160” for 4K projects. Click this dropdown to reveal a comprehensive list of preset aspect ratios. Adobe provides standard options including 16:9, 4:3, 1:1 (square), and vertical formats. Select your desired aspect ratio from this list.
If you need a custom aspect ratio not listed in the presets, Premiere Pro allows manual configuration. You can directly edit the horizontal and vertical pixel dimensions. For example, to create a 21:9 ultrawide format, you might enter 2560 pixels wide by 1080 pixels tall. Remember that changing sequence settings after you’ve already edited content may cause unexpected scaling or cropping of your existing clips, so it’s best to establish your aspect ratio early in the project.
After selecting your new aspect ratio, click “OK” to apply the changes. Premiere Pro immediately updates your timeline, preview monitor, and all associated settings. Your existing clips automatically scale to fit the new aspect ratio. This is where understanding your content becomes important—if you’re changing to a significantly different ratio, you may need to adjust clip positioning and scaling to prevent unwanted cropping.
Adjusting Frame Size and Resolution
Beyond the preset sequence settings, you can achieve aspect ratio changes through frame size and resolution adjustments. This approach offers more granular control and works well when you’re working with footage that doesn’t neatly fit standard presets. Navigate to the Sequence Settings again, but this time focus on the horizontal and vertical pixel dimensions rather than the preset dropdown.
Understanding pixel dimensions helps you calculate the exact aspect ratio you need. If you want a 2.39:1 cinematic ratio at 1080p height, you’d calculate: 1080 × 2.39 = 2,571 pixels wide. Enter this value in the horizontal dimension field. Premiere Pro automatically recalculates your aspect ratio based on these dimensions. This method gives you pixel-perfect control over your output format.
Resolution and aspect ratio work together but serve different purposes. Resolution refers to the total number of pixels (1080p, 2K, 4K), while aspect ratio describes their proportions. You can maintain the same resolution while changing aspect ratio. For instance, you might scale down from 1920×1080 (16:9) to 1440×1080 (4:3) while keeping the height constant. Alternatively, you could change from 1920×1080 to 1920×1440 (4:3 at higher height), which increases resolution while adjusting the ratio.
When adjusting frame size, consider your project’s intended output and the processing power available on your system. Larger frame sizes require more computational resources during editing and rendering. A helpful approach is to work with smaller dimensions during the editing phase, then export at full resolution for final delivery. This balance between quality and performance is something many editors overlook when learning systematic adjustment techniques.
Using Scale and Position Effects
Sometimes you don’t want to change your entire sequence’s aspect ratio—instead, you need to adjust individual clips. Premiere Pro’s Scale and Position effect provides frame-by-frame control over how clips fit within your sequence. This method is particularly useful when mixing footage shot at different aspect ratios or when you want to apply letterboxing creatively.
To apply the Scale and Position effect, select your clip in the timeline, then navigate to Effects panel (usually on the right side of your workspace). Search for “Scale” in the effects search bar. Drag the “Scale” effect onto your selected clip. In the Effect Controls panel, you’ll see sliders for adjusting the scale percentage and position coordinates.
The Scale slider controls the clip’s size relative to the sequence frame. Increasing scale to 110-120% can help fill the frame when working with footage shot at a narrower aspect ratio. The Position controls (X and Y coordinates) let you move the clip horizontally and vertically within the frame. Use these together to center your clip and eliminate unwanted black bars.
For more precise control, use the Crop effect in combination with Scale. The Crop effect removes unwanted portions of your clip, effectively changing how much of the original footage appears. This approach works well when you have extra headroom in your footage—for example, if you shot in 16:9 but need to deliver in 9:16, you can crop the sides and scale up to maintain image quality.
Another powerful technique involves using adjustment layers and nested sequences. Create a new sequence with your target aspect ratio, then nest your original sequence inside it. This non-destructive approach preserves your original editing work while allowing you to output in multiple formats without recreating your edit. This is particularly valuable when you need to repurpose content across multiple platforms simultaneously.
Export Settings and Output Formats
Even if you’ve established your aspect ratio within your sequence, the export settings are where you finalize how your video will appear to viewers. The Export settings in Premiere Pro offer another layer of aspect ratio control that’s separate from your sequence settings. This flexibility allows you to export the same sequence in multiple formats without re-editing.
To access export options, go to File menu and select “Export” then “Media.” In the Export dialog, navigate to the Video tab. You’ll see options for frame size, which may differ from your sequence settings. Premiere Pro allows you to scale your output independently of your sequence. For example, you could edit in 1920×1080 but export in 1440×1080 without touching your sequence settings.
The Codec selection also influences aspect ratio handling. Different codecs handle scaling and aspect ratio preservation differently. H.264 and H.265 are modern codecs that handle aspect ratio information efficiently. When exporting for different platforms, you might need different codecs—YouTube prefers H.264, while streaming services may request ProRes for archival or intermediate formats.
Premiere Pro’s export presets include platform-specific settings. Under the Preset dropdown, you’ll find options for YouTube, Vimeo, Instagram, and other platforms. These presets automatically set the correct aspect ratio, bitrate, and codec for each platform. Using these presets eliminates guesswork and ensures your video displays correctly on your target platform. However, always verify the preset matches your needs, as platform specifications change periodically.
For social media distribution, create multiple export versions from a single sequence. Export once in 16:9 for YouTube, then export again in 1:1 for Instagram feed, and a third time in 9:16 for Instagram Stories and TikTok. This workflow saves tremendous time compared to re-editing for each platform. Many professionals use this approach to maximize content reach with minimal additional effort.
Common Aspect Ratios Explained
Different projects demand different aspect ratios, and understanding the characteristics of common formats helps you choose appropriately. The 16:9 widescreen format dominates modern video content, used by YouTube, Netflix, broadcast television, and most digital platforms. This ratio balances cinematic appeal with practical usability across devices.
The 4:3 aspect ratio represented the standard for television and computer monitors before widescreen became dominant. Some projects still require this format, particularly when delivering to older broadcast systems or archival purposes. Content shot in 4:3 looks boxy by modern standards, but some creators prefer this for specific aesthetic reasons.
Vertical formats have exploded in popularity with mobile video consumption. The 9:16 ratio is standard for TikTok, Instagram Reels, and YouTube Shorts. When creating content specifically for these platforms, shooting and editing natively in 9:16 prevents quality loss and ensures optimal viewing. Many creators now shoot vertical-first, then adapt to horizontal formats rather than the reverse.
The 1:1 square aspect ratio works surprisingly well for social media feeds and stories. Instagram’s feed traditionally displayed square images, and this ratio works well for thumbnails and promotional graphics. Some creators use square formats for versatility—square content can be cropped to either 16:9 or 9:16 without significant quality loss.
Cinematic formats like 2.39:1 and 2.35:1 create dramatic, ultra-wide compositions popular in film production. These ratios require intentional framing and often involve letterboxing when viewed on standard displays. If you’re creating content with cinematic aspirations, these formats convey a professional, theatrical aesthetic.
Troubleshooting Aspect Ratio Issues
Despite careful planning, aspect ratio problems sometimes emerge during editing or export. Black bars appearing unexpectedly usually indicate a mismatch between your clip’s aspect ratio and your sequence aspect ratio. If you’re seeing letterboxing you didn’t intend, check that your clips are scaled properly. The Scale effect can eliminate these bars by increasing the clip size, though this may crop portions of the original footage.
Distorted or stretched video suggests your aspect ratio change involved unequal scaling. Premiere Pro should maintain aspect ratio by default, but if you’re manually entering frame dimensions, ensure you’re calculating correctly. A 16:9 image stretched to 4:3 dimensions without proper scaling will appear compressed vertically. Always use the Scale effect with aspect ratio lock enabled to prevent this distortion.
Export failures sometimes occur when your export settings conflict with your codec or bitrate selections. If an export fails when changing aspect ratio, try these troubleshooting steps: first, verify your frame dimensions are mathematically valid (both width and height should be divisible by 4 for most codecs). Second, ensure your bitrate is appropriate for your resolution—4K exports need higher bitrates than 1080p. Third, try exporting to a different codec or format to isolate whether the problem is aspect ratio-specific.
Performance issues during playback or scrubbing might indicate your sequence settings are too demanding for your hardware. If your computer struggles after changing to a higher resolution aspect ratio, consider reducing your playback resolution or enabling Mercury Engine GPU acceleration. These optimizations help maintain smooth editing workflows even with demanding aspect ratios.
Color space and aspect ratio issues can occur when mixing footage from different sources. Ensure all your clips use the same color space (typically Rec. 709 for HD or Rec. 2020 for HDR). Mismatched color spaces combined with aspect ratio changes can produce unexpected color shifts. Normalize your footage’s color space early in your project to prevent complications.
FAQ
Can I change aspect ratio after editing my entire project?
Yes, but with caveats. Changing sequence settings after editing may cause your clips to scale unexpectedly, potentially cropping important content. You can use the Scale and Position effect on individual clips to compensate, or create a new sequence with your target aspect ratio and nest your original sequence inside. The nested sequence approach is non-destructive and preserves your original work.
What’s the best aspect ratio for YouTube?
YouTube recommends 16:9 (1920×1080 minimum) for standard content. This is the most common aspect ratio and displays optimally on desktop, tablet, and phone screens. YouTube automatically adjusts playback for different devices, but 16:9 provides the best experience across platforms. For YouTube Shorts, use 9:16 vertical format.
How do I prevent quality loss when changing aspect ratios?
Minimize quality loss by avoiding excessive scaling. When possible, scale up rather than down—increasing a clip’s size is less damaging than shrinking it. Maintain your original footage’s resolution throughout editing, only scaling during final export if necessary. Use high-quality codecs like ProRes for intermediate steps if you’re making multiple aspect ratio changes.
Should I change aspect ratio in sequence settings or export settings?
Change aspect ratio in sequence settings if it applies to your entire project. Use export settings to output different aspect ratios from the same sequence. For maximum flexibility, edit in your native aspect ratio and create multiple exports for different platforms. This approach minimizes re-editing while maximizing content distribution.
What aspect ratio should I use for Instagram content?
Use 1:1 (square) for feed posts, 9:16 for Stories and Reels, and 16:9 for carousel posts. Instagram automatically crops content to fit these formats, so shooting natively in your target ratio prevents unwanted cropping. Many creators now shoot vertical-first since 9:16 content reaches the widest audience on mobile platforms.
How do I export in multiple aspect ratios without re-editing?
Create your master edit in your primary aspect ratio, then use Premiere Pro’s export presets for different platforms. Each export can specify different frame dimensions without affecting your sequence. Alternatively, create a single nested sequence and export it multiple times with different frame size settings. This workflow maximizes efficiency when distributing across multiple platforms.


