
Switch Replacement: Electrician-Endorsed Guide
Replacing a light switch is one of the most accessible electrical projects for homeowners, yet it demands respect for safety protocols and electrical codes. Whether you’re upgrading to dimmer switches, installing smart switches, or simply replacing a worn-out toggle, understanding the fundamentals prevents accidents and ensures code compliance. This guide walks you through the entire process with electrician-approved techniques and safety measures that protect both you and your home’s electrical system.
Before touching any switch, recognize that electricity poses genuine hazards—improper handling can cause shock, burns, or fire. The good news: with proper preparation, the right tools, and careful attention to detail, switch replacement is entirely manageable for confident DIYers. We’ll cover everything from safety preparation to finishing touches, ensuring your new switch functions reliably for years.
Safety First: Essential Precautions
The foundation of any electrical project is proper safety preparation. Before you even look at your switch, you must disable power to that circuit. Locate your home’s electrical panel (breaker box) and identify the breaker controlling the switch you’re replacing. Many breakers are labeled, but if yours aren’t, flip the suspected breaker and have someone test the light—it should turn off. For absolute certainty, use a non-contact voltage tester at the switch to confirm zero power present.
Never assume a switch is de-energized based on visual inspection alone. Even experienced electricians use voltage testers every single time. Keep the breaker in the OFF position and consider placing tape over it with a note, preventing others from accidentally restoring power while you work. If you’re uncomfortable locating breakers or identifying circuits, consulting a licensed electrician is money well spent—your safety justifies the expense.
Wear appropriate safety gear: rubber-soled shoes, dry hands, and avoid touching metal pipes or grounded surfaces while working. Keep children and pets away from the work area. Have a flashlight ready, as you’ll lose power to the switch outlet itself. Following these precautions aligns with guidelines from the National Fire Protection Association (NFPA), which emphasizes de-energization as the primary control for electrical safety.
Tools and Materials You’ll Need
Gathering proper tools before starting prevents frustration and ensures professional results. Your toolkit should include:
- Non-contact voltage tester: Essential for confirming power is OFF. Digital models ($15–$30) provide reliability superior to older analog testers.
- Screwdrivers: Phillips and flathead in multiple sizes. Many switches use Phillips-head terminal screws, though some have push-in terminals requiring a flathead to release wires.
- Needle-nose pliers: Helpful for bending wire ends into proper hook shapes for screw terminals and removing stubborn wires.
- Wire strippers: If you need to re-strip any damaged wire insulation. Quality strippers prevent accidental copper damage.
- Flashlight or headlamp: Switch boxes are dark; good lighting prevents mistakes and improves safety.
- Electrical tape: For securing wire connections if needed, though modern switches rarely require it.
For materials, you’ll need the replacement switch itself. Verify it matches your circuit’s amperage (typically 15 or 20 amps for residential lighting) and voltage (120V standard). If upgrading to a code-compliant smart switch or dimmer, ensure it’s rated for your circuit load. Purchase the switch at a reputable supplier—home centers, electrical supply shops, and online retailers all stock quality options.
Understanding Your Switch Configuration
Not all switches are created equal. Single-pole switches control a light from one location and feature two brass terminals plus a ground. Three-way switches control a light from two locations (like stairs with switches at top and bottom) and have three brass terminals plus ground. Four-way switches control lights from three or more locations and have four brass terminals. Attempting to install the wrong switch type will leave your light non-functional.
To identify your switch type, examine the existing switch before removal. Single-pole switches typically say “ON” and “OFF” on the toggle. Three-way switches are unmarked or show arrows. Your new switch packaging will specify its type—match this exactly. The International Code Council (ICC) provides standards for residential electrical installations that your replacement should meet.
Understand wire colors before disconnecting anything. Black wires are hot (live power), white wires are neutral, and bare copper or green wires are ground. The switch interrupts the hot wire path. Never connect white (neutral) wires to switch terminals—this creates dangerous conditions. If your switch box contains multiple wire colors, photograph it before beginning work. This simple step prevents costly reinstallation errors.
Some older homes use different conventions; if you encounter unusual wiring or cloth-covered conductors, stop and contact a professional. Aluminum wiring, common in 1960s–1970s homes, requires special handling and shouldn’t be touched without proper training.
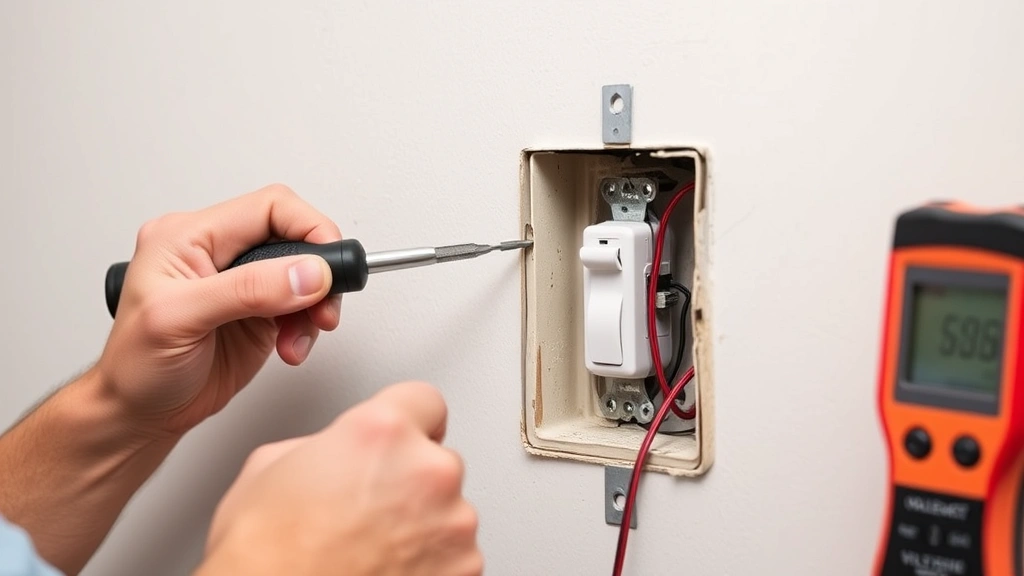
” alt=”Electrician carefully removing old light switch from wall box using screwdriver, with voltage tester visible on nearby surface”>
Step-by-Step Removal Process
Once power is confirmed OFF and you have your tools ready, begin removal:
- Remove the cover plate: Unscrew the single screw holding the plastic or metal faceplate. Keep this screw safe—you’ll reinstall it later.
- Verify power is OFF: Touch your voltage tester to the switch terminals and the box’s metal frame. No beep or light means you’re safe to proceed. This cannot be overstated—test every time.
- Unscrew the switch from the box: Two screws, typically Phillips-head, hold the switch to the electrical box. Remove both completely. The switch will pull forward slightly.
- Disconnect the wires: Loosen the terminal screws counterclockwise. Black (hot) and white (neutral) wires will release. Some switches have push-in terminals on the back—use a flathead screwdriver in the slot to release these. Never yank wires; gentle, steady pressure works best.
- Inspect the wires: Check that insulation is intact and copper isn’t corroded. If wire ends are damaged or discolored, carefully trim 1/2 inch and re-strip using wire strippers. This ensures proper electrical contact.
- Completely remove the old switch: Once all wires are free, pull the switch fully out. Dispose of it responsibly—many retailers accept old switches for recycling.
Throughout removal, handle wires gently to avoid damaging insulation or strands. Damaged wire requires re-stripping, which shortens the conductor—if you don’t have enough length after stripping, you may need a wire extension (a short piece of wire spliced in with a wire nut). Planning ahead prevents this complication.
Installing Your New Switch
Installation mirrors removal in reverse, but requires precision. Begin by examining your new switch’s terminal markings. Most modern switches have brass terminals (for hot wires) and a silver terminal (for neutral), plus a green screw for ground. Consult your switch’s instructions—they specify which wires connect where.
For a standard single-pole switch, follow this sequence:
- Connect the ground wire: The bare copper or green wire connects to the green ground screw. Create a hook-shaped bend at the wire’s end using needle-nose pliers. Slip this loop under the green screw terminal, then tighten clockwise until snug. Never over-tighten—you risk breaking the screw.
- Connect the neutral wire: The white wire connects to the silver terminal (if your switch has one). Again, form a hook, position it under the screw, and tighten gently. Some switches lack a neutral terminal; if so, the white wire connects directly to the box or doesn’t connect to the switch at all—check instructions.
- Connect the hot wire: The black wire connects to a brass terminal. Form a hook, position it, and tighten. If your switch has two brass terminals, both might be active (for specific configurations), or one might be labeled. Follow instructions precisely.
- Verify all connections: Gently tug each wire to confirm it’s secure. Loose connections cause flickering, heat, and fire risk.
When all wires are connected, carefully push the switch back into the electrical box. The wires should fold neatly without excess bunching. If wires seem cramped, you may have extra length—coil excess gently inside the box, but never force the switch. Forcing risks damaging wires or connections. Once seated, align the switch with the box opening and install the two mounting screws, tightening evenly.
Attach the cover plate last, inserting the screw through its center hole and into the switch’s center screw hole. Tighten snugly—over-tightening can crack plastic plates.
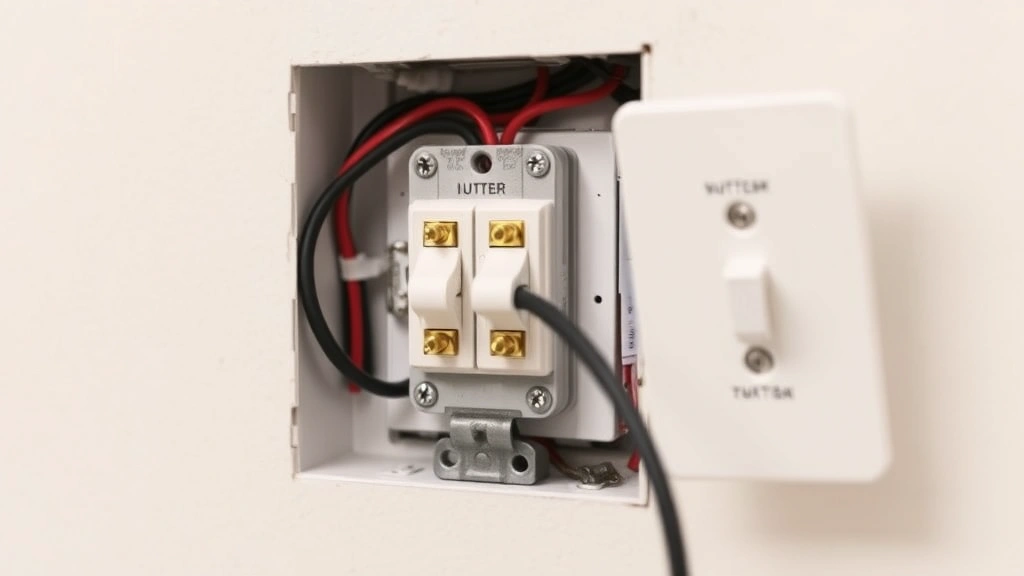
” alt=”New light switch properly installed in wall box with wires correctly positioned and cover plate attached”>
Testing and Troubleshooting
Before declaring victory, restore power to the circuit. Return to your breaker panel and flip the breaker to ON. Listen for any unusual sounds and smell for burning odors—both indicate problems requiring immediate attention (turn power back off and investigate).
Test your new switch by flipping it multiple times. The light should respond immediately and consistently. If nothing happens, turn power off and check all wire connections—loose terminals are the most common culprit. Verify you connected wires to correct terminals by reviewing your switch’s documentation and comparing against the old switch’s configuration.
If the light flickers or dims inconsistently, loose connections are again likely. Tighten all terminal screws slightly. If flickering persists, the switch itself may be defective—replacement switches are inexpensive, so swapping it is reasonable troubleshooting.
Some switches include indicator lights or test buttons (especially GFCI switches). Verify these function as expected. Refer to the manufacturer’s instructions for specific testing procedures—different switch types have different requirements.
If you’re replacing a standard switch with a dimmer switch, note that not all fixtures are dimmer-compatible. LED bulbs, in particular, may flicker or not dim smoothly with older dimmers. Ensure your dimmer is rated for your bulb type and wattage. The packaging specifies compatibility—verify before installation.
Common Mistakes to Avoid
Forgetting to turn off power: This is the most dangerous mistake. Always de-energize the circuit before touching wires. No exception.
Reversing hot and neutral connections: Connecting black to the neutral terminal or white to a hot terminal creates shock hazards and may damage fixtures. Double-check wire colors before connecting.
Over-tightening terminal screws: Excessive force breaks screws or crushes wire insulation, causing short circuits. Snug is sufficient.
Leaving wire insulation damaged: If you nick the insulation during removal, re-strip that section. Exposed copper touching the box or other wires causes shorts.
Installing the wrong switch type: A three-way switch won’t work in a single-pole location, and vice versa. Match the switch type exactly.
Ignoring local electrical codes: Some jurisdictions require permits for electrical work or mandate professional installation. Check with your local building department or home inspector association before starting. Unpermitted work may void insurance or complicate future home sales.
Failing to test before finishing: Always verify the switch works before reinstalling the cover plate. Catching issues early saves time.
Related home improvement projects like DIY car repairs share similar principles: preparation, proper tools, and attention to detail prevent costly mistakes. The same mindset applies to electrical work—respect the task, follow procedures, and don’t rush.
Frequently Asked Questions
Can I replace a switch while the power is on?
Absolutely not. Always turn off power at the breaker panel and verify de-energization with a voltage tester. Working on a live circuit risks electrocution, severe burns, and cardiac arrest.
What if I can’t identify which breaker controls my switch?
If your breaker panel isn’t labeled, flip breakers one at a time and test the light. Once you find the correct breaker, label it for future reference using a label maker or waterproof tape. This prevents others from accidentally restoring power during maintenance.
Is it safe to replace switches in a home with aluminum wiring?
Aluminum wiring requires specialized knowledge. The metal oxidizes differently than copper, affecting connection reliability and fire risk. If your home has aluminum wiring (common in 1960s–1970s construction), consult a licensed electrician before attempting any electrical work.
Do I need a permit to replace a light switch?
Permit requirements vary by jurisdiction. Some areas require permits for all electrical work; others allow homeowner maintenance without permits. Contact your local building department to verify requirements. Even if permits aren’t legally required, following code standards protects your home’s safety and resale value.
My new switch doesn’t have a neutral terminal—what do I do?
Some switches (particularly older designs or certain smart switches) don’t require a neutral connection. If your switch instructions indicate the white wire shouldn’t connect to the switch, leave it disconnected from the switch itself. It may connect directly to the electrical box or another component. Never force a neutral wire into a non-neutral terminal.
Can I install a dimmer in any light socket?
Not all fixtures are dimmer-compatible. Incandescent and halogen bulbs work with most dimmers, but LEDs require special dimmers rated for LED compatibility. Check your dimmer’s specifications and bulb packaging before installation. Using incompatible combinations causes flickering or premature bulb failure.
What causes a newly installed switch to spark or smoke?
Sparking or smoking indicates a serious problem—immediately turn off power at the breaker. Causes include reversed hot/neutral connections, loose wires creating arcing, or a defective switch. Do not attempt to use the switch. Inspect all connections carefully, and if you can’t identify the problem, contact a licensed electrician.
Should I caulk around the switch plate after installation?
In most residential settings, caulking around switch plates isn’t necessary and can trap moisture. However, if your switch is near water sources (bathrooms, kitchens), some builders prefer caulking for aesthetic reasons. Use paintable caulk and avoid blocking ventilation holes. Check your local building codes—some require specific practices in wet areas.


