
DIY Birdhouse: Carpenter’s Guide to Cheer Up
Building a birdhouse is more than just a woodworking project—it’s a meaningful way to bring joy into your life and create a welcoming habitat for feathered friends. Whether you’re looking for a rewarding hands-on activity to lift your spirits or seeking a thoughtful gift for someone who loves nature, constructing a birdhouse combines practical carpentry skills with the therapeutic benefits of DIY craftsmanship. This comprehensive guide walks you through every step of the process, from selecting materials to installing your finished creation.
The beauty of birdhouse building lies in its accessibility to builders of all skill levels. You don’t need an elaborate workshop or expensive equipment—just basic tools, quality lumber, and a commitment to creating something meaningful. As you measure, cut, and assemble each component, you’ll discover that the meditative nature of woodworking can be genuinely uplifting. Plus, watching birds discover and inhabit your creation provides lasting emotional rewards that extend far beyond the initial construction phase.
Understanding Birdhouse Basics and Benefits
Before you pick up a saw, it’s important to understand why birdhouses matter and how they benefit both birds and builders. A well-designed birdhouse provides essential shelter for nesting birds, helping populations thrive in urban and suburban environments where natural cavities become scarce. For you, the builder, this project offers psychological benefits: creating something functional with your own hands boosts confidence, provides a sense of accomplishment, and connects you to nature in a tangible way.
Different bird species require different birdhouse specifications. The entrance hole size, interior dimensions, and mounting height all vary based on which birds you want to attract. This variability means you can customize your project based on local bird populations and personal preferences. Whether you’re building for chickadees, bluebirds, wrens, or woodpeckers, the fundamental construction principles remain consistent, making this an excellent gateway project into more advanced woodworking.
The therapeutic aspect of birdhouse building shouldn’t be underestimated. Engaging in a structured, creative project provides mental health benefits that can genuinely help when you’re feeling down. The combination of physical activity, problem-solving, and visible progress creates a natural mood boost. When you finally see a bird enter your creation, that moment of success provides genuine joy and satisfaction.

Selecting the Right Wood and Materials
Choosing appropriate materials is crucial for both durability and bird safety. Cedar and pine are excellent choices for birdhouse construction due to their natural rot resistance and workability. Avoid pressure-treated lumber, which contains chemicals harmful to birds. Eastern red cedar offers the best combination of durability and safety, though it costs more than pine. If budget is a concern, untreated pine works adequately when properly sealed.
For a basic birdhouse, you’ll need:
- One board measuring 1″ × 8″ × 8′ (cedar or pine)
- Stainless steel or galvanized screws (1.5″ length)
- Exterior wood sealant or paint (bird-safe formulas only)
- Sandpaper (80, 120, and 220 grit)
- Wood filler for gaps and imperfections
Avoid wood treated with creosote or pentachlorophenol, as these compounds pose serious health risks to birds. When purchasing lumber, inspect for warping, knots, and damage. Quality materials ensure your birdhouse lasts multiple seasons and provides reliable shelter. The investment in better materials pays dividends through longevity and performance.
Hardware selection matters more than many builders realize. Stainless steel fasteners resist corrosion better than standard galvanized options, particularly in wet climates. Use screws rather than nails for superior holding power and easier disassembly during maintenance. Avoid using staples or thin wire, which fail prematurely under weather stress.
Essential Tools for the Job
You don’t need an expensive tool collection to build a quality birdhouse. Basic carpentry tools suffice for this project. At minimum, gather:
- Circular saw or miter saw for crosscutting
- Drill with bits (including spade bits for entrance holes)
- Measuring tape and combination square
- Pencil for marking
- Screwdriver or impact driver
- Sandpaper and sanding block
- Clamps for holding pieces during assembly
- Safety glasses and dust mask
If you don’t own these tools, consider renting from a local hardware store or home improvement center. Many retailers offer affordable daily rental rates for power tools. This approach lets you complete the project without the capital investment of purchasing equipment you might not use regularly.
Safety equipment deserves special attention. Always wear safety glasses when cutting and drilling, and use a dust mask to protect your respiratory system. Hearing protection is important when operating power tools for extended periods. Keep your work area clean and well-lit, and ensure clamps secure your workpiece firmly before cutting or drilling.
Detailed Construction Steps
Now for the hands-on part that brings your birdhouse to life. Start by cutting your lumber to these dimensions:
- Front/Back: Two pieces at 7.5″ length
- Sides: Two pieces at 8″ length
- Bottom: One piece at 5″ × 5″
- Roof: Two pieces at 5″ × 7″ and 6″ × 7″
Begin by sanding all pieces with 80-grit sandpaper to remove splinters and rough edges. This step is critical for bird safety—splinters can injure delicate feet and feathers. Progress to 120-grit, then finish with 220-grit for a smooth, professional surface.
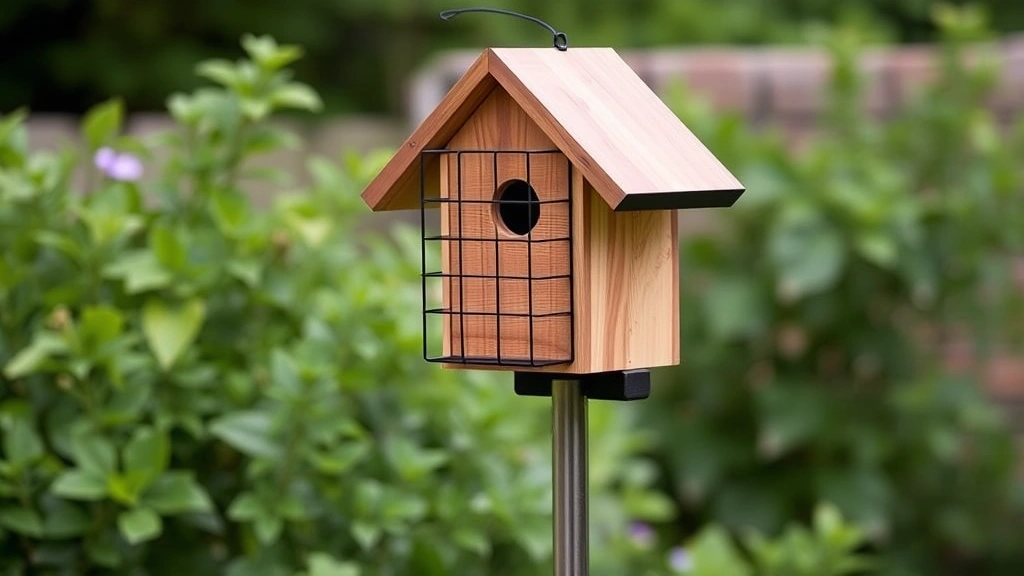
Cut your entrance hole using a spade bit matched to your target species. A 1.25″ hole suits chickadees and wrens, while 1.5″ works for bluebirds. Position this hole 2 inches from the top of the front panel, ensuring it’s perfectly centered. Drill slowly to prevent splintering on the exit side—backing boards with scrap wood helps minimize tear-out.
Assembly follows next. Arrange your front and back panels with sides between them, creating a rectangular frame. Apply wood glue to all joining surfaces, then drive screws through the sides into the front and back panels. Use two screws per joint for maximum strength. Ensure corners are square by measuring diagonally—both measurements should be identical.
Attach the bottom piece last, leaving small gaps (about 1/8 inch) in corners for drainage and ventilation. These gaps are essential for preventing water accumulation and mold growth inside the birdhouse. Drill several small drainage holes if gaps prove insufficient.
The roof assembly requires attention to detail. Attach the larger roof piece to the back panel with a slight overhang (about 1 inch) to shed water away from the entrance. The smaller piece overlaps the larger one, creating a peaked roof that provides superior weather protection. Ensure the roof angles slightly forward to direct rainwater away from the entrance hole.
Finishing and Weatherproofing Your Birdhouse
Proper finishing protects your birdhouse from the elements while maintaining safety for its avian occupants. Choose bird-safe exterior finishes exclusively. Avoid creosote, pentachlorophenol, or any finish containing heavy metals. Look for water-based polyurethane or exterior wood stain formulated specifically for wildlife structures.
Sand the entire assembled birdhouse with 220-grit paper, removing dust with a tack cloth before finishing. Apply your chosen sealant according to manufacturer instructions, typically two coats with adequate drying time between applications. Ensure you coat all exterior surfaces, including the roof and underside, while avoiding the interior cavity.
For enhanced protection in harsh climates, consider painting with exterior latex paint in neutral earth tones. Browns, tans, and greens help the birdhouse blend into its surroundings while providing excellent weatherproofing. Never paint the interior, and avoid bright colors that might attract predators or interfere with bird behavior.
Install a small hinged access door on one side for cleaning and monitoring. This feature transforms your birdhouse from a static structure into a practical management tool. Stainless steel hinges and a simple hook-and-eye latch provide secure closure while remaining easy to operate. If you’re new to carpentry, this addition can be saved for future versions as you build experience.
Installation and Placement Guidelines
Where you mount your birdhouse significantly impacts whether birds will adopt it. Height and exposure matter tremendously. Most species prefer mounting 5-15 feet high on trees or poles, though specific recommendations vary by species. Check local Audubon Society resources for your region’s bird preferences.
Face the entrance hole away from prevailing winds and direct afternoon sun. This orientation protects nestlings from weather extremes and reduces heat stress. Ensure the birdhouse has some shelter from nearby branches or structures while maintaining clear sight lines for parent birds to monitor for predators.
Avoid mounting birdhouses on metal poles without predator guards, as snakes and raccoons easily climb unprotected poles. Install predator guards per U.S. Fish and Wildlife Service guidelines—typically 4-6 foot sections of smooth PVC pipe or metal baffles positioned below the birdhouse.
When mounting to trees, use non-damaging hardware that won’t girdle the trunk. Flexible straps or brackets designed specifically for birdhouse installation prevent bark damage while securing the structure firmly. Avoid nailing directly into living trees, which creates entry points for disease and pest damage.
Consider installing multiple birdhouses if you have suitable habitat. Space them 25+ feet apart to prevent territorial conflicts between nesting pairs. Staggering entrance hole sizes allows different species to coexist in the same general area without direct competition.
Maintenance and Long-Term Care
Your birdhouse requires regular maintenance to remain functional and safe. Clean annually after nesting season concludes, typically in late summer or early fall. Open your access door and remove old nesting material, which may harbor parasites or disease organisms. Discard all contents—never attempt to reuse old nesting materials.
Inspect for damage during cleaning. Check for cracks, rot, loose screws, and deteriorating finish. Sand any rough spots and reapply finish as needed. Replace damaged roof sections or rotted wood before the next nesting season begins. This maintenance schedule extends birdhouse lifespan to 10+ years.
Monitor for pest problems like wasps, ants, or mites. While some species are harmless, infestations can harm nesting birds. If problems arise, consult local extension services for species-specific guidance before taking action.
Document bird activity throughout the season if you’re inclined toward citizen science. Recording nesting dates, clutch sizes, and fledging success contributes valuable data to conservation efforts. This engagement deepens your connection to the project and supports broader understanding of local bird populations.
For those interested in expanding your DIY skills, check out our DIY Nests Hub Blog for additional woodworking projects. You might also explore DIY basement finishing or DIY home security projects that share similar construction principles. If you’re looking for other ways to stay productive, consider our guide on how to change your oil or explore DIY car repairs for additional hands-on learning opportunities.
Frequently Asked Questions
What’s the best time of year to build a birdhouse?
Build birdhouses during winter or early spring, ideally 4-6 weeks before local nesting season begins. This timing ensures your structure is weathered and ready when birds start seeking nesting sites. In most temperate regions, this means completing construction by March or April.
Can I paint my birdhouse bright colors?
While bright colors might appeal to you aesthetically, birds prefer natural earth tones. Bright colors can attract predators and may interfere with bird behavior. Stick to browns, tans, greens, or leave natural wood exposed. This approach protects your feathered residents while maintaining an attractive appearance.
How do I prevent sparrows from taking over my birdhouse?
House sparrows are aggressive competitors. If they’re problematic in your area, reduce entrance hole size to 1.125 inches, which excludes sparrows while accommodating smaller native species. Alternatively, mount birdhouses in open areas rather than near buildings where sparrows congregate.
Should I install a perch below the entrance hole?
No—avoid adding perches. Perches actually help predators and aggressive species like house sparrows access the entrance. Native cavity-nesting birds don’t require perches and nest successfully without them. Omitting perches improves predator resistance and reduces competition from unwanted species.
What should I do if birds aren’t using my birdhouse?
Several factors could discourage occupancy: wrong entrance hole size for local species, poor mounting location, insufficient shelter, or predator pressure. Research your specific region’s bird preferences, ensure adequate height and exposure, provide nearby vegetation for protection, and install predator guards. Be patient—it may take multiple seasons for birds to discover and trust your structure.
Can I use pressure-treated lumber for birdhouses?
Absolutely not. Pressure-treated lumber contains toxic compounds harmful to birds. Always use untreated cedar, pine, or other natural woods. If cost is a concern, untreated pine works adequately when sealed properly with bird-safe finishes.
How often should I clean my birdhouse?
Clean annually after nesting season concludes, typically late August through September. Some species raise multiple broods per season, so avoid cleaning during active nesting. If you notice problems like pest infestations or disease signs during the season, consult local wildlife experts before intervening.
What mounting hardware is safest for trees?
Use flexible straps or brackets designed specifically for birdhouse installation. These distribute pressure evenly and prevent bark damage. Avoid nailing directly into living trees, which creates entry points for disease and pests. For pole mounting, use sturdy brackets with predator guards positioned below the structure.


