How to Clean Bathtub Jets: The Plumber-Recommended Method
Jetted bathtubs provide a luxurious spa-like experience right in your own home, but they require regular maintenance to function properly and safely. Over time, mineral deposits, soap residue, bacteria, and mold can accumulate inside the jet nozzles and internal plumbing lines, reducing water pressure and potentially creating health hazards. Many homeowners don’t realize that neglected bathtub jets can harbor harmful microorganisms and become breeding grounds for biofilm, which can affect water quality and cause unpleasant odors.
Professional plumbers consistently recommend a systematic cleaning approach that addresses both visible debris and hidden buildup within the jet system. This comprehensive guide walks you through the exact methods that licensed professionals use to restore your bathtub jets to like-new condition, ensuring optimal performance and hygiene for your family. Whether you have air jets, water jets, or a combination system, these proven techniques will help you maintain your investment and extend the lifespan of your bathtub.

Understanding Your Bathtub Jet System
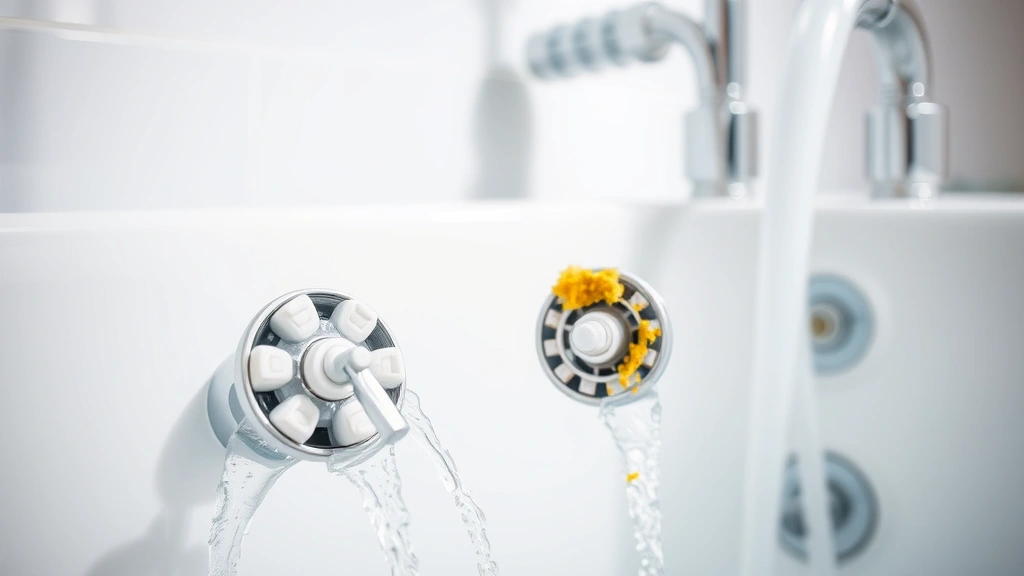
Before diving into cleaning procedures, it’s important to understand how bathtub jets actually work. Most modern jetted bathtubs contain either air jets, water jets, or a hybrid system. Water jets draw water directly from the tub and force it through nozzles at high pressure, while air jets mix air with water to create a gentler massage effect. Both systems have internal pipes and chambers that are hidden from view but absolutely critical to performance.
The internal pathways of your jet system are particularly vulnerable to contamination because they remain moist and dark—ideal conditions for bacterial growth and biofilm formation. According to research from the CDC, improperly maintained hot tubs and jetted baths can harbor dangerous pathogens including Legionella, Pseudomonas, and various fungi. This makes regular cleaning not just a maintenance issue but a genuine health concern for you and your family.
Understanding whether you have a self-contained jet system (where jets operate independently) or an integrated system (where jets share the main water supply) will determine which cleaning method works best for your situation. Check your bathtub’s manual or manufacturer documentation to identify your specific system type before proceeding.

Essential Tools and Materials
Gathering the right supplies before you start ensures an efficient and effective cleaning session. You don’t need expensive commercial products—many of the most effective solutions are common household items that are both safe and economical. Here’s what professional plumbers recommend keeping on hand:
- White vinegar (distilled, 5% acidity) – the primary cleaning agent for mineral deposits
- Baking soda – gentle abrasive and deodorizer for stubborn residue
- Enzymatic drain cleaner – breaks down organic matter without harsh chemicals
- Dish soap – mild surfactant for general cleaning
- Soft-bristled brush – for cleaning visible nozzles without causing damage
- Small pipe cleaner or dental floss – for clearing jet openings
- Rubber gloves – protection for your hands during cleaning
- Safety glasses – essential when working with cleaning solutions
- Measuring cup – for precise solution ratios
- Spray bottle – for applying solutions to specific areas
According to the Plumbers Union, many professionals prefer enzymatic cleaners over harsh chemical solutions because they’re safer for your plumbing system and better for the environment while remaining highly effective against biofilm.
The Vinegar Soak Method
The vinegar soak is the most popular plumber-recommended technique for cleaning bathtub jets, and it’s remarkably effective for removing mineral deposits and mild bacterial growth. This method leverages the natural acidity of vinegar to dissolve calcium, lime, and other mineral buildup that restricts water flow through the jets.
Step-by-step process:
- Fill your bathtub with hot water until all jets are submerged, typically about 3/4 full
- Add 2 cups of white distilled vinegar directly to the water
- Turn on the jets and let them run for 15-20 minutes to distribute the vinegar solution through the internal plumbing
- Turn off the jets and let the solution soak for 30-60 minutes (longer for heavily soiled systems)
- Run the jets again for another 10-15 minutes to flush out loosened debris
- Drain the tub completely
- Refill with clean water and run jets for 5 minutes to rinse thoroughly
- Repeat the rinse cycle one more time to ensure all vinegar smell is eliminated
The beauty of the vinegar method is that it’s non-toxic, inexpensive, and won’t damage rubber seals or internal components. However, if your water is extremely hard or your jets haven’t been cleaned in years, you may need to repeat this process 2-3 times for optimal results. Many plumbers suggest doing a vinegar soak monthly as preventive maintenance.
Enzymatic Cleaner Approach
For more stubborn biofilm and bacterial buildup, enzymatic cleaners offer superior performance compared to vinegar alone. These products contain natural enzymes that literally digest organic matter, breaking down the protective barriers that bacteria use to survive. This method is particularly effective if you notice persistent odors or discoloration in your jets.
Enzymatic cleaners are specifically formulated for plumbing systems and are gentler than commercial drain cleaners. The International Code Council recognizes enzymatic treatments as appropriate for residential plumbing maintenance when used according to manufacturer instructions.
Enzymatic cleaning procedure:
- Select a high-quality enzymatic cleaner designed specifically for jetted tubs (many are available at hardware stores)
- Fill the tub with hot water to cover all jets
- Add the enzymatic cleaner according to product instructions (dosages vary by brand)
- Run the jets continuously for 20-30 minutes to circulate the enzyme solution
- Allow the solution to work by letting it sit for 2-4 hours (or overnight for severe buildup)
- Run the jets again for 15 minutes to flush out dissolved debris
- Drain completely and refill with clean water
- Run jets for 10 minutes to rinse thoroughly
- Repeat the rinse cycle until you detect no residual odor or taste from the cleaner
The enzymatic approach works exceptionally well when combined with vinegar. Many professional plumbers use the vinegar soak first to remove mineral deposits, then follow with an enzymatic treatment to address biological contamination. This one-two approach provides comprehensive cleaning that addresses both chemical and biological issues.
Deep Cleaning with Baking Soda
Baking soda serves multiple functions in jet cleaning: it acts as a mild abrasive, neutralizes odors, and can help break down stubborn residue that vinegar alone cannot address. This method is particularly useful for visible jet nozzles and external surfaces, though it can also be incorporated into the soaking process for enhanced results.
Baking soda deep clean method:
- Create a paste by mixing baking soda with water (approximately 3 parts baking soda to 1 part water)
- Using a soft-bristled brush, scrub the visible jet nozzles with the paste in circular motions
- Pay special attention to the edges and crevices where debris accumulates
- For stubborn buildup, let the paste sit on nozzles for 10-15 minutes before scrubbing
- Use a pipe cleaner or old toothbrush to gently clear any openings
- Rinse thoroughly with clean water
- For internal deep cleaning, fill the tub with hot water and add 1 cup of baking soda
- Run the jets for 15 minutes, then soak for 30 minutes
- Run jets again for 10 minutes and drain completely
- Refill and run jets one final time to remove all baking soda residue
Professional plumbers often recommend combining all three methods—vinegar, enzymatic cleaner, and baking soda—for maximum effectiveness. Start with vinegar to address minerals, follow with enzymatic treatment for biological matter, and finish with baking soda for any remaining residue and odor control.
For those interested in broader DIY cleaning strategies, many of these same principles apply across different household systems.
Preventing Future Buildup
The most effective approach to jet maintenance is prevention through regular cleaning schedules. Rather than waiting until problems develop, establishing a consistent routine keeps your system running smoothly and reduces the need for intensive deep cleaning sessions.
Recommended maintenance schedule:
- Weekly: After using jets, run them for 5 minutes with hot water only to flush out any debris
- Bi-weekly: Run a quick vinegar cycle (1 cup vinegar in full tub, jets on for 10 minutes)
- Monthly: Perform a full vinegar soak as described in section three
- Quarterly: Complete a deep enzymatic cleaning treatment
- Annually: Conduct a comprehensive cleaning combining all methods
Additional preventive measures include maintaining proper water chemistry if your tub has circulation features, ensuring adequate ventilation to prevent mold growth, and addressing any water quality issues in your home. Hard water requires more frequent cleaning, so if you have mineral-rich water, consider installing a water softening system or increasing your cleaning frequency.
Many homeowners overlook the importance of routine home maintenance across all systems, but bathtub jets are particularly sensitive to neglect. Treating them with the same care you’d give other plumbing fixtures ensures years of reliable performance.
When to Call a Professional
While these DIY methods handle most cleaning situations effectively, certain problems require professional intervention. Licensed plumbers have specialized equipment and expertise that exceeds what’s practical for homeowner maintenance.
Call a plumber if you experience:
- Complete loss of water pressure in jets despite multiple cleaning attempts
- Persistent foul odors that don’t improve after enzymatic treatment
- Visible contamination or discoloration that suggests serious bacterial growth
- Water backing up or draining slowly from the tub
- Leaks or water seeping from beneath the tub
- Unusual noises coming from the jet system during operation
- Evidence of mold growth inside jet openings that won’t respond to cleaning
Professional plumbers can perform high-pressure flushing of internal jet lines, access hidden components for inspection, and use specialized antibacterial treatments that aren’t available to consumers. They can also identify whether your jet system has underlying issues that require repair or replacement rather than just cleaning.
The cost of professional cleaning typically ranges from $200-$500 depending on system complexity and the severity of buildup, which many homeowners find reasonable insurance against the $3,000+ cost of replacing a damaged jet system.
FAQ
How often should I clean my bathtub jets?
Professional plumbers recommend a full vinegar soak monthly, with quick weekly flushes after each use. If you use your jets daily or have hard water, increase frequency to bi-weekly deep cleaning. The exact schedule depends on usage patterns, water quality, and how quickly you notice reduced performance.
Is it safe to use bleach in my jet system?
No. Bleach can damage rubber seals, corrode internal components, and create dangerous chemical reactions if it mixes with other cleaning products. Stick to vinegar, baking soda, and enzymatic cleaners specifically designed for plumbing systems. The Plumbing Connection explicitly warns against bleach in jetted tub systems.
Can I use CLR or other commercial descalers?
While some commercial descalers work on mineral deposits, they can be harsh on rubber components and internal seals. If you choose to use them, dilute heavily and run jets for only 10 minutes maximum. Vinegar is gentler and nearly as effective, making it the preferred choice for regular maintenance.
What if my jets still smell bad after cleaning?
Persistent odors suggest stubborn biofilm or bacterial growth that requires enzymatic treatment. If smell persists after an enzymatic soak, the problem may be in hidden areas unreachable by DIY methods, warranting professional service. Don’t use your jets if they smell bad—this indicates potential health hazards.
How do I know if my jet system is air or water jets?
Water jets produce a strong, focused stream and typically have larger openings. Air jets produce gentler, bubbling sensations and appear smaller. Check your bathtub manual or look at your system specifications. Some tubs have both types working together.
Will vinegar damage my tub’s finish?
No. The diluted vinegar solution used in cleaning won’t harm acrylic, fiberglass, or porcelain finishes. The 2-cup ratio in a full tub creates a very mild solution. However, always rinse thoroughly afterward to prevent any lingering vinegar smell.
Can I run the jets with just water to clean them?
Running jets with plain hot water helps flush loose debris but won’t dissolve mineral deposits or kill bacteria effectively. It’s useful as a quick weekly maintenance step but insufficient for thorough cleaning. Combine water flushing with chemical or enzymatic treatments for best results.
Is it normal for jets to lose pressure over time?
Yes, gradual pressure reduction is normal as mineral deposits accumulate. However, if you notice significant pressure loss within months of cleaning, or if pressure doesn’t improve after cleaning, contact a plumber to check for internal problems like clogged lines or failing pump components.


