
How to Clean Vornado Fan: Expert-Backed Guide for Peak Performance
Vornado fans are engineered marvels known for their powerful air circulation and distinctive vortex technology. However, like all mechanical devices, they require regular maintenance to operate efficiently and safely. Dust accumulation on fan blades, motor components, and intake vents can reduce airflow by up to 30%, forcing your fan to work harder and consume more energy. Understanding how to clean a Vornado fan properly ensures longevity, maintains performance, and prevents potential safety hazards associated with dust buildup near electrical components.
This comprehensive guide walks you through every step of cleaning your Vornado fan, from initial disassembly to reassembly and testing. Whether you own a tower fan, box fan, or pedestal model, these techniques apply across Vornado’s product line. We’ll cover safety protocols, recommended tools, and maintenance schedules to keep your fan running like new.
Safety Precautions Before Cleaning
Before touching any part of your Vornado fan, unplug it from the electrical outlet. This is non-negotiable. Even though the fan isn’t running, residual electrical charge can cause injury. Wait at least five minutes after unplugging to allow any capacitors to fully discharge. Never attempt to clean a fan while it’s plugged in, even if you believe it’s off.
Work in a well-lit area with plenty of space. Disassembling a fan creates small parts that can easily get lost. Consider laying out a clean cloth or towel to organize screws, clips, and other components in the order you remove them. This prevents confusion during reassembly and ensures no parts are forgotten.
Wear safety glasses to protect your eyes from dust particles and debris. If you have respiratory sensitivities, wear a dust mask rated N95 or higher. Dust from fans can contain allergens, pet dander, and microscopic particles that irritate lungs and sinuses. Ensure your workspace has good ventilation, and consider cleaning your fan outdoors if possible.
Consult your Vornado fan’s user manual before beginning. Different models have slightly different disassembly procedures. Vornado’s official website provides model-specific documentation and customer service support if you encounter issues.
Tools and Supplies You’ll Need
Gathering the right tools before starting prevents frustration and ensures thorough cleaning. Here’s a complete checklist:
- Screwdriver set: Phillips and flathead in multiple sizes. Most Vornado fans use Phillips head screws, but having options ensures compatibility.
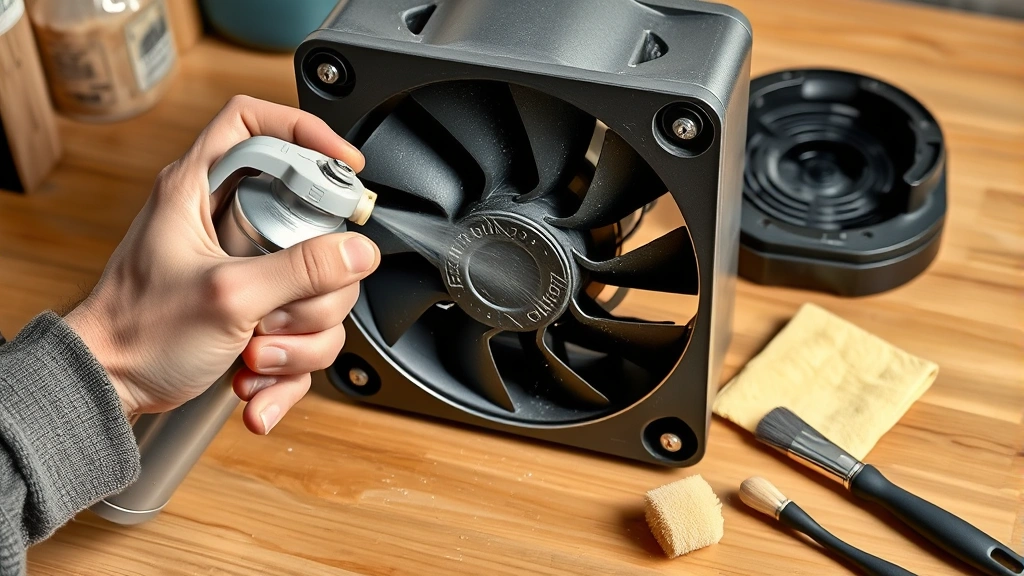
- Compressed air canister: An invaluable tool for blowing dust from tight spaces and motor vents without disassembling further. Look for OSHA-approved compressed air systems that meet safety standards.
- Soft-bristled brushes: Old toothbrushes work excellently for cleaning blade edges and crevices. Avoid stiff wire brushes that can scratch plastic components.
- Microfiber cloths: These trap dust effectively without scratching surfaces. Regular cotton towels leave lint behind.
- Mild detergent solution: Mix a few drops of dish soap with warm water. Avoid harsh chemicals that damage plastic or electrical components.
- Cotton swabs: Perfect for cleaning around motor bearings and electrical contacts without introducing moisture to sensitive areas.
- Vacuum with brush attachment: Captures loose dust efficiently, though compressed air is preferable for electrical components.
- Container for small parts: A shallow dish or magnetic tray keeps screws and clips organized.
[IMAGE_1]
Step-by-Step Disassembly Process
Proper disassembly is crucial for accessing all cleaning areas. Start by locating all fasteners holding your fan together. Vornado fans typically have screws on the rear housing, sometimes hidden under rubber feet or stickers.
Step 1: Remove the front grille. Most Vornado models feature a snap-on or screw-secured front grille. Gently pry the grille away from the housing using a plastic spoon or flathead screwdriver wrapped in cloth. This prevents scratching. If screws are present, remove them and set them aside in your parts container. Take a photo of the grille’s orientation before removal to simplify reinstallation.
Step 2: Disconnect the blade assembly. Once the grille is off, you’ll see the fan blades. Some models have a center nut or bolt holding the blade assembly to the motor shaft. Use the appropriate wrench or socket to loosen this fastener by turning counterclockwise. Note the direction the blade assembly comes off—this matters for correct reassembly. Remove any washers or spacers and keep them organized.
Step 3: Access the housing and motor. Remove screws from the rear panel or base. Vornado fans typically have 4-8 fasteners securing the housing. As you remove each screw, note its location. Different screw lengths may exist, so keeping them separate prevents installation errors. Gently separate the housing halves. If resistance occurs, look for additional hidden fasteners or clips before forcing separation.
Step 4: Document the configuration. Before proceeding further, take multiple photographs of the internal layout, wire routing, and component positions. This visual reference prevents reassembly mistakes and is invaluable if you forget the exact configuration.

Cleaning Fan Blades and Housing
Fan blades accumulate dust that restricts airflow and creates imbalance, causing vibration and noise. Begin by using a soft brush or old toothbrush to gently scrub blade surfaces. Work from the blade root toward the tip, following the blade’s natural contours. Pay special attention to the blade’s trailing edge, where dust accumulates thickly.
For stubborn buildup, dampen your cloth slightly with the mild detergent solution and wipe each blade individually. Ensure you clean both sides—the pressure side and suction side accumulate different dust patterns. Rinse with a clean, damp cloth and dry immediately with a microfiber towel to prevent water spots and rust on metal components.
The front and rear grilles require thorough cleaning since they’re the primary dust entry points. Use compressed air to blow dust from the grille’s mesh pattern, working from inside the fan outward. Follow with a soft brush to dislodge stubborn particles. If the grille is removable, soak it briefly in warm soapy water, scrub gently, rinse thoroughly, and air dry completely before reinstalling.
The housing interior collects dust that doesn’t reach the blades. Use compressed air in short bursts to dislodge this debris, directing it away from electrical components. Work systematically from top to bottom, allowing gravity to help. Follow up with a brush to capture particles that compressed air doesn’t fully remove. A small handheld vacuum with a brush attachment can capture loose dust effectively.
Check the motor housing for dust accumulation around bearing areas. These areas are critical for smooth operation. Use compressed air carefully around these zones, as excessive pressure can force dust deeper into bearings. Cotton swabs slightly dampened with isopropyl alcohol can clean around bearing seals without introducing water that causes corrosion.
Motor and Electrical Component Care
The motor is your fan’s heart, and cleaning it requires caution. Never use water directly on the motor or electrical connections. Moisture and electricity create fire and shock hazards. Instead, rely on compressed air and dry cleaning methods exclusively.
Use short bursts of compressed air to remove dust from motor windings visible through any access points. Angle the air stream to blow dust outward and away from the motor. Avoid prolonged air pressure in one spot, which can force dust deeper into windings or damage delicate components.
Inspect electrical connectors for corrosion, indicated by white or green discoloration. If present, disconnect the wire (if safely accessible and the fan is unplugged) and clean the connector with a cotton swab barely dampened with isopropyl alcohol. Allow complete evaporation before reconnecting. The National Fire Protection Association (NFPA) emphasizes that corrosion in electrical connections increases fire risk, making this step important.
Check the capacitor—a cylindrical component often colored blue, black, or brown. This component stores electrical charge and can cause serious injury if touched improperly, even when unplugged. Never touch the capacitor directly. If dust surrounds it, use compressed air from a distance to blow debris away. If the capacitor shows signs of bulging or leaking, stop cleaning and consult a professional or consider replacement.
Bearing lubrication sometimes requires attention. Consult your manual to determine if your Vornado model has sealed bearings (requiring no maintenance) or oil-port bearings (requiring light lubrication). If oil ports exist, use a single drop of electric motor oil on each port. Never over-lubricate, as excess oil attracts dust and creates sludge that impedes rotation.
Reassembly and Testing
Reassembly is the reverse of disassembly, but proceed methodically. Refer to the photographs you took during disassembly to confirm component positioning and wire routing. Install components in reverse order: housing halves first, then motor assembly, followed by blade assembly, front grille, and final fasteners.
Housing reassembly: Align the housing halves carefully, ensuring no wires are pinched. Insert screws by hand first to ensure they’re threading properly before tightening. Tighten in a crisscross pattern to ensure even pressure distribution, similar to tightening car wheel lugs. Don’t over-tighten, as plastic housings crack under excessive force.
Blade installation: Reinstall the blade assembly on the motor shaft. Replace any washers or spacers in their original positions. Tighten the center bolt or nut by turning clockwise until snug. The blade should rotate freely by hand without wobbling. If it binds or wobbles, disassemble and recheck positioning.
Grille installation: Snap or screw the front grille back into place, ensuring it seats fully. The grille must be secure to prevent vibration noise during operation.
Final inspection: Before plugging in, visually inspect all fasteners, wire connections, and component positions. Ensure no wires are pinched, and all connectors are fully seated. Verify that no tools, screws, or debris remain inside the housing.
Testing: Plug the fan into the outlet and switch it on. Listen for unusual noises—grinding, squealing, or rattling indicate misalignment or missed fasteners. Observe blade rotation to confirm smooth, balanced operation. If vibration occurs, immediately unplug and recheck blade centering and fastener tightness. Run the fan for five minutes on each speed setting to confirm normal operation across all modes.
Maintenance Schedule and Prevention
Preventing dust accumulation is more efficient than deep cleaning. Develop a maintenance routine based on your environment. In dusty conditions (workshops, basements), clean your Vornado fan monthly. In typical home environments, quarterly cleaning suffices. Pet owners should clean monthly due to increased hair and dander accumulation.
Weekly maintenance: Gently vacuum or wipe the grille with a dry cloth to remove surface dust. This takes two minutes and prevents heavy buildup.
Monthly maintenance: Use compressed air to blow dust from the grille and housing exterior. Remove the front grille and use compressed air on internal components. This prevents the need for disassembly.
Quarterly deep cleaning: Perform the complete disassembly and cleaning procedure outlined in this guide. This maintains peak performance and extends fan lifespan by years.
Position your fan strategically to minimize dust intake. Keep it away from open windows, doors, and direct traffic paths. Use ASHRAE standards as guidance for optimal air circulation without excessive dust exposure. In high-dust environments, consider placing the fan in a slightly enclosed area with a pre-filter to trap large particles before they enter the fan.
Store your Vornado fan in a clean, dry location when not in use for extended periods. Cover it with a clean cloth to prevent dust accumulation during storage. Before using it again after storage, perform a quick exterior cleaning and test run.
If you perform similar cleaning tasks on other household items, reference our guides on how to clean vinyl siding for exterior maintenance techniques and how to clean concrete floors for dealing with dusty workshop environments. For those interested in broader home maintenance, our DIY basement finishing guide includes ventilation considerations that impact fan performance.
FAQ
How often should I clean my Vornado fan?
In typical home environments, clean your fan quarterly. Dusty conditions, pet hair, or high-traffic areas warrant monthly cleaning. Weekly grille wipes prevent heavy buildup and reduce deep-cleaning frequency.
Can I use water to clean the motor?
Absolutely not. Water and electricity create fire and shock hazards. Use only compressed air and dry cleaning methods on motors and electrical components. Water is acceptable only for plastic housings and grilles, and only if they’re completely dry before reassembly.
My fan makes a grinding noise after cleaning. What went wrong?
This typically indicates misaligned blades or a loose fastener. Unplug immediately and recheck the blade assembly’s centering on the motor shaft. Verify all housing screws are tight. If grinding persists, a bearing may be damaged and require professional service.
Is it necessary to disassemble my fan completely for cleaning?
Not always. For light dust, grille removal and compressed air application suffice. Deep cleaning requiring blade and housing access justifies complete disassembly. Choose your approach based on dust accumulation severity.
What’s the best lubricant for fan bearings?
Use electric motor oil specifically designed for fan bearings. Never use household oils like WD-40 or cooking oil. Consult your manual for the correct oil type and application points. Many modern Vornado fans have sealed, maintenance-free bearings requiring no lubrication.
Can I clean my Vornado fan in the dishwasher?
No. Only the removable plastic grille might survive dishwasher heat, but hand washing is safer. Never submerge motors, electrical components, or housing assemblies. Hand washing with gentle soap and warm water is the safest approach for plastic parts.
How do I know if my fan’s capacitor is bad?
Signs of a failing capacitor include the fan not starting, running slowly, making humming sounds without spinning, or visible bulging/leaking on the capacitor itself. If you suspect capacitor failure, stop using the fan and consult a professional technician, as capacitor replacement requires electrical expertise.
My Vornado fan still runs slowly after cleaning. What else could be wrong?
Slow operation after cleaning suggests either incomplete debris removal, motor issues, or electrical problems. Verify all internal components are dust-free by repeating the compressed air step. If slowness persists, the motor bearings may be wearing out, requiring professional service or replacement.


