How to Build a Deck: Pro Tips You Need to Know
Building a deck transforms your outdoor living space into a functional entertainment area, but success requires careful planning, proper materials, and meticulous execution. Whether you’re a seasoned DIY enthusiast or tackling your first major project, understanding the fundamentals of deck construction ensures safety, durability, and structural integrity. This comprehensive guide walks you through every phase of deck building, from initial design considerations to final finishing touches.
A well-constructed deck can increase your home’s value, provide years of reliable outdoor enjoyment, and serve as a showcase for your building skills. However, deck building involves working with heavy materials, power tools, and structural components that bear weight and weather exposure. Following best practices and local building codes isn’t just recommended—it’s essential for creating a safe, code-compliant structure that withstands the elements and supports your family for decades.
Planning and Design Fundamentals
Before purchasing a single board or mixing concrete, invest time in comprehensive planning. Start by determining your deck’s purpose—will it serve as a dining area, lounge space, or entertaining platform? This influences size, layout, and load-bearing requirements. Measure your available space carefully, considering sight lines, sun exposure, and proximity to trees or structures. Sketch multiple design options, noting dimensions in feet and inches with precise measurements.
Check local building code requirements before finalizing your design. Most jurisdictions require permits for decks over 30 inches high or exceeding 200 square feet. Building codes specify post spacing, beam sizing, railing requirements, and foundation depth—these aren’t suggestions but legal requirements protecting structural safety. Contact your local building department to obtain specific code requirements, which vary significantly by region and climate.
Consider the deck’s orientation relative to your home. South-facing decks receive maximum sun exposure but may become uncomfortably hot in summer. North-facing decks stay cooler but receive less direct light. East-facing decks provide morning warmth, while west-facing designs catch afternoon rays. Think about shade solutions, privacy screening, and how the deck connects to your home’s existing architecture. A deck that harmonizes with your home’s style and materials enhances curb appeal and resale value.
Create detailed drawings showing top-down views and side elevations. Include post locations, beam placements, ledger board attachment points, and stair details. Calculate load-bearing requirements—standard residential decks must support 40 pounds per square foot of live load plus 10 pounds per square foot of dead load (the deck’s own weight). This affects beam spacing, post sizing, and foundation depth. If you’re uncertain about structural calculations, consult a structural engineer or use established deck design resources that provide tested specifications.
Essential Materials and Tools
Deck construction requires quality materials that withstand outdoor exposure, moisture, temperature fluctuations, and UV radiation. Pressure-treated lumber remains the most affordable option, treated with preservatives to resist rot and insect damage. Exterior-grade composite materials offer lower maintenance and longer lifespan but cost more initially. Tropical hardwoods like ipe or cumaru provide superior durability and natural beauty. Choose materials appropriate for your climate and maintenance preferences—tropical hardwoods work well in humid regions, while composites suit areas with extreme temperature variations.
Essential tools include a circular saw or miter saw for cutting lumber, a power drill for fastening, a level for ensuring proper slopes and alignment, and a tape measure for precise dimensions. A post-hole digger or auger speeds foundation work significantly. Safety equipment—work gloves, safety glasses, dust masks, and hearing protection—protects against injuries. A speed square helps establish proper angles for cuts and measurements. Consider renting specialized equipment like concrete mixers or pneumatic nail guns if undertaking a large project.
Fasteners matter tremendously for deck longevity. Use stainless steel or hot-dipped galvanized screws and bolts that resist corrosion. Avoid regular steel fasteners, which rust and stain wood while weakening structural connections. For ledger board attachment to your home, use approved flashing and bolts rated for the load. Joist hangers, post bases, and metal brackets should match your fastener material to prevent galvanic corrosion—mixing different metals accelerates deterioration.
Foundation and Post Installation
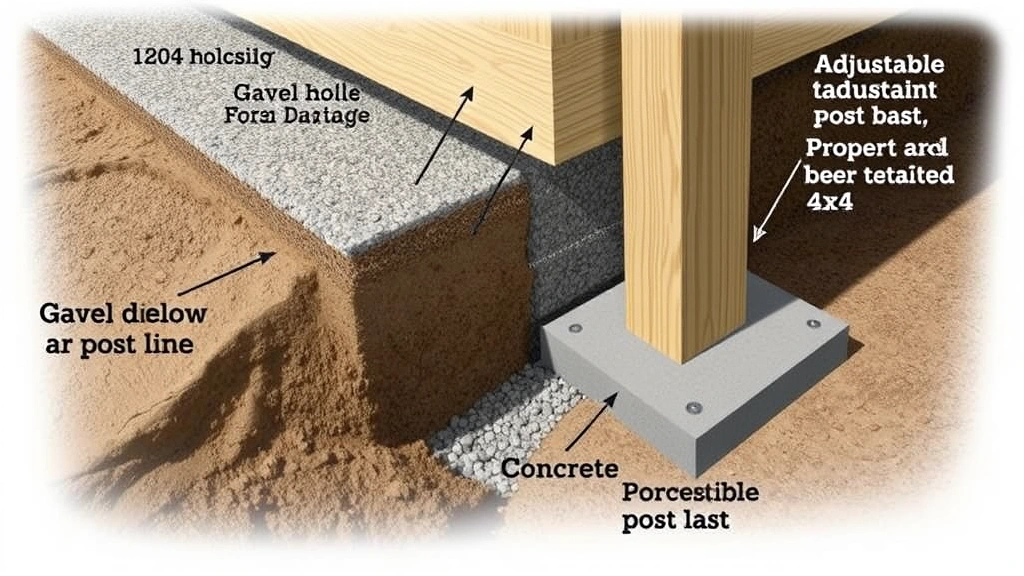
A deck’s foundation determines its stability and longevity. Posts must rest on frost-protected footings that extend below your local frost line—typically 12 to 48 inches depending on climate. Frost heave, caused by freezing and thawing soil, lifts posts and destabilizes the entire structure. Consult your local building department for frost line depth requirements in your area.
Dig post holes at marked locations, extending below the frost line. Use a level to ensure holes are vertical. Place 4 to 6 inches of gravel in each hole for drainage—water pooling around posts accelerates rot. Set concrete footings below grade, then position posts on adjustable post bases or concrete piers that elevate wood above ground level. This prevents direct soil contact and allows air circulation underneath, critical for wood preservation. Posts should be pressure-treated lumber rated for ground contact, typically 4×4 or larger depending on load calculations.
Set posts plumb using a level, checking both directions. Brace posts temporarily with diagonal supports while setting concrete. Mix concrete according to manufacturer instructions and fill holes to ground level or slightly above, creating a slight slope for water drainage. Allow concrete to cure fully—typically 48 hours—before removing braces and beginning frame construction. Improper post installation causes sagging, uneven surfaces, and safety hazards, so invest time in getting this foundation work correct.
For elevated decks, ledger board attachment requires special attention. The ledger board connects your deck to the house rim joist, transferring loads directly into the home’s structure. Install flashing above the ledger board to prevent water intrusion, which causes rot in house framing. Use lag bolts or through-bolts spaced 16 inches apart maximum, fastened to the rim joist or band board—never into band board alone. A flawed ledger attachment is the leading cause of deck collapses, so follow structural attachment guidelines precisely.
Building the Frame Structure
Once posts and ledger boards are securely installed, construct the frame using beams and joists. Beams are primary horizontal members spanning between posts, while joists are secondary members running perpendicular to beams, supporting decking boards directly. Beam size depends on span and post spacing—calculations vary by wood species and load requirements. Standard residential decks typically use doubled 2×8 or 2×10 beams for 12-foot spans, but your specific requirements depend on local codes and design loads.
Install beams using post bases and bolts, ensuring connections are tight and level. Use a water level or laser level to ensure beams are perfectly level—even slight slopes cause water pooling and uneven decking appearance. Space joists 16 inches on-center for 2×6 or 2×8 joists, or 12 inches on-center for 2×4 joists. Closer spacing provides stiffer decking with less bounce. Joist hangers connect joists to beams securely, distributing loads across large bearing surfaces. Install joist hangers with all fasteners specified by the manufacturer—using fewer fasteners significantly reduces load-bearing capacity.
Cantilever design—joists extending beyond the beam—adds visual interest and functional space but requires careful engineering. Generally, cantilevers shouldn’t exceed one-third of the joist span. A joist spanning 12 feet between posts can cantilever only 4 feet maximum. Excessive cantilevers cause uneven settling and structural failure. When in doubt, consult structural plans or a professional engineer to verify cantilever dimensions.
Install rim joists around the deck perimeter, connecting end joists and creating a finished edge. Install blocking between joists at mid-span for longer joists to prevent twisting and increase rigidity. Check the entire frame structure for squareness using diagonal measurements—opposite corners should measure identically. Make adjustments before installing decking, as correcting structural issues later requires removing boards and potentially disassembling the frame.
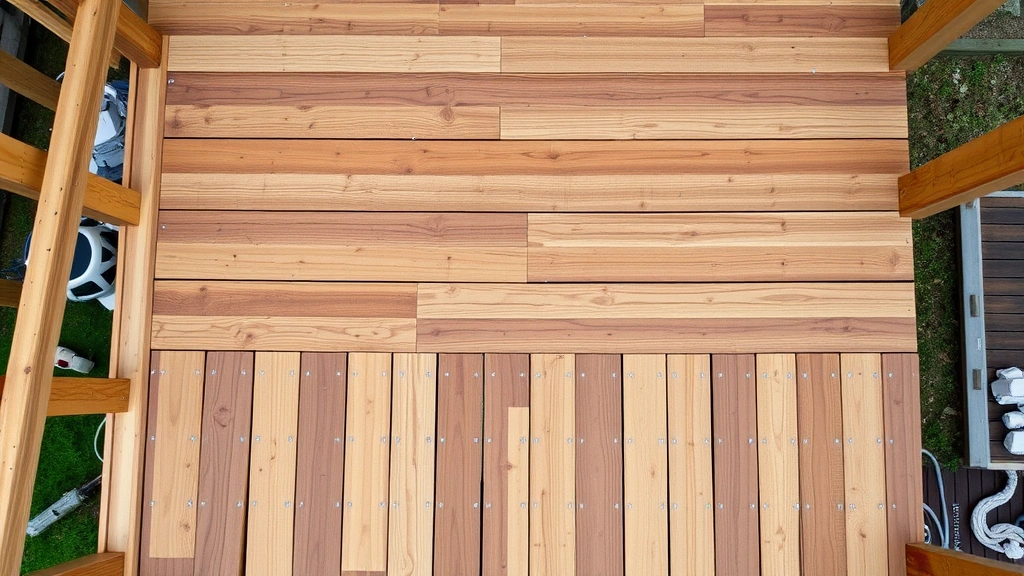
Decking Installation and Finishing
Decking boards are the visible surface, requiring careful installation for appearance, safety, and longevity. Space boards 1/8 inch apart to allow for wood expansion and moisture movement—boards swell when wet, and without spacing, they’ll cup and buckle. Use 1/16-inch spacing for composite materials, which expand more than wood. Install boards perpendicular to joists, using two fasteners per joist for 2×6 boards or three for wider boards, preventing rotation.
Start decking installation from the house side, working toward the deck’s outer edge. This approach ensures the last row aligns properly without narrow slivers. Stagger board joints so they don’t align across consecutive boards—this improves appearance and structural performance. Pre-drill fastener holes in pressure-treated lumber to prevent splitting, especially near board edges. Use corrosion-resistant screws rather than nails, which work loose over time as wood moves with moisture and temperature changes.
Consider your woodworking project experience when selecting decking patterns. Straight installations are simplest but diagonal patterns add visual interest and structural strength. Herringbone and chevron patterns require more cuts and careful planning but create stunning focal points. Whatever pattern you choose, maintain consistent spacing between all boards for professional appearance and proper water drainage.
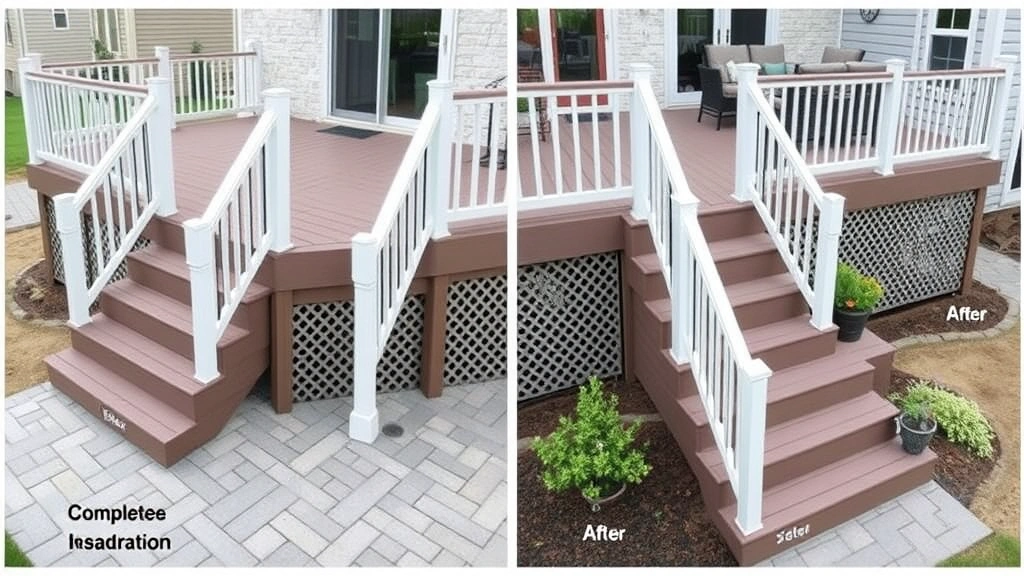
After installing all decking boards, sand the surface to remove splinters and rough spots. Pressure-treated lumber often has raised grain after exposure to weather and moisture. Sanding eliminates this hazard and prepares the surface for finishing. Apply exterior-grade stain or sealant to protect wood from UV damage and moisture penetration. Most finishes require reapplication every 2-3 years for optimal protection. Composite decking requires less maintenance but may need periodic cleaning to prevent algae growth and staining.
Safety Standards and Building Codes
Deck safety depends on adherence to building codes that specify railing requirements, stair dimensions, and load capacities. Railings are required for decks over 30 inches above ground, with specific height, spacing, and strength requirements. Standard railings must be 36-42 inches high, with balusters (vertical supports) spaced no more than 4 inches apart—a sphere 4 inches in diameter shouldn’t pass between balusters. Railings must withstand 200 pounds of horizontal force without failing.
Stairs require specific dimensions for safety and comfort. Stair treads should be 10-11 inches deep, with risers 7-8 inches high. Consistent dimensions on all stairs prevent tripping—variation in step height is a common accident cause. Handrails must be 34-38 inches above stair treads, with 1.5-inch diameter graspable surfaces. Outdoor stairs require non-slip surfaces, especially important in wet conditions. Stair stringers (the angled supports) must be properly sized and securely fastened to prevent movement or collapse.
Before construction begins, obtain necessary building permits and schedule inspections. Most jurisdictions require foundation inspection before frame installation, frame inspection before decking, and final inspection after completion. These inspections ensure code compliance and provide documentation proving the deck was built to standard. Unpermitted decks may require removal, create insurance claims complications, and reduce property resale value. The permit process, while sometimes inconvenient, protects your investment and safety.
Load capacity calculations depend on proper engineering. Standard residential decks are designed for 40 pounds per square foot live load—roughly equivalent to 10 people standing on 100 square feet. Exceeding this capacity risks structural failure. When planning deck use, consider that concentrated loads (like a hot tub) require reinforced framing. Hot tubs typically weigh 100+ pounds per square foot when filled with water and people, necessitating engineered support structures distinct from standard deck framing.
Long-Term Maintenance
A well-built deck requires ongoing maintenance to preserve its condition and safety. Inspect your deck annually, checking for rot, insect damage, loose fasteners, and structural movement. Look beneath the deck for signs of water damage, soft wood, or pest activity. Press a screwdriver into suspicious areas—if it penetrates easily, rot has compromised the wood. Replace damaged boards promptly before rot spreads to structural members.
Clean your deck regularly to remove leaves, debris, and organic growth. Algae and mold thrive in damp, shaded areas, creating slippery surfaces and staining wood. Pressure washing removes buildup but may damage wood if pressure exceeds 1500 psi. Use appropriate cleaning solutions designed for deck wood, avoiding bleach which damages wood fibers. Trim overhanging branches to improve air circulation and reduce moisture retention—better ventilation prevents rot and pest problems.
Reapply protective finishes every 2-3 years for pressure-treated lumber, or as recommended by finish manufacturers. Composite decking requires less frequent maintenance but still benefits from periodic cleaning. Check fasteners regularly, particularly around high-traffic areas where movement loosens connections. Tighten loose bolts and replace corroded fasteners immediately. A deck that’s well-maintained remains safe and attractive for 15-20+ years, while neglected decks deteriorate rapidly and become safety hazards.
Winterization protects your deck in cold climates. Remove snow and ice promptly to prevent water damage and slippery surfaces. Avoid salt-based ice melts, which corrode fasteners and damage wood. Use sand or alternative products for traction. In areas with extreme temperature swings, allow for wood movement by ensuring proper spacing and avoiding over-fastening, which restricts expansion and causes splitting.
Frequently Asked Questions
How long does deck construction typically take?
Timeline depends on deck size, complexity, and weather conditions. A simple 12×16-foot deck requires 3-5 days of active work, while larger or more complex designs take 1-2 weeks. Foundation work—digging, setting posts, and pouring concrete—requires curing time, extending the overall project. Professional crews complete decks faster, but DIY builders should allocate additional time for learning, problem-solving, and detail work. Plan for weather delays, especially during rainy seasons when concrete curing slows significantly.
Do I need a permit for my deck?
Most jurisdictions require permits for decks over 200 square feet or elevated more than 30 inches. Some areas require permits for all decks regardless of size. Contact your local building department to confirm requirements—permits cost $50-200 typically but are essential for legal compliance, insurance coverage, and property resale. Building without required permits creates liability and property value concerns that far exceed permit costs.
What’s the best wood for deck construction?
Pressure-treated lumber offers affordability and proven performance, lasting 15-20 years with proper maintenance. Composite materials provide durability and low maintenance, lasting 25+ years but costing more initially. Tropical hardwoods like ipe offer superior durability and natural beauty, lasting 25-30+ years. Choose based on budget, maintenance preferences, climate, and aesthetic goals. Consider your home improvement commitment level when selecting materials requiring different maintenance schedules.
How deep should deck posts be buried?
Posts must extend below your local frost line, typically 12-48 inches depending on climate. Frost line depth varies significantly by region—northern areas require deeper footings than southern regions. Contact your local building department for specific frost line requirements. Posts should rest on gravel and concrete footings, never directly in soil, which retains moisture and accelerates rot. Proper footing depth is non-negotiable for deck stability and longevity.
Can I attach a deck directly to my house?
Yes, but ledger board attachment requires proper flashing and fastening to prevent water intrusion and structural failure. The ledger must be attached to the rim joist or band board with lag bolts or through-bolts spaced 16 inches apart. Install flashing above the ledger board to direct water away from the house structure. Improper ledger attachment causes severe damage and is the leading cause of deck collapses. Follow manufacturer specifications and local codes precisely for this critical connection.
What spacing should I use between decking boards?
Space pressure-treated wood decking 1/8 inch apart to allow for expansion when wet. Composite materials expand more, requiring 1/16-inch spacing or as specified by manufacturers. Proper spacing prevents buckling, cupping, and splitting as boards absorb moisture and swell. Use spacers during installation to maintain consistent gaps. Boards installed too tightly will buckle as they expand, creating a wavy, unsafe surface.
How often should I seal or stain my deck?
Pressure-treated lumber typically requires sealing or staining every 2-3 years, depending on climate and finish quality. Composite decking requires less frequent maintenance but benefits from periodic cleaning. Monitor your deck’s appearance—if water no longer beads on the surface, reapplication is needed. Regular maintenance extends deck life significantly compared to neglected decks. Establish a maintenance schedule and stick to it for optimal results.


