How to Build a Shed: Expert Tips Inside
Building a shed is one of the most rewarding DIY projects you can undertake. Whether you need extra storage space, a workshop, or a garden retreat, a well-constructed shed adds functionality and value to your property. This comprehensive guide walks you through every step of the process, from planning and foundation work to roofing and finishing touches. With proper planning, the right tools, and attention to detail, you can create a durable structure that serves your needs for decades.
The beauty of shed building lies in its accessibility to DIYers of varying skill levels. Unlike more complex home projects, shed construction focuses on fundamental carpentry principles and straightforward techniques. Whether you’re tackling your first major project or you’re an experienced builder looking to streamline your process, understanding the key phases of construction ensures your shed will be structurally sound, weather-resistant, and built to last.
Planning and Permits
Before breaking ground on your shed project, invest time in thorough planning. Start by determining your shed’s purpose, size, and location on your property. Most residential sheds range from 8×10 feet to 12×16 feet, though your specific needs may differ. Consider factors like proximity to property lines, access to utilities, drainage patterns, and how the structure will complement your existing landscape.
Obtaining proper permits is essential, even though many homeowners overlook this step. Check with your local building department or International Code Council (ICC) to understand zoning regulations, setback requirements, and size restrictions in your area. Most jurisdictions require permits for structures exceeding 100-200 square feet. Building codes exist to ensure structural safety and protect property values. Skipping permits can result in fines, complications during property sales, or mandatory removal of your shed.
Work with your local building inspector to understand foundation requirements, roof pitch specifications, and wind load considerations for your region. Different climates demand different construction approaches. Coastal areas require hurricane-resistant framing, while snow-heavy regions need steeper roof pitches and stronger structural support. This preliminary consultation prevents costly mistakes later.
Create detailed plans or purchase pre-made shed plans from reputable sources. Your plans should include foundation specifications, framing layouts, material lists, and electrical considerations if needed. If you’re new to construction, reviewing beginner woodworking projects can help you understand basic techniques before tackling larger structural work.
Site Preparation and Foundation
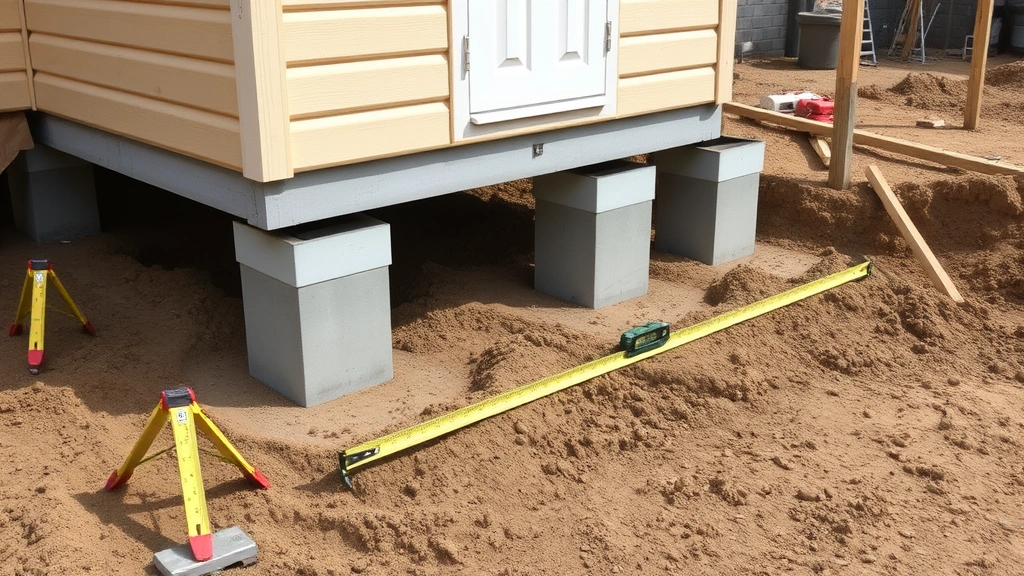
A solid foundation determines your shed’s longevity and structural integrity. Begin by clearing the site of vegetation, rocks, and debris. Mark out your shed’s footprint using string and stakes, ensuring corners are square by measuring diagonals (they should be equal). Remove topsoil from the foundation area, typically 6-12 inches deep depending on your ground conditions.
Foundation options include concrete pads, gravel, concrete slab, or treated wood skids. Concrete pads are popular for most residential sheds. Dig post holes 3-4 feet deep below the frost line (varies by region, typically 12-48 inches). Check American Concrete Institute (ACI) guidelines for proper concrete specifications. Pour concrete footings and set pressure-treated posts or concrete piers at each corner and midpoint along walls. This approach prevents frost heave and allows air circulation underneath, reducing moisture problems.
Alternatively, a concrete slab provides excellent protection against ground moisture and rodents. A 4-6 inch reinforced slab with proper drainage and a vapor barrier protects your shed contents effectively. Gravel foundations work for smaller, temporary structures but require regular maintenance and don’t protect against moisture or pests.
Ensure proper drainage around your foundation. Grade the site so water slopes away from the structure at least 6 feet. Consider installing a French drain or swale if your property has drainage challenges. Poor drainage leads to foundation settlement, wood rot, and structural problems that compound over time.

Framing the Structure
Once your foundation is set and cured, begin framing the shed walls. Start with the bottom plates, securing them to your foundation with concrete anchors or bolts. Use pressure-treated lumber for bottom plates to resist moisture. Frame walls using standard 2×4 lumber, typically spaced 16 inches on center. This spacing provides adequate support while maintaining material efficiency.
Build walls flat on the ground, then raise them into position. This method is safer and more efficient than building walls in place. Mark stud locations on both top and bottom plates before assembly. Cut studs to length (typically 7 feet 9 inches for 8-foot walls, accounting for plate thickness), then nail or screw them in place. Use 16d nails or 3-inch screws for structural connections.
Install window and door openings during framing. Rough openings should be 1.5 inches wider and 1 inch taller than the actual window or door to allow installation space. Install headers above openings to carry roof loads. For openings under 3 feet wide, a 2×4 header typically suffices. Wider openings require larger headers or engineered solutions.
Brace walls securely as you raise them, using temporary diagonal bracing to keep them plumb. Check walls with a level in both directions before permanently securing them. Connect walls at corners with blocking and corner bracing. Once all walls are plumb and square, install the top plates and add any additional blocking needed for roof attachment.
Frame the roof structure using rafters or trusses. Trusses are pre-engineered assemblies that simplify roof framing significantly. If building site-cut rafters, calculate the proper angle based on your roof pitch. Common pitches for sheds range from 4:12 to 8:12 (4-8 inches of rise per 12 inches of run). Steeper pitches shed water better but require more material. Secure rafters at the ridge with metal plates or blocking, and tie them to walls with hurricane ties or rafter ties to prevent uplift during high winds.
Roofing Installation
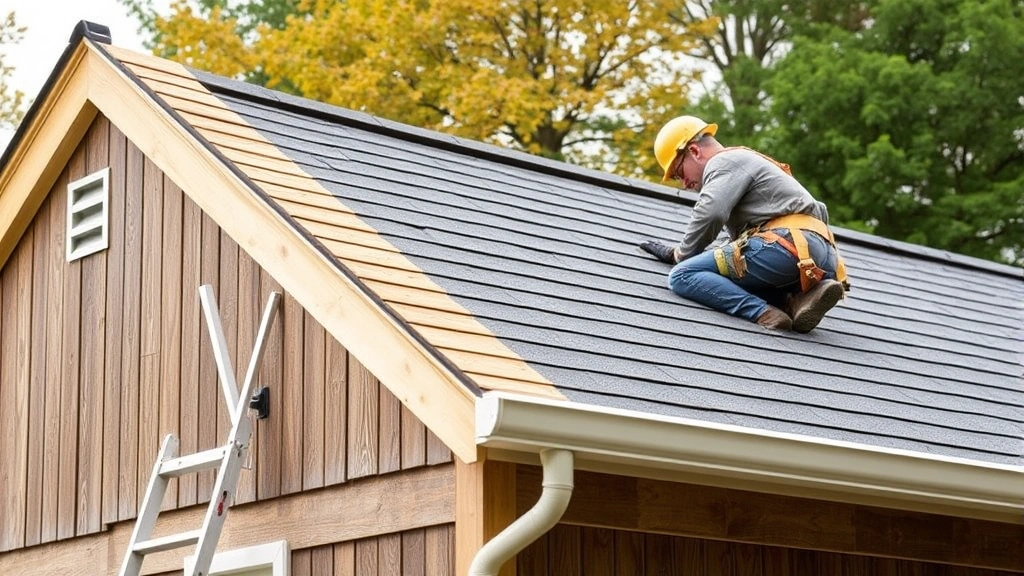
Proper roofing protects your shed’s interior from weather damage. Begin by installing roof decking (plywood or oriented strand board) over rafters, typically 1/2-inch thickness for standard rafter spacing. Leave 1/8-inch gaps between sheets to allow for expansion. Secure decking with ring-shank or spiral nails spaced 6 inches along edges and 12 inches in the field.
Install roofing underlayment over decking. Modern underlayment provides an additional moisture barrier and allows the roof to breathe. Felt or synthetic underlayment prevents ice damming and protects against wind-driven rain. Overlap courses 4-6 inches and secure with roofing nails or staples.
Choose roofing material based on budget, climate, and aesthetic preferences. Asphalt shingles are economical and widely available, with lifespans of 15-25 years. Metal roofing offers superior durability (40-70 years) and excellent snow shedding properties, making it ideal for heavy-snow regions. Wood shingles provide attractive aesthetics but require more maintenance. Install shingles according to manufacturer specifications, typically starting at the eaves and working upward.
Install flashing at roof penetrations, valleys, and transitions to prevent leaks. Step flashing at wall-to-roof transitions and valley flashing where two roof planes meet are critical for weather protection. Use National Roofing Contractors Association (NRCA) guidelines for proper flashing installation. Improper flashing is the leading cause of roof leaks, so take extra time to ensure correct installation.
Consider ventilation requirements for your shed. Roof vents or ridge vents prevent moisture accumulation in the attic space, reducing mold growth and extending roof life. Even uninsulated sheds benefit from basic ventilation, as it helps regulate interior temperature and humidity.
Siding and Exterior Finishing
Choose siding material that complements your home and withstands your climate. Common options include vinyl, wood, metal, or composite materials. Vinyl siding is affordable and low-maintenance but can become brittle in extreme cold. Wood siding offers classic aesthetics but requires regular maintenance and painting. Metal siding is durable and fire-resistant. Composite materials combine durability with minimal maintenance.
Install house wrap or building paper over sheathing before siding to provide a secondary moisture barrier. Overlap courses 6 inches and secure with staples. This layer prevents wind-driven rain from reaching the framing structure, significantly extending your shed’s lifespan.
Install siding according to material-specific guidelines. Wood siding typically requires 1/4-inch overlap between courses and expansion gaps for seasonal movement. Start at the bottom and work upward, ensuring level courses with a laser level or chalk line. Leave 1/4-inch gaps around window and door trim for seasonal expansion and contraction.
Install trim boards around windows, doors, and roof edges. Quality trim work enhances appearance and protects structural elements from weather exposure. Use corrosion-resistant fasteners (stainless steel or galvanized) to prevent rust staining and premature fastener failure.
Paint or stain your shed exterior to protect wood and enhance aesthetics. Choose exterior-grade paint or stain formulated for wood protection against UV damage and moisture. Proper surface preparation—cleaning, sanding, and priming—ensures long-lasting color and protection. Plan to repaint every 5-7 years depending on climate and material exposure.
Interior Features and Storage
Once the exterior envelope is complete and weather-tight, focus on interior features. Install flooring appropriate for your shed’s use. Concrete provides durability for tool storage and workshops. Wood subfloors offer better comfort and insulation for hobby spaces or garden rooms. Elevated wood floors on skids allow air circulation underneath, preventing moisture problems.
Add insulation if your shed will serve as a workspace or you live in a cold climate. Fiberglass batts, spray foam, or rigid foam board provide thermal resistance. Typical sheds benefit from 3-4 inches of insulation in walls and 6-8 inches in ceilings. Install a vapor barrier on the warm side of insulation to prevent moisture accumulation.
Plan storage solutions strategically. Wall-mounted shelving maximizes vertical space without consuming floor area. Pegboard systems organize hand tools efficiently. Overhead storage racks store seasonal items and keep them accessible. If you’re interested in optimizing storage spaces, review our guide on basement finishing and storage optimization for applicable techniques.
Install windows and doors that match your framing rough openings. Exterior doors should swing outward to maximize interior space. Security considerations matter, especially for sheds storing valuable equipment. Install quality locks and consider motion-sensor lighting if the shed is remotely located. For security-conscious builders, our home security guide contains principles applicable to shed protection.
Add electrical service if your shed requires lighting or power tools. Run conduit through walls to protect wiring. Install a dedicated circuit from your main panel with proper breakers and grounding. Hire a licensed electrician for this work to ensure code compliance and safety. Proper electrical installation prevents fire hazards and ensures your equipment operates safely.
Consider finishing options based on your shed’s purpose. Hobby spaces might benefit from drywall and finished ceilings for a polished appearance. Utility sheds require only weatherproof surfaces. If you’re planning interior finishing, our house painting guide covers interior finishing techniques applicable to shed spaces.
FAQ
How long does it take to build a shed?
Timeline depends on shed size, complexity, and your experience level. A basic 8×10 shed takes 2-4 weeks for an experienced builder working part-time. Beginners might require 4-8 weeks. Foundation curing (concrete) requires 7 days before framing begins. Complex features like electrical service, insulation, and finished interiors add 2-4 weeks.
What’s the most important step in shed building?
Proper foundation work is paramount. A level, well-drained foundation prevents structural problems, rot, and settling issues that compound over years. Investing time in site preparation and foundation installation pays dividends in longevity and performance.
Do I need building permits for my shed?
Yes, most jurisdictions require permits for structures exceeding 100-200 square feet. Permits ensure code compliance, structural safety, and protect your property investment. Check local requirements before beginning construction. Unpermitted structures complicate future property sales and may require removal.
What lumber should I use for shed construction?
Use pressure-treated lumber for components contacting soil or exposed to moisture (bottom plates, posts, sills). Standard framing lumber (2x4s, 2x6s) works for walls and roofing. Exterior plywood or OSB for sheathing. Pressure-treated lumber resists rot and insect damage, significantly extending structure life.
Should I insulate my shed?
Insulation benefits sheds used as workshops, studios, or hobby spaces where comfort matters. Tool storage sheds don’t require insulation but benefit from ventilation to prevent moisture accumulation. If you’ll spend time working in your shed, insulation improves comfort and energy efficiency if heating or cooling is planned.
What roof pitch should my shed have?
Minimum 4:12 pitch ensures adequate water drainage in most climates. Snow-heavy regions benefit from 6:12 or steeper pitches for better snow shedding. Flat roofs (0:12-2:12) require quality membranes and frequent maintenance. Steeper pitches shed water and snow more effectively, reducing maintenance needs.
How do I prevent moisture problems in my shed?
Install proper foundation with drainage, add roof and wall ventilation, use house wrap and quality roofing, and maintain gutters and downspouts. Keep the interior dry by controlling humidity through ventilation. Address any water intrusion immediately to prevent mold and structural damage.
Can I build a shed on a gravel foundation?
Gravel foundations work for temporary or small structures but don’t provide optimal protection. They allow pest access, offer no moisture barrier, and require ongoing maintenance. Concrete piers or slab foundations provide superior protection and longevity, justifying the initial investment.
What’s the best roofing material for a shed?
Asphalt shingles offer affordability and simplicity. Metal roofing provides superior durability and excellent snow shedding. Choose based on budget, climate, and aesthetic preferences. Metal roofing costs more initially but lasts 40-70 years versus 15-25 for shingles, making it economical long-term in harsh climates.
Should I hire professionals or build it myself?
Building a shed yourself is achievable for most DIYers, particularly with proper planning and research. Hire professionals for foundation work, roofing, and electrical service if you lack experience. This hybrid approach ensures structural integrity while saving money on labor for straightforward tasks like framing and siding.


