
Build a Wooden Deck? Pro Tips You Need
Building a wooden deck is one of the most rewarding DIY projects you can undertake, transforming your outdoor space into a functional entertainment area. Whether you’re adding a small platform off your back door or constructing a sprawling multi-level deck, understanding the fundamentals will save you time, money, and frustration. This comprehensive guide covers everything from initial planning through final finishing, ensuring your deck is both beautiful and built to last.
A well-constructed wooden deck requires careful attention to design, material selection, structural integrity, and local building codes. The timeline for a typical deck project ranges from two to four weeks, depending on size and complexity, though proper preparation and planning phases can extend this significantly. By following professional techniques and safety protocols, you’ll create an outdoor space that enhances your home’s value and provides years of enjoyment.
Planning and Design Fundamentals
Before purchasing a single board, invest time in detailed planning. Start by assessing your yard’s slope, drainage patterns, and sun exposure. These environmental factors significantly impact your deck’s longevity and usability. Sketch your design to scale, noting dimensions, entry points, and traffic flow patterns. Consider how the deck will connect to your home—will it be directly off a door, or will you need stairs?
Create a detailed materials list based on your design, including all lumber, fasteners, concrete, and hardware. Account for waste; professionals typically add 10-15% to material estimates. Document the deck’s height, which determines railing requirements and affects how stairs will function. Check whether your design requires ICC building code compliance, as most jurisdictions have specific requirements for deck construction. Your local building department can provide guidelines specific to your area.
Consider the deck’s orientation relative to sun and wind. A deck facing west receives intense afternoon heat, while north-facing decks stay cooler but may accumulate moisture. These factors influence both comfort and maintenance requirements. If you’re expanding your outdoor living space, review our DIY Nests Hub Blog for complementary project ideas that work well with deck construction.
Materials and Wood Selection
Selecting the right wood species is crucial for deck durability and appearance. Pressure-treated lumber remains the most economical choice for structural components, offering excellent rot and insect resistance. Treated wood typically contains copper-based preservatives and requires proper handling—always wear gloves and avoid breathing sawdust when cutting.
For decking boards, consider these popular options: pressure-treated southern pine (budget-friendly, requires regular maintenance), cedar or redwood (attractive natural appearance, moderate durability), tropical hardwoods like ipe or cumaru (exceptional durability, difficult to work with), or composite materials (low maintenance, higher upfront cost). Each option involves trade-offs between cost, aesthetics, and longevity.
Pressure-treated lumber is rated by its retention level—typically .40 PCF for above-ground use and .60 PCF for ground contact. Always use .60 PCF-rated lumber for posts, beams, and any wood touching soil. Purchase lumber from reputable suppliers and inspect for warping, checking, and defects before delivery. Allow pressure-treated wood to dry for several weeks before installation, as wet wood shrinks significantly during curing.
When selecting fasteners, use stainless steel or hot-dipped galvanized hardware rated for outdoor use. Avoid standard steel fasteners, which rust and stain wood. For composite decking, follow manufacturer recommendations precisely, as some materials require specific fastener types to prevent damage and maintain warranties.
Building Permits and Code Compliance
Never skip the permitting process. Most jurisdictions require permits for decks exceeding 200 square feet or those elevated more than 30 inches above grade. Permits ensure your deck meets safety standards and protect your property’s insurance coverage. Unpermitted decks can create liability issues and complicate future home sales.
Contact your local building department or National Association of Home Builders to understand specific requirements. Common code requirements include: minimum post spacing (typically 6 feet), beam sizing based on span and load, railing height and baluster spacing (usually 4 inches maximum), stair dimensions, and frost line depth for post footings. Frost line depth varies by region—in northern climates, posts must extend 3-4 feet below grade to prevent frost heave.
Schedule inspections at critical phases: after footings are set, after framing is complete, and upon project completion. Inspectors verify proper post spacing, adequate fastening, correct railing heights, and stair dimensions. This process protects you and ensures your deck is safe for family and guests. If you’re undertaking other home improvements, our guide on DIY basement finishing covers similar permitting processes for interior projects.
Foundation and Post Installation
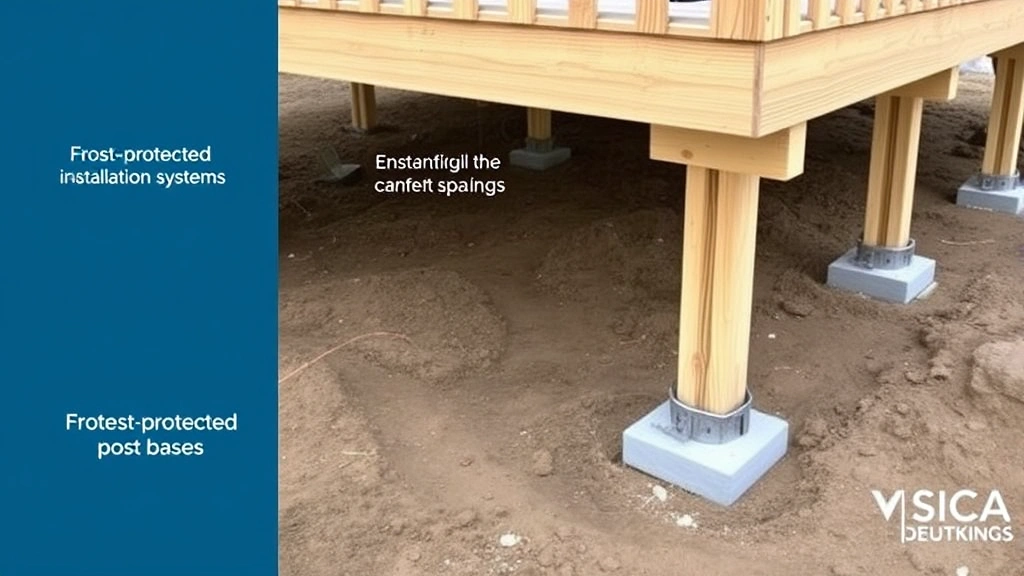
Proper foundation work determines your deck’s structural longevity. Posts must rest on footings that extend below the frost line, preventing heave damage from freeze-thaw cycles. Dig holes 3-4 feet deep in northern climates, 2-3 feet in moderate zones, and 1-2 feet in warm regions. Holes should be at least 12 inches in diameter.
Pour concrete footings for each post location. For above-ground decks, use frost-protected shallow foundation (FPSF) methods or post bases that allow water drainage. Never set posts directly on soil or concrete pads resting on grade. After concrete cures (typically 48 hours), install adjustable post bases that allow for leveling and provide clearance above the footing surface.
Position posts plumb using a level, checking both directions. Posts must be perfectly vertical to prevent structural issues and railing problems. Use temporary bracing to maintain alignment during construction. Space posts according to your beam span and load calculations—typically 4-6 feet for residential decks. Ensure all posts are the same height before cutting—measure from a chalk line snapped at a consistent height above grade.
Connect posts to beams using appropriate hardware. Bolted connections, post bases, and through-bolts provide necessary strength. Never rely on nails alone for post connections. Use galvanized or stainless steel bolts, washers, and nuts rated for outdoor applications. Tighten all fasteners securely but avoid over-tightening, which can strip threads or crush wood.
Framing and Structural Components
Beam sizing and spacing represent critical structural decisions. Beams must support the dead load (deck materials) plus live loads (people and furniture, typically 40 pounds per square foot). Consult American Wood Council span tables or use structural design software to determine appropriate sizing for your lumber species and span.
Install beams level and properly supported at all bearing points. Beams should rest fully on posts or ledger boards—partial bearing creates stress concentration. Use blocking or shims to ensure full contact. Joists typically span perpendicular to beams, spaced 12 or 16 inches on center depending on joist size and wood species. Smaller spacing provides stiffer, safer decking.
The ledger board—where your deck attaches to your house—requires special attention. Flash the ledger with metal flashing that directs water away from your home’s rim board and foundation. Improper flashing causes water damage to your house’s structure, the most common cause of deck-related home damage. Install flashing before attaching the ledger, ensuring it extends above the deck surface and wraps around the rim board.
Attach the ledger with bolts spaced 16 inches apart, extending through the rim board and into the house’s band board. Use galvanized or stainless steel bolts with large washers. Install joists perpendicular to the ledger using joist hangers, ensuring proper fastening with all recommended nails or screws. Never rely on toe-nailing alone; joist hangers provide necessary strength and prevent wood crushing.
Install rim joists around all exposed deck edges, connecting outer joists to the ledger and beams. Rim joists help distribute loads and provide a finished appearance. Ensure all connections are secure and that the framing is square and level before proceeding to decking installation.
Decking Installation Best Practices
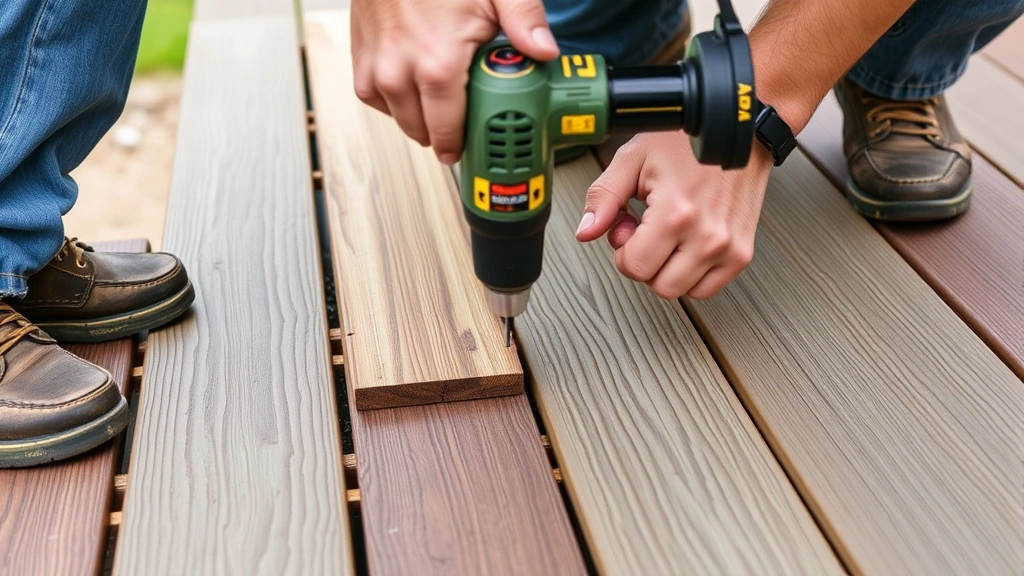
Decking board installation requires attention to spacing, fastening, and pattern. Leave 1/8-inch gaps between boards (or follow manufacturer recommendations for composite materials) to allow for expansion and water drainage. Improper spacing causes cupping, warping, and moisture-related failures. Use spacers to maintain consistent gaps throughout installation.
Stagger board joints so they don’t align across consecutive rows. This pattern distributes loads more effectively and improves the deck’s appearance. Start at the ledger and work toward the outside edge, adjusting the final row’s width to create a balanced appearance. For large decks, consider running decking diagonally or in herringbone patterns, though these require more material and labor.
Fasten boards with corrosion-resistant fasteners—stainless steel or hot-dipped galvanized. Use two fasteners per board at each joist intersection for standard boards, and follow manufacturer specifications for composite materials. Deck screws typically provide superior holding power compared to nails and allow easier board replacement. Pre-drill screw holes in hardwoods to prevent splitting.
For pressure-treated wood, allow boards to acclimate for several weeks before final installation. This reduces movement during the critical early curing period. Install boards with the growth rings facing down (bark side up) when possible, as this orientation reduces cupping. Sand the deck surface after all boards are installed, addressing rough areas and preparing for finishing.
Finishing and Maintenance
Proper finishing protects your deck investment and enhances appearance. Options include clear sealers (showing wood grain), semi-transparent stains (adding color while showing texture), solid-color stains, and paints. Each offers different aesthetics and protection levels. Clear sealers require more frequent reapplication (annually to every two years) but preserve natural wood appearance.
Before finishing, allow newly installed decks to weather for 3-6 months, allowing wood to stabilize and surface fibers to weather naturally. This improves stain adhesion and reduces blotching. Clean the deck thoroughly, removing dirt, mildew, and surface fibers. Use a power washer carefully (1500 PSI maximum) to avoid wood damage, or hand-scrub with a stiff brush and deck cleaner.
Apply finishes according to manufacturer instructions, typically two coats for optimal protection. Choose products designed for horizontal surfaces and rated for your climate zone. Reapply finishes every 2-3 years or when water no longer beads on the surface. Regular maintenance significantly extends deck life, preventing costly repairs.
Maintain your deck by sweeping regularly, removing standing water, and addressing damage promptly. Replace damaged boards before they compromise structural integrity. Trim vegetation to improve air circulation and reduce moisture accumulation. In winter climates, avoid rock salt on decks; use calcium chloride or sand for traction instead. For related finishing techniques, explore our DIY house painting guide, which covers similar surface preparation and finishing principles applicable to deck staining.
FAQ
How long does it take to build a deck?
A typical 12×16-foot deck takes 3-4 weeks from planning through final finishing. Smaller decks (8×10 feet) may be completed in 2-3 weeks, while larger or more complex designs require 4-6 weeks. Permitting timelines add 1-2 weeks. The permitting process and material selection typically extend the overall timeline more than construction itself.
What’s the best wood for deck building?
Pressure-treated southern pine offers excellent value for structural components and is widely available. For decking boards, consider cedar or redwood for appearance and moderate durability, tropical hardwoods for exceptional longevity, or composite materials for minimal maintenance. Your choice depends on budget, climate, and maintenance preferences.
Do I need a building permit for a deck?
Yes, most jurisdictions require permits for decks exceeding 200 square feet or elevated more than 30 inches. Even smaller decks may require permits in some areas. Permits ensure structural safety, proper drainage, and code compliance. Check with your local building department—unpermitted decks create liability and insurance issues.
How often should I seal my deck?
Reapply sealers or stains every 2-3 years for pressure-treated wood, or when water no longer beads on the surface. Climate significantly impacts resealing frequency—decks in wet climates need more frequent maintenance than those in dry regions. Clear sealers typically require annual application, while solid-color stains last 2-3 years.
What spacing should I use between decking boards?
Leave 1/8-inch gaps between boards for standard wood decking to allow expansion and water drainage. Some pressure-treated lumber manufacturers recommend 1/4-inch spacing. Composite materials vary—follow specific manufacturer guidelines, as some require different spacing than wood. Proper spacing prevents cupping, warping, and moisture damage.
How deep should deck post footings be?
Post footings must extend below the frost line to prevent frost heave damage. Frost line depth varies: 3-4 feet in northern climates, 2-3 feet in moderate zones, and 1-2 feet in warm regions. Contact your local building department for your specific area’s frost line depth. Above-ground decks still require adequate footing depth to prevent heave and settling.


