Build a Deck? Expert Tips for Lasting Results
Building a deck is one of the most rewarding DIY projects you can undertake. Whether you’re creating an outdoor entertainment space or simply extending your home’s living area, a well-constructed deck adds significant value and functionality to your property. However, the difference between a deck that lasts decades and one that deteriorates within a few years comes down to proper planning, material selection, and construction technique.
This comprehensive guide walks you through every critical step of deck building, from initial design considerations through final finishing touches. You’ll learn how to avoid costly mistakes, select materials that withstand weather exposure, and understand the timeline involved in creating a deck that stands the test of time. Whether this is your first deck project or you’re looking to refine your approach, these expert tips will help ensure your investment provides years of reliable outdoor living space.
Planning and Design Fundamentals
Before you purchase a single board, invest time in thorough planning. Your deck’s success depends on understanding local building codes, assessing your yard’s topography, and determining the deck’s purpose. Start by visiting your local building department to understand required setbacks, height restrictions, and safety standards in your area. Many jurisdictions require ICC building codes compliance, which govern everything from post spacing to railing height.
Measure your yard carefully, noting slopes, existing structures, and sun exposure. A deck that receives afternoon shade will require different material considerations than one in full sun. Sketch your design to scale, including dimensions, post locations, and any built-in features like benches or planters. This planning phase typically takes several hours but prevents expensive mistakes during construction.
Consider your deck’s purpose when determining size and features. A family entertaining space requires different design than a quiet reading retreat. Think about traffic flow, furniture placement, and whether you’ll add amenities like hot tubs or shade structures. Your design should also account for drainage—standing water accelerates wood deterioration and creates safety hazards. When finishing outdoor spaces, proper water management is essential.
Height calculations demand precision. Most decks connect to house doors at a specific elevation. Measure from your door threshold down to grade level, accounting for frost line requirements in your region. Northern climates typically require posts to extend below the frost line—typically 3-4 feet—to prevent heaving during freeze-thaw cycles.
Choosing the Right Materials
Material selection profoundly impacts your deck’s longevity and maintenance requirements. Three primary categories dominate the market: pressure-treated lumber, composite materials, and tropical hardwoods. Each offers distinct advantages and trade-offs.
Pressure-treated lumber remains the most economical choice. Modern pressure-treated wood uses copper-based preservatives rather than arsenic compounds, making it safer for residential use. It’s readily available, easy to work with, and performs well when properly maintained. However, it requires regular staining or sealing—typically every 2-3 years—to prevent graying and moisture penetration. Expect to invest in maintenance throughout the deck’s 15-20 year lifespan.
Composite decking blends wood fibers with plastic polymers, creating a material that resists rot, insects, and fading better than wood alone. Initial costs run 2-3 times higher than pressure-treated lumber, but dramatically reduced maintenance makes composites attractive for busy homeowners. Composite decks require only occasional cleaning and don’t need staining or sealing. Quality composite products maintain appearance for 25-30 years with minimal intervention.
Tropical hardwoods like Ipe and Cumaru offer exceptional durability and natural beauty. These dense woods resist rot, insects, and weathering for 25+ years with minimal maintenance. However, they’re expensive, difficult to cut and fasten (often requiring pre-drilling), and environmentally controversial. If selecting hardwoods, verify sustainable sourcing through Forest Stewardship Council certification.
For structural components—posts, beams, and joists—always use pressure-treated lumber rated for ground contact. Never use untreated wood for these critical elements, as ground moisture exposure causes rapid deterioration. Match fastener materials to your wood choice: stainless steel or hot-dipped galvanized fasteners prevent corrosion and staining on all wood types.
Foundation and Post Installation
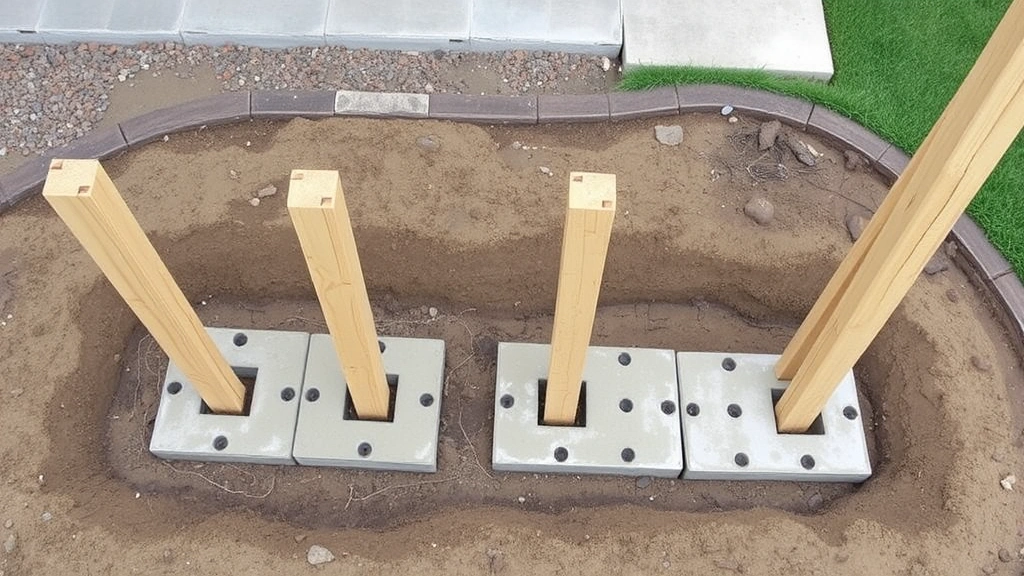
A deck’s structural integrity depends entirely on proper foundation work. Posts bear your entire deck’s weight plus live loads from people and furniture, making their installation non-negotiable. Improper post installation is the leading cause of deck failure and collapse.
Begin by locating post positions according to your design, typically spaced 8 feet apart along beams. Dig holes extending below your region’s frost line—consult USDA zone maps for your area’s requirements. In most northern regions, dig 3-4 feet deep; southern areas may require only 18-24 inches. Holes should be wider at the base to accommodate concrete footings.
Install concrete footings in every post hole. Concrete prevents wood-to-soil contact, the primary driver of rot. Pour concrete at least 8 inches above grade to prevent water from splashing soil onto posts. Many builders use post bases—metal brackets that sit on concrete footings and hold posts above the concrete surface, further reducing moisture exposure.
Set 4×4 pressure-treated posts in the bases, ensuring they’re perfectly plumb (vertical) in both directions. Use a level to verify alignment. Posts that lean even slightly create structural stress and accelerate wood fiber breakdown. Secure posts with bolts or lag screws as specified by your post base manufacturer.
Check post spacing against NFPA standards for your deck height. Posts supporting decks over 12 feet high may require closer spacing than those supporting lower decks. Never guess about structural requirements—consult your local building department or a structural engineer if uncertain.
Building the Frame Structure
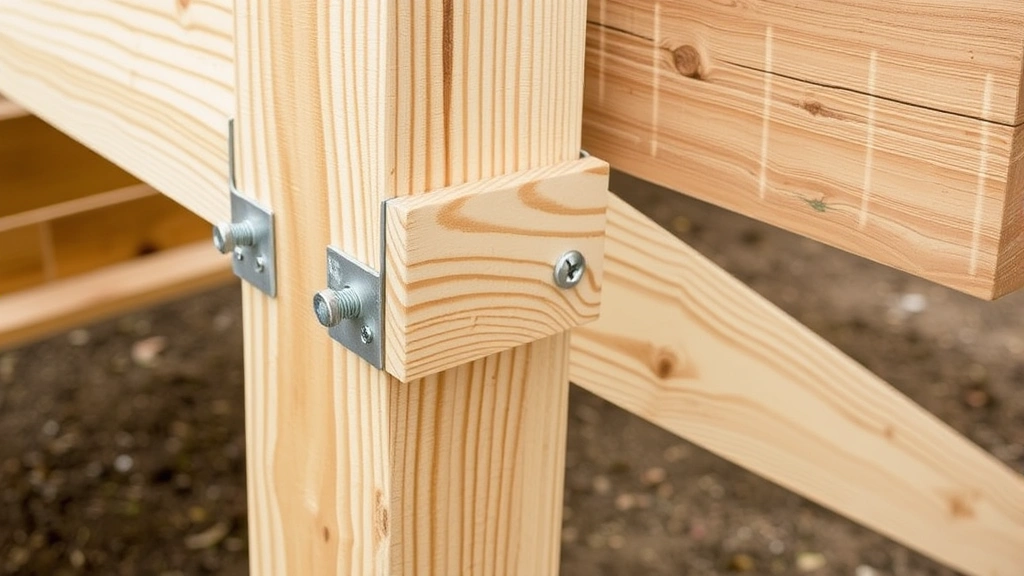
Once posts are set, install beams perpendicular to posts, connecting them securely with bolts or approved joist hangers. Beams typically use doubled 2×8, 2×10, or 2×12 lumber depending on span and post spacing. Longer spans require larger beams to prevent sagging.
Calculate beam sizes using span tables provided in American Wood Council publications. These tables account for wood species, spacing, and load requirements. Using undersized beams creates visible sag and structural failure risk. When in doubt, use larger lumber—the extra cost is minimal compared to repair expenses.
Install joists perpendicular to beams, spacing them 16 inches on center for most decking materials. Joists transfer weight from decking to beams, so proper sizing and spacing is critical. Use 2×8 or 2×10 joists depending on span length. Joists spanning more than 12 feet often require sistering (doubling) or additional support.
Secure joists to beams using joist hangers—metal brackets that support joists while allowing slight movement for wood expansion and contraction. Joist hangers are stronger than nails alone and distribute loads more evenly. Install them according to manufacturer specifications, using required fastener types and quantities.
Check your framing for square by measuring diagonals—equal diagonal measurements indicate square corners. Slight adjustments during framing prevent crooked decking and railing misalignment later. A square frame looks professional and functions better structurally.
Install rim joists (also called band boards) around the deck’s perimeter, connecting the outermost joists. Rim joists create a finished appearance and provide lateral bracing. Ensure rim joists are pressure-treated lumber rated for ground contact, as they’re exposed to weather on multiple sides.
Installing Decking Boards
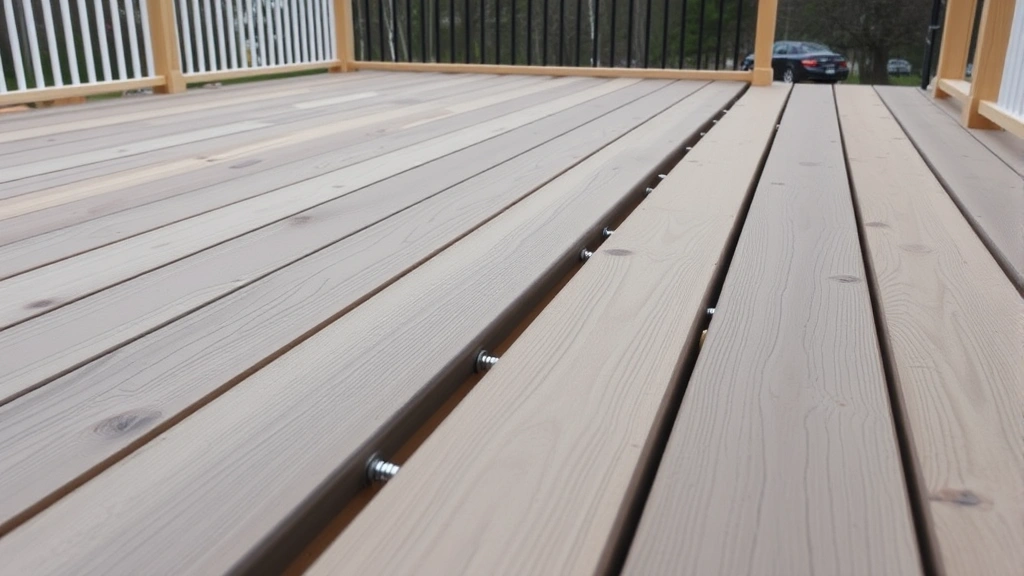
Decking board installation is where your design becomes visible, but proper technique ensures longevity. Start by spacing boards ¼ inch apart to allow water drainage and wood movement. This small gap prevents moisture accumulation and reduces cupping (warping) as wood expands and contracts seasonally.
Lay out boards before fastening to verify pattern and minimize cuts. Running boards parallel to the house creates a linear appearance, while diagonal patterns add visual interest but require more cutting and waste more material. Consider sight lines from your house—the pattern you see most often should look intentional and balanced.
Fasten boards with stainless steel or galvanized deck screws rather than nails. Screws hold better as wood shrinks and resist popping. Use 2½-inch screws for standard 2×6 decking over 1½-inch joists. Two screws per board at each joist provide adequate fastening. Pre-drill screw holes in hardwoods to prevent splitting.
Work from one end of the deck toward the other, maintaining consistent spacing. Use spacer blocks between boards to ensure uniform gaps. This methodical approach prevents spacing drift that becomes obvious as you progress.
Stagger board joints over joists rather than allowing continuous lines across multiple boards. Staggered joints distribute loads more evenly and create a more professional appearance. Avoid placing joints at the same location on consecutive boards.
Sand the finished decking surface lightly before applying finish. Sanding removes splinters and opens wood pores, allowing stain or sealer to penetrate evenly. Start with 120-grit sandpaper, progressing to 150-grit for a smooth final surface.
Adding Railings and Stairs
Railings serve dual purposes: safety and aesthetics. Building codes mandate railings on decks over 30 inches high, with specific requirements for height, strength, and baluster spacing. Check your local code for exact specifications—requirements vary by jurisdiction.
Standard railing height is 36-42 inches measured from the deck surface. Balusters (vertical posts) must be spaced no more than 4 inches apart to prevent children from getting trapped. Railings must resist 200 pounds of horizontal force without failing, so use quality materials and proper fastening.
Build railing frames from 2×4 pressure-treated lumber for durability. Install posts at 4-foot intervals, securing them to the deck frame with bolts or lag screws. Connect horizontal rails between posts, then install balusters. Choose baluster style to match your home’s architecture—traditional vertical balusters, horizontal cable rails, or composite balusters all offer different aesthetics.
Stairs require careful attention to safety and code compliance. Each step must have consistent rise (vertical height) and run (horizontal depth). Typical stairs have 7-inch risers and 10-inch runs. Inconsistent steps cause trips and falls—measure carefully and verify consistency before installing.
Install stringers (the angled supports holding stair treads) securely to the deck frame. Most codes require stringers at 3-4 foot intervals depending on stair width. Use bolts through solid structural members rather than nailing stringers, as stairs experience significant impact loading.
Treads should be the same material as your decking for visual consistency. Space stair treads the same width as your deck boards, and maintain consistent spacing between treads. Paint or stain stairs the same color as the deck, or choose contrasting colors to improve visibility and safety.
Finishing and Long-Term Maintenance
Finishing protects your investment and extends deck life significantly. The type of finish depends on your material choice. Pressure-treated wood benefits from stain-sealers that protect against UV damage and moisture penetration. Composite materials typically require only occasional cleaning, though some manufacturers offer protective coatings. When painting or staining outdoor structures, use products designed for exterior horizontal surfaces.
Apply finish in appropriate weather conditions—temperatures between 50-85°F with low humidity produce best results. Plan finishing work for late spring or early fall when weather is stable. Avoid finishing in direct sun, which causes lap marks and uneven color.
Most pressure-treated decks benefit from re-staining every 2-3 years. Watch for graying, which indicates UV damage and moisture penetration. Graying doesn’t indicate structural failure but signals that protective finish is degrading. Regular maintenance prevents costly repairs and keeps your deck looking new.
Implement a maintenance routine including spring cleaning, debris removal, and annual inspection. Sweep accumulated leaves and dirt, which trap moisture and promote algae growth. Inspect fasteners for rust or corrosion, replacing as needed. Check posts and framing for rot by probing with a screwdriver—soft wood indicates decay requiring repair.
Composite decks require less maintenance but still benefit from annual cleaning. Use mild soap and water with a soft brush to remove dirt and algae. Avoid pressure washers on composite materials, which can damage the surface. Most composite decks need no staining or sealing, dramatically reducing maintenance time and expense.
Plan for eventual repairs and replacement. Fasteners may corrode, boards may split, and railings may loosen over time. Budget for maintenance costs as part of deck ownership. A well-maintained pressure-treated deck typically lasts 15-20 years; composite decks often exceed 25 years. Hardwood decks can last 30+ years with proper care. Understanding your deck’s expected lifespan helps with long-term planning. You might also explore protecting your outdoor areas with security considerations.
FAQ
How long does deck construction typically take?
Deck construction timeline varies by size and complexity. A 12×16 foot deck typically requires 3-5 days for an experienced builder. Planning and permitting add 2-4 weeks beforehand. Simple designs with no stairs finish faster; complex designs with multiple levels take longer. Weather delays can extend timelines significantly, particularly during rainy seasons.
What’s the most common deck building mistake?
Inadequate post installation causes most deck failures. Posts set directly on soil or concrete without proper footings sink and rot, leading to structural failure. Always extend footings below the frost line and use concrete piers or post bases that elevate posts above ground contact.
Do I need a building permit for my deck?
Most jurisdictions require permits for decks over 30 inches high or with certain roof coverings. Permits ensure your deck meets safety codes and structural requirements. Unpermitted decks can create liability issues and complicate home sales. Always check with your local building department before starting.
Should I hire a contractor or build the deck myself?
This depends on your experience level and available time. DIY deck building is achievable for careful builders with basic carpentry skills. However, structural errors can cause collapse and injury. If you’re uncertain about post spacing, beam sizing, or railing requirements, hire a professional. The cost of professional work is small compared to repair expenses from structural failure.
What’s the difference between pressure-treated and composite decking?
Pressure-treated wood is less expensive initially but requires regular staining and sealing. Composite materials cost more upfront but require minimal maintenance. Composite decks resist rot and insects better and maintain appearance longer. Choose based on your budget and maintenance preferences.
How often should I stain my deck?
Pressure-treated decks typically need re-staining every 2-3 years. Watch for graying or water beading—when water no longer beads on the surface, the protective finish is failing. Some high-quality stains last longer; budget for more frequent maintenance on exposed, sunny decks compared to shaded areas.


