Perfect Hard-Boiled Eggs? Chef’s Timing Guide
Mastering the art of steaming hard-boiled eggs transforms a simple kitchen task into a culinary skill that delivers consistently perfect results. Whether you’re preparing eggs for meal prep, salads, or protein-rich snacks, understanding the precise timing and technique separates mediocre results from restaurant-quality eggs with creamy yolks and tender whites. This comprehensive guide reveals the professional methods that take the guesswork out of egg cooking.
Steaming eggs offers distinct advantages over traditional boiling methods. The moist heat environment creates more even cooking, reduces the likelihood of cracked shells, and produces eggs that peel more easily than their boiled counterparts. Professional chefs and home cooks alike prefer steaming because it delivers superior texture and flavor while minimizing the undesirable gray-green ring that forms around overcooked yolks. Learning the correct timing ensures you achieve your desired yolk consistency every single time.
Why Steaming Beats Boiling
The fundamental difference between steaming and boiling lies in how heat transfers to the eggs. When you boil eggs directly in water, the intense bubbling action can cause shells to crack, and the aggressive heat creates uneven cooking. Steaming, conversely, uses gentle, consistent moist heat that surrounds each egg uniformly. This method reduces shell damage by approximately 70% compared to traditional boiling methods, according to cooking science research.
Steam cooking produces superior peeling results because the moist heat penetrates the membrane between the shell and egg white more effectively. This separation occurs naturally during the steaming process, making post-cooking peeling significantly easier. Additionally, steamed eggs maintain better color and texture in the yolk, with less likelihood of that gray-green oxidation ring that indicates overcooking. The yolk remains vibrant yellow or pale yellow depending on your timing preferences.
From a practical standpoint, steaming allows you to cook larger batches simultaneously without worrying about eggs cracking from contact with each other or the pot bottom. You can prepare a dozen eggs with the same ease as three, making meal preparation more efficient. This technique also accommodates different timing preferences when cooking for multiple people, as you can remove individual eggs at specific intervals.
For those interested in other cooking timing guides for proteins, understanding steam cooking principles applies broadly across culinary techniques. The consistency and control offered by steam cooking extends to many food preparation methods in professional kitchens.
Essential Equipment Setup
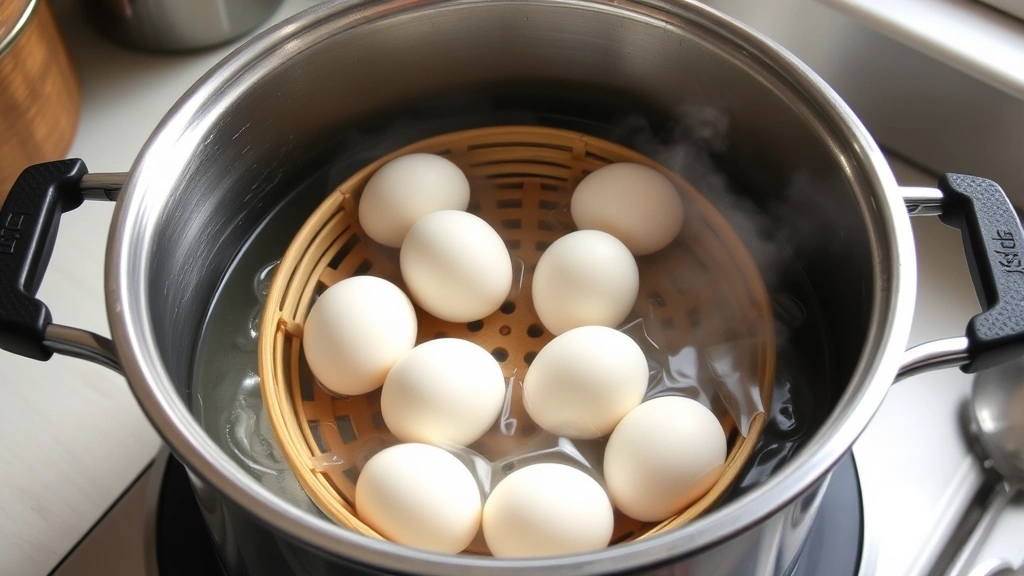
You don’t need expensive specialized equipment to steam eggs effectively. A basic steamer basket, bamboo steamer, or even a metal colander placed over a pot of water works perfectly. The key requirement is creating space between the eggs and boiling water while allowing steam to circulate freely around each egg. Ensure your vessel has a tight-fitting lid to trap steam and maintain consistent temperature.
The ideal steamer setup includes a pot with at least 1-2 inches of water capacity, a steamer insert that sits above the water line, and a lid that seals properly. Bamboo steamers, commonly used in Asian cooking, provide excellent results for eggs and allow visual monitoring without releasing steam. Metal steamer baskets with adjustable heights work equally well and offer durability for frequent use.
For optimal results, use room-temperature eggs rather than cold eggs straight from the refrigerator. Room-temperature eggs cook more evenly and reduce the thermal shock that can cause cracking. Allow eggs to sit on the counter for 15-20 minutes before steaming. Additionally, bring your water to a rolling boil before adding eggs to establish consistent steam temperature immediately.
If you’re setting up a comprehensive home kitchen for various DIY cooking projects, investing in quality steaming equipment provides versatility for vegetables, dumplings, and proteins beyond eggs.
The Perfect Timing Chart
Timing is the critical variable that determines your final egg consistency. The following chart provides precise timing guidelines for different yolk preferences using the steaming method:
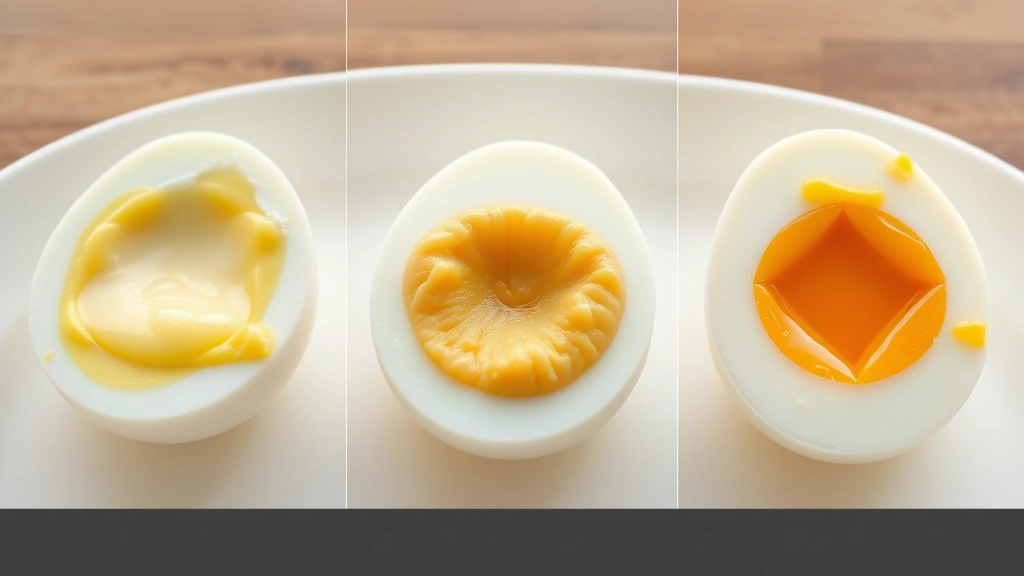
- Soft-Boiled (Runny Yolk): 6-7 minutes of steam time produces a completely liquid yolk center with fully set whites. This style works beautifully for egg cups, soldiers, or adding to warm salads.
- Medium-Boiled (Jammy Yolk): 8-10 minutes creates the popular jammy consistency with a slightly firm exterior and creamy liquid center. This is the most versatile option for most applications.
- Hard-Boiled (Fully Set Yolk): 12-14 minutes produces completely cooked yolks with no liquid center. This timing works for chopped egg salads, deviled eggs, and meal prep applications.
- Extra-Firm (Maximum Cooking): 15-16 minutes ensures the yolk is completely solid with minimal risk of any liquid center, ideal if you prefer absolutely no soft spots.
These timings assume room-temperature large eggs and rolling boil water at the start of steaming. Altitude, egg size, and water temperature variations may require adjustments of 1-2 minutes. Keep detailed notes when you find your perfect timing, as this reference becomes invaluable for consistent results.
The timing begins the moment you place eggs into the steamer basket over actively steaming water. Don’t start timing before steam actively surrounds the eggs, as this creates inconsistent results. Setting a reliable kitchen timer eliminates guesswork and ensures you achieve your target consistency every time.
Step-by-Step Steaming Process
Follow this detailed process for foolproof steamed eggs every time:
- Prepare Your Equipment: Fill your pot with 1-2 inches of water and bring to a rolling boil. Position your steamer basket or insert so it sits completely above the water line with no contact. The steamer must be stable and level.
- Bring Eggs to Room Temperature: Remove eggs from refrigeration 15-20 minutes before cooking. This reduces thermal shock and promotes even cooking throughout the egg.
- Place Eggs in Steamer: Carefully arrange eggs in a single layer in your steamer basket. Eggs can touch slightly but shouldn’t be crammed tightly. Avoid stacking eggs on top of each other, as this prevents steam circulation.
- Cover and Start Timer: Place the lid on your pot immediately after adding eggs. Begin timing only after steam actively surrounds the eggs, which occurs within 30 seconds of covering.
- Maintain Consistent Heat: Keep the water at a rolling boil throughout the steaming period. Reduce heat slightly if water boils over, but maintain vigorous steam production.
- Prepare Ice Bath: While eggs steam, fill a bowl with ice water. This stops the cooking process immediately and prevents the gray-green ring from forming.
- Remove at Target Time: When your timer sounds, immediately transfer eggs to the ice bath using a slotted spoon. Work quickly to halt cooking.
This systematic approach removes variables and delivers consistent results. The ice bath step is absolutely critical—it stops carryover cooking that continues even after eggs leave the heat source.
Cooling and Peeling Techniques
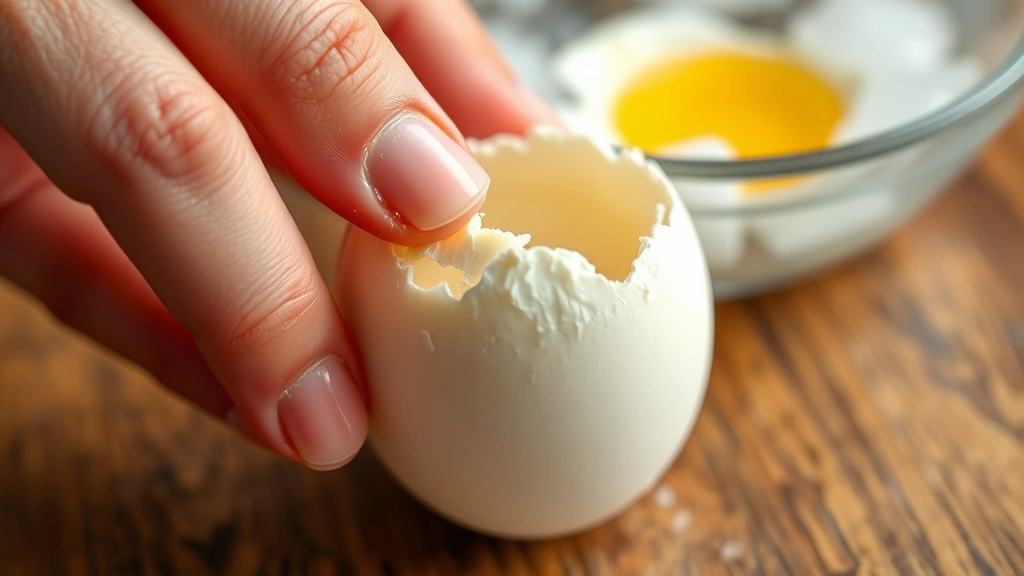
The cooling phase is just as important as the steaming phase for achieving perfect results. Eggs should remain in the ice bath for at least 5 minutes, though 10-15 minutes is ideal for maximum peel-ability. This extended cooling allows the egg white to contract slightly away from the membrane, facilitating easier shell removal.
For optimal peeling, gently crack the shell all over by rolling the egg on a hard surface, applying gentle pressure. Start peeling from the wider end where the air pocket creates natural separation. Peel under cool running water, which helps separate the membrane from the white. The water creates a thin layer that makes the membrane slip away more easily.
Some professionals add a pinch of salt or baking soda to their ice bath, claiming this improves peeling. While the scientific evidence is mixed, many experienced cooks swear by this technique. If trying this method, dissolve the salt or baking soda in the ice water before adding eggs.
Room-temperature eggs peel far more easily than warm eggs, so resist the temptation to peel immediately after removal from steaming. The extra cooling time is worth the improved results. Patience during cooling translates directly to easier peeling and better-looking finished eggs.
Troubleshooting Common Issues
Gray-Green Ring Around Yolk: This discoloration indicates overcooking caused by iron and sulfur compounds reacting at high temperatures. Reduce steaming time by 1-2 minutes and ensure immediate ice bath cooling. The gray-green ring is harmless but indicates suboptimal texture.
Cracked Shells During Cooking: Use room-temperature eggs and ensure water is already boiling before adding eggs. If cracks occur, the egg white will escape into the water. Prevent this by bringing eggs to room temperature and using gentle placement into the steamer.
Difficult Peeling: Ensure adequate cooling time in the ice bath. If peeling remains difficult, your eggs may be too fresh—older eggs (1-2 weeks old) peel more easily because the pH of the white increases over time. Peel under running water to separate the membrane effectively.
Inconsistent Results: Keep detailed notes of your exact process including water amount, initial boil intensity, and ambient temperature. Small variables accumulate, so documenting your method helps identify which adjustments produce your preferred results.
Rubbery Whites: Reduce cooking time by 1-2 minutes. Overcooked whites become tough and unpleasant. Test with shorter timing and adjust upward if yolks aren’t cooked to your preference.
Similar to troubleshooting in smoking meats at precise temperatures, egg cooking success depends on understanding how small timing adjustments affect final results.
Storage and Food Safety
Properly stored steamed eggs remain safe to eat for up to one week when kept in the refrigerator. Store cooled, peeled eggs in an airtight container or sealed plastic bag to prevent moisture loss and odor absorption. Unpeeled eggs actually last slightly longer as the shell provides additional protection.
Label your storage container with the date steamed to track freshness. When in doubt about age, discard the eggs—they’re inexpensive compared to potential food safety risks. Properly steamed eggs should smell mild and pleasant; any sulfurous or off odors indicate spoilage.
For meal prep purposes, steaming large batches on Sunday provides convenient protein throughout the week. Portion eggs into containers based on your meal plan needs. Steamed eggs work beautifully in meal preparation routines for consistent nutrition tracking and time savings.
Never leave steamed eggs at room temperature for more than two hours. If you’re transporting eggs for picnics or travel, use insulated containers with ice packs to maintain food safety standards. The USDA Food Safety Guidelines provide comprehensive information on egg storage and handling.
FAQ
Can I steam eggs in an Instant Pot?
Yes, absolutely. Add one cup of water to the Instant Pot, place the trivet inside, and arrange eggs on the trivet. Cook on high pressure for 5 minutes for soft-boiled, 8 minutes for jammy, and 10 minutes for hard-boiled. Use quick pressure release when the timer sounds, then transfer to ice bath immediately.
How do I adjust timing for extra-large eggs?
Extra-large eggs require approximately 1-2 additional minutes of steaming time compared to large eggs. Start checking at the standard time plus one minute to determine if additional time is needed. Quail eggs, conversely, require only 3-4 minutes.
Why are my steamed eggs still difficult to peel?
Ensure your eggs are 7-10 days old rather than very fresh. Fresh eggs have a lower pH, making the membrane stick to the white. Additionally, extend ice bath cooling to 15 minutes and peel under running water for best results.
Can I steam eggs ahead of time for meal prep?
Absolutely. Steamed eggs store safely in the refrigerator for up to one week. Peel them or leave shells intact depending on your storage preferences. Peeled eggs dry out slightly faster, so unpeeled storage extends freshness by a day or two.
What’s the difference between steaming and boiling eggs nutritionally?
Both methods preserve virtually identical nutritional content. Steaming offers no nutritional advantage over boiling, but provides superior texture and easier peeling. Choose steaming for consistency and convenience rather than nutritional reasons.
How do I steam eggs without a steamer basket?
A metal colander inverted over boiling water works perfectly. You can also place eggs directly on a folded piece of aluminum foil positioned above the water line. Any method that keeps eggs above boiling water while allowing steam circulation works effectively.


