How Long to Smoke a Whole Chicken: Chef-Backed Guide
Smoking a whole chicken is one of the most rewarding culinary projects for both beginners and experienced pitmasters. Unlike larger cuts that demand hours of patience, a properly smoked chicken delivers tender, juicy meat with a beautiful smoke ring in just a few hours. The key to success lies in understanding temperature control, preparation techniques, and the subtle timing adjustments that separate an average smoked chicken from an exceptional one.
Whether you’re firing up your first smoker or refining your technique, this comprehensive guide covers everything you need to know about smoking whole chicken. We’ll walk through preparation, temperature management, timing calculations, and professional tips that will elevate your backyard smoking game. By the end, you’ll have the confidence to produce restaurant-quality smoked chicken consistently.
Ideal Temperature and Timing Basics
The most common question pitmasters ask is straightforward: how long to smoke a whole chicken at 225 degrees? At this classic low-and-slow temperature, plan for approximately 30 to 45 minutes per pound. A 4-pound chicken typically requires 2 to 3 hours, while a 5-pound bird needs 2.5 to 3.5 hours. However, these are guidelines rather than absolutes—your actual cooking time depends on several variables including smoker type, outside temperature, humidity, and how often you open the smoker door.
Most professional pitmasters prefer smoking chicken between 225°F and 275°F. At the higher end of this range (275°F), you’ll reduce cooking time to roughly 20 to 30 minutes per pound. A 4-pound chicken at 275°F typically finishes in 80 to 120 minutes. This temperature range strikes an optimal balance between developing a proper smoke ring and maintaining meat moisture. The USDA Food Safety and Inspection Service mandates that poultry reach an internal temperature of 165°F in the thickest part of the thigh to be considered safe for consumption.
Temperature consistency matters more than absolute speed. Fluctuations in smoker temperature cause uneven cooking and can result in some portions being undercooked while others dry out. Invest in a quality dual-probe thermometer—one for monitoring smoker temperature and another for tracking the chicken’s internal temperature. This simple tool prevents most common smoking failures.
Preparing Your Chicken for Smoking
Proper preparation determines whether your smoked chicken will be memorable or mediocre. Start by selecting a whole chicken between 3.5 and 5 pounds. Smaller birds tend to dry out, while larger ones require extended cooking times that can compromise texture. Remove the chicken from refrigeration 30 to 45 minutes before smoking to allow it to reach closer to room temperature—this promotes more even cooking throughout.
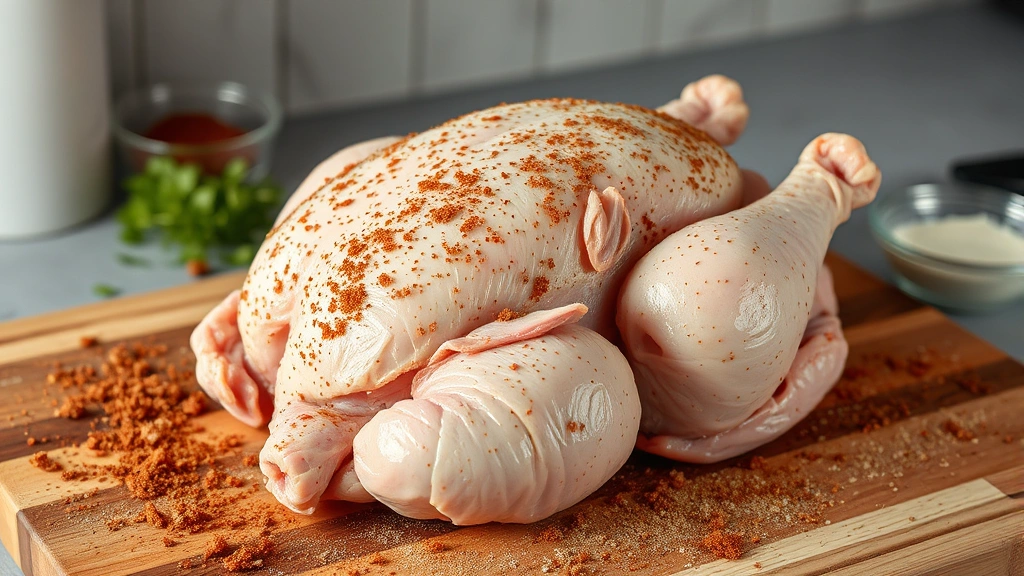
Pat the chicken completely dry using paper towels. Moisture on the skin prevents proper browning and smoke adhesion. Many experienced pitmasters use the technique of loosening the skin around the breast and thighs, then rubbing seasoning directly onto the meat underneath. This approach delivers more intense flavor than surface-only seasoning.
Apply your dry rub generously, covering all surfaces including inside the cavity. A basic but effective rub combines kosher salt, black pepper, paprika, garlic powder, and onion powder in equal parts. For those following National Center for Home Food Preservation guidelines, ensure your salt content meets food safety standards. Allow the seasoned chicken to sit uncovered in your smoker for 15 to 30 minutes before igniting the heat—this “pellicle” formation helps smoke adhere more effectively to the skin.
Consider injecting your chicken with a butter-based or broth-based injectable marinade. This technique, common among competition pitmasters, delivers moisture directly into the meat. Inject the marinade into the thickest parts of the thighs and breasts, using approximately 1 ounce of liquid per pound of chicken.
Smoking Temperature Zones
Understanding temperature zones helps you choose the right smoking approach for your situation. Low temperature smoking (225°F to 240°F) produces the most pronounced smoke flavor and the deepest color. This range requires patience but rewards you with exceptional results. Most whole chickens in this zone take 2.5 to 3.5 hours depending on size.
The medium temperature zone (250°F to 275°F) represents the sweet spot for most home smokers. It balances cooking speed with smoke penetration and flavor development. A typical 4-pound chicken finishes in approximately 90 to 120 minutes. This range works exceptionally well for gatherings where timing is critical because the shorter cooking window provides more predictability.
Higher temperature smoking (300°F and above) accelerates the process but reduces smoke ring development and can dry out poultry. Most experts recommend staying below 300°F when smoking whole chicken. If you’re short on time, smoking at 275°F and finishing the chicken in a hot oven (400°F) for the final 10 to 15 minutes provides acceptable results, though purists prefer the all-smoker method.
Before you begin, read your smoker’s manual and familiarize yourself with its temperature management system. Different smoker types—offset barrel smokers, vertical water smokers, pellet smokers, and electric models—all have unique characteristics affecting heat distribution and temperature stability. Offset smokers require more active temperature management, while pellet smokers offer digital temperature control that makes maintaining consistent heat significantly easier.
Step-by-Step Smoking Process
Step 1: Set Up Your Smoker
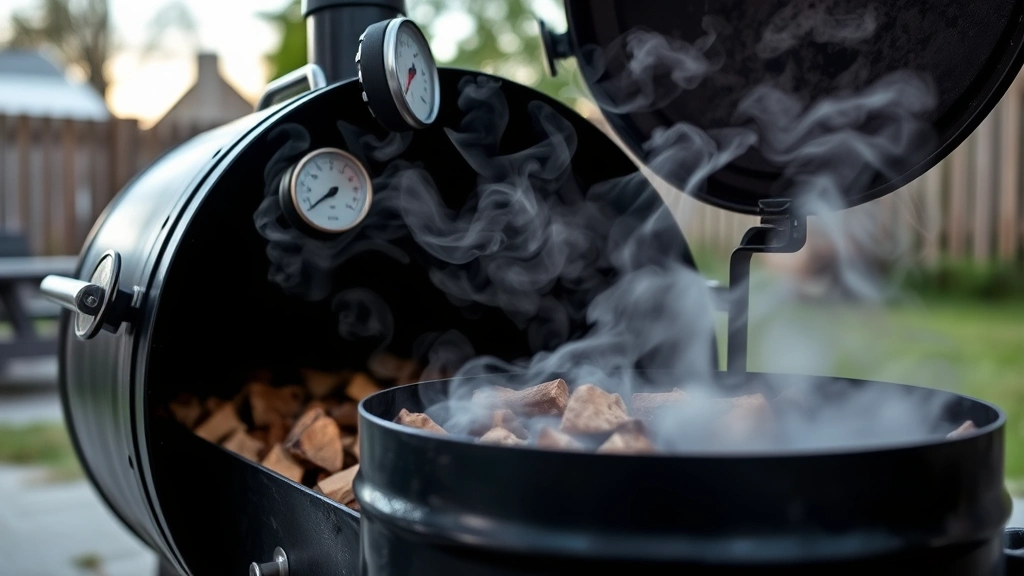
Fire up your smoker 30 to 45 minutes before cooking to allow temperature stabilization. Aim for your target temperature—225°F for traditional low-and-slow smoking, or 275°F for faster results. Place a water pan or drip pan below the grate to catch drippings and maintain humidity inside the smoking chamber. Some pitmasters add apple juice or cider to this water to enhance the final flavor profile.
Add your smoking wood to the firebox or wood tray. If you’re using a pellet smoker, load the hopper and let the system reach temperature. For offset smokers, establish a steady fire with your chosen wood type. Allow the smoke to turn thin and blue before placing your chicken on the grate—thick white smoke deposits acrid creosote that creates unpleasant flavors.
Step 2: Position the Chicken
Place your prepared chicken directly on the smoker grate, breast-side up. Position it away from direct heat if your smoker has hot and cool zones. Chicken cooks more evenly when positioned in the cooler section of the smoking chamber. If your smoker is relatively small, the chicken may need to sit closer to the heat source—just monitor temperature carefully and adjust grate position if needed.
Step 3: Monitor and Maintain
Resist the urge to constantly open the smoker door. Every time you open it, you lose heat and smoke, extending cooking time by 10 to 15 minutes. Check the chicken’s progress using your remote thermometer rather than lifting the lid. Most thermometers allow you to monitor temperature from outside the smoker.
Maintain your target smoker temperature throughout the cooking process. Add fuel and adjust vents as needed to keep temperature steady. If your smoker temperature fluctuates more than 15 to 20 degrees, the cooking time becomes unpredictable and results suffer.
Step 4: Spritz and Rotate (Optional)
Some pitmasters spritz their chicken every 30 minutes with apple juice or cider vinegar. This technique keeps the skin moist and can enhance color development. If you choose to spritz, use a spray bottle to mist the chicken quickly, minimizing door-opening time. Other experts skip this step entirely and still achieve excellent results.
Rotating the chicken halfway through cooking—turning it 180 degrees—helps ensure even heat exposure if your smoker has hot spots. This step is particularly important for offset smokers that produce more temperature variation across the cooking chamber.
Testing for Doneness
Never rely solely on cooking time to determine when your chicken is finished. Internal temperature is the only reliable indicator of doneness. Insert an instant-read thermometer into the thickest part of the thigh without touching bone. The chicken is done when this thermometer reads 165°F or higher.
Check the thigh temperature rather than the breast because thighs take longer to cook. Chicken breasts reach safe temperature around 160°F to 165°F, but waiting for the thighs to reach 165°F ensures the entire bird is properly cooked. Many pitmasters check both thigh and breast temperatures to ensure even cooking throughout.
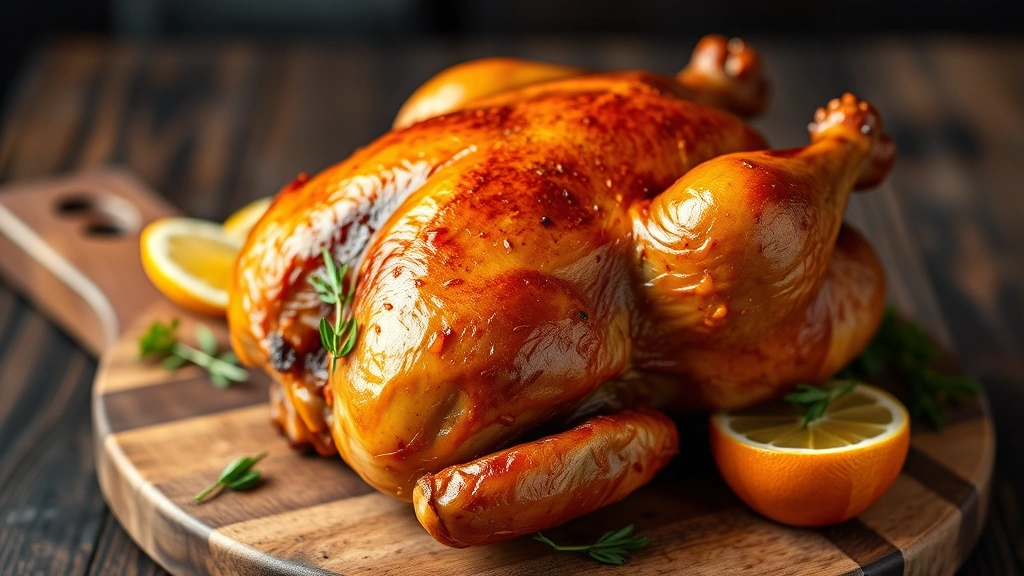
The chicken’s juices should run clear when you pierce the thickest part of the thigh. While this is less reliable than a thermometer, it provides a secondary verification that cooking is complete. The skin should appear deep golden-brown or mahogany-colored with a visible smoke ring just beneath the surface.
If your chicken reaches 165°F in the thigh but the skin hasn’t developed the color you desire, transfer it to a 400°F oven for 5 to 10 minutes to finish the crust. This technique, similar to reverse searing a steak, provides excellent color while maintaining moisture inside.
Resting and Serving
Remove the chicken from the smoker when it reaches target temperature and place it on a cutting board. Let it rest for 10 to 15 minutes before carving. During this resting period, carryover cooking continues slightly—the internal temperature may rise 2 to 5 degrees—and the meat’s fibers relax, allowing juices to redistribute throughout the bird. Cutting into the chicken immediately after smoking causes these valuable juices to run onto the plate rather than staying in the meat.
Once rested, carve the chicken by first removing the legs (thighs and drumsticks), then the wings, and finally slicing the breasts. If you’ve prepared multiple chickens, consider stacking them on a serving platter and tenting loosely with foil to keep them warm while you finish carving.
Smoked chicken pairs beautifully with simple sides that don’t compete with the subtle smoke flavor. Consider serving with cornbread, coleslaw, or roasted vegetables. The BBQ Guys community frequently recommends pairing smoked chicken with traditional barbecue sides and sauces, though the bird itself typically doesn’t need sauce if properly seasoned and smoked.
Common Mistakes to Avoid
Overcooking the Chicken
The most frequent error is cooking chicken too long. Remember that chicken continues cooking as it rests, so pull it from the smoker at 160°F in the thigh if you prefer juicier results. The carryover cooking will bring it to a safe 165°F within minutes of resting. This technique requires slightly more attention but delivers noticeably juicier results.
Inadequate Smoker Preparation
Failing to properly season your smoker or allowing thick white smoke to coat the chicken ruins the final product. Always aim for thin, blue smoke. If you’re seeing heavy white smoke, your fire is too cool or your wood is too wet. Allow the fire to burn hotter or use seasoned wood that’s been stored in a dry location.
Temperature Fluctuations
Opening the smoker door frequently to check progress causes temperature swings that extend cooking time unpredictably. Use a remote thermometer probe instead. Quality thermometers cost $30 to $80 and pay for themselves through improved results and reduced guesswork.
Skipping the Dry Rub
Smoking chicken without proper seasoning results in bland meat regardless of smoking technique. Invest time in a quality dry rub or brine your chicken overnight before smoking. The difference between seasoned and unseasoned smoked chicken is dramatic.
Wet Skin Before Smoking
Excess surface moisture prevents proper browning and smoke adhesion. Pat your chicken completely dry with paper towels before applying seasoning. This simple step dramatically improves the final texture and appearance.
Wood Selection and Smoke Profile
The type of wood you burn significantly impacts flavor. Apple wood produces a mild, slightly sweet smoke that complements poultry beautifully. Cherry wood adds a touch of fruity flavor and creates an attractive reddish color on the skin. Hickory delivers a stronger, more traditional barbecue flavor that some find too intense for delicate chicken. Oak provides a medium-strength smoke that works well for most applications.
Avoid softwoods like pine or fir, which contain resins that create acrid, unpleasant flavors. Never use treated lumber or scrap wood of unknown origin. Always purchase smoking wood from reputable suppliers who ensure proper seasoning and quality control.
Many competition pitmasters blend different woods to create custom smoke profiles. A combination of apple and cherry wood, for instance, creates complexity that pure single-wood smoking can’t achieve. Start with single-wood smoking to understand each variety’s characteristics, then experiment with blends once you’ve developed baseline competence.
If you’re using a pellet smoker, you have less control over wood type since the system feeds consistent pellets. However, premium pellet brands offer diverse wood varieties including specialty blends designed specifically for poultry. Check your smoker manufacturer’s recommendations for wood pellet types to ensure optimal performance.
For those interested in expanding their smoking repertoire, exploring how long to smoke prime rib at 225, how long to smoke pork loin at 225, or how long to smoke a brisket at 225 provides valuable context for understanding how different proteins respond to similar temperature and time parameters. Each meat type requires slightly different approaches, but the fundamental principles remain consistent.
Understanding how long to rest a brisket also helps inform poultry resting practices, as the principles behind carryover cooking and juice redistribution apply across all smoked meats.
FAQ
How long does a 4-pound whole chicken take to smoke at 225°F?
A 4-pound chicken typically requires 2 to 3 hours at 225°F, depending on your smoker’s consistency and environmental factors. The general rule of 30 to 45 minutes per pound provides a reliable estimate. Always verify doneness using an instant-read thermometer rather than relying solely on time.
Can I smoke a frozen chicken?
Never smoke a frozen chicken. Thaw it completely in your refrigerator over 24 hours before smoking. Frozen poultry won’t cook evenly, and the exterior may overcook while the interior remains dangerously undercooked. Additionally, food safety guidelines recommend thawing poultry only in the refrigerator or cold water, not at room temperature.
What’s the difference between smoking chicken at 225°F versus 275°F?
At 225°F, chicken takes approximately 2.5 to 3.5 hours and develops a deeper smoke flavor and color. At 275°F, the same chicken finishes in 90 to 120 minutes with slightly less pronounced smoke characteristics. Choose your temperature based on available time and desired smoke intensity. The 275°F method works well when you need faster results without sacrificing quality.
Should I brine my chicken before smoking?
Brining overnight before smoking significantly improves juiciness and flavor. A basic brine consists of salt, sugar, and water in a 1:1:8 ratio. However, a quality dry rub also produces excellent results. Brining adds extra moisture but requires planning ahead. For best results, combine brining with a flavorful dry rub.
How do I prevent my smoked chicken from drying out?
Avoid overcooking by removing the chicken at 160°F in the thigh and allowing carryover cooking to bring it to 165°F during the resting period. Additionally, use an injected marinade, brine the chicken beforehand, or maintain a water pan in your smoker to add humidity. Smoking at slightly lower temperatures (225°F rather than 300°F) also preserves moisture better.
Can I smoke multiple chickens at once?
Yes, you can smoke multiple chickens simultaneously as long as your smoker has adequate space and can maintain consistent temperature. Arrange them so air circulates between birds. Cooking time remains approximately the same since the smoker temperature stays constant. Monitor each chicken’s internal temperature individually to ensure even doneness.
What internal temperature indicates my smoked chicken is done?
The USDA mandates 165°F in the thickest part of the thigh. Check temperature in the thigh rather than the breast because thighs cook slower. Once the thigh reaches 165°F, the entire bird is safe to eat. Many pitmasters pull at 160°F to account for carryover cooking, resulting in juicier meat.


