Can You Build a Shed? Expert Tips Inside
Building a shed is one of the most rewarding DIY projects you can undertake. Whether you’re looking to create extra storage space, a workshop, or a peaceful retreat in your backyard, a shed offers practical value and genuine satisfaction upon completion. The question isn’t whether you can build a shed—it’s whether you’re ready to commit the time, effort, and resources to see the project through successfully.
Many homeowners underestimate their ability to construct a functional outdoor structure. With proper planning, the right tools, and adherence to building codes and safety standards, most people can successfully build a shed that will last for decades. This comprehensive guide walks you through every aspect of shed construction, from initial planning through final touches, ensuring you have the knowledge and confidence to tackle this exciting project.
Assessing Your Skills and Experience
Before you commit to building a shed, honestly evaluate your current skill level and experience with construction projects. Building a shed doesn’t require professional carpentry expertise, but it does demand basic competency with tools, ability to follow measurements precisely, and patience with problem-solving. If you’ve successfully completed DIY car repairs or home improvement projects, you likely have the foundational skills needed.
Consider your comfort level with the following tasks: using power tools safely, reading and interpreting blueprints, understanding basic carpentry joints, and working at heights. If these activities make you nervous, start with smaller projects first. You might also consider taking a hands-on workshop or consulting building guides to build confidence before breaking ground.
Physical capability matters too. Shed construction involves lifting heavy materials, working outdoors in various weather conditions, and maintaining proper posture while performing repetitive tasks. Enlist help from friends or family members—this isn’t just practical; it makes the experience more enjoyable and safer overall.
Understanding Local Building Codes and Permits
One of the most critical aspects of shed construction that many DIYers overlook is compliance with local building codes and permit requirements. These regulations exist to ensure structural safety, protect property lines, and maintain neighborhood standards. Ignoring them can result in fines, inability to sell your home, or requirements to demolish your completed shed.
Contact your local building department or code enforcement office to determine what permits and inspections your shed project requires. Most jurisdictions require permits for structures over a certain size—typically 100-200 square feet, though this varies by location. Even smaller sheds may need approval regarding setback requirements from property lines and neighboring structures.
Building codes address structural integrity, roof load capacity for your climate, foundation requirements, and ventilation standards. The International Code Council (ICC) publishes the International Building Code (IBC), which forms the basis for most local codes. Your jurisdiction may adopt this code with local amendments. Review your specific local codes before finalizing your design to avoid costly modifications later.
Permit costs typically range from $50-$300 depending on your location and shed size. This investment protects you legally and ensures your structure meets safety standards. Inspectors will verify foundation work, framing integrity, roof installation, and electrical work if applicable. Building inspections throughout the process catch problems early when they’re easier to correct.
Choosing Your Shed Design and Size
The next critical decision involves selecting your shed’s size and design. Purpose drives this choice—a storage shed has different requirements than a workshop or she-shed retreat space. Consider what you’ll store or do in your shed, how much space you actually need, and what design complements your home’s aesthetic.
Common shed sizes include 8×10 feet (80 square feet), 10×12 feet (120 square feet), 12×16 feet (192 square feet), and larger structures. Smaller sheds work well for basic storage and are more affordable and easier to build. Larger sheds provide workshop space, multiple storage zones, or comfortable retreat areas but require more materials and construction time.
Design options range from simple rectangular structures with gabled roofs to more elaborate styles with windows, porches, or decorative elements. Your choice affects complexity and cost. A basic gabled roof design is relatively straightforward for beginners, while saltbox or gambrel roofs require more advanced carpentry skills. Research designs on DIY building blogs and construction resources to find inspiration and realistic plans.
Consider your site’s orientation. Position your shed to take advantage of natural light if it includes windows, and ensure proper drainage away from the foundation. Account for future access—you’ll need room to maintain the exterior and open doors fully. Check utility locations before finalizing placement, as you don’t want to build over underground electrical, gas, or water lines.
Essential Tools and Materials
Successful shed construction requires both proper tools and quality materials. You don’t need professional-grade equipment, but basic tools should be reliable and well-maintained. Essential hand tools include a tape measure, level, circular saw, drill-driver, hammer, square, and safety equipment (glasses, gloves, dust mask).
Power tools make the project significantly easier and faster. A miter saw cuts lumber accurately and quickly for framing. A reciprocating saw handles rough cuts and demolition work. A nail gun speeds fastening dramatically compared to hand-nailing. A table saw provides precision for rip cuts. Rent equipment you won’t use frequently—most tool rental shops charge reasonable daily or weekly rates.
Material selection impacts both durability and cost. Pressure-treated lumber resists rot and insect damage, making it ideal for sills and framing members near ground level. Cedar or redwood offers natural rot resistance and attractive appearance for exterior surfaces. Standard dimensional lumber (2x4s, 2x6s) handles most framing requirements. Plywood serves as sheathing and subflooring. Metal roofing, asphalt shingles, or corrugated panels offer different durability and aesthetic options.
For a typical 8×10 shed, expect to spend $1,500-$3,000 on materials, depending on quality and finishes. Pressure-treated lumber costs more than standard pine but lasts significantly longer. Quality roofing materials prevent costly leaks. Don’t compromise on fasteners—use hot-dipped galvanized or stainless steel nails and screws to prevent rust.
Foundation Preparation and Installation
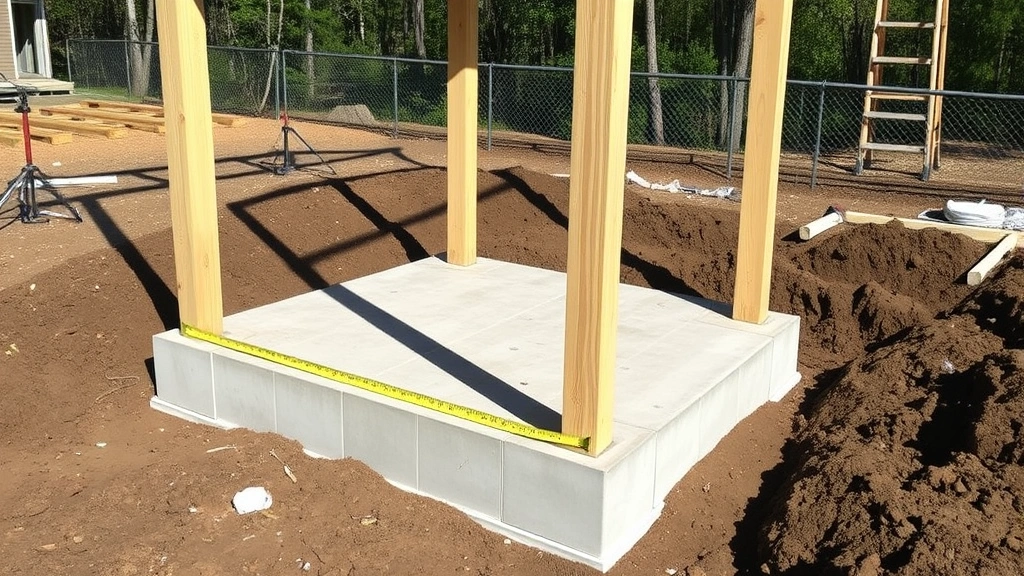
A proper foundation is absolutely essential for shed longevity. Poor foundation work leads to rot, structural failure, pest infiltration, and interior moisture problems. Your foundation type depends on climate, soil conditions, and local building codes. Common options include concrete piers, concrete slabs, and gravel pads with pressure-treated skids.
Concrete piers provide excellent drainage and frost protection in freeze-thaw climates. Dig holes below the frost line (depth varies by region—typically 2-4 feet), set concrete-filled pier tubes, and install pressure-treated posts. This method prevents frost heave that can warp or crack structures built on shallow foundations.
A concrete slab offers a solid, level surface and works well in warmer climates with stable soil. Proper grading ensures water drains away from the structure. Slab edges should be thickened and reinforced with rebar. A concrete slab typically costs $300-$600 for an 8×10 shed but provides decades of trouble-free service.
Gravel pads with pressure-treated skids suit temporary or budget-conscious installations but offer less protection long-term. Level the ground carefully, compact gravel thoroughly, and ensure proper drainage. Replace gravel annually and inspect skids regularly for rot.
Whatever foundation you choose, ensure it’s perfectly level—even slight slopes cause framing issues and operational problems with doors and windows. Use a laser level or long straightedge to verify levelness before proceeding with framing work.
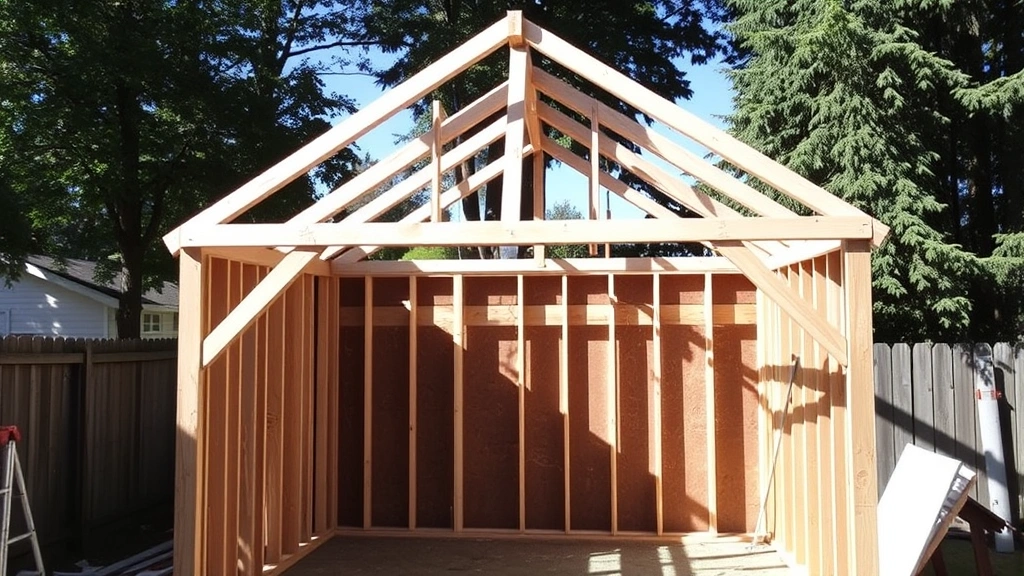
Framing Your Shed Structure
Framing is where your shed truly takes shape. This phase requires precision and attention to detail, as framing errors compound throughout construction. Begin by establishing your floor frame with pressure-treated rim joists and floor joists on proper spacing (typically 16 inches on center). Install rim joists and band boards to create a rectangular frame, then add interior joists for support.
Sheath the floor frame with pressure-treated plywood, secured with corrosion-resistant fasteners. This creates a solid working surface for wall framing and protects against moisture and pests. Stagger plywood seams and leave 1/8-inch gaps for expansion.
Wall framing follows standard construction practices: vertical studs spaced 16 inches on center, connected to top and bottom plates. Use 2×4 lumber for walls on most sheds. Mark stud locations on top and bottom plates before assembly, then assemble walls on the ground and raise them into position. This is significantly easier than building walls in place, especially for beginners.
Include headers above windows and doors sized according to the opening span. A rough opening typically requires a header made from doubled 2x6s or 2x8s, depending on width and roof load. Proper headers prevent sagging and structural failure around openings.
Brace walls temporarily with diagonal members until they’re properly connected, then install permanent diagonal bracing or plywood sheathing for lateral stability. This bracing resists wind and racking forces that can distort the structure.
Install wall sheathing (plywood or oriented strand board) to provide weather resistance and structural strength. Stagger seams and space fasteners 6 inches on center at edges and 12 inches in the field. Sheathing significantly strengthens the structure against wind and impacts.
Roofing Systems and Installation
Your roof design affects both aesthetics and functionality. A simple gabled roof (two sloping planes meeting at a peak) is easiest for beginners and sheds water effectively. Shed roofs (single sloping plane) are even simpler but offer less interior headroom. More complex designs like gambrel or saltbox roofs provide additional storage but require advanced carpentry skills.
Roof framing begins with determining the proper pitch (slope). Most areas require at least a 4:12 pitch (4 inches of vertical rise for every 12 inches of horizontal run) for adequate drainage and snow shedding. Steeper pitches (6:12 or 8:12) look more attractive but require more materials. Rafters are the structural members supporting roof loads.
Calculate rafter length using the Pythagorean theorem or rafter tables based on your pitch and span. Cut bird’s mouth notches where rafters meet the top plates to ensure proper seating. Install collar ties between opposite rafters to resist thrust forces that push walls outward. Roof trusses—prefabricated triangular assemblies—offer an alternative to site-built rafters and arrive ready to install.
Roof sheathing typically uses 1/2-inch plywood or OSB, installed perpendicular to rafters. Space fasteners 6 inches on center at edges and 12 inches in the field. Proper sheathing prevents rafter deflection and provides a surface for fastening roofing materials.
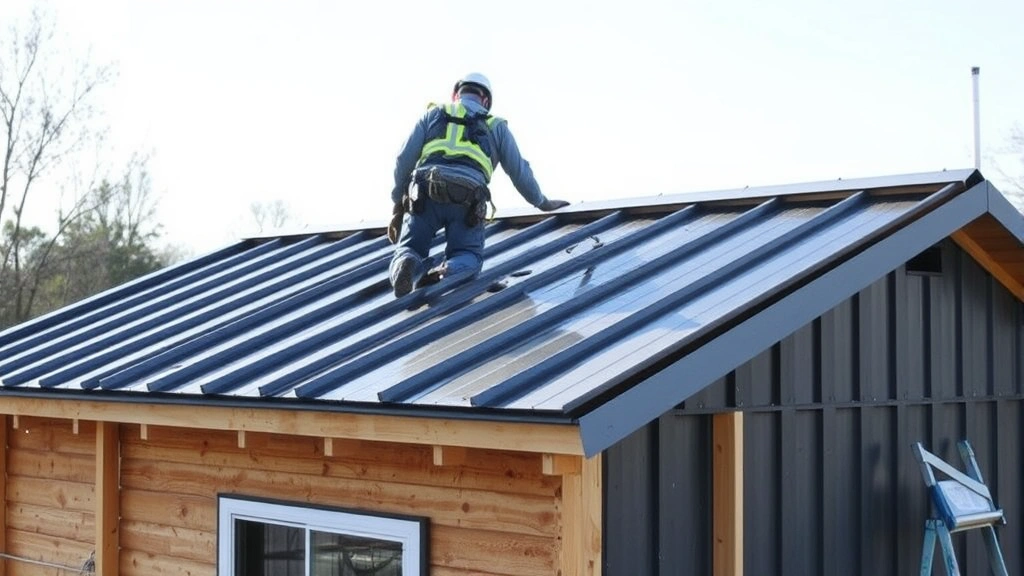
Roofing material choices include asphalt shingles (most affordable, 15-20 year lifespan), metal roofing (durable, 40+ year lifespan), or corrugated panels (economical, moderate lifespan). Install underlayment (roofing felt or synthetic) before applying the final roofing material. This provides additional water protection and extends roof life. Follow manufacturer specifications for fastening patterns and overlap requirements—improper installation voids warranties and causes premature failure.
Exterior Finishing and Weatherproofing
Weatherproofing protects your shed investment and preserves the structure for decades. Begin with proper flashing—metal or rubber strips that direct water away from vulnerable areas like roof-wall junctions, window and door openings, and penetrations. Flashing installation is critical; water that gets behind exterior surfaces causes hidden rot and structural damage.
Install gutters and downspouts to manage roof runoff. Gutters direct water to downspouts that carry it away from the foundation. Without gutters, water cascades off the roof and saturates soil adjacent to the structure, promoting foundation problems and erosion.
Exterior siding options include wood, vinyl, metal, or composite materials. Wood siding offers traditional aesthetics but requires regular maintenance—painting or staining every 5-7 years. Vinyl siding is low-maintenance and affordable but less durable than other options. Metal or composite siding provides excellent durability with minimal maintenance. Whatever material you choose, ensure proper installation with adequate fastening and spacing for expansion.
Caulk all seams, joints, and penetrations with exterior-grade sealant to prevent water infiltration. Quality caulk remains flexible through temperature extremes and maintains a weather-tight seal for 10+ years. Poor caulking is a common source of water damage in otherwise well-built sheds.
Paint or stain exterior surfaces to protect wood and enhance appearance. Quality exterior paint or stain includes UV protection and fungicides to prevent damage and discoloration. Proper surface preparation—cleaning, sanding, and priming—ensures paint adhesion and longevity. Plan to repaint or restain every 5-10 years depending on climate and product quality.
Interior Setup and Organization
Once your structure is weathertight, focus on interior functionality. Install insulation if you plan to spend significant time in the shed or store temperature-sensitive items. Fiberglass batts, blown cellulose, or foam board all work well. Proper ventilation prevents moisture accumulation that causes mold and wood decay.
Flooring options include stained or sealed concrete, vinyl tiles, or wood planks. Sealed concrete is economical and durable for storage sheds. Wood flooring offers warmth and comfort for workshop or retreat spaces but requires moisture protection and regular maintenance. Proper grading ensures water drains away from the structure, preventing puddles and moisture problems.
Lighting and electrical work require careful planning and adherence to electrical codes. Consult a licensed electrician if you’re unfamiliar with electrical work. Improper installation creates fire and shock hazards. Many jurisdictions require permit and inspection for any electrical work in accessory structures. For simple setups, battery-powered LED lighting offers a safe, code-compliant alternative to hardwired systems.
Storage solutions maximize shed utility. Wall-mounted shelving, pegboards, and overhead racks organize tools and supplies efficiently. Plan storage layout before finalizing interior dimensions to ensure everything fits as intended. Well-organized storage makes your shed more functional and encourages regular use.
Climate control features enhance comfort and protect stored items. Ventilation prevents moisture accumulation and mold growth. In hot climates, shade cloth or light-colored roofing materials reduce interior temperatures. In cold climates, insulation and weatherstripping maintain warmth if you’ll use the shed year-round.
FAQ
What’s the average cost to build a shed yourself?
A basic 8×10 shed typically costs $1,500-$3,000 in materials depending on quality and finishes. Labor costs for professional construction range from $3,000-$8,000 or more. DIY construction saves labor costs but requires your time and effort. Larger sheds or those with advanced features cost proportionally more. Understand realistic timelines before starting to plan your budget accurately.
Do I need a permit for my shed?
Most jurisdictions require permits for sheds over 100-200 square feet. Even smaller sheds may need approval regarding setback requirements and property line compliance. Contact your local building department to determine specific requirements. Permit costs typically range from $50-$300. Building without required permits risks fines and requirements to demolish your completed structure.
What’s the best foundation for a shed?
Foundation choice depends on your climate and soil conditions. Concrete piers provide excellent drainage and frost protection in freeze-thaw climates. Concrete slabs offer solid, level surfaces in stable soil conditions. Gravel pads with pressure-treated skids work for temporary or budget-conscious installations but require more maintenance. Consult local building codes and soil conditions when choosing your foundation type.
How long does shed construction typically take?
A basic 8×10 shed typically takes 2-4 weeks for a single person working part-time or 1-2 weeks with help. Larger or more complex designs require additional time. Weather delays and permit inspections can extend timelines. Plan for flexibility and don’t rush—quality construction takes time.
What tools do I absolutely need?
Essential hand tools include a tape measure, level, circular saw, drill-driver, hammer, and square. Safety equipment (glasses, gloves, dust mask) is non-negotiable. Renting power tools like miter saws, table saws, and nail guns makes the project significantly easier. Most tool rental shops charge reasonable daily or weekly rates for equipment you won’t use frequently.
Can I build a shed without prior construction experience?
Yes, with proper planning and research, most people can successfully build a shed. Start with a simple design, follow proven plans, and don’t hesitate to ask questions or seek help. Watch instructional videos and consult DIY building resources before and during construction. Consider taking a hands-on workshop to build confidence with tools and techniques.
What’s the most common mistake people make when building sheds?
Skipping or rushing foundation work is the most common and costly mistake. Poor foundations lead to structural failure, rot, and pest problems that are expensive to repair. Taking time to properly prepare and install your foundation pays dividends for decades. The second most common mistake is neglecting proper weatherproofing—inadequate flashing, caulking, and drainage lead to water infiltration and hidden damage.


