DIY Shed Building? Expert-Backed Guide to Constructing Your Own Storage Structure
Building your own shed is one of the most rewarding DIY projects you can undertake. Whether you need extra storage for tools, garden equipment, or seasonal items, a well-constructed shed adds both functionality and value to your property. This comprehensive guide walks you through every step of the process, from planning and permits to foundation work and final finishing touches.
A shed project requires careful planning, proper materials, and attention to building codes and safety standards. Unlike some DIY endeavors, shed construction demands precision in framing, roofing, and weatherproofing to ensure your structure stands the test of time. This guide combines expert recommendations with practical insights to help you build confidently.
Planning Your Shed Project
Before you purchase a single board, invest time in thorough planning. Determine what size shed you need based on intended use and available space. Most homeowners build sheds ranging from 8×10 feet to 12×16 feet, though smaller 6×8 models work for basic tool storage. Consider future needs—it’s often worth building slightly larger than your current requirements suggest.
Create detailed plans or purchase pre-made shed plans from reputable sources. Your plans should include exact dimensions, material lists, and construction sequencing. Our DIY building resources can guide you through initial planning phases. Quality plans prevent costly mistakes and ensure structural integrity. If you’re new to building projects, consult resources on becoming a carpenter to understand fundamental construction principles that apply to shed building.
Calculate material costs accurately by creating an itemized list: lumber, roofing materials, fasteners, door hardware, and finishing supplies. Budget for tools you may need to purchase or rent, including a circular saw, drill, level, and safety equipment. Add 10-15% to your estimate for waste and unforeseen expenses.
Understanding Building Codes and Permits
Building codes exist to ensure safety, structural soundness, and property value protection. Most jurisdictions require permits for structures over 100-200 square feet, though many areas require them for any permanent building. Check with your local building department before starting—violations can result in fines and required removal of non-compliant structures.
Building codes typically address:
- Setback requirements: Minimum distances from property lines and existing structures
- Foundation standards: Frost depth requirements and proper load distribution
- Wind and snow load ratings: Structural capacity for your climate zone
- Electrical standards: If adding outlets or lighting, compliance with NFPA electrical codes
- Ventilation requirements: Moisture control and air circulation
Contact your local International Code Council (ICC) certified building official for specific requirements. Most departments provide checklists and inspection schedules. Obtaining proper permits actually protects you—inspections catch problems before they become expensive structural issues.
Selecting the Right Location
Location determines your shed’s longevity and functionality. Choose a spot with good drainage to prevent water pooling around the foundation. Avoid low-lying areas where water accumulates during rain. Ideally, position your shed on slightly elevated ground or grade the area to slope away from the structure.
Consider sun exposure—excessive heat can warp wood and damage stored items, while excessive shade promotes moisture and mold growth. Morning sun with afternoon shade is ideal. Ensure adequate distance from property lines per local codes, typically 5-10 feet depending on jurisdiction. Verify utility line locations (call 811 or your local utility locator service) before digging foundations.
Access is crucial. Position your shed where you can easily move equipment in and out. Consider prevailing winds—position door openings away from dominant wind directions to prevent wind-driven rain from entering. Check sight lines to ensure the shed doesn’t create dead zones affecting property visibility or security. If you’re concerned about security, review our home security guide for storage protection strategies.
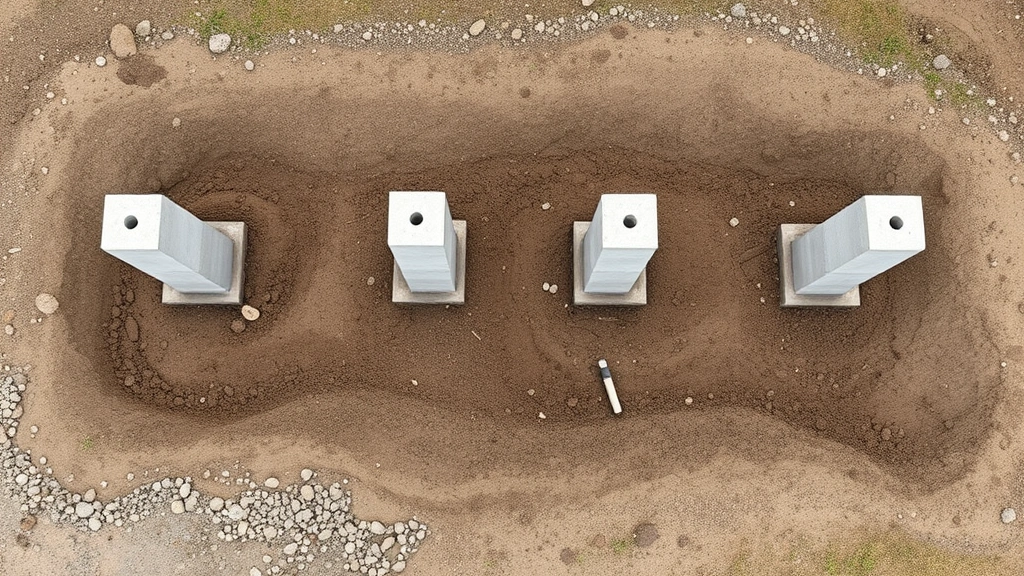
Foundation Installation Essentials
A proper foundation is non-negotiable for shed longevity. Poor foundations lead to settling, shifting, and structural failure. Three primary options exist: concrete piers, concrete slabs, and skid foundations.
Concrete Piers are ideal for most climates. Dig holes below the frost line (varies by region—consult local codes for your area’s frost depth, typically 2-4 feet). Set concrete piers at each corner and every 4-6 feet along the structure. Piers should extend above grade by 12-18 inches, with a concrete pad at the base for load distribution. This approach allows air circulation underneath, reducing moisture problems.
Concrete Slabs work well in warm climates without freeze-thaw cycles. A 4-6 inch reinforced concrete slab provides excellent support and protects against ground moisture. Slabs require proper grading, compacted base material, and perimeter footings below frost line in colder regions.
Skid Foundations use pressure-treated wood or concrete blocks. While budget-friendly, this method requires careful monitoring for settling and deterioration. Skids are acceptable for temporary structures but less ideal for permanent sheds.
Level your foundation precisely—even slight slopes cause wall misalignment and operational problems. Use a laser level or transit to check foundation elevation at multiple points. Concrete should cure fully (7-14 days) before building begins.
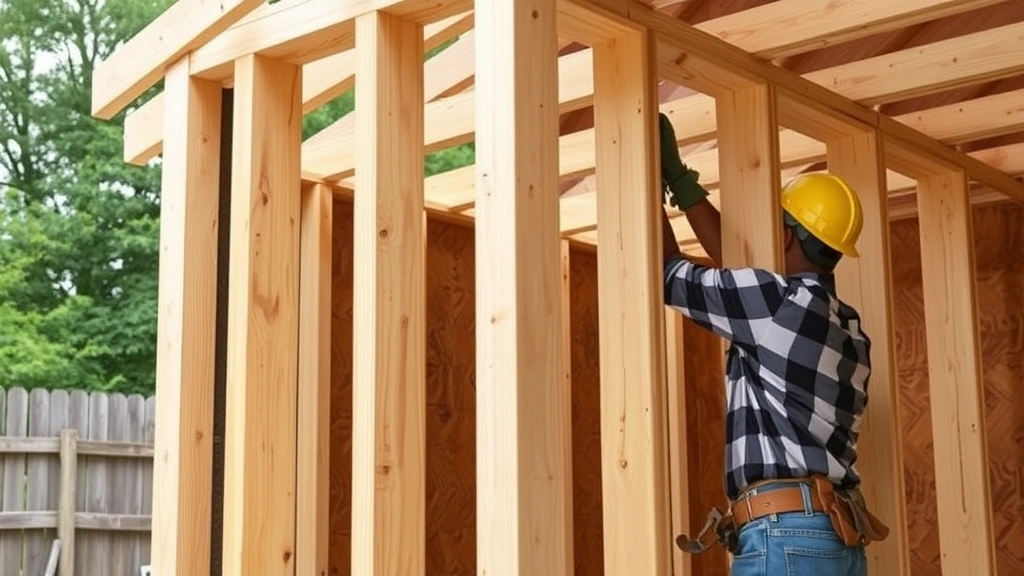
Framing and Wall Construction
Proper framing creates a strong, square structure. Use pressure-treated lumber for bottom plates (the base frame) to resist moisture and decay. Standard wall framing uses 2×4 lumber spaced 16 inches on center for residential-style sheds, or 24 inches on center for lighter-duty structures.
Build wall frames on the ground, then raise them into position. This method is faster and safer than building in place. Ensure frames are square by checking diagonal measurements—they should be equal. Brace walls temporarily with diagonal bracing until roof trusses or beams are installed to provide lateral bracing.
Stud spacing affects sheathing and siding options. Wider spacing (24 inches) requires thicker sheathing to prevent sagging. Consider this when selecting materials. Install wall sheathing (plywood or OSB) to create a structural diaphragm that ties the frame together and resists racking (diagonal shifting).
Door and window openings require headers—horizontal beams that span the opening and carry roof load. Header size depends on opening width and roof load. Consult American Wood Council span tables or structural guides for proper sizing. Undersized headers lead to sagging doors and structural failure.
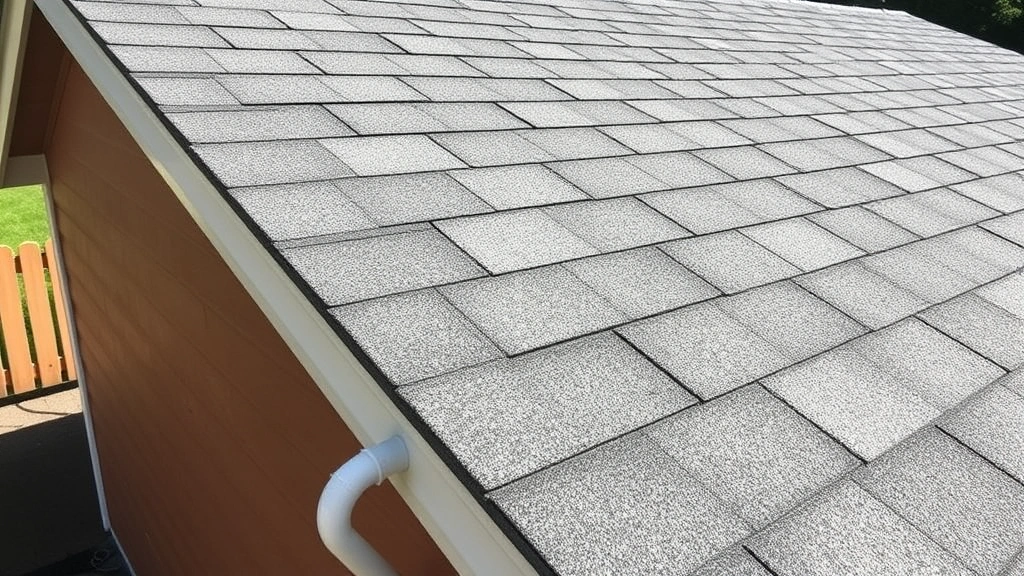
Roofing Your Shed
The roof is your shed’s primary defense against weather. Roof design should shed water efficiently and withstand your region’s snow and wind loads. Common shed roof styles include gable (peaked) and single-slope (shed-style) designs.
Roof Trusses vs. Rafters: Pre-made trusses are faster and often more economical than site-built rafters. Trusses are engineered for specific spans and loads. If building rafters on-site, ensure proper sizing and collar tie spacing to prevent spreading. Inadequate bracing causes roof sag and eventual structural failure.
Roof pitch (slope) affects water drainage and snow shedding. Minimum pitch is typically 3:12 (3 inches of rise per 12 inches of horizontal run) for shingles, though steeper pitches (6:12 or greater) improve drainage and reduce ice dam risk. Steeper roofs are safer but use more materials and are harder to install.
Sheathing material depends on your roofing choice. Asphalt shingles require solid sheathing (plywood or OSB). Metal roofing can use spaced purlins in some cases. Install underlayment (roofing felt or synthetic) before shingles to provide secondary water protection. Proper ventilation under the roof prevents moisture accumulation and extends shingle life—use soffit vents and ridge vents to allow airflow.
Weatherproofing and Siding
Weatherproofing protects your shed and stored contents from moisture intrusion. Install house wrap or felt underlayment before siding to create a moisture barrier. This is critical—wood deterioration from moisture causes expensive repairs and structural failure.
Siding options include wood, metal, vinyl, and fiber cement. Wood provides classic appearance but requires regular maintenance. Metal and vinyl are low-maintenance and durable. Fiber cement combines durability with wood appearance. Your choice depends on budget, aesthetics, and maintenance tolerance.
Flash all penetrations—where roof meets walls, around doors and windows, and where utilities enter. Flashing prevents water from entering at these vulnerable points. Use quality, durable flashing materials and seal all joints with appropriate caulk or sealant.
Install gutters and downspouts to direct roof runoff away from the foundation. This prevents water pooling and foundation saturation. Downspouts should extend at least 4-6 feet from the structure. Consider relating this to broader home protection—review our basement finishing guide for moisture control principles that apply to above-ground structures.
Interior Finishing and Organization
Interior finishing depends on intended use. Tool sheds benefit from wall-mounted storage systems, pegboards, and shelving. Workbenches or potting tables serve specific purposes. Ensure adequate ventilation to prevent moisture and mold—operable vents or windows help significantly.
Flooring options include concrete, wood, or compacted gravel. Concrete is durable and easy to clean. Wood provides traditional appeal but requires maintenance. Gravel is economical but doesn’t provide clean workspace. If adding electrical outlets or lighting, ensure proper wiring and protection. Consult National Electrical Contractors Association (NECA) guidelines for safe exterior wiring practices.
Paint or stain exterior wood surfaces to extend life and improve appearance. Quality exterior stain or paint protects wood from UV damage and moisture. Plan on re-coating every 3-5 years depending on climate. Interior surfaces can be left natural or painted for easy cleaning and brighter appearance.
For those with broader building interests, explore woodworking plans for custom shelving and storage solutions. Additionally, understanding painting techniques helps you finish your shed professionally.
FAQ
Do I need a permit for a shed?
Most jurisdictions require permits for permanent structures, particularly those exceeding 100-200 square feet. Some areas require permits for any structure. Check local building department requirements before starting. Obtaining permits protects you legally and ensures your structure meets safety standards.
What’s the minimum foundation depth?
Foundation depth depends on your region’s frost line—the depth soil freezes in winter. Frost heave (ground expansion during freezing) causes foundation shifting and structural damage. Frost lines range from 2-4 feet deep. Consult your local building department for specific requirements in your area.
Can I build a shed on a sloped property?
Yes, but you’ll need to level the building site. This might involve cutting and filling or building on piers at different heights. Proper grading ensures water drains away from the foundation. Consult local codes for maximum slope allowances and proper drainage design.
What roof pitch should I use?
Minimum pitch for asphalt shingles is 3:12, though 4:12 or steeper is better for water shedding and snow removal. Steeper pitches improve drainage but increase material costs and installation difficulty. Your climate’s snow and rain intensity should influence your choice.
How long does shed construction typically take?
A 10×12 shed typically takes 2-4 weeks for an experienced DIYer working part-time. Timelines vary based on experience, weather, and complexity. Foundation curing adds 1-2 weeks to the schedule. Budget extra time for permitting and inspections.
What safety precautions are essential?
Always wear appropriate PPE: safety glasses, work gloves, dust masks, and hearing protection. Use proper ladder safety when working at heights. Ensure tools are properly grounded and maintained. Follow manufacturer instructions for all power tools. Never rush—most accidents occur when people work too quickly or skip safety steps.


