Build a Pole Barn: Pro Tips and Essentials
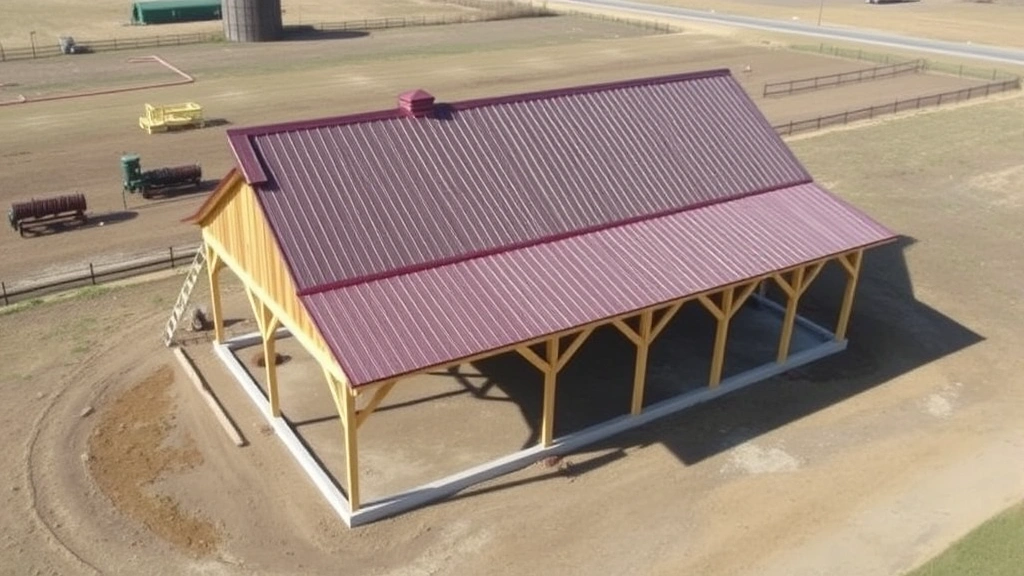
A pole barn represents one of the most versatile and cost-effective structures you can build on your property. Whether you need additional storage, a workshop, livestock shelter, or covered parking, pole barns offer exceptional flexibility with minimal foundation requirements. Unlike traditional stick-frame construction, pole barns utilize large wooden posts anchored directly into the ground, eliminating the need for expensive concrete foundations while maintaining structural integrity and durability.
This comprehensive guide walks you through every stage of pole barn construction, from initial planning and site preparation through final finishing touches. We’ll cover essential tools, materials, safety protocols, and professional techniques that ensure your project meets local building codes and stands strong for decades. Whether you’re a seasoned DIY enthusiast or tackling your first major building project, understanding these fundamentals will set you up for success.
Understanding Pole Barn Basics
Pole barns, also called post-frame buildings, have been used for agricultural and commercial purposes for generations. The fundamental design involves vertical wooden posts—typically 6×6 or 8×8 treated lumber—set into the ground at regular intervals. These posts bear the structural load of the roof and walls, creating an open, flexible interior space without load-bearing walls.
The advantages of pole barn construction are substantial. First, the simplified foundation system reduces material costs by 30-40% compared to traditional concrete slabs. Second, the open floor plan allows for future modifications without structural concerns. Third, pole barns can be constructed relatively quickly—many DIYers complete projects in 2-4 weeks. Fourth, the design naturally accommodates various roof pitches and configurations, making them suitable for different climates and purposes.
However, pole barns require careful attention to building codes and engineering principles. The ground conditions, frost line depth, wind loads, and snow loads all influence post spacing, depth, and diameter. Before beginning any construction, consult International Code Council guidelines for your region to ensure compliance with current standards.
Planning and Permits
Successful pole barn construction begins long before digging the first post hole. Comprehensive planning prevents costly mistakes, structural failures, and legal complications. Start by clearly defining your building’s purpose, dimensions, and budget.
Site Assessment: Walk your property and identify the optimal location. Consider drainage patterns, utility lines, prevailing winds, sun exposure, and accessibility for vehicles or equipment. Avoid low-lying areas prone to water accumulation. Call before you dig—contact your local utility locating service to mark underground gas, electric, water, and sewer lines.
Building Permits and Codes: Contact your county or municipal building department to obtain permit requirements. Most jurisdictions require permits for structures exceeding 100-200 square feet. Building officials will verify that your project complies with local zoning ordinances, setback requirements, and height restrictions. They’ll also specify snow load, wind speed, and frost depth requirements for your area—critical data for post sizing and spacing calculations.
Many areas now require National Frame Building Association engineered plans for pole barns. These professional designs account for local environmental factors and ensure structural safety. While hiring an engineer adds $500-$1,500 to your project, it’s often required and always worthwhile for buildings 30 feet or larger.
Material Planning: Create detailed material lists for posts, beams, trusses, roofing, siding, fasteners, and hardware. Order materials well in advance—treated lumber and steel roofing sometimes have extended lead times. Get quotes from multiple suppliers and consider bulk discounts.
Site Preparation and Layout
Proper site preparation establishes the foundation for your entire project. Begin by clearing vegetation and debris from the construction area. Remove topsoil and organic matter from post locations—these materials compress over time and compromise stability.
Establishing Layout: Use string lines and batter boards to establish accurate corner locations and building lines. Mark post centers using spray paint or chalk. For rectangular buildings, verify squareness by measuring diagonals—they should be equal. Modern DIYers often use GPS-enabled laser levels or transit levels to ensure precision, though experienced builders successfully use traditional string and level methods.
Excavation: Post holes must extend below the frost line—typically 3-4 feet in northern climates, 18 inches in mild climates. Consult your local building department for exact requirements. The hole diameter should be 3-4 inches wider than the post for proper concrete backfill. For an 8×8 post, a 12-14 inch diameter hole works well. Consider renting a power auger for faster, more consistent holes—manual digging becomes exhausting on larger projects.
Ground Preparation: Before setting posts, ensure the bottom of each hole is solid and undisturbed. If you hit soft soil or groundwater, deepen the hole until you reach stable material. For marginal soils, add 4-6 inches of gravel for drainage and bearing surface.
Foundation and Post Installation
Post installation represents the most critical phase of pole barn construction. Incorrect post placement, depth, or alignment compromises the entire structure’s integrity.
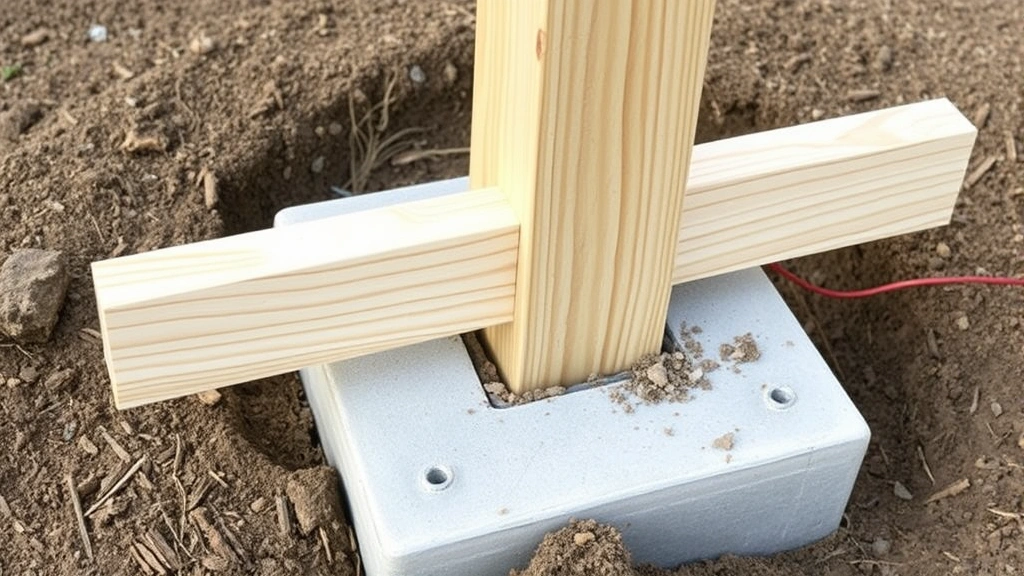
Concrete Footings: Use concrete specifically designed for below-grade applications. Standard 60-pound bags work adequately for smaller projects; larger buildings benefit from ready-mix concrete trucks. Mix concrete to a thick, peanut-butter consistency—too wet concrete doesn’t provide proper bearing support. Pour concrete around the post base, ensuring it extends 6-12 inches above grade and slopes away for drainage.
Post Positioning: Before concrete sets, use temporary bracing to hold posts perfectly vertical. Check plumb in two directions using a level. Posts must be aligned both along the building length and across the width. Diagonal bracing with 2x4s, secured with temporary fasteners, prevents movement while concrete cures. Allow concrete to cure for 24-48 hours before removing bracing or applying loads.
Post Treatment: All posts below grade must be pressure-treated lumber rated for ground contact. Look for lumber treated with copper-based preservatives—these provide superior longevity compared to older arsenic-based treatments. Verify the retention level meets American Wood Protection Association standards for your climate zone.
Beam Installation: Once concrete cures, install primary beams connecting posts along the building length. These beams, typically 2×12 or 2×14 lumber, carry the weight of roof trusses and lateral loads. Use galvanized bolts, lag screws, or metal connectors for secure attachment. Ensure beams are level—use shims under bolts if necessary. Proper beam installation directly impacts roof performance and building longevity.
Framing the Structure
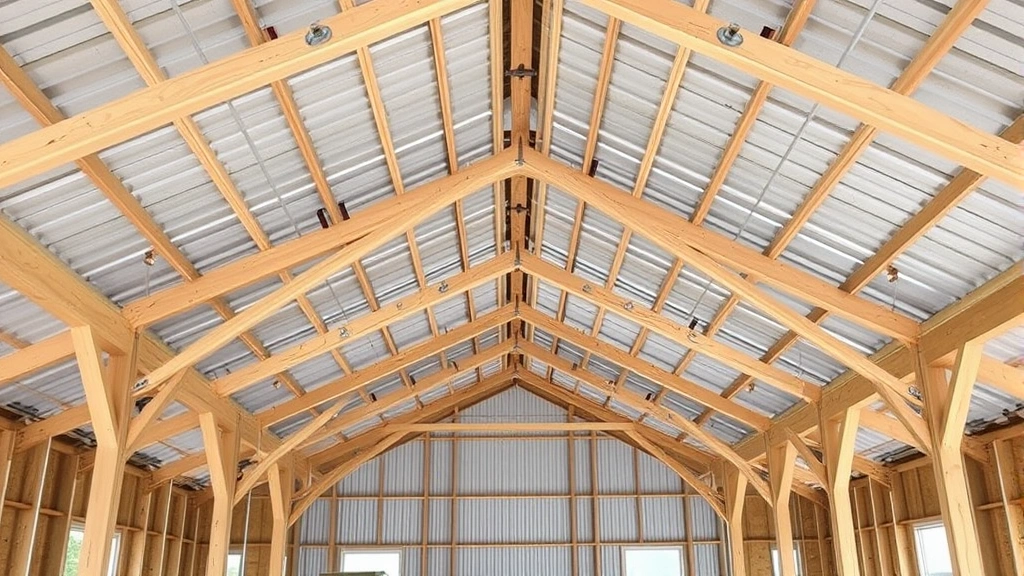
Roof truss installation transforms a framework into a functioning structure. Most pole barns use prefabricated trusses—engineered assemblies that arrive ready for installation.
Truss Selection: Work with truss manufacturers to specify roof pitch, overhang length, and load requirements. Common pole barn pitches range from 4:12 to 6:12 (steep enough for snow shedding in northern climates, moderate enough for wind resistance). Overhangs of 12-24 inches protect walls from weather while providing aesthetic appeal.
Truss Installation: Begin truss placement at one end of the building. Use temporary bracing to hold trusses vertical and properly spaced. Secure trusses to beams using metal connectors or bolts—never rely on nails alone. Install collar ties and lateral bracing per truss design specifications. These components prevent truss spreading under load and resist wind uplift. As you progress along the building, install temporary diagonal bracing to maintain alignment and plumb.
Gable Framing: If your design includes gable ends, frame these with 2×4 studs after trusses are fully installed and braced. Gable studs support siding and help resist wind loads. Verify that gables are square and properly aligned before permanently fastening.
Roofing Installation
Quality roofing protects your entire investment from weather damage. Pole barn roofing options range from economy corrugated metal to premium standing-seam systems.
Roof Decking: Most pole barns skip traditional plywood decking and install metal roofing directly over purlins (secondary framing members running perpendicular to trusses). Purlins, typically 2×4 or 2×6 lumber, are spaced 4-6 feet apart and attached to trusses with metal connectors. This open design reduces material costs and allows excellent ventilation.
Metal Roofing: Corrugated metal panels offer durability, affordability, and ease of installation. Panels typically cost $0.75-$2.50 per square foot installed. Standing-seam systems cost more ($3-$5 per square foot) but provide superior aesthetics and longevity. Install roofing according to manufacturer specifications—improper fastening causes leaks and wind damage. Use rubber-gasketed fasteners that compress as they’re tightened, creating weather-tight seals. Space fasteners as specified, typically 12-24 inches along panel ribs.
Ventilation: Proper attic ventilation prevents moisture buildup, wood rot, and premature roofing failure. Install soffit vents along the lower roof edge and ridge vents at the peak. Aim for ventilation area equal to 1/150th of the attic floor area—this balanced approach prevents pressure imbalances.
Walls and Siding
Wall installation provides weather protection and defines your building’s appearance. Pole barn walls can be simple or sophisticated, depending on your budget and intended use.
Girt Installation: Horizontal girts (typically 2×6 or 2×8 lumber) connect posts and provide nailing surface for siding. Space girts 16-24 inches apart vertically. Secure them with bolts or lag screws to resist wind loads. Proper girt installation prevents siding from buckling or separating during storms.
Siding Options: Metal siding panels match roof material and provide excellent durability. Corrugated or ribbed metal panels cost $0.50-$1.50 per square foot. Wood siding offers traditional appearance but requires maintenance. T-111 plywood siding costs less but needs regular staining or painting. For painting or staining siding, choose weather-resistant products rated for exterior exposure.
Door and Window Installation: Plan door locations for equipment access and workflow efficiency. Standard pole barn doors are 10×12 or 12×14 feet, accommodating tractors and vehicles. Install doors using proper framing headers and hinges rated for the door weight. Windows provide natural light and ventilation—install them with flashing to prevent water intrusion.
Insulation and Interior Finishing: If your pole barn will be climate-controlled, install insulation between girts or under roof. Fiberglass batts, spray foam, or rigid foam boards all work—choose based on budget and performance requirements. For climate-controlled spaces, add vapor barriers to prevent moisture accumulation. Interior finishing might include drywall, plywood sheathing, or exposed framing depending on intended use.
Final Touches and Finishing
Completing your pole barn involves attention to details that enhance functionality and longevity. These finishing steps transform a basic structure into a refined, functional building.
Drainage and Grading: Grade around the building to slope away from the structure—aim for at least 2 inches of drop per 10 feet. This prevents water from pooling against posts and causing rot. Consider installing gutters and downspouts to direct roof runoff away from the building. For buildings in wet climates or low-lying areas, install French drains or swales to manage water flow.
Concrete Floors: Many pole barn owners pour concrete floors for easier cleaning and equipment movement. Install a 4-6 inch gravel base, then pour 4 inches of concrete with proper slope for drainage. Consider adding control joints every 10-15 feet to minimize cracking. For livestock buildings, roughen the surface for improved traction.
Utility Installation: Run electrical service conduit before walls are completely enclosed. Install grounding rods for lightning protection—critical for metal-roofed buildings. Consult a licensed electrician for proper sizing and installation of circuits and breakers. If plumbing is needed, install water and waste lines before finishing walls.
Security Considerations: For buildings storing valuable equipment or materials, implement security measures. Secure all doors with quality locks and hinges. Consider installing security lighting or surveillance systems. For information on comprehensive security solutions, explore our DIY home security guide.
Regular Maintenance: Pole barns require minimal maintenance but benefit from routine inspections. Annually check posts for signs of rot or insect damage. Inspect roof fasteners for corrosion or loosening. Check concrete footings for heaving or settlement. Address any issues immediately to prevent small problems from becoming expensive repairs.
Building a pole barn successfully combines proper planning, quality materials, careful construction, and attention to local building codes. Whether you’re creating storage for woodworking projects or constructing a livestock shelter, the fundamentals remain consistent. Take time to understand each phase, invest in quality materials, and don’t hesitate to consult professionals when needed. Your completed pole barn will provide decades of reliable service and excellent value for your investment.
FAQ
How deep should pole barn posts be buried?
Posts must extend below the frost line, which varies by location. Most northern climates require 3-4 feet of post depth, while mild climates may only need 18-24 inches. Contact your local building department for exact requirements for your area, as frost depth directly impacts structural stability and safety.
Can I build a pole barn without permits?
Building codes require permits for most structures exceeding 100-200 square feet. Building without permits can result in fines, difficulty selling your property, and problems with insurance claims. Always obtain proper permits and inspections—they protect you legally and ensure your building meets safety standards.
How much does it cost to build a pole barn?
Costs vary widely based on size, materials, and finishes. A basic 30×40 pole barn shell typically costs $3,000-$8,000 in materials. Larger buildings or those with insulation, electrical service, and finished interiors cost significantly more. Get detailed quotes from suppliers and consider your long-term needs when planning your budget.
What’s the best roofing material for pole barns?
Metal roofing is the most popular choice for pole barns due to durability, affordability, and ease of installation. Corrugated panels cost less but standing-seam systems offer superior appearance and longevity. Choose based on your budget, climate, and aesthetic preferences.
How long does it take to build a pole barn?
A typical 30×40 pole barn can be completed in 2-4 weeks with proper planning and adequate labor. Timeline depends on weather, site conditions, complexity, and whether you’re finishing the interior. Professional crews work faster than DIY teams, but many enthusiasts enjoy spreading the project over several months.
Do I need an engineer for my pole barn?
Many jurisdictions require engineered plans for buildings 30 feet or larger or those in high-wind or heavy-snow regions. Even where not required, engineering ensures your building safely handles local environmental loads. The cost ($500-$1,500) is worthwhile insurance against structural failure.
What’s the difference between pole barns and traditional stick-frame buildings?
Pole barns use large posts anchored in ground rather than concrete foundations with wall framing. This eliminates expensive footings, creates open interior spaces, and simplifies construction. Traditional buildings offer more customization options but cost significantly more and require longer construction timelines.


